Exploring Windows 7 on the Mac: installation via Boot Camp
 Prince McLean
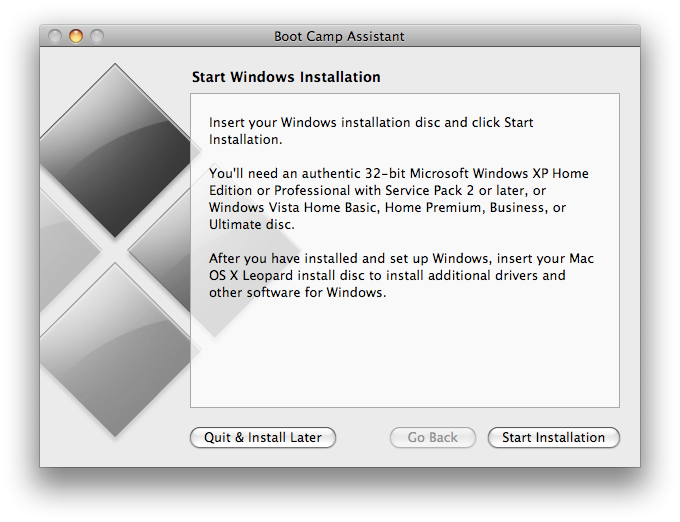
This series looks at the features Windows 7 offers to Mac users, and what is involved in moving from XP. This segment looks specifically at how Windows 7 differs from Mac OS X in setup and installation, and how Microsoft has made improvements over the experience offered by XP and Vista.
Mac users have a number of reasons to install Windows; some might want to run Windows in a virtual environment such VMware’s Fusion, Parallels Desktop, or Sun’s free VirtualBox to run a custom corporate app (or some other software that only works on Windows), right on the Mac OS X desktop.
Others might want to install Windows natively on their Mac using Boot Camp for full the performance required to run many Windows-only games. And many Mac users are also owners of generic PCs, and want to setup their Windows PC to share files and sync data with their Mac.
Portions of this article will apply to all these users, with a focus on Mac users who install Windows (and Windows 7 in particular) directly on their Mac using Boot Camp. A previous article looked at what is involved in installing Windows 7 within a virtual environment.
Using Boot Camp
While Apple’s Boot Camp Utility (below) is sometimes portrayed as a translation layer that allows Windows to run on Mac hardware, it is really just a two-step preparation tool that first formats the boot drive so that Windows can be installed, and then provides the installed copy of Windows with Apple-supplied driver software to properly access all of the unique hardware on Macs.
Neither of these steps are necessary when running within a virtual environment, as those tools both run Windows from a virtual disk image that sits in the regular Mac OS X file system, and supply drivers for the virtual hardware they emulate, presenting a generic PC environment of standard network, graphics, and other virtual components to whatever version of Windows is installed.
Reformatting the disk with Boot Camp
If your hard drive is full or nearly full, you might have some initial pains preparing for Boot Camp. You’ll need at a minimum 15 GB of free disk space to install Windows 7, and by free we mean really free; if you throw away just enough files to give yourself 15 GB, chances are your drive will still have files scattered around to the point that Boot Camp won’t actually be able to clear out a partition space for Windows.
That’s because Boot Camp doesn’t just allocate for Windows some of your drive’s disk space; it actually reformats the entire disk in place, lopping off a contiguous area of the disk to set up a blank disk partition, and shrinking down your boot volume to account for the difference.
This is a potentially dangerous operation, so make sure you have a full backup of your drive, either using a disk cloner utility or Time Machine to backup to an external USB drive or network server such as Time Capsule.
While we’ve never experienced any problems with repartitioning the disk in place, it makes no sense to perform this high wire act without a net, because any interruption or disk error could result in an invalid partition map and an unreadable volume that very likely can’t be recovered.
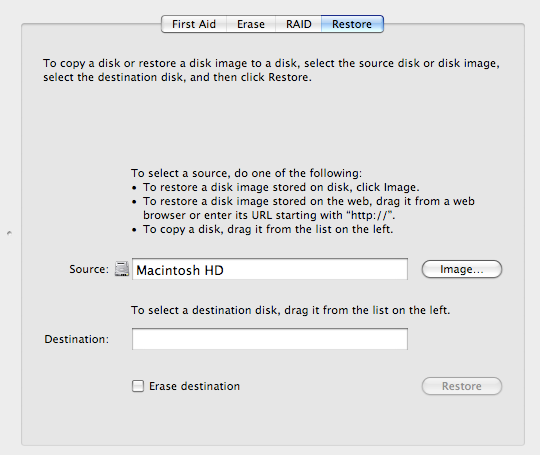
Once you identify the amount of space you want to allocate for Windows, Boot Camp moves around your files on disk like Tetris pieces to create a free contiguous area it can partition for Windows. If it runs into too many files that can’t be moved, it will ask you to solve the problem by imaging your drive to another disk and then moving it all back.
That operation, which can be done using Disk Utility, takes some time. You’ll need to first select your drive and create an image of it (below) on another drive (such as an attached USB drive), then put your system in Firewire target mode and restore the image to the disk using another system. Another option would be to boot your system up from your Mac OS X install DVD and run Disk Utility from the disc to restore the image to your boot drive.
It may also be possible to defrag your drive using a disk optimization tool such as iDefrag, which can sometimes move around files that Boot Camp won’t.
Ideally, Boot Camp will be able to find enough room to make those steps unnecessary. Even so, it will take some time (as much as a couple hours) for Boot Camp to complete the repartitioning step. Also, keep in mind that Boot Camp only knows how to start with a drive with one partition, so if you’ve already partitioned your boot disk, Boot Camp will insist you reformat it back to one single partition first.
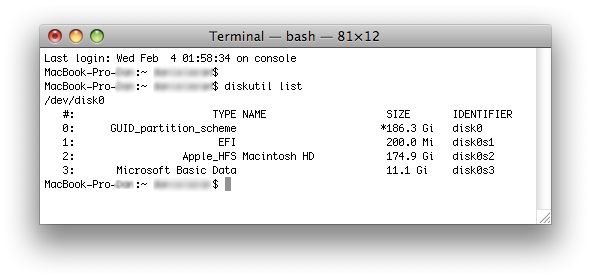
Once complete, your drive will show up with two usable partitions, the first being your regular Mac boot drive, and the other with a horrible name along the lines of “disk0s3.†That stands for “disk 0, slice 3,†where slice means partition. There are two other invisible partitions, slice 0, the partition table, and slice 1, a 200 MB partition allocated to EFI. (Remember when the whole drive was less than 200 MB?) Slice 2 is your original Mac partition.
Making Windows feel at home on the Mac
Windows doesn’t really know how to handle GPT, the type of partition table used by EFI, the boot firmware system used on all Intel Macs (and their equivalent to the OpenFirmware used by PowerPC Macs). However, Intel developed EFI with Windows in mind, so it made the standard backward compatible with MBR, the simpler partitioning scheme used by generic PCs that still depend upon BIOS rather than EFI.
Windows, including the new Windows 7, expects to find a BIOS boot environment and an MBR (master boot record) to identify the disk partition to be used during installation. Boot Camp prepares a dummy MBR in the GPT that identifies the new partitions it created, and the Mac’s EFI firmware pretends to be BIOS for Windows during the reboot process.
That allows Mac users to simply insert a Windows install DVD and directly boot from it; the software thinks its installing on an old fashioned, generic PC when really its running on a state-of-the-art EFI PC made by Apple.
Among other things, the fancy EFI firmware that Macs use support the same kinds of Mac-only features OpenFirmware has long provided, including:
Firewire target mode, which makes the disk’s partitions visible to another system via Firewire
Option boot for selecting a startup disk and partition at reboot
C boot for starting up from an optical drive
BIOS PCs have to manually configure the boot volume, and can’t boot the system into target mode. They also typically only offer experimental-quality USB booting, something Microsoft doesn’t officially support in Windows. That greatly complicates the task of trying to install Windows on an external USB drive, making it something that Apple’s Boot Camp subsequently doesn’t support either.
Brave souls can download an EFI utility and edit their copy of the Windows installer to attempt to install Windows on an external USB disk, but this isn’t a task for the faint of heart. Install Windows to a Macintosh USB drive (without Bootcamp). « Tube Shards
While Windows can’t take advantage of all the benefits of the Mac’s modern firmware, EFI does make it easy to select between Mac OS X and Windows at boot, and also enables the system to select the desired boot device from within either operating system (using Apple’s supplied control panel under Windows), something Windows can’t do when running on a dual-booting, generic PC.
Direct installation of Windows using Boot Camp
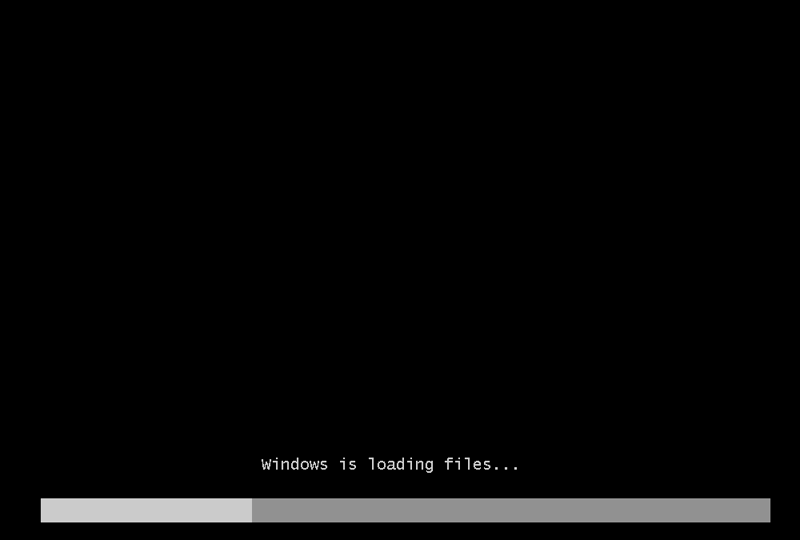
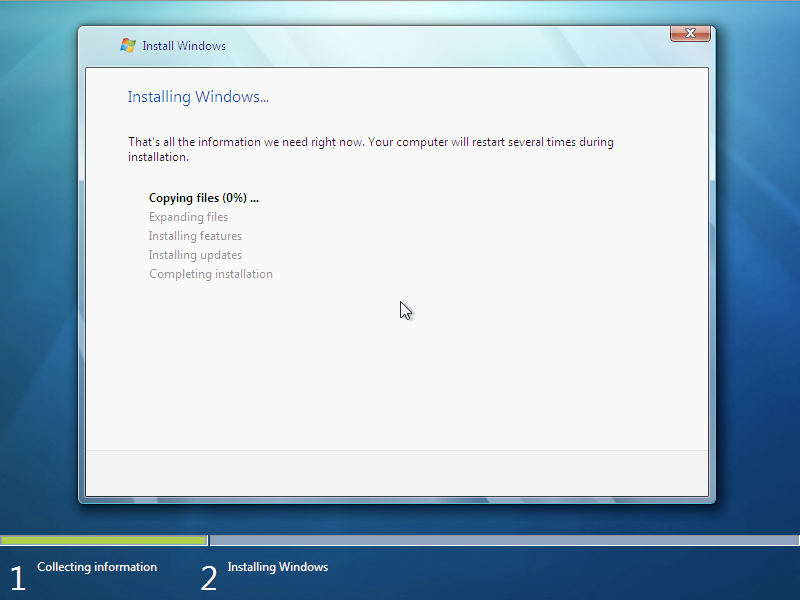
The install process of Windows keeps getting more sophisticated. The new Windows 7 beta is now on par with the first releases of Mac OS X. Starting with Windows 2000, Microsoft moved its desktop operating system from a DOS-based startup and installer to one using the NT kernel. However, Windows still dropped down into text mode during the installation, just as NeXTSTEP, the predecessor to Mac OS X, once did. The Windows install experience is now entirely graphical from the initial screen (below top) thorough the install progress steps (below bottom), which are presented as if in an active, Aero-styled window (albeit non-functional, as the window is only ornamental).
Apple’s Mac OS X installer boots a pared down version of Mac OS X from the DVD to run its install process. That enables the install DVD to also run some handy and familiar Mac OS X apps prior to the install process, including the full version of Disk Utility for examining, verifying, and formatting volumes. The Windows 7 installer runs as a custom system with some integrated options for performing just a few disk operations.
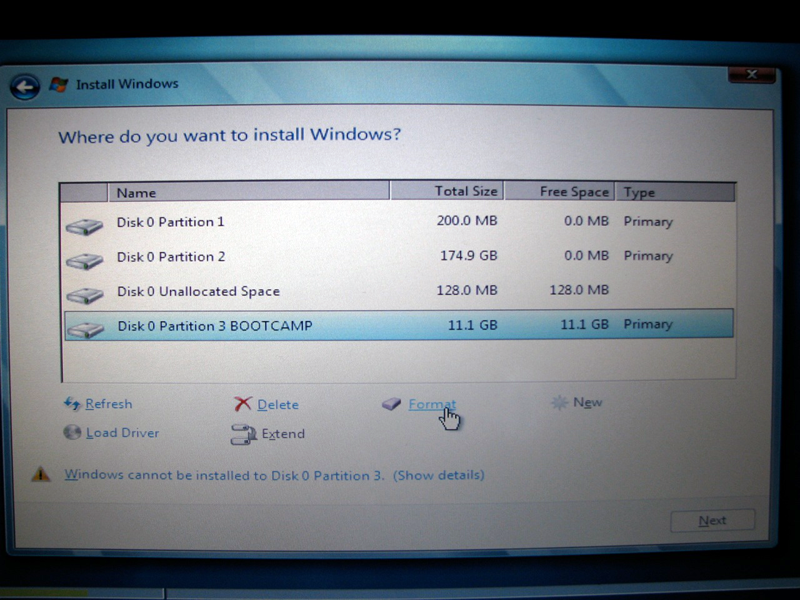
One is required when installing Windows 7 on the partition prepared by Boot Camp, because Windows 7 demands an NTFS disk partition to begin installing. In the install image below, Windows reports seeing all of the disk partitions, although it thinks the GPT partition 0 is “unallocated.â€
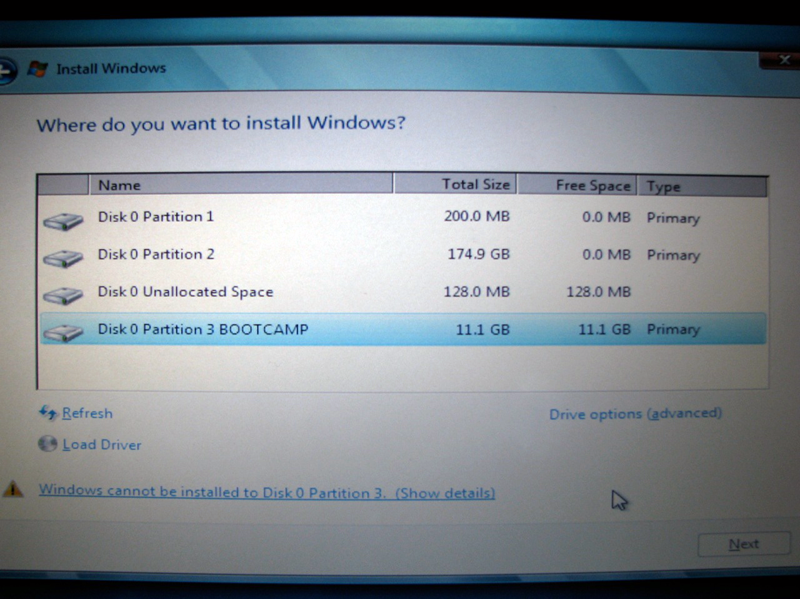
The partition we want to install Windows on is partition 3, labeled BOOTCAMP, but the installer says that’s not possible. To get around this problem, click on “Drive options (advanced),†which reveals the option to Format partition 3 (below). Click Ok to dismiss the warning that the partition might have something on it (it doesn’t). The format is done rapidly, as the FAT volume only needs a quick NTFS volume format written on it.
Once that step is past, Windows 7 installs itself for about a half hour, then presents some installation options related to setting up an initial user account, automatic system update preferences, and the new HomeGroup sharing features. Windows 7 then sets up networking, allowing you to select a WiFi network and log in. If you allow it, Windows 7 immediately downloads and installs a couple of updates, although they aren’t actually identified until they are being installed.
On page 2 of 2: Easy drivers with Boot Camp; and Installing third party security and Apple apps for Windows.
Once you arrive at the Windows 7 desktop, insert your Leopard install DVD and Windows will offer to install the software drivers Apple provides (below top). This process provides over a dozen custom drivers (below bottom) for all of the unique hardware supplied on every Mac, from the trackpad to the audio, network, and graphics adapters to USB and devices such as the iSight cameras built into MacBooks.
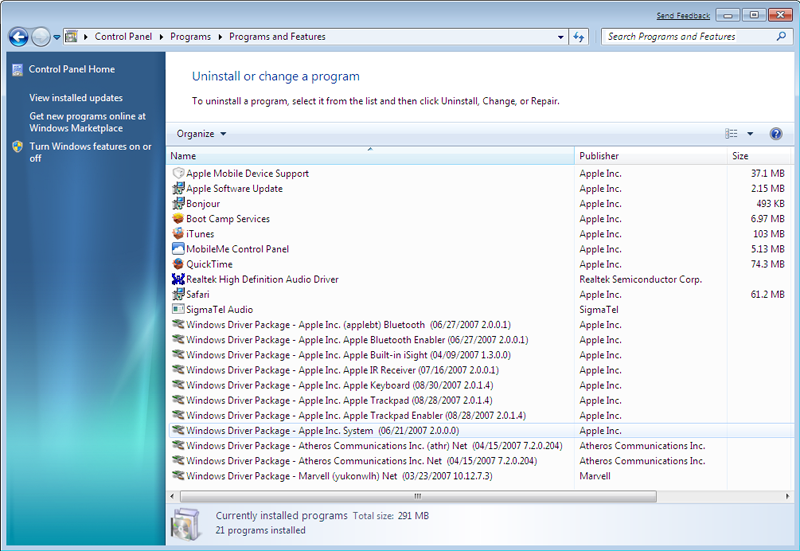
This simple one step installer makes installing Windows on a Mac easier than installing it on a generic PC, as most PC makers require you to select and then download a series of driver install files and then typically install each one sequentially, sometimes with reboots in between. If Apple had any interest in selling Macs with Windows pre-installed just like other PC makers, it could certainly do so, and could offer a nicer install experience, to boot.
The Boot Camp drivers Apple supplies are intended for use with XP or Vista, and were delivered prior to the beta of Windows 7. Even so, there are few problems being reported by Mac users playing with the new beta. You should also install the updated drivers supplied in Boot Camp Update 2.1 for Windows Vista 32 or Boot Camp Update 2.1 for Windows Vista 64 (depending on the 32 or 64-bit version of Windows 7 you installed). You might also need to run the Troubleshoot Compatibility wizard in Windows 7 to get the system to recognize the Apple supplied drivers. And of course, remember that Windows 7 is still in beta and that Microsoft warns against using it for anything apart from testing purposes.
In our limited testing, Windows 7 appears to have fewer problems with device drivers compared to Vista at its launch. The new beta had no problem identifying a generic USB hard drive that Vista had choked on, and it had no problem identifying an iPod that Vista had earlier refused to work with. In some cases we did have to tell Windows to search for a driver for certain devices (including, oddly, the video card driver), but it seemed to work pretty well in identifying what was needed after the initial push.
Installing third party security and Apple apps for Windows
Once Windows is installed, you’ll want to activate anti-virus and anti-malware software. Microsoft provides Windows Defender for malware, but you’ll need to obtain an anti-virus tool. In addition to the beta software and paid version of AVG that Microsoft links to, you can also install a free, basic version of AVG.
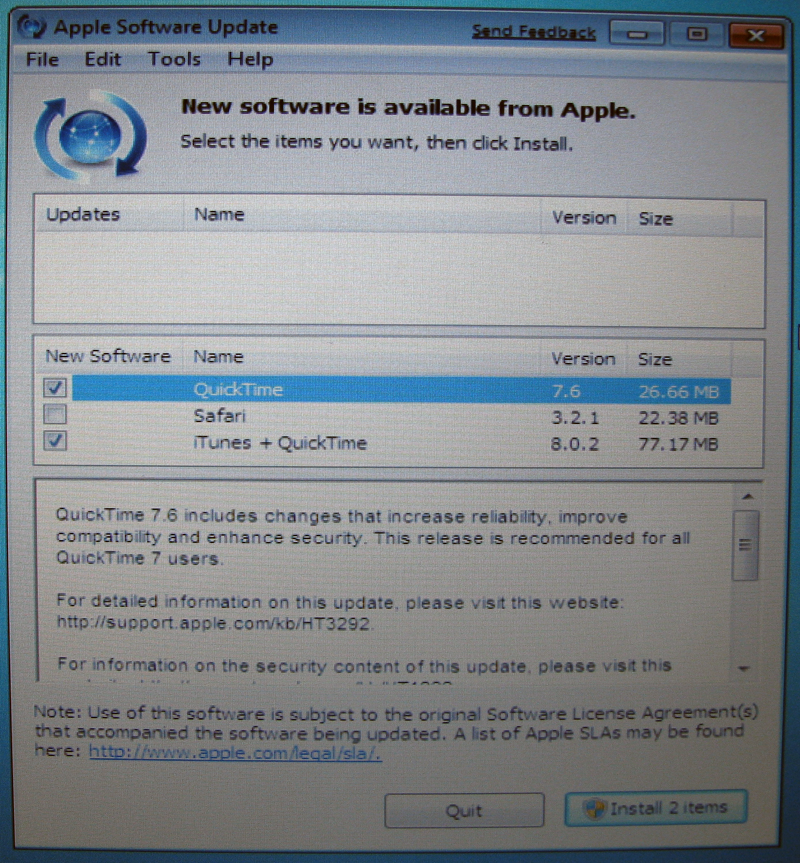
You’ll probably also want to install Apple’s familiar Safari browser, which will provide the option of installing Apple Software Update mechanism. That will ask to update itself, and then will recommend installing QuickTime (below). Once you install that, Apple will recommend Bonjour (for local discovery of printers and Mac and AirPort file shares) and iTunes, which will recommend installation of the MobileMe sync setup control panel for Windows.
The download recommendations supplied by Apple’s Software Update drove Windows-centric pundits completely bananas as they fretted in anguish about Apple’s use of the popularity of iTunes to spread its other free software to Windows users. Mac users will probably just find the recommendations useful, particularly if they want their Windows setup to use the same familiar apps and to sync their data with their Mac via MobileMe. In addition to Apple’s optional Windows apps, Boot Camp also installs a control panel in Windows for various settings unique to the Mac, including setting a boot drive preference, and options involving F-keys and an infrared remote, and an option to restart after a power failure.
While Apple’s software for Windows offers Mac users a familiar experience while working in Windows, Microsoft itself has made many of the elements in Windows 7 more similar to the Mac OS X desktop than ever before. The next segment will take a look.


 William Gallagher
 Malcolm Owen
 Marko Zivkovic
 William Gallagher and Mike Wuerthele

 Wesley Hilliard
 Andrew Orr