The ultimate guide on how to customize your iPhone running iOS 16
 Wesley Hilliard
Use built-in iOS features to customize the iPhone
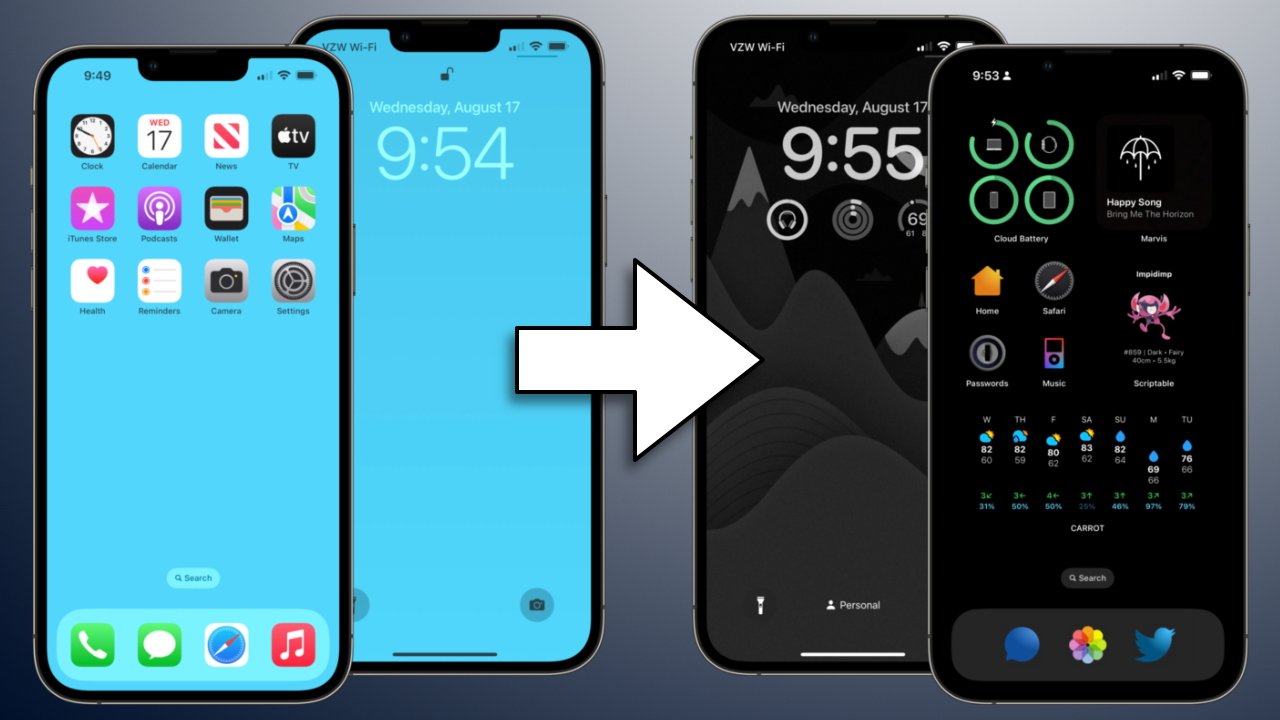
Apple's iOS 16 makes the iPhone more customizable than ever. This is the ultimate guide on how to make the iPhone a more personal device.
Personalization and customization of software can be complicated, especially if it is hidden away in menus most users will never interact with. However, Apple has taken a different approach by making user customization a tentpole feature of iOS 16.
Nearly every interaction on the iPhone can be customized or controlled in some way due to multiple interlocking features. These include Lock Screen customization, widgets, custom app icons, and Focus Modes.
Jump to a section:
| Lock Screen | Home Screen | Focus Modes |
|---|---|---|
| Wallpaper | Clean up | Notifications |
| Clock font and color | Wallpaper | Custom Screens |
| Widgets | Apps | Schedule |
| Saving options | Widgets | Focus filters |
Throughout the text, we refer to Focus Modes as a method of organizing customized Home Screens, Lock Screens, and more. When no Focus is active, users are technically in a "default" Focus with its own settings, so everything mentioned for an active Focus still applies.
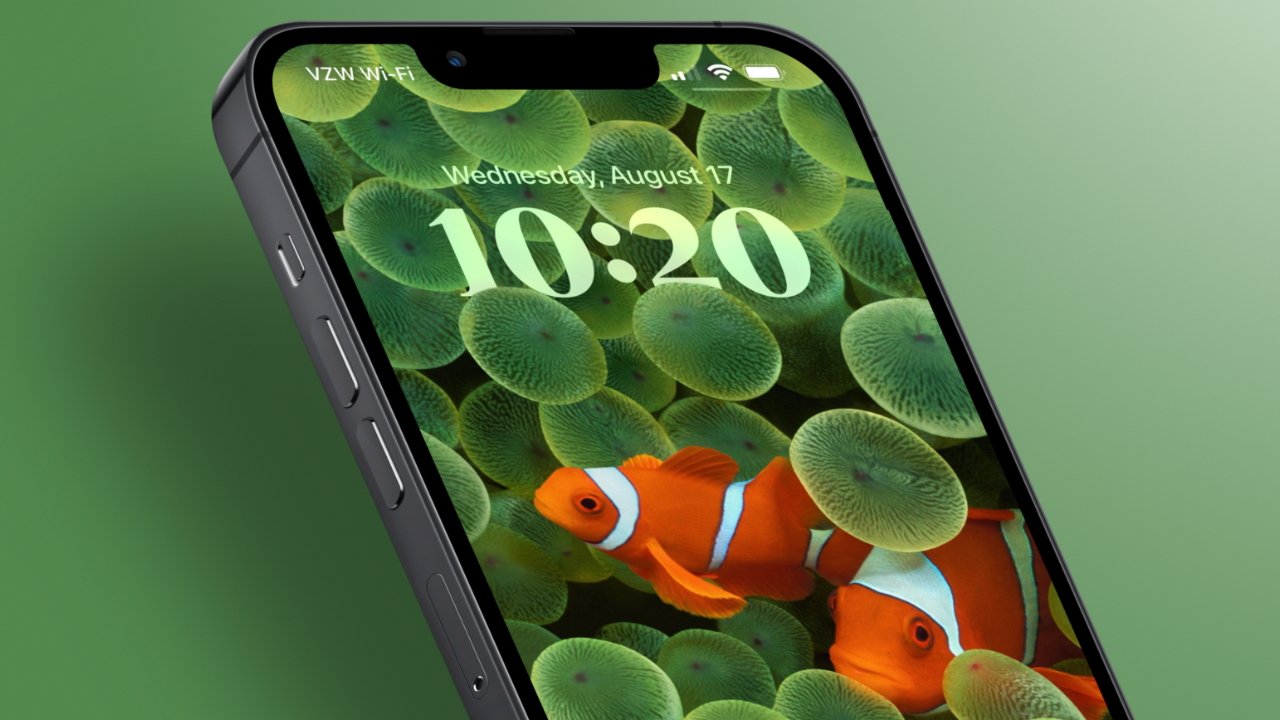
How to customize the iPhone Lock Screen
The Lock Screen is the best place to start customizing an iPhone running iOS 16. From here, Apple allows users to change the wallpaper, clock font, widget placement, and Home Screen wallpaper.
Users can create multiple Lock Screens and associate them with Focus Modes. At least one Lock Screen must remain unattached to a Focus Mode, which becomes the default Lock Screen.
This guide will focus on creating a single custom Lock Screen.
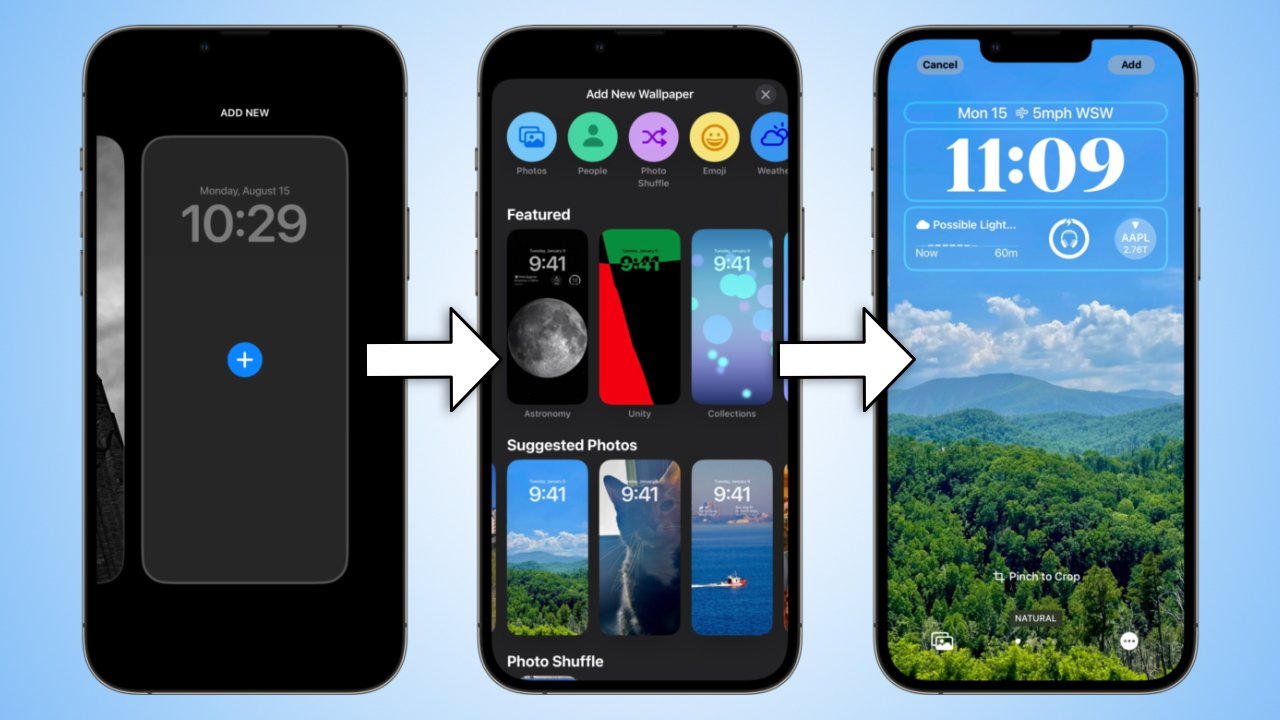
Start by creating a new Lock Screen
- Unlock the iPhone and long press on the Lock Screen.
- Swipe to the right until a blank screen appears with "Add New" at the top.
- Tap the "+" button in the center of the display to open the wallpaper selection tool.
Wallpaper selection
The wallpaper selection tool has options varying from a user's personal photo library to dynamic wallpapers created by weather conditions. Take time to scroll through the recommended options, tap on an option to preview, and hit "cancel" to return to the selection screen.
Wallpaper categories include:
- Photos - search the entire photo library using search terms and filters
- People - surface photos based on the People album filled with labeled faces
- Photo Shuffle - generate a wallpaper that shuffles a set of personal photos throughout the day based on people, pets, nature, cities, or a manual selection
- Emoji - select up to six emojis and generate a wallpaper using one of five patterns
- Weather - a wallpaper is generated based on the current conditions at the user's location. These conditions can include sunny, cloudy, raining, snowing, fog, and more.
- Astronomy - a selection of animated wallpapers that show the Earth, Moon, or Solar System using current conditions such as time of day, moon phase, and planetary position. A unique unlock animation will play for the Earth and Moon options.
- Color - generate a simple wallpaper using a selection of gradients or a solid color
- Suggested Photos - a group of photos based on what Apple's algorithm deems wallpaper worthy. A good starting point for finding images with depth effects.
- Collections - a set of dynamic wallpapers created by Apple. These use layered elements that animate when the phone is unlocked or take advantage of the depth effect.
The wallpaper depth effect uses algorithms to determine if parts of a photo should overlap the clock. Any photo is eligible for this effect, even if it isn't a portrait photo with depth data. Adding a widget turns off this effect.
Users can skip straight to the wallpaper editing screen for the Lock Screen by selecting "Use as Wallpaper" in the Photos app Share Sheet.
After selecting a wallpaper, users can swipe between filters on photo wallpapers or select different views in some of Apple's dynamic wallpapers. Pinch to pan and zoom a photo into a better spot, especially if the depth effect is active on the clock.
Turn off the depth effect or perspective shift using the ellipses menu in the bottom right corner. Select a new photo while keeping the existing widget selection active by selecting the photos icon in the bottom left corner.
Choosing the right clock font and color
Now that a wallpaper has been selected, it's time to customize the clock font and text color scheme.
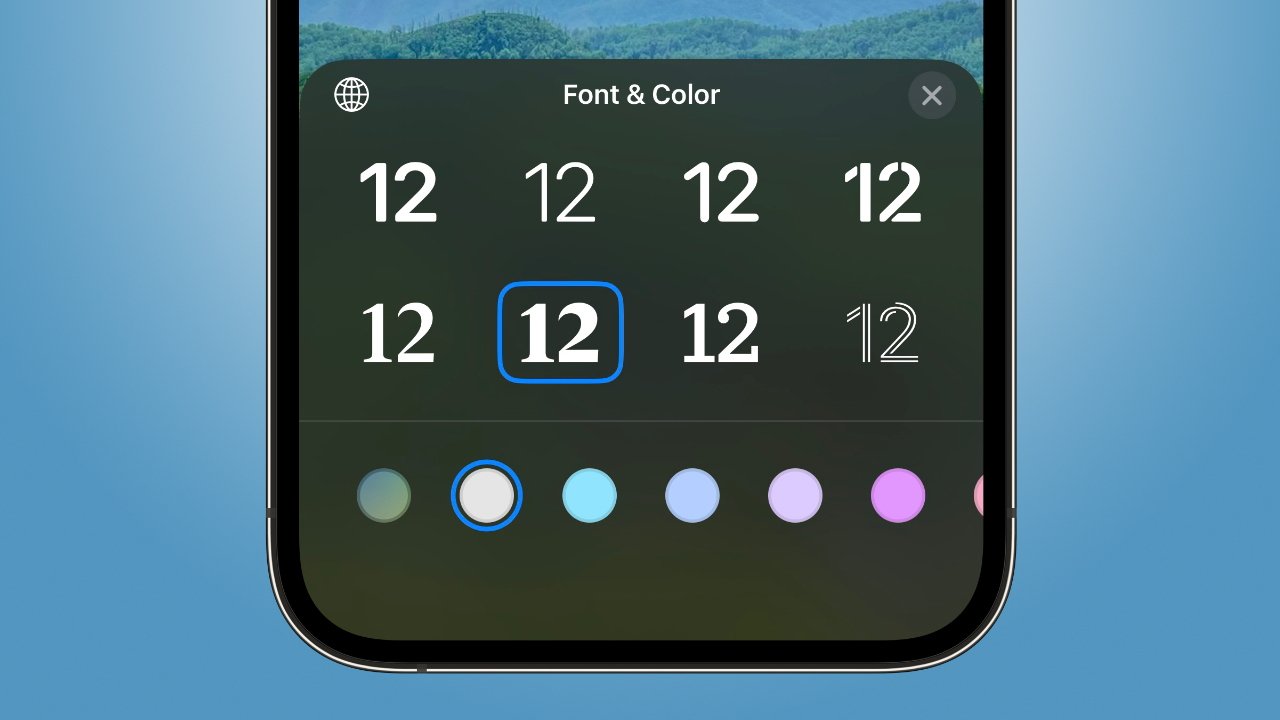
Text font selection doesn't affect widget fonts. However, the selected color affects all widgets and text.
- Tap on the clock.
- Select from one of eight font options for the clock text.
- Select from multiple color options and gradients, or scroll the color menu all the way to the right for a color picker.
- Tap the "x" in the top right of the menu to finalize the selection.
The first color in the color selection menu is a gradient based on the wallpaper. This can sometimes offer too little contrast with the background, so the second option is another gradient with more opacity and contrast. The remaining colors have a slider for selecting color intensity.
Adding Lock Screen widgets
There are four square widget slots below the clock and a text widget above. These five spots can show data pulled from apps installed on the iPhone, including third-party apps.
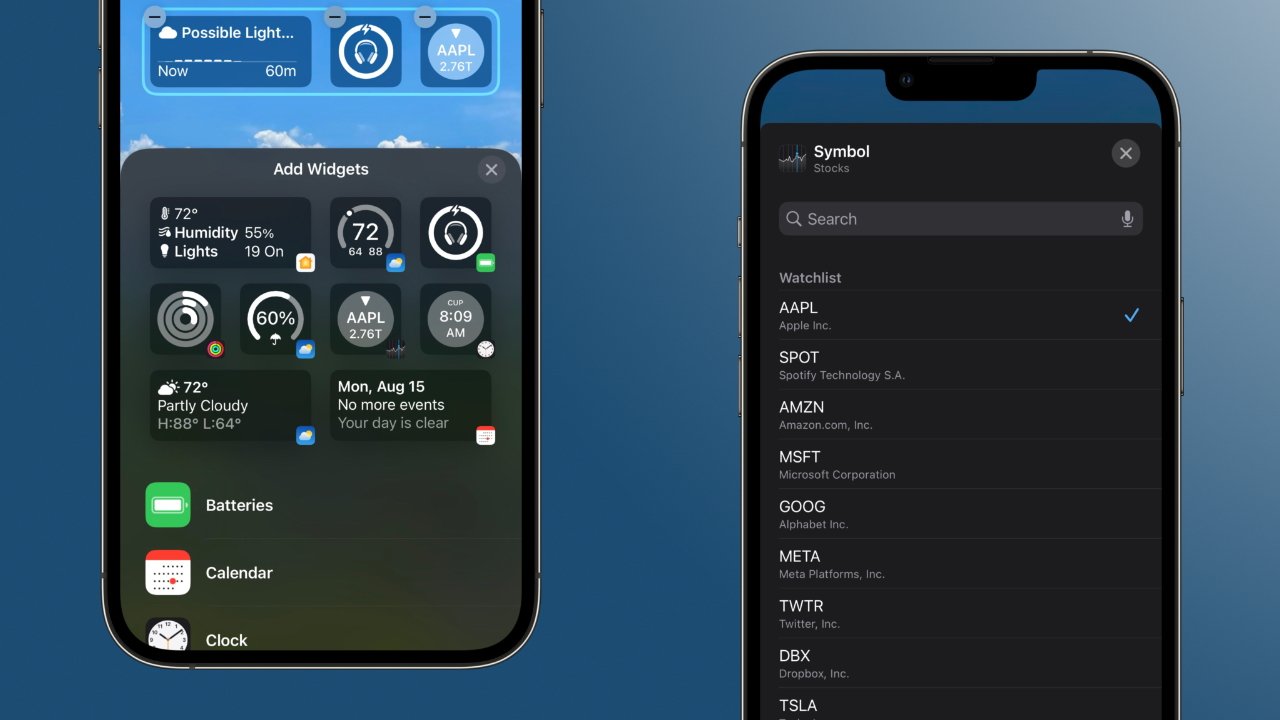
To add a widget to the Lock Screen:
- Tap on the "Add Widgets" square.
- Select from one of the suggested widgets, or scroll down to pick widgets specific to each installed app. When apps offer multiple widget options or styles, they can be swiped through.
- Tap on a widget in the selection menu to see it appear in the widgets block.
- Press and hold on a widget in the block to move it.
- Tap on a widget, when configurable, to select what data is shown within the widget.
- Tap on the "x" in the top right of the menu to finalize the selection.
Some widgets can be configured with different data. The Home app, for example, has a widget for showing conditions within the home. Tapping on that widget when customizing the widget view gives users a list of sensors to select between.
The text widget above the clock can be configured similarly. It shows the date by default and cannot be removed from the Lock Screen. Tap it to select an alternative option.
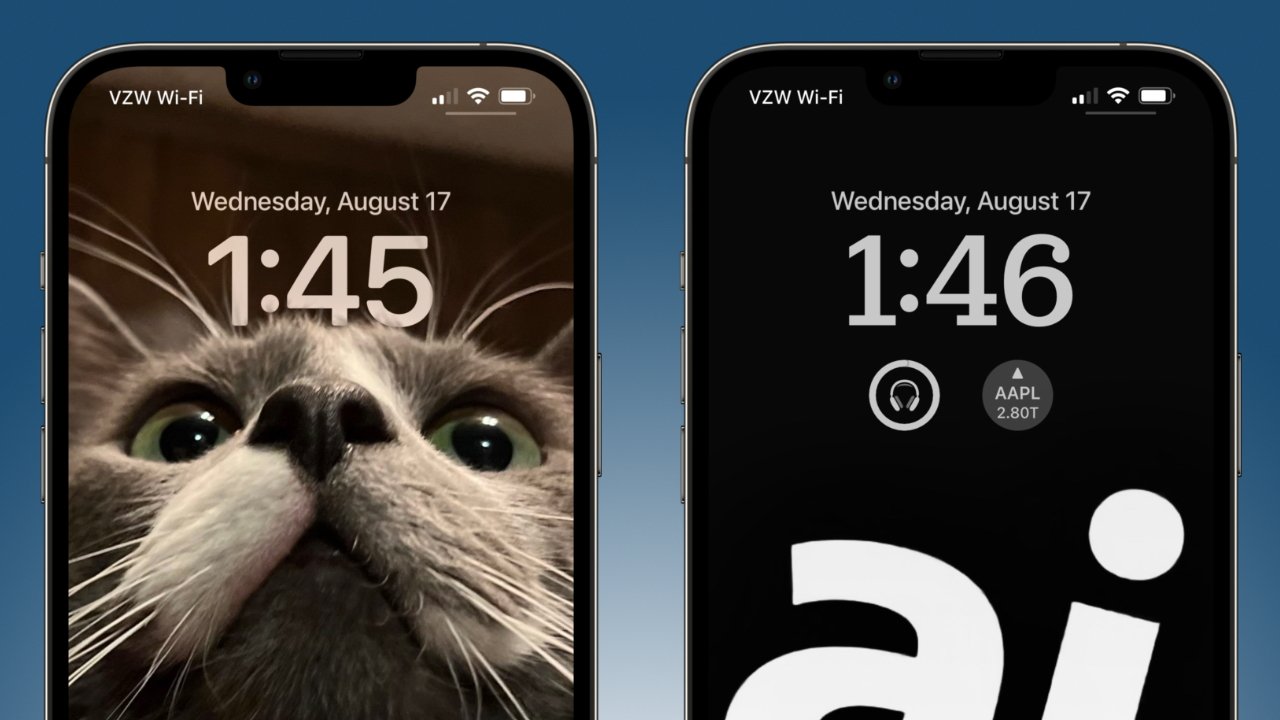
Not all Lock Screens need widgets. Some wallpapers create an interesting depth effect where some elements overlap the clock. However, this effect is turned off when widgets are added.
Finalizing a custom Lock Screen
With a wallpaper selected, clock customized, and widgets picked, it is time to save the new Lock Screen.
- Tap "Done" in the top right corner of the display.
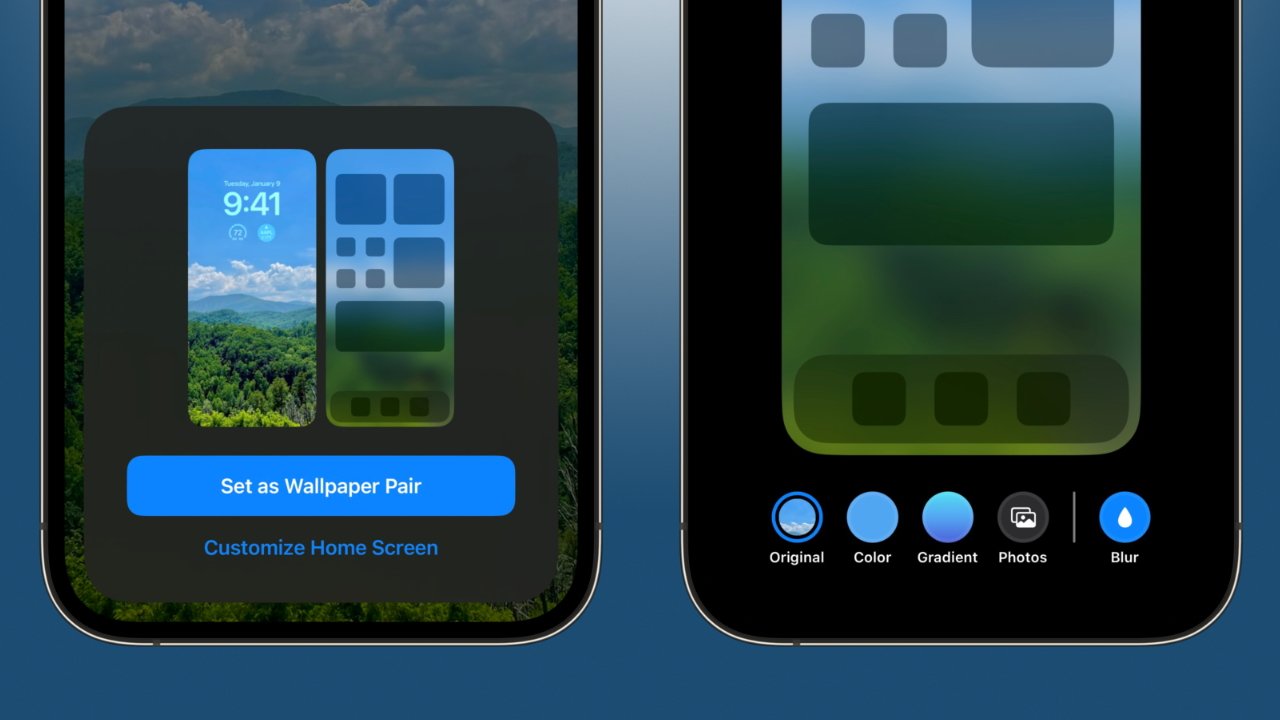
- A pop-up will show how the wallpaper will appear on the Lock Screen. Select "Set as Wallpaper Pair" if the presented effect is desired, which finalizes the Lock Screen.
- Or, select "Customize Home Screen" to customize the Home Screen wallpaper.
- By default, the Lock Screen wallpaper is used for the Home Screen. Users can toggle a blur effect or select an entirely different photo or color wallpaper.
- Tap "Done" to finalize the Home Screen wallpaper. This can be changed later without affecting the Lock Screen if desired.
The user will be returned to the Lock Screen selection menu after the custom Lock Screen has been created. Swipe left and right to see all of the created Lock Screens. Swipe up to see an option to delete a custom Lock Screen.
Tap on a Lock Screen to make it the active screen. By default, a Lock Screen is independent of Focus modes, which is shown as a "Focus" icon at the bottom of the wallpaper selection.
To tie the Lock Screen to a Focus Mode, tap on that "Focus" button. More details about creating a customized Focus Mode and what results from this will be provided later in this guide.
How to customize the iPhone Home Screen
The iPhone Home Screen had remained a simple grid of installed apps until iOS 14 introduced widgets and an App Library. Now, users can go far beyond rearranging icons into folders.
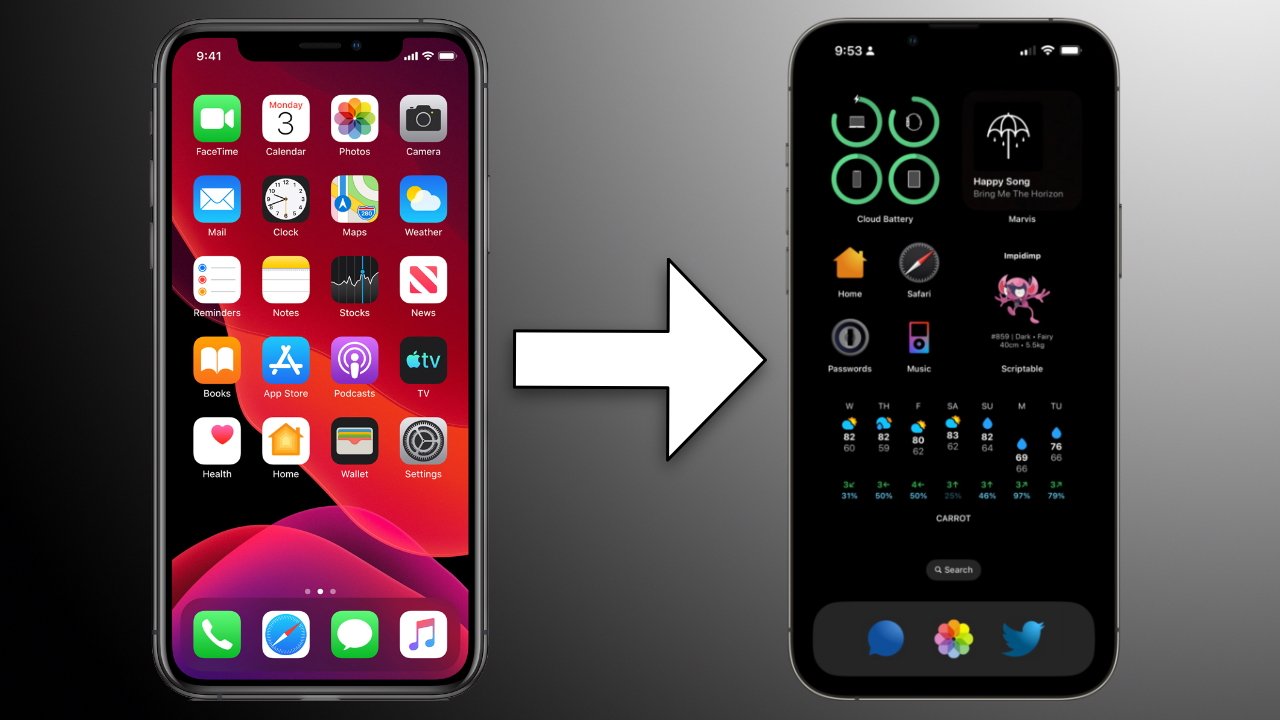
The Home Screen consists of app icons, app folders, widgets, and pages. An iPhone can have up to six rows of four apps and a dock. Fill up a page, and a new page is created for up to 15 pages.
This guide will focus on creating a single custom Home Screen page. Before that, we'll cover removing old apps and Home Screen pages to start cleaning.
Remove apps, widgets, or entire Home Screen pages
Part of managing the Home Screen is getting rid of unnecessary junk. To prevent new apps from automatically installing themselves on the Home Screen, go to the Settings app, select "Home Screen," and tap "App Library Only."
Remove entire Home Screen pages at once and send all apps to the App Library
The following steps are a must for anyone who hasn't taken the time to customize their iPhone since iOS 14. Users downloading more than a handful of apps will likely have several pages of unorganized app icons, and this method is the fastest way to get rid of them.
To delete unneeded Home Screen pages:
- Press and hold on an app icon or blank space in the Home Screen.
- When pressing an app, a menu for managing that app will appear. Keep pressing to enter "wiggle mode" to edit the Home Screen.
- Tap on the Home Screen tab indicator at the bottom of the screen. It looks like a series of dots.
- A page of available Home Screens will appear. A check mark indicates that Home Screen is active for the current Focus mode.
- Tap on a checkmark to disable that Home Screen for the current Focus. That Home Screen is still available for other Focus Modes and isn't deleted.
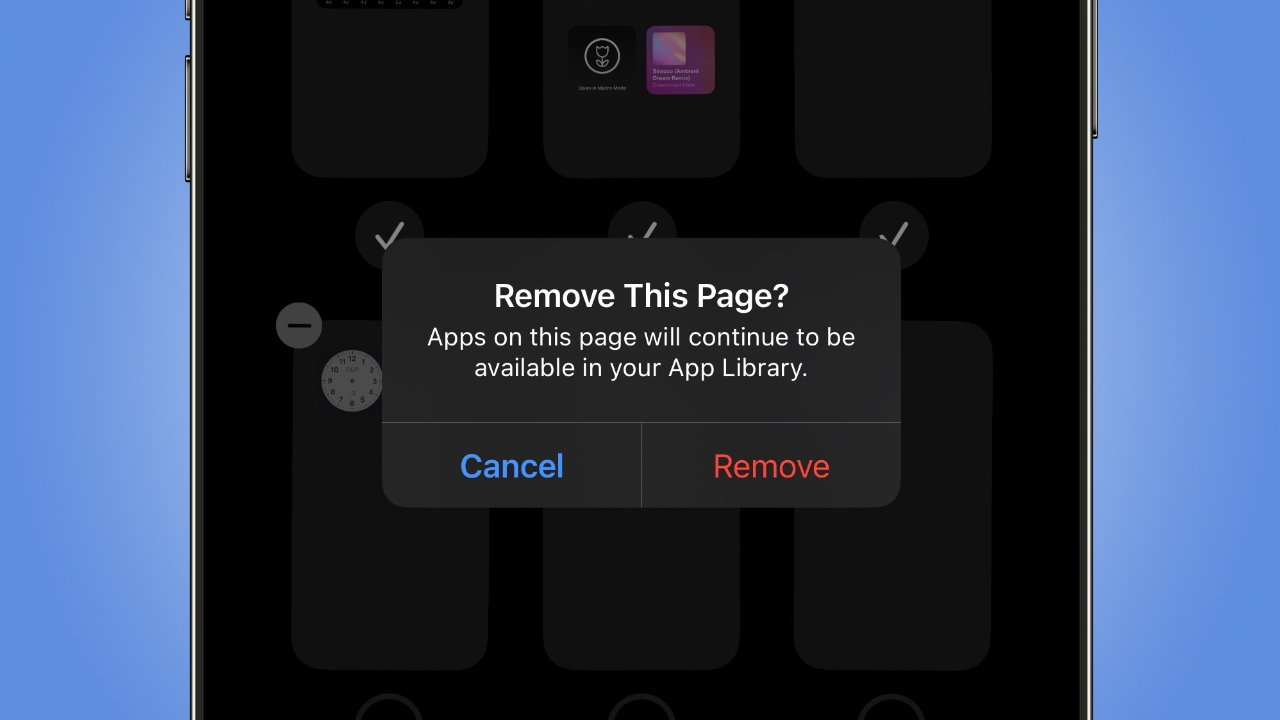
- When the checkmark is removed, a "-" will appear in the top left of a page. Tap that "-" to delete the entire page and its contents.
- All apps on a deleted page are sent to the App Library.
Once satisfied with the remaining Home Screens, it is time to clean up what wasn't deleted or disabled.
Send unwanted apps to the App Library
The App Library is a searchable repository of every app installed on the iPhone. Sending apps here won't delete them from the device, instead, it gets the app icons out of the way and keeps them organized for easy use later.
Now, it is unnecessary to keep every installed app on the Home Screen.
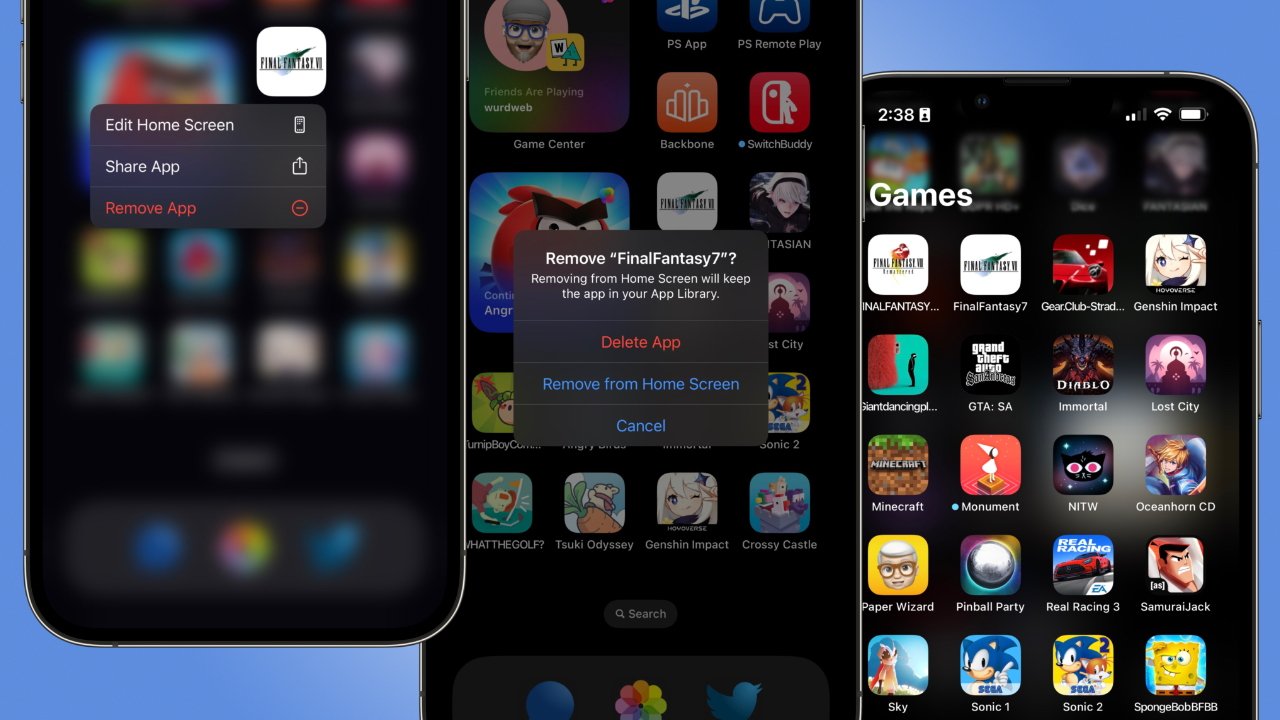
To delete or remove apps:
- Press and hold on an app icon or blank space in the Home Screen.
- When pressing an app, a menu for managing that app will appear. Keep pressing to enter "wiggle mode" to edit the Home Screen.
- Tap on the "-" that appears at the top left of an object to remove it from the Home Screen.
- A pop-up will ask if this app should be deleted or moved to the App Library. Select "Remove from Home Screen" to keep the app installed.
- Repeat the process for any apps needing to be removed.
These steps also apply to removing Shortcut bookmarks or Safari bookmarklets. Tapping on the "-" will ask the user to delete the bookmark entirely, which will need to be recreated later.
Remove widgets from the iPhone Home Screen
Apple includes example widgets on the latest operating system install, so it may be necessary to remove some unwanted widgets right away. Widgets and widget stacks can be managed similarly.
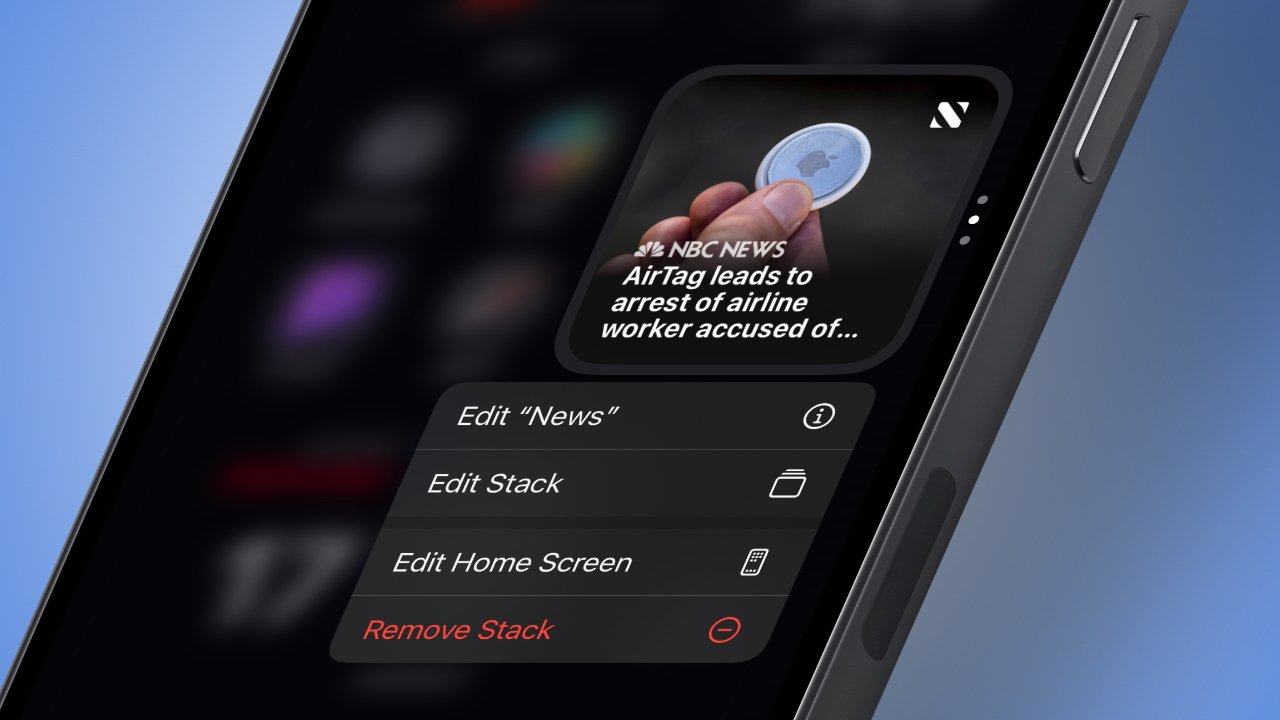
To remove a widget:
- Press and hold on a widget or blank space in the Home Screen.
- When pressing a widget, a menu for managing that widget will appear. Keep pressing to enter "wiggle mode" to edit the Home Screen.
- Widgets can sit alone on the Home Screen or in stacks. Tap on the "-" to remove an individual widget or an entire stack. Tap on a stack to manage individual widgets within.
Now that the unwanted junk has been deleted, it is time to start customizing the Home Screen.
Select a wallpaper for the Home Screen
The Home Screen wallpaper can be selected independent of the active Home Screen page and Lock Screen wallpaper. The wallpaper will be the same for every active page in a Focus Mode but can change between Focuses based on user preferences.
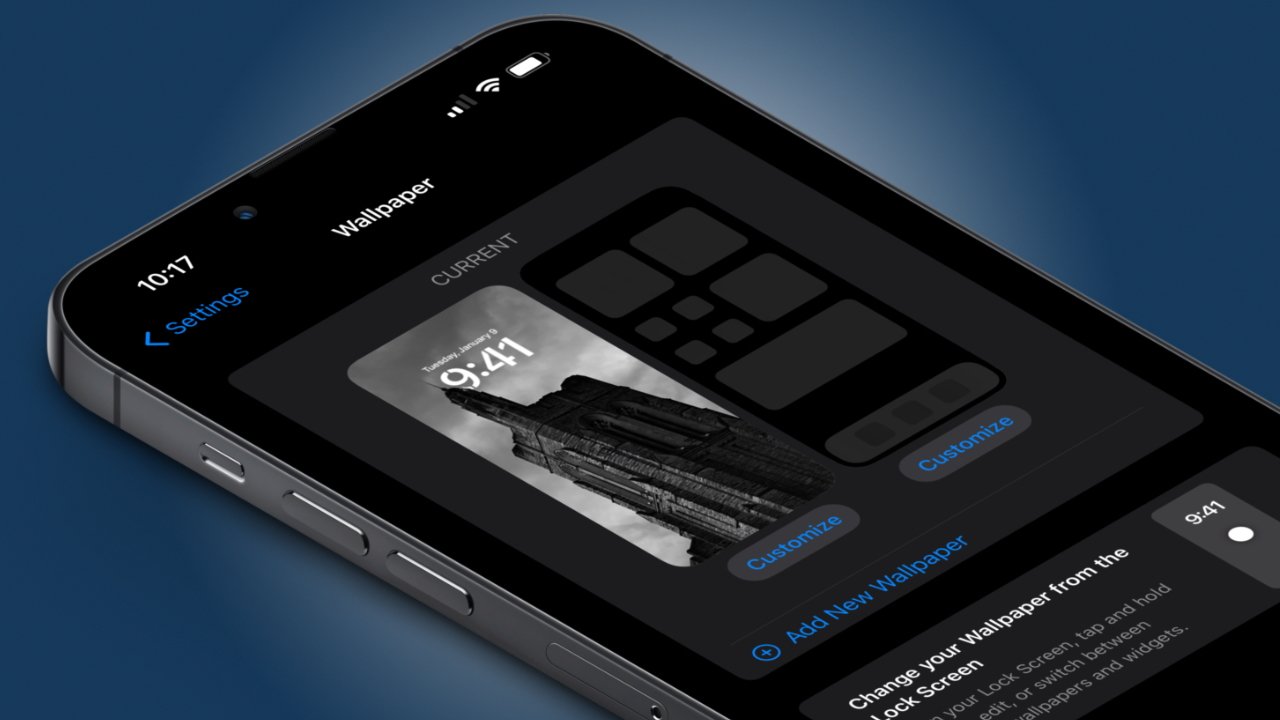
If you've already customized your iPhone Home Screen wallpaper based on the earlier Lock Screen customization, skip this section. Follow these steps if you'd like to select a new wallpaper independent of the Lock Screen.
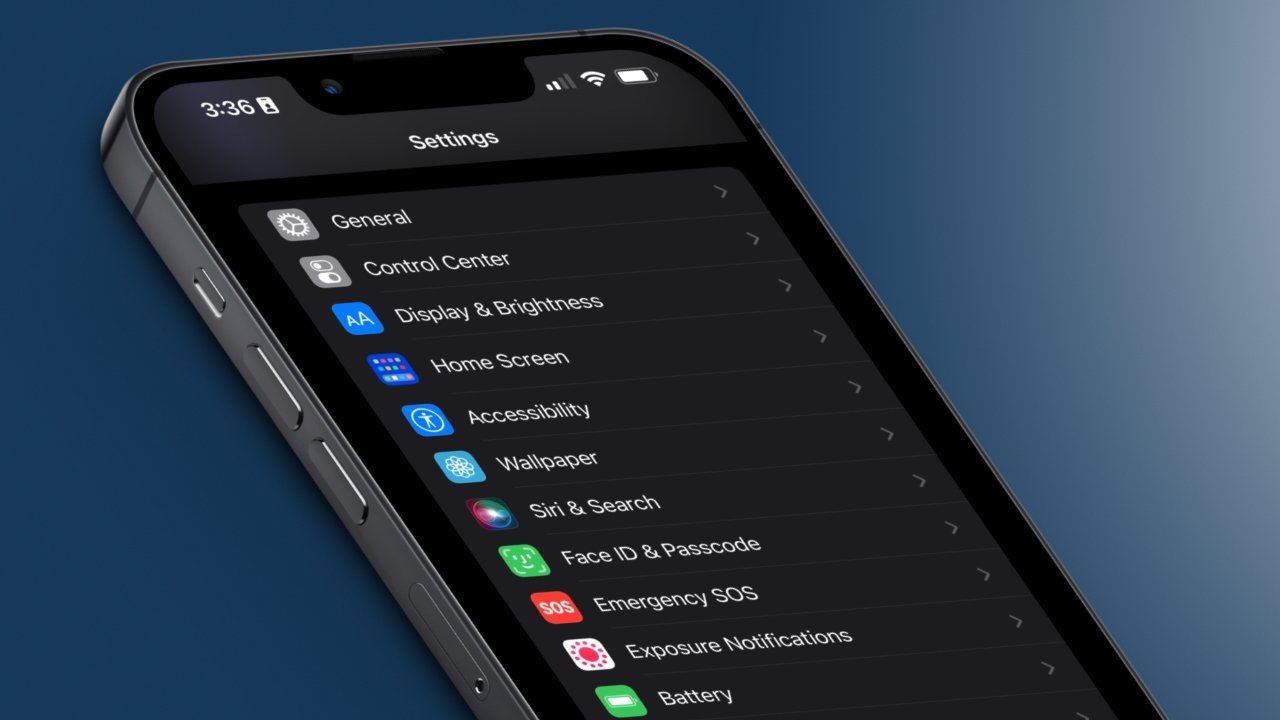
- Open the Settings app.
- Scroll down and select "Wallpaper."
- The Lock Screen wallpaper is shown on the left, Home Screen on the right. Tap "Customize" on the right to change the Home Screen wallpaper.
- Select from the options at the bottom: use the same wallpaper as the Lock Screen, use a solid color, use a gradient, or select a new photo.
- Toggle the blur option for photo backgrounds on or off.
- Select "Done" in the top right to finish editing.
Use this setting to cultivate a wallpaper that matches the chosen Home Screen page. Widgets and app icons can be created to complement a wallpaper, but users don't have to be locked into a single wallpaper choice.
Selected wallpapers for a given Lock Screen and Home Screen are saved based on the current Focus Mode.
Add apps and custom icons to the Home Screen
Now that the Home Screen has a desirable wallpaper and there are no unnecessary apps or widgets in the way, it's time to start adding apps and Shortcuts bookmarks.
Adding an app to the Home Screen
Apps can be added from the App Library. These app icons are static and controlled by the developer. Some third-party apps have alternative icons that give users some control over customization without needing Shortcuts. No Apple apps have alternate icons.
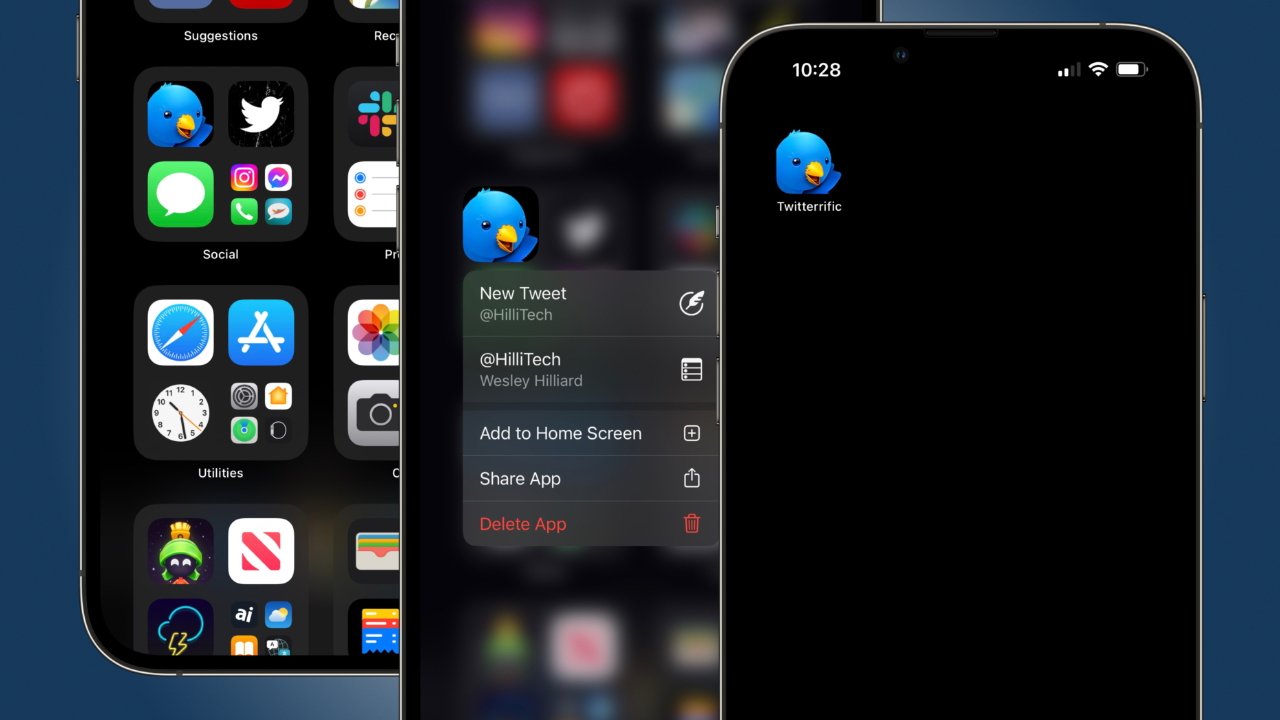
To add an app to the Home Screen:
- When on the Home Screen, swipe to the right until the App Library is reached.
- Locate an app to add to the Home Screen. Press and hold on the app icon until a menu appears.
- Select "Add to Home Screen." The app will be added to an empty slot on the current page, or a new page will be created if there isn't any space.
- Press and hold on the app icon and begin dragging to reposition the app. Existing app icons and widgets will move out of the way.
- Let go of the app at the desired location and tap "Done" in the top right corner to exit wiggle mode.
App icons are static across the operating system. Since an app can be added to multiple Home Screen pages used across different Focuses, changing the app icon will change the app icon everywhere.
Since a single icon might not work on every custom wallpaper in every Focus, users can use custom bookmarks created in Shortcuts. This feature is also useful for Apple apps, which do not have alternate icon options.
Add custom app icons to the Home Screen
It is up to the user to source custom icons for apps. There are many ways to find new and unique icon packs online, from Gumroad to Reddit. It can also be useful (and free) to download and edit existing icons in an app like Affinity Photo.
Once there is a selection of custom icons available within the Photos app or Files, it is time to create a Shortcuts bookmark.
- Open the Shortcuts app.
- Tap the "+" button to create a new Shortcut.
- Tap "add action" and search for "Open App." Select "Open App" from the results.
- Tap on "App" shown in blue text. Search for the app being opened by a custom icon. Select that app.
- Rename the Shortcut by tapping on the menu at the top of the editing screen. While this isn't necessary, it is needed to keep track of multiple app launchers built in Shortcuts.
- From the same top menu, select "Add to Home Screen."
- Tap on the text to rename the icon. Tap on the icon next to the text to select a custom image from Photos or Files.
- Tap "add" to finish customizing the icon and add it to the Home Screen.
Return to Shortcuts and tap the ellipses on the created app launcher shortcut to add another custom icon for that app to the Home Screen. Repeat this for every custom page used on different Focuses where that app will be used.
This method allows alternate custom icons for the same app bookmark across Focuses that use different wallpapers and widgets. Create a new Shortcut for each app that needs a custom icon.
A notification banner is the only significant difference between tapping an app icon from the App Library and tapping an app bookmark with a custom icon. App bookmarks will always show that a Shortcut is run for a brief moment when tapping the icon.
Add widgets to the Home Screen
There are dozens of great apps in the App Store for creating custom widgets. Also, most other apps offer some kind of built-in widget for showing data from that app.
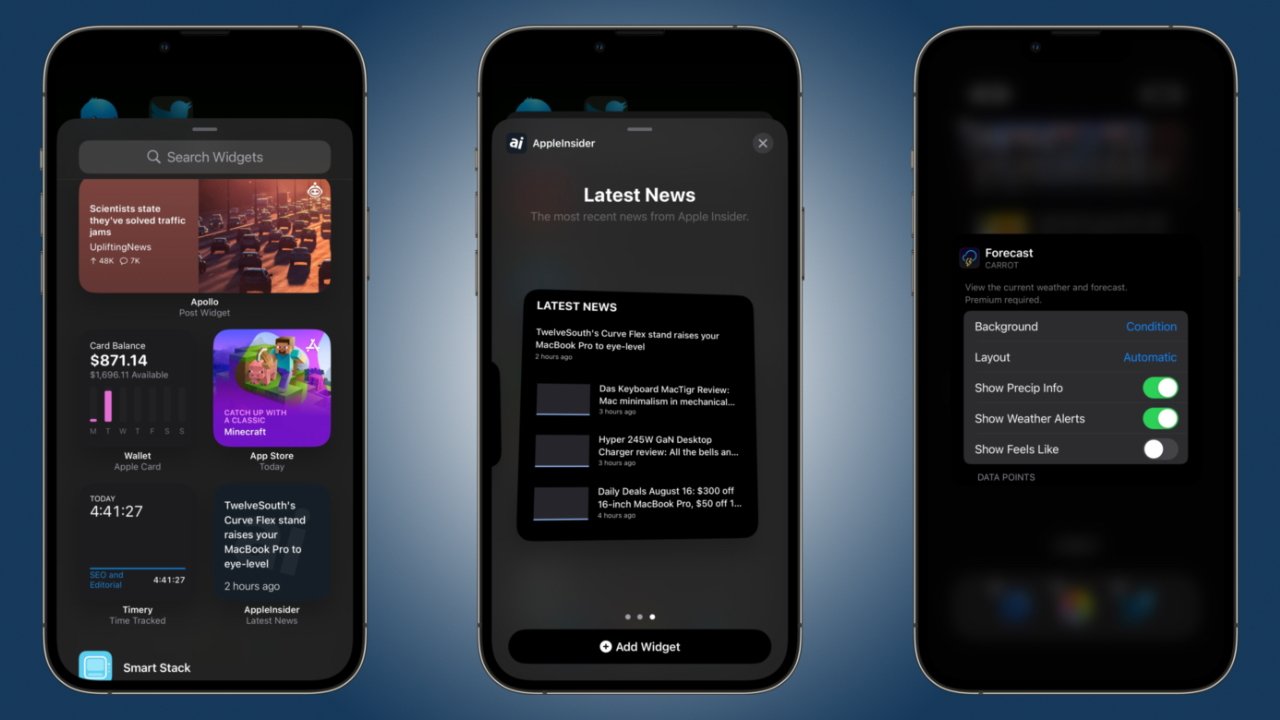
Many users will be satisfied with the widgets provided by apps like Carrot Weather or Fantastical. However, when a little more customization is needed, be sure to build some custom widgets to match a wallpaper or Focus.
When it's time to add a widget to the Home Screen:
- On the Home Screen, press and hold on blank space or an app icon to enter wiggle mode.
- Tap on the "+" in the top left corner.
- A selection of suggested widgets are at the top, followed by a list of apps with available widgets. The "Smart Stack" option generates a stack of widgets based on app usage.
- Press on a widget to drag it into position on the Home Screen. Hover a widget over another widget of the same size to add it to a stack.
- Tap on a stack to edit widgets within the stack.
- With wiggle mode still active, tap on a placed widget to edit the contents when available. For example, change what conditions the weather app shows.
Place a widget, change its background and data shown, and select which apps or bookmarks are shown on the page. Now, a single Home Screen page is complete and ready to be used for a specific Focus.
Putting it all together with Focus Modes
After creating a Lock Screen and a Home Screen page layout, it is time to connect them using a Focus Mode. When a Focus is active, only the selected Home Screen pages are shown with a custom wallpaper and specific Lock Screen.

Change between Focuses or turn off Focus to see different customized layouts. Use scheduling tools and automation to make things change based on contexts.
Focus Modes are managed from the Settings app under the "Focus" section. A list of existing Focuses is shown with a "+" in the top right corner to add more. Users can have up to ten Focuses.
Apple's pre-defined Focuses have different controls within them. For example, the Driving Focus doesn't have Home Screen page selection available. Explore each of the default Focuses or create a new custom Focus.
Pre-defined Focuses like Driving, Work, and Personal have default names and icons. Creating or editing a custom Focus gives users options for selecting an icon, color, and name.
Customizing notification options
Thanks to iOS 16, notification filters are much easier to manage. Rather than determining which people and apps should be allowed to notify the user, a new option enables filtering out certain apps and people instead.
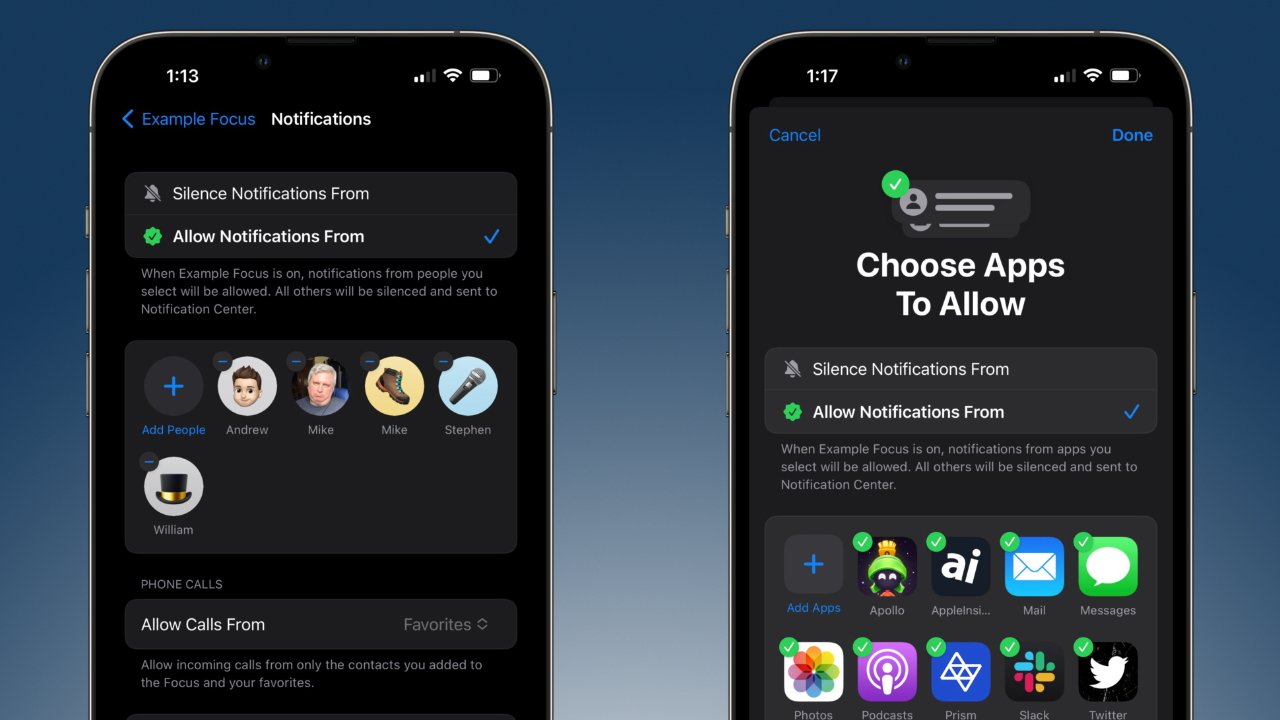
Select "Silence Notifications From" to allow every app or person not listed in the filter to notify the user. Select "Allow Notifications From" to only allow select apps or people to notify the user.
Only one of the two options can be selected per Focus Mode.
Silence or allow notifications from people
- Tap on "People" and choose if the list of people should be allowed or silenced.
- Tap "Add People," and a Contacts modal window will slide up. Navigate the UI and select everyone to be included in the list. It helps if Contacts have already been sorted into groups.
- Tap "Done" to finalize the selection.
- A toggle for "Allow Repeated Calls" can be turned on or off based on user preference.
Silence or allow notifications from apps
- Tap on "Choose apps." The previous selection of allowing or silencing notifications will already be active.
- Tap "Add Apps," and an alphabetical list of every installed app will appear. Navigate the UI and select each app to be included in the list.
- Tap "Done" to finalize the selection.
- A toggle for "Time Sensitive Notifications" can be turned on or off based on user preference.
An additional options menu below the People and Apps selections gives more Focus-specific controls. Options here include showing or hiding silenced notifications on the Lock Screen, dimming the Lock Screen, or hiding Notification Badges from app icons.
Choosing custom screens
The section below notification settings is used to tie a Lock Screen, a selection of Home Screen pages, and an Apple Watch face to a Focus. When the Focus is active, the selected screens will be used.
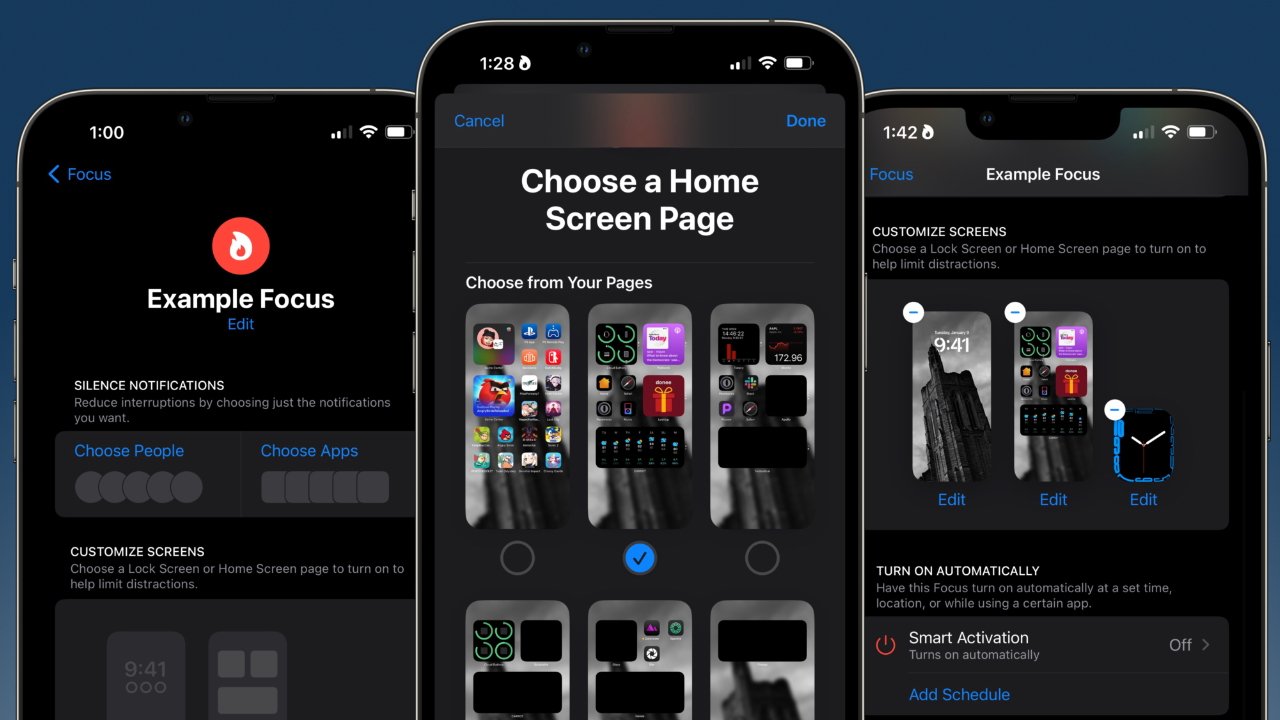
To manage custom screens for a Focus:
- Tap the first iPhone image to select a Lock Screen.
- Tap on the desired Lock Screen for the current Focus being edited. Multiple Lock Screens can be selected. However, it isn't clear how a Focus will choose between multiple options.
- Tap "Done" to continue.
- Tap the second iPhone image to select Home Screens.
- Tap on each Home Screen page that will be used for the current Focus. The Home Screen wallpaper will default to the Lock Screen's selection. Use the Home Screen wallpaper selection guide from earlier to change this independent of the Lock Screen.
- Tap "Done" to continue.
- Tap on the Apple Watch image to choose from available watch faces.
- Tap "Done" to finish.
When this Focus is activated for any reason, the Lock Screen, Home Screen, and Apple Watch face will change. This can be used to change a device's context based on being at work or before bedtime.
Scheduling Focus Modes
Focus Modes can be activated in a variety of ways. Users can select a Focus from Control Center, Settings, or even by switching the Lock Screen.
While these manual options are easy to access and can be very useful, automation makes things feel a little more magical. With a few settings, a user's iPhone can change into whatever visual context is needed at that moment.
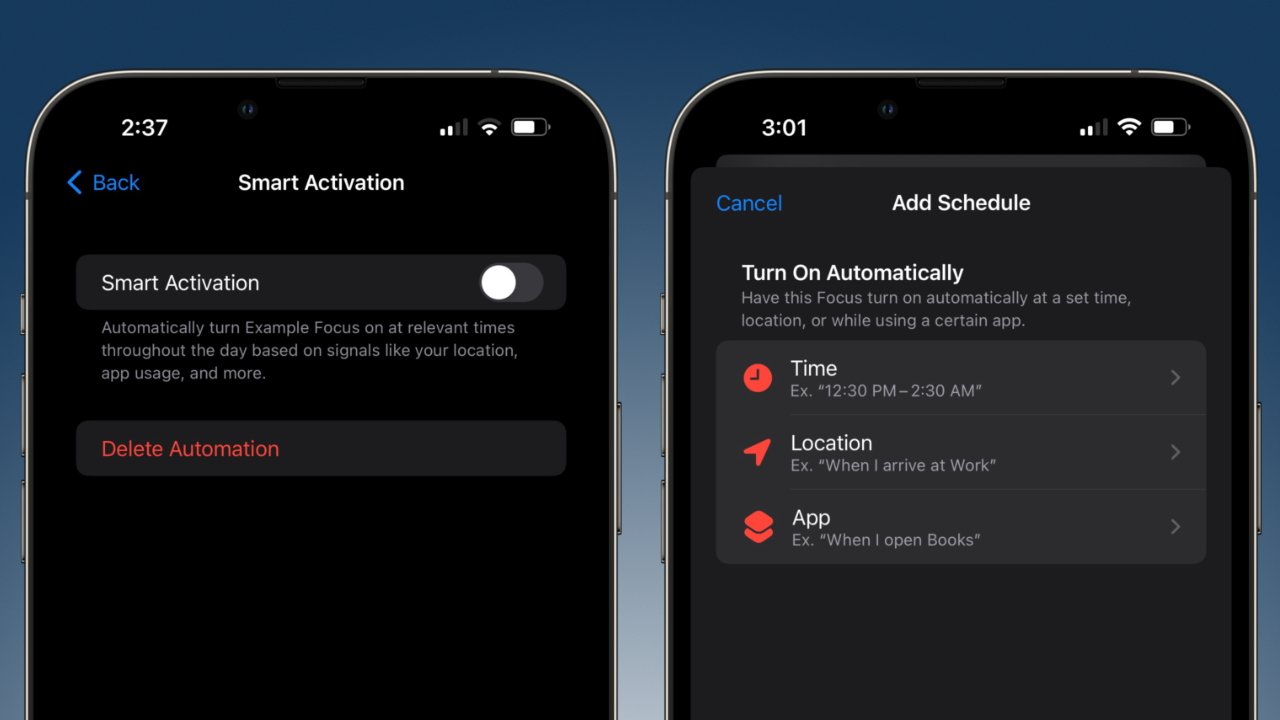
Focus Mode built-in automations
By default, Focus Modes include at least one optional automation for toggling the Focus on and off using something Apple calls "Smart Activation." This mode is the most ambiguous because it will use machine learning to decide when the Focus should be active.
Other default activation modes are included with specific Focuses when relevant.
- Driving Focus - activate automatically based on device data or when connecting to CarPlay or car Bluetooth
- Fitness Focus - activate when a workout is started on Apple Watch
- Gaming Focus - activate when a game controller is connected
- Sleep Focus - activate using the sleep schedule in Apple Health
- Mindfulness Focus - activate when a session is started in the Mindfulness app
Users can also set custom activations within the Focus settings.
- In the Focus settings, tap "Add Schedule."
- Choose from "Time," "Location," or "App."
- Time lets users activate a Focus based on a time of day and day of the week.
- Location lets users activate a Focus based on a location like work, school, home, or a searched address.
- App lets users activate a Focus based on an opened app. For example, activate the Reading Focus when Books or Kindle is opened.
Select "Add Schedule" multiple times to create different parameters for a single Focus.
Focus Filters
Focus Filters were introduced in iOS 16. Apps can designate specific interface sections as a "filter" that users can assign to a Focus.
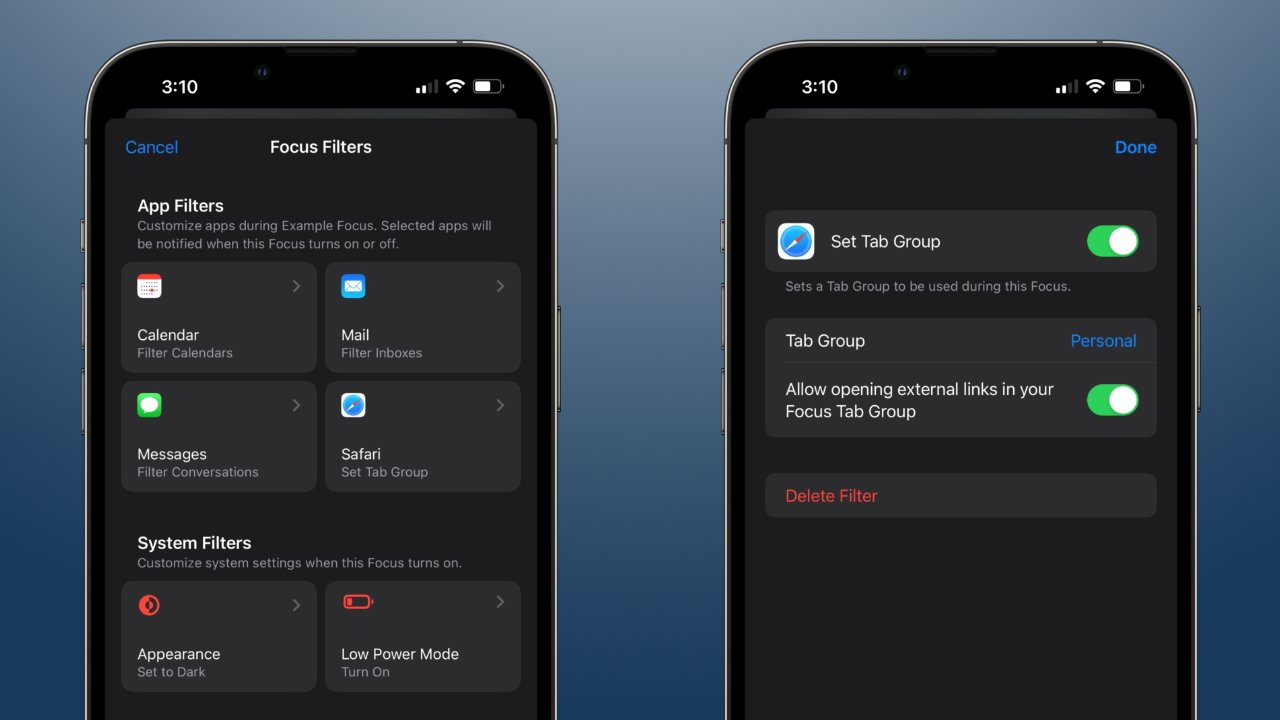
For example, in Apple Mail, a user could be signed into a work email and a personal email. Using Focus Filters, a user could hide work email completely when in any Focus that isn't work-related.
Because this feature is relatively new, developers will have to add support. Pay attention to app updates and add new filters to each Focus to ensure every app and experience is optimized for a given context.
To add a Focus Filter
- In the Focus settings, tap "Add Filter" near the bottom.
- Select which filter to apply.
- Configure the filter by selecting which account or information to use.
- Tap "Add" to finish configuring the Filter
System wide preferences
There are still a few more aspects of iOS that can be customized for user preference. These settings change how the device looks and feels in a more universal fashion rather than something specific like a Home Screen.
Check out the following guides for even more control over how the iPhone operates:


 Andrew Orr


 Amber Neely
 William Gallagher