How to record a video of the iPhone 11 screen
 William Gallagher
Add this button to Control Center and you can quickly make screen recordings
Whichever iPhone you've got, there are two ways to record a video of what's on the screen, whether it's when you want to preserve a memory or to create a tutorial for someone.
At some point, someone has asked you how to do something on your iPhone 11, and if they were right there with you, you'd just do it right in front of them or for them on their iPhone. You'd show them how to do it and they'd know.
But they're not with you. They could be in a remote location with no way to pay a visit, such as halfway across the country or under a government-ordered lockdown situation. Which means you will probably have to talk them through it.
Describing how to do things over the phone is liable to cause injury. Or given that shaking your iPhone undoes things, it could lead to an awful lot of undone actions before they finally get that you mean they should tap the teeny i button.
What you can do instead is screen-record your iPhone. Do the things you're describing to them, take the steps, and let the iPhone make a video of you doing it. Then you can send them that video explainer.
In the end, you're both sorted. They have a record of what they need to do for a specific task, and you're saved from having to go through the explanation process yet again in the future.
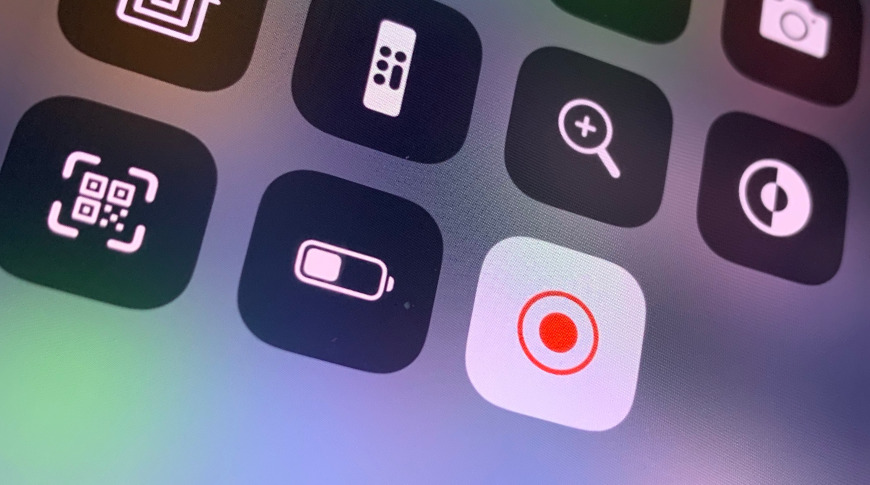
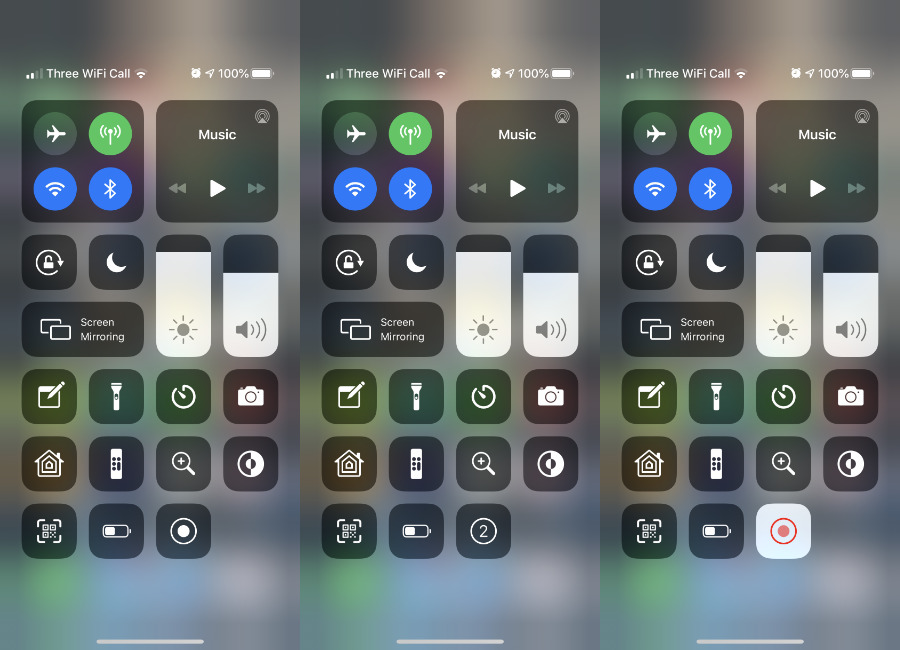
There are two ways to accomplish this, with one being suitable for quickly dashing off a short video, and one for making longer or more elaborate movies. The quick way involves a little preparation, though, as you need to set up Control Center to include a screen record button.
How to set up Control Center
- Go to Settings
- Choose Control Center
- Tap Customize Controls
- If Screen Recording is not in the top list, tap on it in the second
- Now it's in the top list, tap and hold to rearrange it
- Tap Back
It's slightly confusing how you can rearrange the various controls in Control Center because they're presented here as a vertical list, but that's not how you'll use them later. Later in Control Center itself, you'll see both that they're arranged as rows of buttons, and also that you are limited to rearranging controls in the bottom half of the screen only.
Nonetheless, when you have added the screen recording button and can then spot it in Control Center, you're good to go.
How to screen record on iPhone 11
- Swipe down to reveal Control Center
- Tap on the video record button
- Wait through the three-second countdown
- Swipe up to leave Control Center
- Do whatever you need to demonstrate to someone
- Tap on the red clock at top left
- Tap Stop
The key to this is the video record button. When you first swipe down to reveal Control Center, it's a hollow white circle around a filled-in white circle.
When you then tap on it, that center circle becomes a 3-2-1 countdown. And then it becomes a red dot. At times when you're in Control Center and it's recording, that icon has a red dot in it.
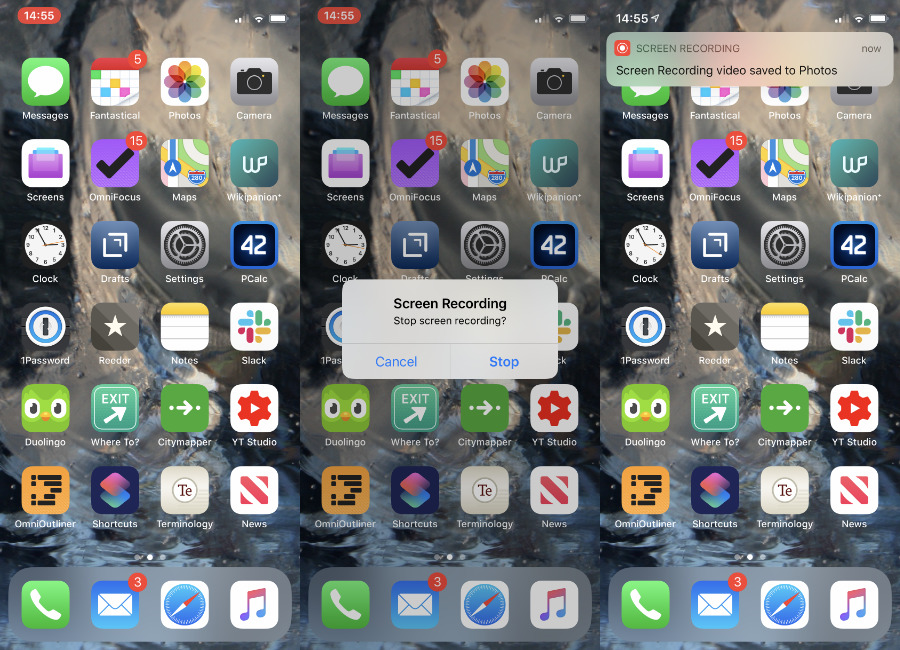
Unless you want to screen record showing someone how to use something in Control Center, though, you need to swipe up to leave it. When you do, you go back to your regular home screen or into the app that you were in before.
All that's visibly changed is that the clock at the top left of your iPhone has gained a red background. Tapping on that clock or red background gets you a prompt about stopping recording.
If you do stop it, then you get a notification that the video you recorded has been saved. It's in your camera roll.
That means you can then share it over email, Messages, or any other way that you might send someone a photograph.
How to screen record longer videos on iPhone 11
You tend to use that Control Center method of screen recording to make short videos. There isn't actually any limit on how long they can be, at least until you've recorded enough to fill up your iPhone's storage.
However, if your iPhone screen switches off, the recording stops automatically. So you may want to go to Settings, Display & Brightness, and pick the Auto-Lock time.
It's the speed and convenience of swiping into Control Center, tapping one button, and then just tapping another end it, that makes this useful. When you want to show someone a single feature of iOS, or illustrate a solitary point, you can be done and sending them the video in moments.
You might want something more elaborate, though. Say you're showing them how long it takes to download a huge app over cellular. The editor in the iOS Camera Roll would let you cut the start or the end, but it couldn't let you skip in the middle, for instance.
Similarly, you might want to annotate the screen. Or pause it while you have an audio recording of yourself describing some particular detail.
You could do much of this by recording all you need with the Control Center option, then editing in iMovie. If you're starting to do elaborate screen recording videos, though, you're better off using the separate recorder that comes built-in to the Mac.
How to screen record on iPhone 11 using QuickTime Player
- Connect your iPhone to your Mac with a Lightning cable
- Launch QuickTime Player on the Mac
- Choose File, New Movie Recording
- Click the dropdown arrow to the immediate right of the red record button
- Choose your iPhone from the list headed Camera
- Press the red record button
Notice that it is New Movie Recording that you have to click in the Mac's QuickTime Player, even though there's a New Screen Recording option underneath it. That's because if you choose the screen recording one on your Mac, it will record the screen of your Mac.
When you're done, press the square, black, stop button on QuickTime Player. Unlike the iPhone, this doesn't automatically save the video so you have to remember to choose File, Save.

QuickTime Player has no more complex editing functions than the Camera Roll on iOS, but again you can open the video in iMovie.
Alternatives to Apple's own screen recording
While you're connecting your iPhone to your Mac, you could look at alternative apps such as Screenflow. This is a third-party app for recording screens and it is particularly good.
What's more, though, it has evolved from a basic screen recorder into very nearly a whole video production app. It will let you zoom in on certain areas of the recording, and build sequences from multiple different screen videos if you need it.
Keep up with AppleInsider by downloading the AppleInsider app for iOS, and follow us on YouTube, Twitter @appleinsider and Facebook for live, late-breaking coverage. You can also check out our official Instagram account for exclusive photos.


 William Gallagher and Mike Wuerthele
 Christine McKee
 Malcolm Owen
 Marko Zivkovic


 Wesley Hilliard