How to make Mac notifications show longer, or leave faster
 William Gallagher
Notifications are so handy on a Mac -- and so distracting, too
You can't always turn on Do Not Disturb to get rid of all distracting notifications, but there are ways to make them less distracting — or more convenient — in macOS.
Apple revamped notifications in macOS Big Sur, but they're still either distracting, or you miss them.
That distraction obviously includes when they slide in from the side of the screen as you're working, and then slide away again. They can do that slide-on, slide-off so quickly that you don't get to actually read the notifications, in which case you've now smashed your concentration entirely.
Or they can slide in and stay there, which is sometimes just as annoying. You've seen it, you've been notified, but you still have to stop what you're doing to dismiss them.
Apple provides some straightforward ways of changing much of this, which are simple, if possibly a bit of a slog. It concerns choosing what style of notifications you want — per app.
Choose what style of notifications you want
For every single app on your Mac, you can go through changing how it notifies you — or whether it does at all.
When you first install an app it's going to ask you about letting it send notifications. But if you change your mind, or if the app has just worn you down, it's off to the Settings app for you.
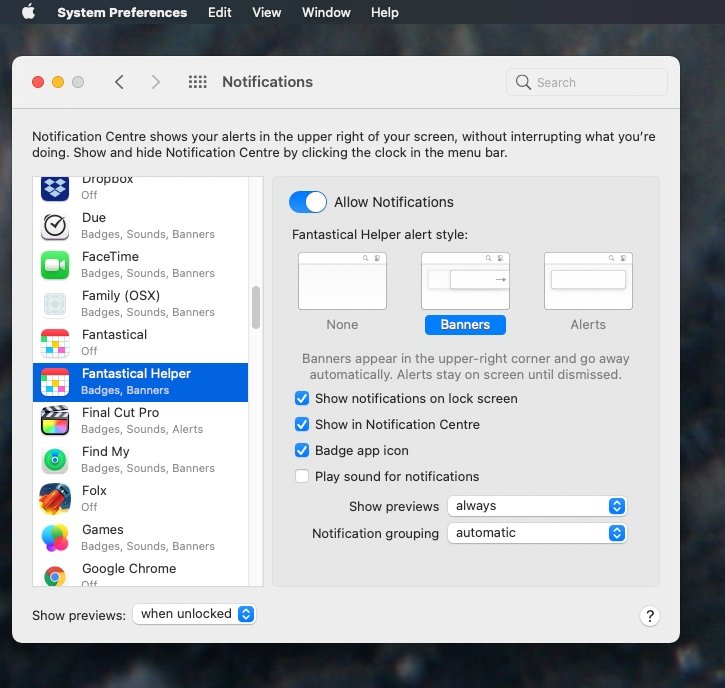
How to change notifications in Settings
- Choose the Apple menu, and select System Preferences
- Click on Notifications
- For each application, click on its name in the list
- Choose whether to Allow Notifications or not
- Choose an alert style, None, Banners, or Alerts
- Decide whether to let the notification play a sound (if available)
There are other options, chiefly to do with whether notifications are shown when you've got a screensaver running. But these are the key ones that control just what degree of distraction you're willing to put up with.
It can seem peculiar to turn on Allow Notifications, and then choose None for the style of notification you want. However, this panel also controls whether an app can notify you by putting a red badge on a Dock icon, for instance.
Notice that for all third-party apps, you have an option to Play sound for notifications — or not. Some of Apple's own apps such as Mail, Music, Keynote, Notes, and more, do not offer that setting.
Deciding between None, Banners, and Alerts
It's not going to take much for you decide whether you want None, that is, no on-screen notifications at all. The real question is that if you do want any, whether you'd prefer Banners or Alerts.
If the notifications are sliding onto your Mac's screen and then sliding off, you've got a Banner style one. Whereas if it slips on and stays there until you click on it, that's an Alert.
Choose the one you prefer, for each app in turn. Do this and you can fix the irritation of notifications that stay until you break off what you're doing to dismiss them.
Equally, if there are apps whose notifications disappear before you've finished reading them, the fix is to change those to alerts.
Apple gives and Apple takes away
This is no longer true if you're running the latest Big Sur, but on previous releases of macOS, there was a useful Terminal command for notifications. If you're still running an old macOS, you can use it to change how long a banner notification stays onscreen.
There have been at least two different Terminal commands for this, and you'll have to try each to see if they work on your Mac. In both cases, you open Terminal, paste or type in the command, then either logout or restart your Mac.
defaults write com.apple.notificationcenterui bannerTime SECONDS
defaults write com.apple.notificationcenterui bannerTime -int SECONDS
Remember, it's one command or the other, not both. And it's most likely to be neither if you keep your Mac up to date.
But replace the word 'SECONDS' in those commands with some numeric figure, then paste the whole line into Terminal.
If the first command works, then after restart then banner notifications will stick around for longer — or shorter — as you chose. If it hasn't made a difference, try the second command and restart again.
It's not clear why Apple would include a Terminal command for this and then take it away again. Much less why it could add a second Terminal command, and then take that away too.
Limitations of macOS Big Sur
Fortunately, just knowing the difference between Banners and Alerts — and how to change them — is enough to save you some aggravation. Big Sur does not give you any keystrokes to dismiss a notification, you have to move your cursor up to just the right point and wait a beat for an X or Clear box to appear.
If being able to tap a key to dismiss a notification would be good, so would any way to choose when the notification either offers or outright demands a response. Mail will let you reply or delete right from the notification, for instance, where software updates want you to choose when to do them.
Working around the limitations
One issue with notifications is that they distract you by appearing. A second is that they either require you to dismiss them, or they can require you to select from a drop down menu.
If you have an app such as Keyboard Maestro, you could programme a keystroke to dismiss a notification for you. It would require Keyboard Maestro to move your cursor to precisely the right spot on the screen, wait half a second for the Close or Clear box to appear, then clicking for you.
That would work until you moved to a different Mac, say going from your office iMac to your home MacBook Air. Then the position for the cursor would be different because of the smaller screen, but you could make a second copy of the Keyboard Maestro macro.
You could program it to do all of the above and then recognize when a notification is showing an Options button. Keyboard Maestro could click in that button and select which ever option you've previously decided.
All of this is possible, and you're not going to do any of it. Much more sensible and easily straightforward is to use the heavy-handed Do Not Disturb.
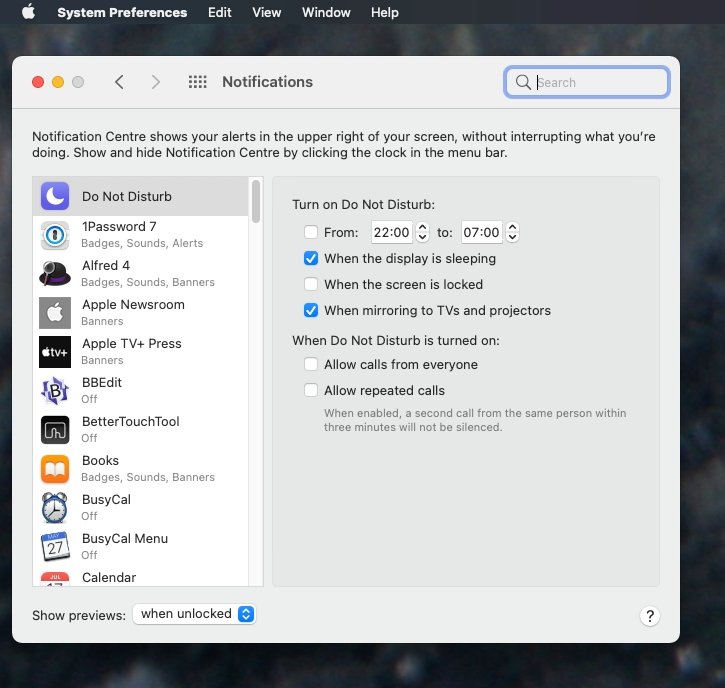
Do Not Disturb on Mac
The Mac's Do Not Disturb feature is subtly, but importantly, different to that on iOS.
On iPhone and iPad, if you switch on Do Not Disturb, notifications will still appear on the lock screen. They just don't make a sound, nor trigger haptic feedback.
They simply sit there until you choose to look at the screen and do something about them. On the Mac, they do the same thing — but they sit in the Notification Center. They don't display and then go away, they simply don't display.
That's exactly what you want when you're trying to concentrate on your work. But it's exactly what you don't want when there is one particular notification you absolutely must know about immediately.
So you can turn on Do Not Disturb and just make yourself check Notification Center by clicking on the time in the top right corner of your Mac. It's just hardly convenient.
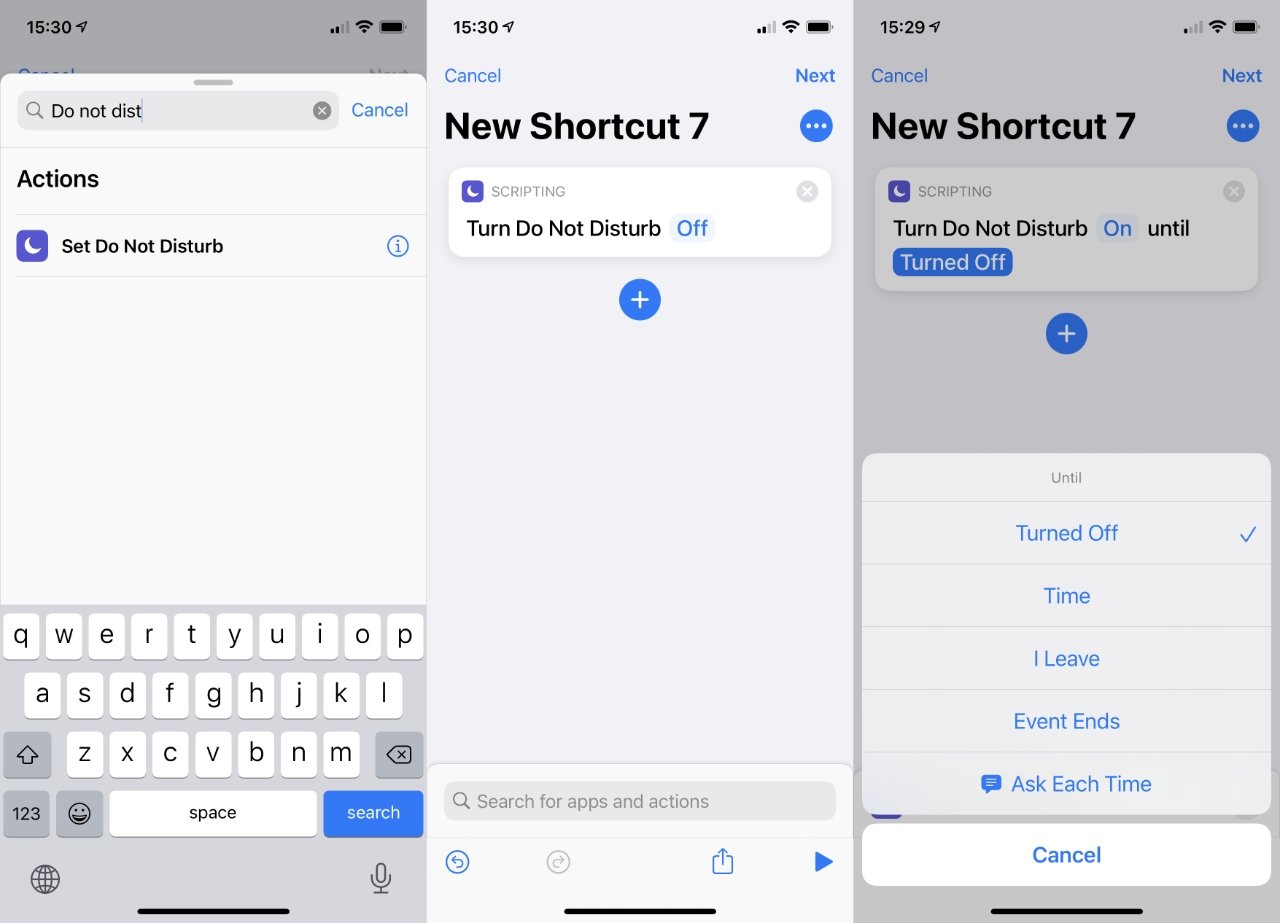
This may change with macOS Monterey as Shortcuts come to the Mac. Based on what Shortcuts are already available on iOS, it's reasonable to assume we will be able to create a keystroke or a Siri command that turns Do Not Disturb on and off more handily.
Until then, though, reducing unnecessary distractions from notifications is a job of going through the settings for every app and deciding what you do and don't really need.
Keep up with everything Apple in the weekly AppleInsider Podcast — and get a fast news update from AppleInsider Daily. Just say, "Hey, Siri," to your HomePod mini and ask for these podcasts, and our latest HomeKit Insider episode too. If you want an ad-free main AppleInsider Podcast experience, you can support the AppleInsider podcast by subscribing for $5 per month through Apple's Podcasts app, or via Patreon if you prefer any other podcast player. AppleInsider is also bringing you the best Apple-related deals for Amazon Prime Day 2021. There are bargains before, during, and even after Prime Day on June 21 and 22 — with every deal at your fingertips throughout the event.


 Amber Neely


 Malcolm Owen