How to use Notify When Left Behind with your AirTag
 Malcolm Owen
Always be reminded if you leave your bag behind with AirTag separation alerts.

If you frequently forget to pick up your keys or bag before going somewhere, here's how to use AirTag to remind you, so you'll never leave your valuables alone again.
The introduction of AirTag expanded the core concept of the Find My app and network to more than Apple's hardware ecosystem. If you lost an item, just like an iPhone or AirPods, you could easily look up in the app the last known location of the misplaced devices, as well as to perform some remote actions such as locking it or making it play a sound.
While AirTag could chiefly be used to track down items that have been placed somewhere and forgotten about, this sort of thinking isn't that efficient, as people often remember the item some time after leaving it. If you're unlucky and remember a long time later, you might do so at a far distance from it, lengthening the retrieval time.
The time to remember and how long to act to get the item back is crucial, especially in population-dense areas like a city. For valuable items like a bag, wallet, or keys, they may have been picked up and moved, with a savvy thief discarding the AirTag if it's easily visible, minimizing the chance of you getting your items back.
For cases such as a wallet, there's the added problem of straight-up theft, with pickpockets potentially escaping with the goods without the victim being aware until it's too late.
Naturally, Apple has a system in place that can help with this, and that's separation alerts
Notify When Left Behind
What AirTag does that can help in these situations is to give you a heads-up that the AirTag is being separated from your iPhone. For example, an alert could be made when you move the iPhone a short distance away from the AirTag, or vice versa.
In effect, you're alerted when you're leaving the AirTag behind, or if the AirTag is being moved away from you in a theft. This reduces the time it takes for you to be aware that something's wrong, and therefore to act.
The system isn't just limited to between the AirTag and iPhone. It can also be enabled if you own an Apple Watch and leave an iPhone at a location, for example, with the Apple Watch displaying a separation alert pertaining to the iPhone.
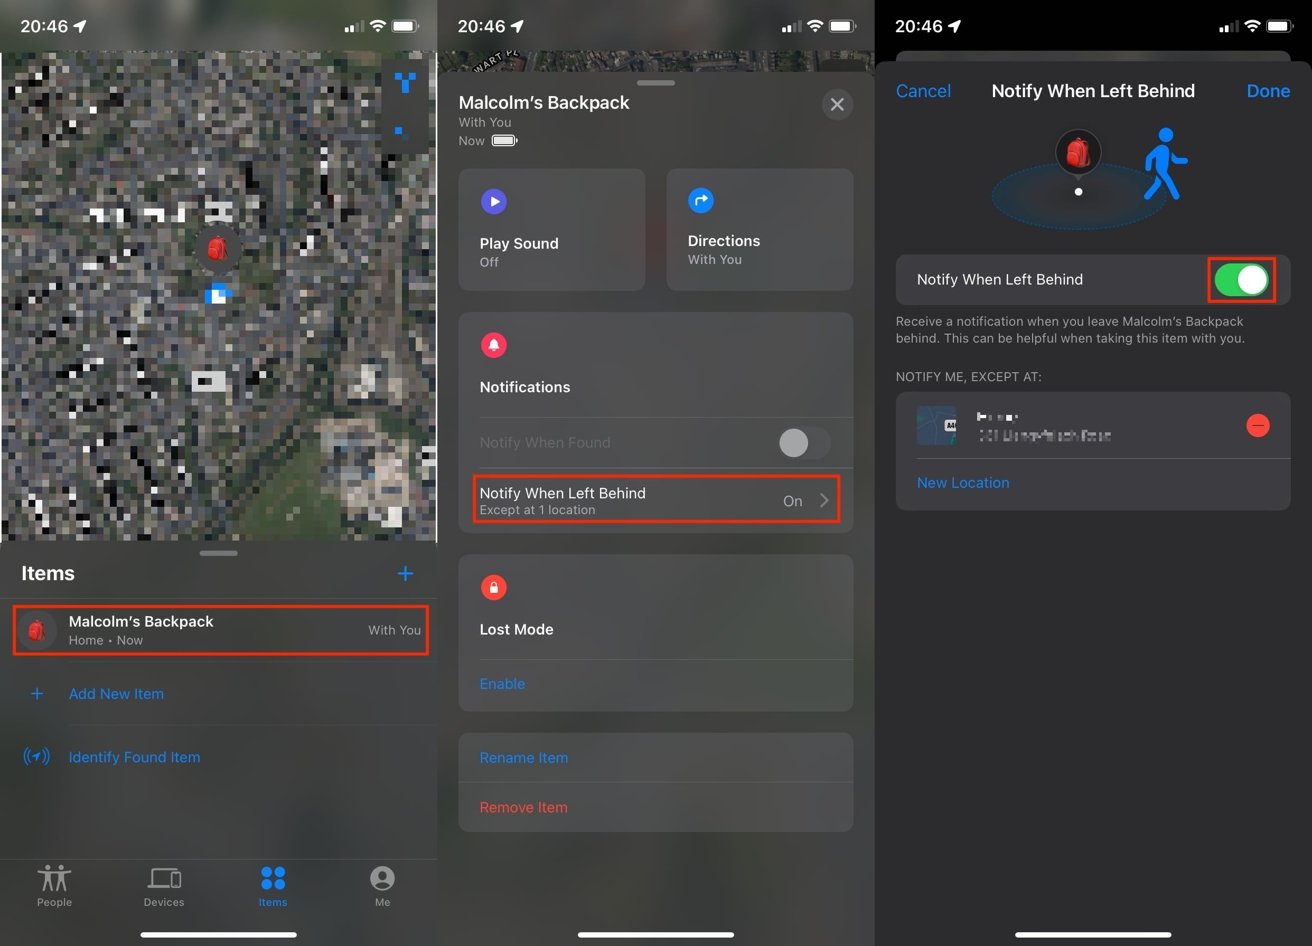
How to enable Notify When Left Behind for AirTag on an iPhone
- Open Find My.
- Tap Items.
- Tap the AirTag or the name you've given to the AirTag.
- Scroll down and select Notify When Left Behind.
- Tap the toggle next to Notify When Left Behind to turn it green.
Exceptions to the Rule
While handy, the system may not necessarily be useful for all situations. For example, if you have your AirTag attached to a backpack and you leave it at home to perform an errand where it's not required, you don't really benefit from being alerted at that time.
Really, with the exception of very frequently used items like keys, the need for the alert only really applies when you're not at home or a place you consider to be safe enough to store stuff. You want the alert when you're in public.
What you can do is employ the "Notify Me, Except At" feature of the alerts, which will prevent the notification from being made when the AirTag is at specific locations, like home or work.
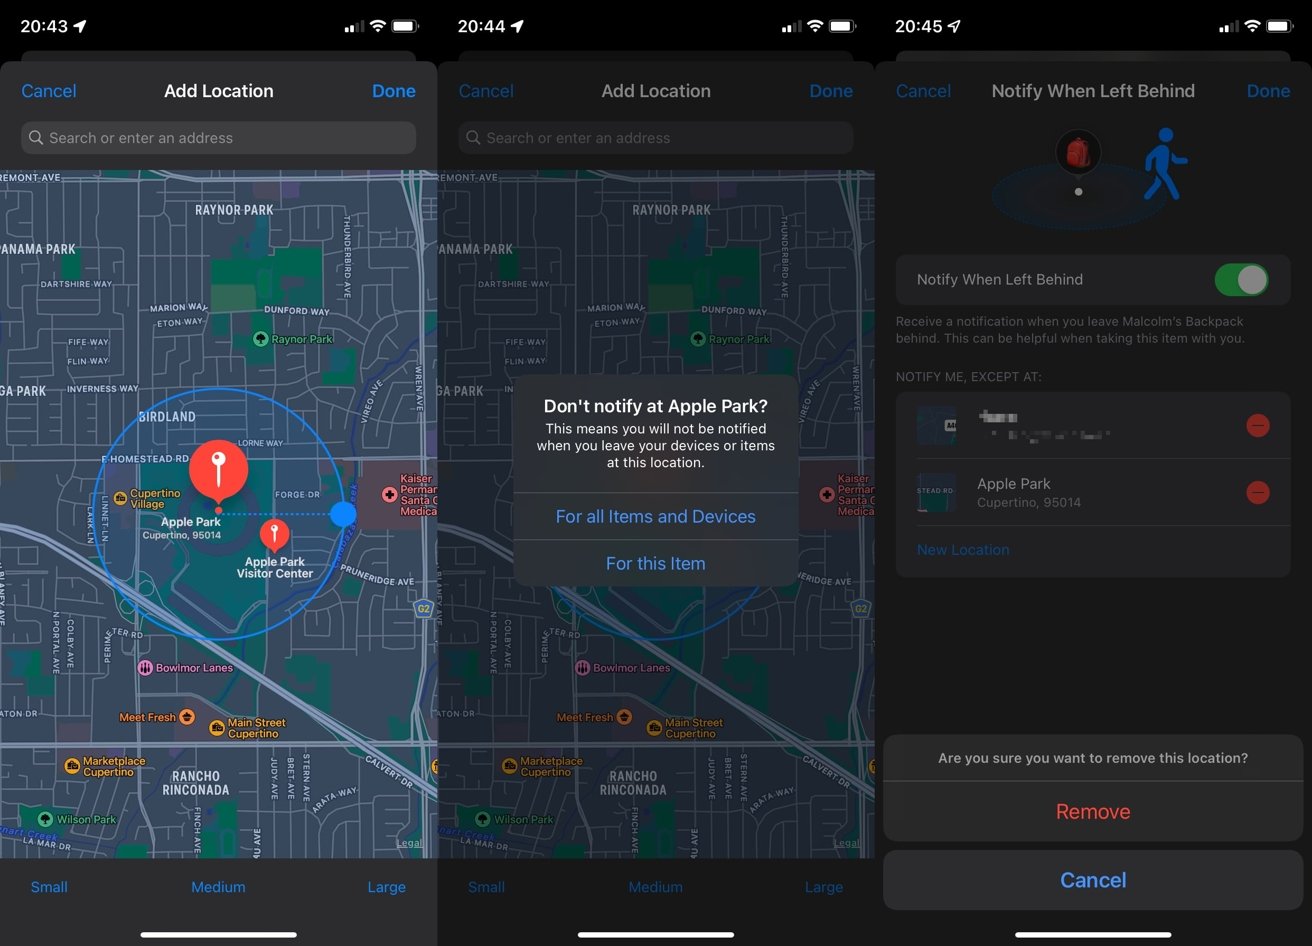
To do this, you need to access the Notify When Left Behind section for the AirTag within the Find My app. Below the toggle is a section titled "Notify Me, Except at," which can be used to identify safe locations.
The feature offers suggested places, such as your home address, to add to the list with a simple tap of the plus icon, but you can also add custom locations. This is performed by tapping New Location, then searching for the address you want to use.
You're also given the option to set a designated fence that signifies the area that notifications will be suppressed within. You can customize this by resizing the blue circle directly, or by tapping "Small," "Medium," or "Large" presets at the bottom of the map.
Once finished, tap Done. You may be asked if you want the location to suppress alerts for just that item or for all items that appear in Find My. Select either "For all Items and Devices" or "For this Item," depending on whether it applies to all your stuff.
To remove a location, tap the minus next to the place, then "Remove" to confirm.


 William Gallagher and Mike Wuerthele
 Christine McKee
 William Gallagher

 Marko Zivkovic