How to reuse an iPad as a remote On Air light
 William Gallagher
We're all on video calls more now, and few of us are in places where we can escape interruptions. But an iPad can be turned into an On Air light — and positioned anywhere you want.
Maybe it's not that you're about to go live on PBS. Maybe it's just that you've got a podcast to record in your den and know that the kids in the kitchen are going to make a lot of noise.
They still are. An "On Air" light is no guarantee that anyone will pay any attention, but at least if they can see it's on, they know enough to feel guilty.
And to not come slamming open the doors in your office, not just yet.
Not an actual On Air light
Real studios can have actual On Air lights, lights that, well, light up. They turn red, with either "On Air" or "Recording" in white or yellow.
They also can cost a lot of money. It is possible to jury-rig a cheap one with a low-cost light, extended USB cable, and a HomeKit automation.
But if you have an unused iPad lying around, it's better. That whole, large iPad screen can turn red and display the words "On Air" or whatever else you want it to much clearer.
Plus, an iPad is portable. You can choose to put up an actual On Air light anywhere, but it has to be somewhere with power. It has to be somewhere it will be seen.
Whereas an iPad, while it still needs power at least for a while each day, it can be left in the kitchen now and the hallway later. If you work in a garden shed, an iPad On Air light can still be in the house near you, or far away in your work office.
The hardware you need
Something has to trigger that On Air light to turn on, and it's going to be a Mac, an iPhone, an iPad, or an Apple Watch. Don't buy a device just to do this, but you're "on air" because you're working, and what you're working with is likely to be one of these devices.
For preference, a Mac is the easiest option because it gives you three possible ways to remotely set up an "On Air" light.
The "On Air" light itself can be any Apple device other than the Apple Watch, or the Apple TV 4K.
This time, the best option is an iPad that you're not using. It's the right combination of portability and screen size.
You do have to think about power, but if it's being charged up every night anyway, you don't have to think about it much. If it isn't, you need a Lightning cable that's long enough to reach to the nearest wall socket.
That iPad also has to:
- Be turned on
- Logged into your Apple ID
- Have its Auto-lock set to Never It's that last one you'll forget, if you forget anything. You can't wake up an iPad remotely, so the screen has to stay on. That is drawing power, and it is therefore running down your battery. But at least the iPad isn't doing anything more, like looping through YouTube videos. Depending on where the iPad is, you may well be unable to see whether it's still on. And actually, the best solution for using it as an On Air light varies depending on where it is, too.
- iPad mini (5th generation or later)
- iPad (6th generation or later)
- iPad Air (3rd generation or later)
- iPad Pro
- MacBook Pro (2016 or later)
- MacBook Air (2018 or later)
- MacBook (2016 or later)
- Mac mini (2018 or later)
- Mac Pro (2017 or later)
- iMac (2017 or later)
- Retina 5K, 27-inch iMac (2015 or later)
- iMac Pro (2017)
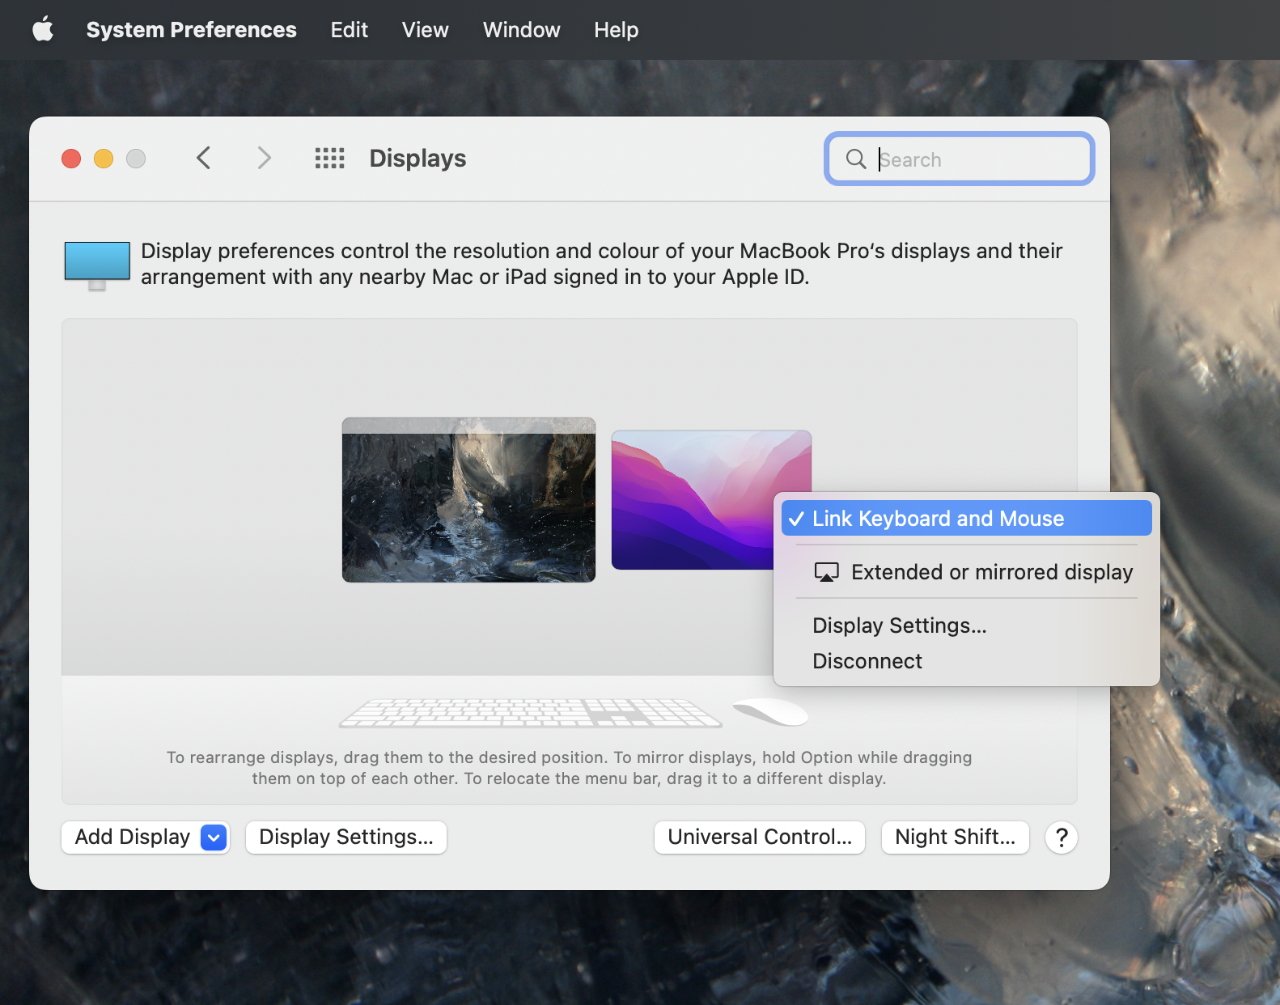
Use Universal Control when your iPad is close enough
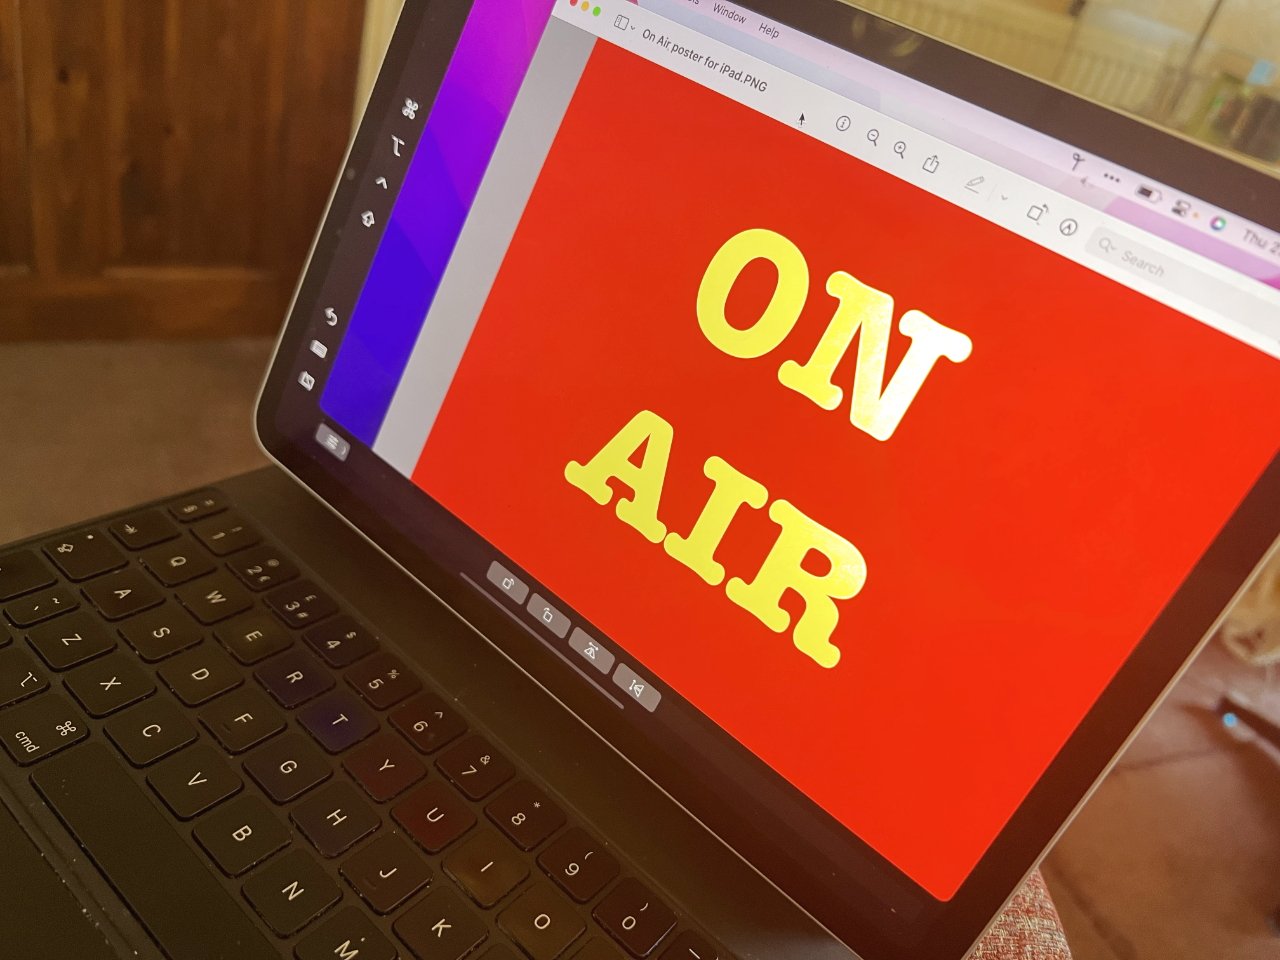
Maybe you're in an open plan area and you're able to mount the iPad high enough that other people can see it. And yet angled so that you can see it too. In that case, it is certainly within range for Universal Control from your Mac. Just make a large red image with yellow or white text saying, "On Air," and drag it to the iPad when you want to. Strictly speaking, you could do this even if you weren't able to see the iPad's screen. It wouldn't be the most elegant solution if the iPad were turned to face away from you, but it would work. Except that the way Universal Control works, your cursor can be on one screen, yet until you click on something there, you can't do much. The foreground application is on the other screen, not the iPad. It's not remotely a problem when both screens are in front of you, since you can see what's happened. But when they're not, when the iPad is just out of sight, Sidecar is better. There are specific minimum requirements for Universal Control on both the Mac you're working with, and the iPad you want to use.Also, the iPad must be running iPadOS 13 or later. The Mac must be on macOS 10.15 or later.
When to use Sidecar
Sidecar extends your Mac's desktop to the iPad's screen. At first, that seems like a difference that makes no difference — if the iPad is turned away from you, you're not going to be able to see it any more clearly.
But when you're using Sidecar, one screen remains the foreground one no matter what you do. For instance, drag your cursor over to the iPad under Sidecar and press the Command and Space Bar keys to call up Spotlight.
Under Sidecar, Spotlight appears on your main screen. Under Universal Control, it would appear on the iPad.
So Sidecar has a tiny bit less potential for confusion than Universal Control.
What you need to run Sidecar
There are specific minimum requirements for Sidecar on both the Mac you're working with, and the iPad you want to use.
- iPad mini (5th generation or later)
- iPad (6th generation or later)
- iPad Air (3rd generation or later)
- iPad Pro
- MacBook Pro (2016 or later)
- MacBook Air (2018 or later)
- MacBook (2016 or later)
- Mac mini (2018 or later)
- Mac Pro (2017 or later)
- iMac (2015 or later)
- iMac Pro (2017)
Also, the iPad must be running iPadOS 13 or later. The Mac must be on macOS 10.15 or later.
Sidecar still only works when your iPad is within around 10 meters, or around 33 feet. Sometimes you want a little more, sometimes you need it to be halfway across your office.
There's one last option, though it is a bit of a workaround.
Use Focus Modes
Shortcuts on Mac and iOS do feature many options that appear ripe for this. You could, for instance, have a Shortcut that displays a specific image from your Photos library.
You could even, in theory, have that happen whenever a specific email arrives in Mail's inbox. Send an email with a subject heading of, say, "Light the fuse," and you can set off a whole chain of Shortcut animations.
But not on another device. Right now, the very best you can do with Shortcut automations is make the target iPad display a notification that you want to run a Shortcut.
However, there is another macOS and iOS Shortcuts feature that does not require you to walk over the iPad and allow the notification every time.
This is changing slightly under the forthcoming iOS 16 and macOS Ventura, but right now you can create a Shortcut that runs when you change Focus Modes.
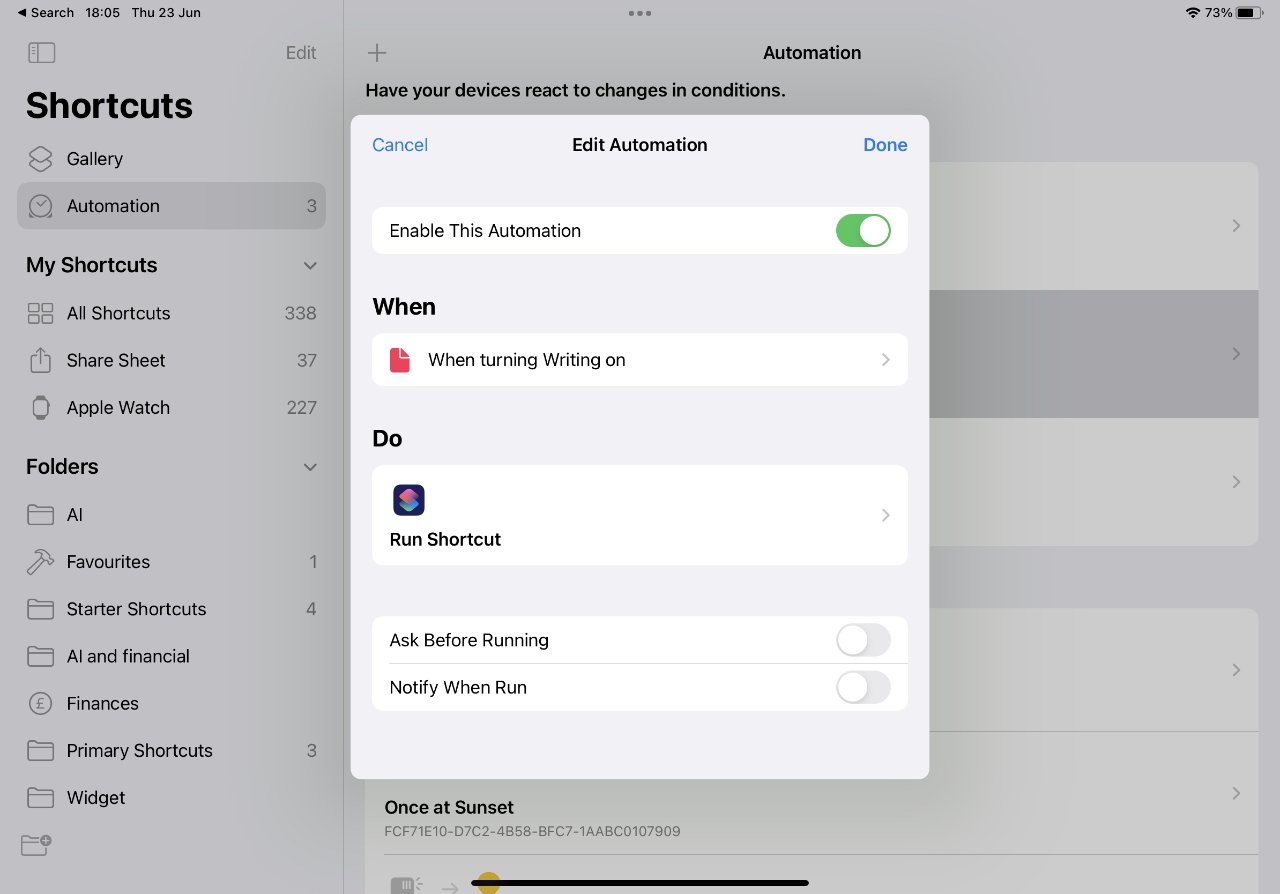
Setting up Shortcuts and Focus Mode
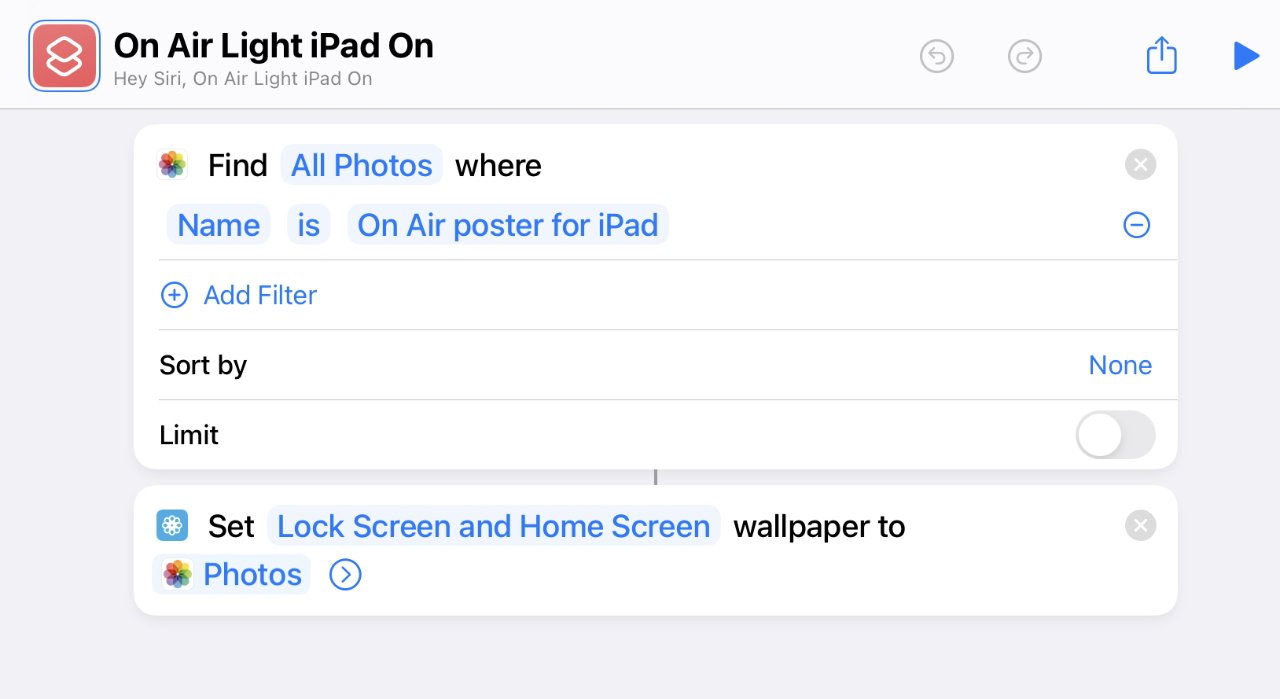
- Make a large On Air poster
- On the iPad, go to Shortcuts
- Make a Shortcut with a Find Photos action, and a Set Lock Screen one
- Specify the name of the poster in that Find Photos section
- Tap Done
- Choose Automation from the sidebar, tap the plus sign
- Choose Create Personal Automation
- Scroll down the New Automation list until you reach the Focus section
- Choose a Focus and tap on it
- From the options that appear, tap to select When Turning On
- Tap Next
- Under Add Action, choose Run Shortcut and specify the one you just created
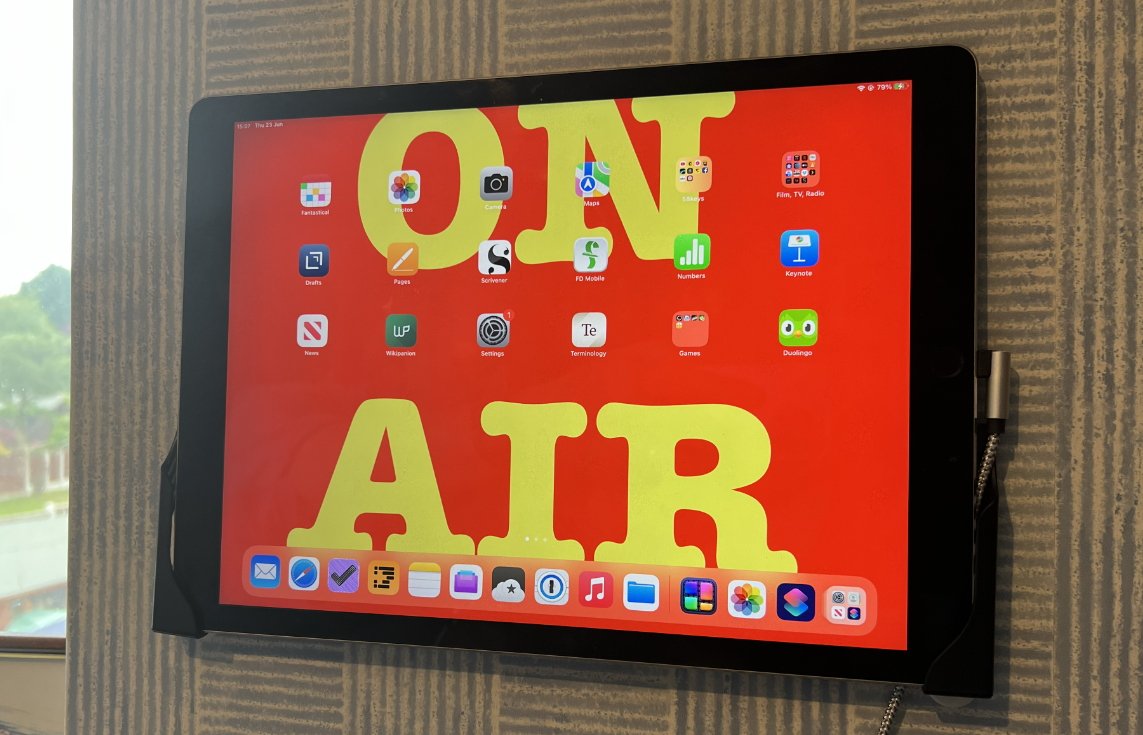
If you do this, then when you're on that iPad and you choose a particular Focus mode, the iPad's wallpaper changes to your red "On Air" poster.
That's not perfect. If your iPad is always running a Dashboard app, for instance, the wallpaper will change but nobody will ever know.
It's also a little ugly, with the poster sitting behind all of your app icons. But if the desktop is showing, the poster is large and clear.
The trick of this, though, is that it doesn't only work when you choose that Focus Mode on the iPad. You can choose it on any of your devices and it automatically starts on the rest of them.
So turning on a Focus Mode on your Mac will also turn it on for the iPad. Apple is so careful about potential misuse of its OS tools that it won't allow a Shortcut to be run remotely, even by you.
But it will allow Focus Mode to be changed.
Shortcuts is a great feature, but it's still flaky
It's possible that this just won't work. Sometimes during testing, AppleInsider would find that Shortcuts on the Mac stopped allowing us to edit anything, to the extent that we had to throw the Shortcut away and start over.
Shortcuts also gets very confused if you don't name your photos correctly. When it's just, say, IMG_3792, then it can end up that you have two of the same name.
They'll have other metadata differences, neither macOS nor iPadOS will get them mixed up, but Shortcuts will. So take the time to name them "On Air Off," for instance.
For some reason, and who knows why, more general failures in Shortcuts seemed to affect the When Turning Off option more than When Turning On.
At least, though, that means your On Air light is on for longer than you need, rather than turning off too soon.
Tidying up
Whether you drag the "On Air" poster from your Mac to the iPad screen via Sidecar or Universal Control, or whether you use Focus Modes, there is something left to do.
You need to switch all of this off again when you're done.
With Sidecar and Universal Control, that means dragging the image back — or quitting the image app. With the Focus Mode trick, you have to create a new automation.
This is set up the same way as the Focus Mode automation above, except for where you tap the When Turning On option. You've already guessed that you need to instead choose When Turning Off.
But doing that actually gets both on and off selected. So remember to tap to deselect When Turning On.


 Malcolm Owen
 Mike Wuerthele