How to publish ebooks on Amazon Kindle and Apple's Books using a Mac
 William Gallagher
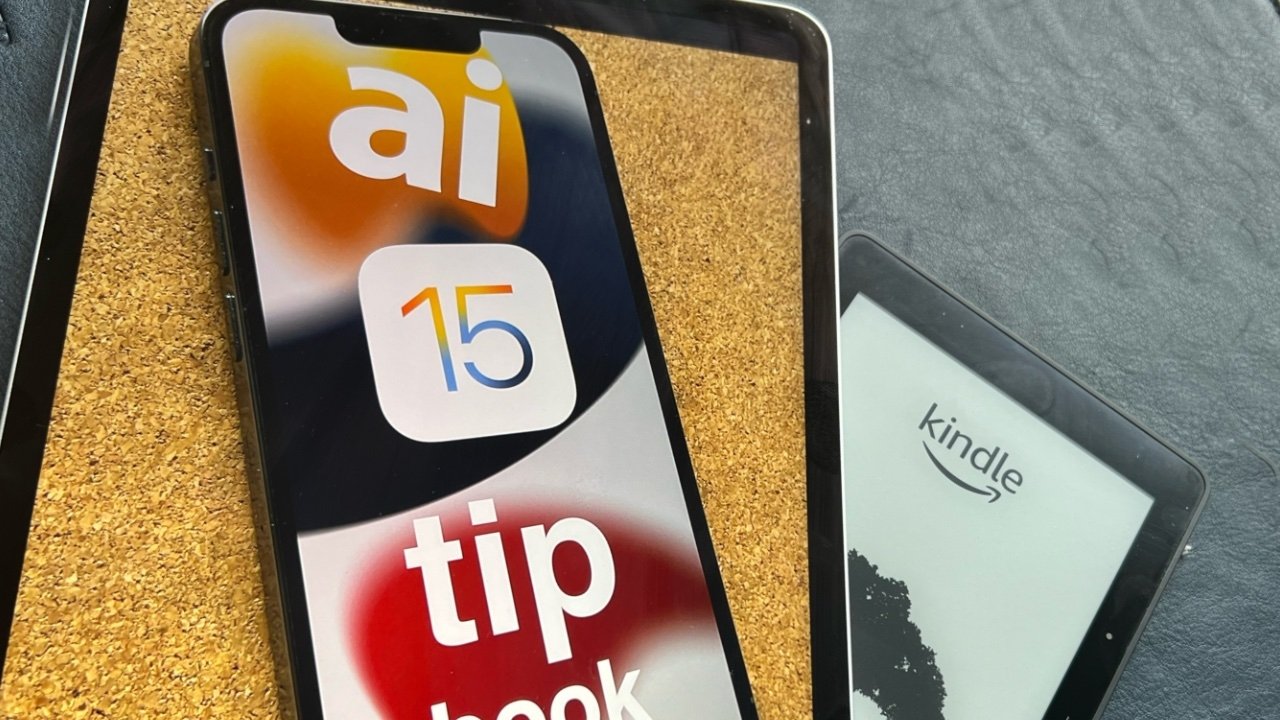
You have all the tools to create books on a Mac, and get them on sale on both Amazon Kindle and Apple Books. Here's what you need to do.
Kindles and iPads are great for reading anything on, even if that anything is just a report you've written for work. If you simply need to step away from your desk to concentrate on reading something, you can AirDrop a PDF or any document to your iPad, or you can email the same to your Kindle.
AppleInsider iOS 15 Tip Book
If you want to do more than that, though, if you want to make a more formatted ebook and sell it, you need to concentrate on three areas.
So this is a complete guide to creating and formatting books, to formatting and preparing them, and to all the stages of publishing. The processes change and develop over time, so to certain of telling you exactly what you can do and what you have to do, AppleInsider did it too.
Following every step described here, the "AppleInsider iOS 15 Tip Book" was published is now live on Apple Books and Amazon Kindle. Check out for yourself exactly what the result of these processes are — and along the way, learn much more about iOS 15 too.
- Writing
- Design and distribution
- Promotion
This is the same for all books, but if you're writing for a publisher, you can at least hope that they will handle the promotion. It becomes more important that you do promotion if, say, you want to sell a book directly on your website without using Amazon or Apple, but it's always part of the process.
And one important thing about the process. Start it now. Writing the book is going to take the longest time, but it is startling how long and how fiddly it is to upload your very first ebook to either Apple or Amazon Kindle.
You can't finish the job until you've finished the book, but you can create an account, fill out tax details, and so on.
Writing the book
We're not going to tell you how to write a book. You know that it's one word after another, and whatever process you have, however quick or slow it might be, the writing is entirely up to you.
What's not up to you is what you do with that writing when you're done. You must end up with a copy of your complete manuscript in one document — and it has to be in one of just a few certain formats.
There's Pages, for example, which is free, already on your Mac, and from which you can publish directly into Apple Books. Also, since the end of Apple's iBooks Author app, has been made ever stronger for writing and publishing ebooks.
If Apple prefers Pages then, similarly, Kindle prefers Microsoft Word. It will take other formats, and there are reasons to use PDF instead, but it is geared up for Word — and will keep telling you so.
Of course, though, you can write in Pages and then export your text in Word format. Amazon need never know that you haven't taken out a year's subscription to Word just to save one document.
And it's not as if Pages is some second choice, some lesser option. Pages is particularly good for ebooks because it contains writing and imaging tools that especially easy to use, leaving you able to concentrate on your text.
Only, if you are going to write in a different Mac word processor and then export to Word format, you could also look at the $50 Scrivener app, for example. This is a particularly fine writing tool that uses its own format as you write, but it can make a Word document at the end.
Book and book publishing apps
So you can write and publish a book using just the Pages app that comes on your Mac, or Word, or Scrivener, and one key reason to do so is that these may be very familiar apps to you. They may be the apps you always use to write, and the fact that you can use them to make your book is a bonus and a boon.
However, there are alternatives, there are more specialist tools that you can use making books, not for writing them first. They tend to be worth it most when you're doing many books, but they also remove a lot of the friction that both Apple Books and Amazon Kindle can throw at you.
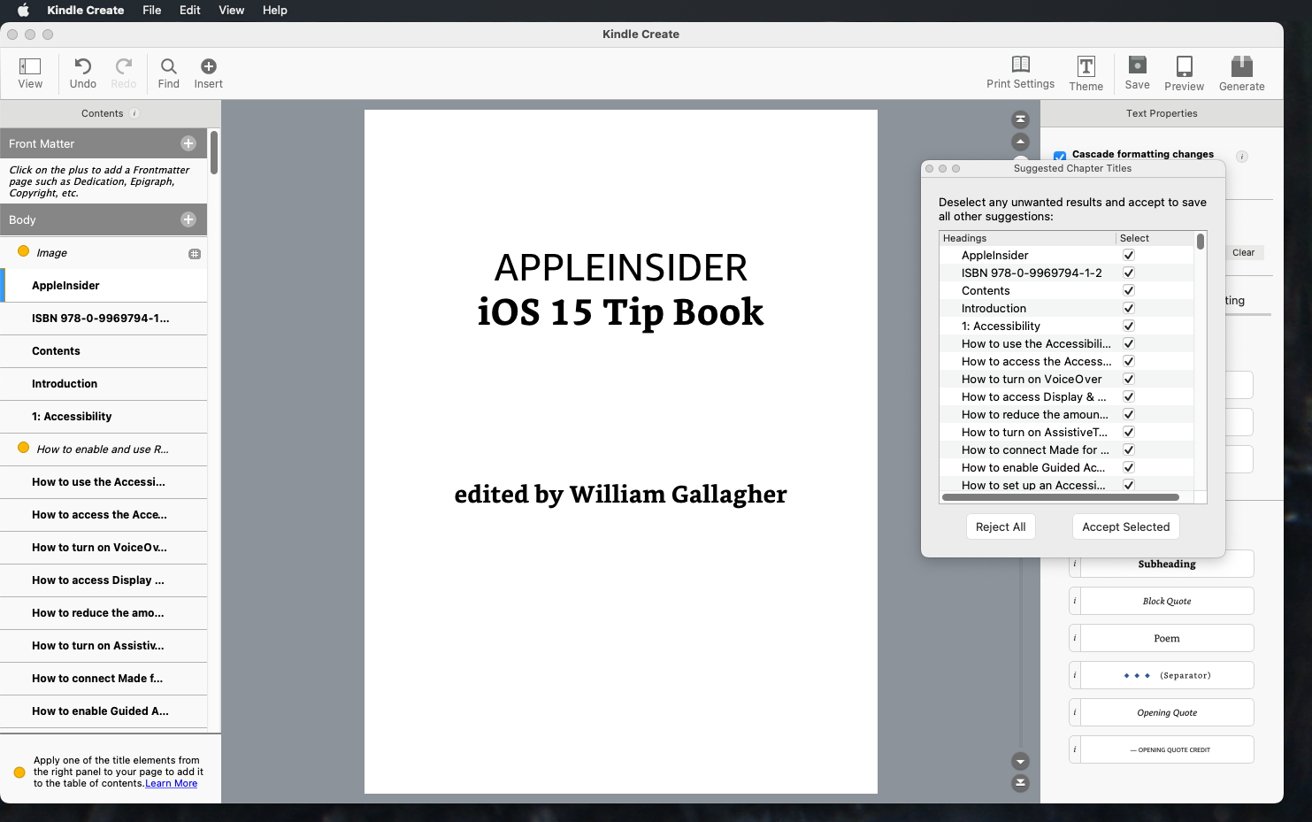
One option is Kindle Creator for Mac, which is a free download. It takes a Word document that you create in Word, Pages, Scrivener or anything else, and then prepares Kindle files.
If you've been using Macs for a long time, however, you won't like this app. Kindle Create for Mac will take you back in time to how Macintosh software used to be, especially Macintosh software ported over from Windows. It is not pretty, it is clunky, but it makes a book document that you can then readily upload to Amazon.
It's no use when you want to upload to Apple Books, but Vellum is.
Vellum is a Mac-only book production tool that offers only limited designs, but those designs are excellent, and the app does make producing books so simple that it's a pleasure.
Plus it produces ebooks for Apple Books, Kindle, Nook, and more.
The latest Vellum 3.3.1 has a free trial download, costs $200 to produce any number of ebooks you want, or $250 for any number of ebooks and print books.
It's not a casual purchase, and if you are just doing one book for your family, it isn't worth it.
Yet as well as producing gorgeously simple book designs, Vellum also feels like it skips over some problems that you get when creating books straight out of Pages or Word. AppleInsider created a new book specifically so this article could detail the latest steps and requirements, and there were unexpected problems.
Everything was solved and all of the solutions are here, but for a time the big mystery was why there had been any difficulty at all when last time, it was so easy. The answer was that last time we just used Vellum.
Using Pages to write an book
Nonetheless, not only do you already have Pages, but it is a far better app for actually writing text. You can write in apps like Vellum, but really just to make adjustments and corrections. For writing the whole book, Pages has the tools to make writing longform text much easier and better.
Before you've written the first word of your magnum opus, for instance, be sure to use Pages' Styles feature. Styles let you say that okay, right now this bit of text is a small subheading, but then later on change your mind and make it a chapter heading instead.
Truly, it is a pain writing a line of text and then clicking on the Format button, choosing a style from the list, then going back to writing the next sentence. But it's worth it later if, for any reason, you want to make any change.
If you've used Styles then any change of mind means one change in the book. One click in, say, the first heading and you can then change it to a different font, layout, or size, and simultaneously change every heading in the entire book.
Plus Pages does speed up the process, a little.
If you type a chapter heading, then through the Format pane tell Pages that it is indeed a chapter heading, all you have to do next is hit Return. Pages knows that the next line after a heading is likely to be regular or body copy, so it switches you to that style.
Automatic Table of Contents in Pages
There is a tremendous feature in Pages by which, if you have used Styles, the app can automatically create a contents page for you. It's superb for when you're sending someone the Pages document.
It's useless for Kindle.
And surprisingly, it's not very good for Apple Books, either.
Apple Books ought to pick up the Table of Contents (TOC) from your Pages document, but it doesn't. Not unless you ignore the Pages TOC feature and instead use the related bookmarks and links tools instead.
This is related in that, just as with the regular Pages TOC, it depends on you having used Styles to define what's a chapter heading and what's not. It just isn't as fast as the automatic TOC.
Making a contents page from bookmarks
- Click in a chapter heading.
- Click on the Documents icon at top right
- Then choose Bookmarks
- Click Add Bookmark
This creates a bookmark, a link pointing to this heading in this chapter. You then go through every chapter, or any other heading you want included in the TOC, and do exactly the same.
Once you've been through the whole book, you go back to the top, start a new page, and build up the TOC there.
- Write all of the chapter titles onto the page
- Select the first one
- Right-click and choose Add Link
- Choose Bookmark
- From the Bookmark dropdown, choose the one you want
There's no Done button, you just click away from the Bookmark dropdown when you've chosen the bookmark you want for this heading.
And then you go through doing exactly the same thing for each line in your contents page.
What you end up with is a list of chapters, where you can click on any of the and jump to that part of your book. This is what you need, because this is what will survive the move to Apple Books.
Making hard choices about the Table of Contents
You want a TOC. Amazon Kindle will actually warn you during the uploading process if you don't have one, but Contents handling is more of a dark art than it should be.
The Apple Books version made out of bookmarks won't cut it for Kindle, and nor will one created using Pages's own built-in TOC generator. In theory, the way to get a Kindle TOC is to use a form of bookmarks and links, but in practice unless you are actually going to edit the book in Microsoft Word, it's not reliable.
What is reliable for getting Kindle to show a TOC is to upload in PDF instead of Word, but don't do it. Even Kindle's automated process will throw up its hands and say fine, upload PDF if you must, but it will not look good.
Or rather, it might be okay with a book like a novel that has only straight text. When the formatting is in any way complex or you need to include images, then PDF will work but it will look horrible.
In the short term, it's better to not have a table of contents in the Kindle book than to put up with how a PDF upload results in image problems and altered page breaks.
Plus an ebook created in Pages with proper Styles and a TOC at the start - whether by the Pages feature or bookmarks and links - will show a contents page on Kindle. You just won't be able to tap to move to different chapters.
It's a good thing that people tend to read many books from start to finish, rather than skipping around. And it's a very good thing that Kindle remembers where you were when you last left off reading.
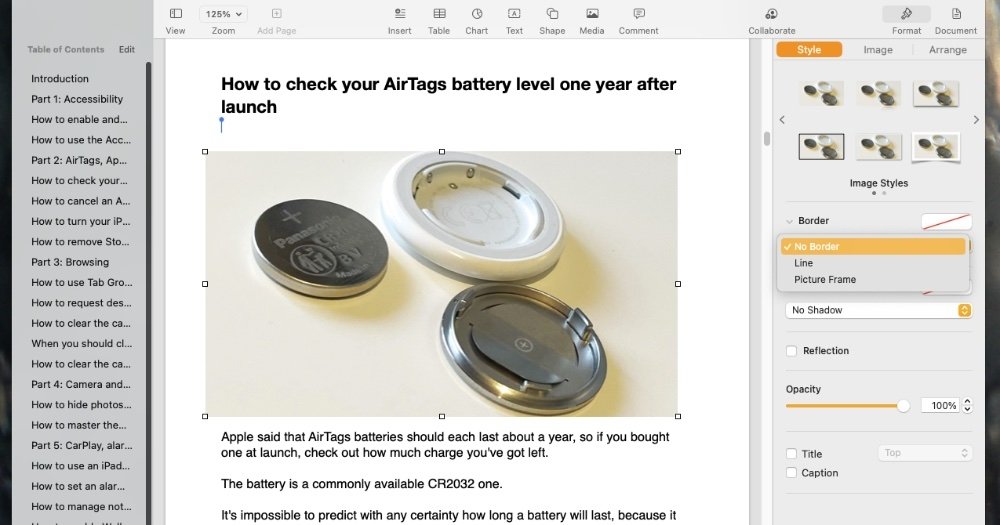
Images in Pages
Speaking of images, they are hard to do very well on Kindle, but they're useful - and they look great on Apple Books. And also in the Kindle app on iPad or iPhone, where they can be shown in their full color and full resolution.
There is also an important Pages feature to do with images, too. Again, if you're writing a novel with just straight text, you can probably ignore this, but for any book that requires illustrations, learn how Pages handles them.
That is partly so that you can see how you can drag an image to resize it, or how for instance you can paste an image inside some text.
But it's more significant than that. If you drag an enormous image into Pages and then drag to reduce it down to a smaller size, you will get what looks like a smaller image.
It will be the size you want on the page, it will go where you drag it. But it will only look like a smaller image.
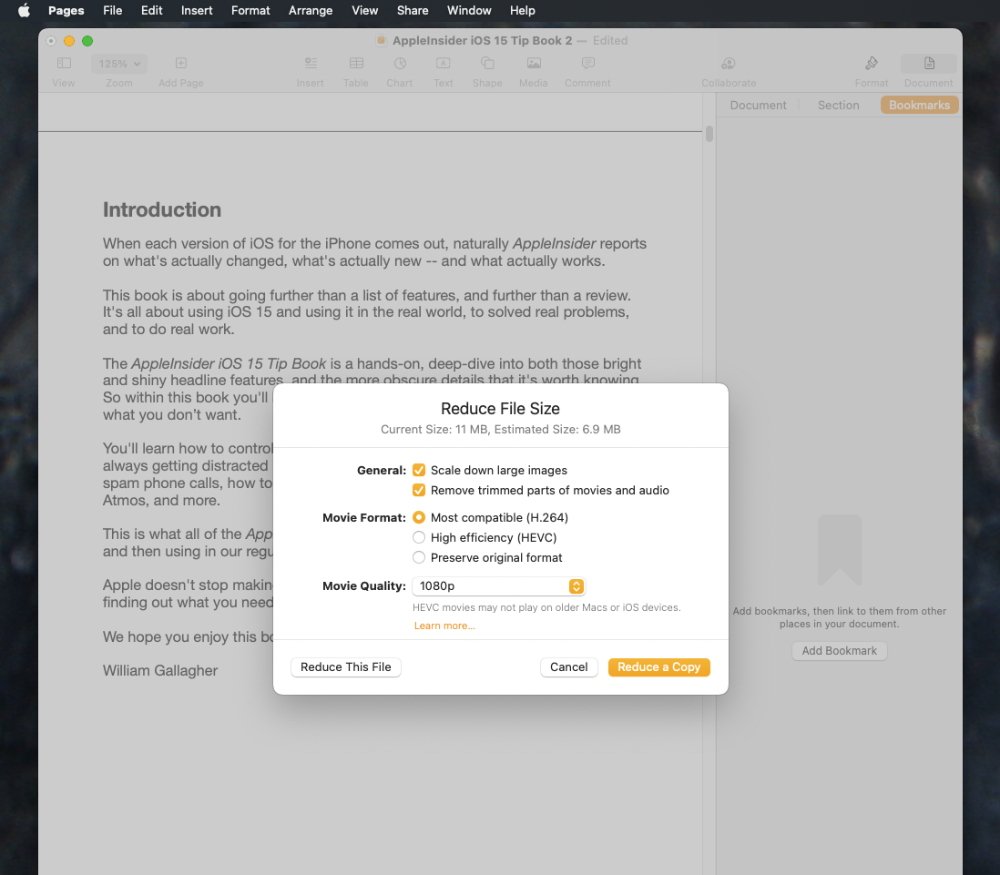
In reality, it is still that enormous original — it is still occupying the same space that it did when you first dragged it in. This adds up, and it means you can get a Pages document that is far too large for what it needs to be.
Neither Amazon nor Apple will object if you upload a large file, but that uploading will take longer and it's possible that certain automated processes will, too.
So when you've got all of your images in place in your Pages document, go to the File menu and choose Reduce File Size... There are many options here, but the basic defaults will get you a Pages document that looks the same, publishes the same, yet is a much smaller file.
Frontmatter and book details
Frontmatter is the name for everything written that goes before the main text in your book, so introductions and forewords, for instance. You just write the frontmatter as you would any other part of the book, but it's also best to keep a copy separately as you will use some of this information later in the process.
The most prominent example of this is the ISBN. You do not have to register your book and get an ISBN from Bowker in the US, but what that number does is say you are the publisher.
Without it, Amazon or Apple effectively becomes the publisher. It may make no practical difference, but keep ownership yourself and get an ISBN.
A single ISBN costs $125, or you can buy 10 for $295. If you do an ebook now and a paperback later, you'll need a separate ISBN for each.
Note that if you are going to have one, you need to get it before you are ready to upload the book to Apple or Amazon. Apple is clear that it will solely let you enter your ISBN the first time you setup the book, whereas Amazon looks to be more forgiving, at least letting you complete many other sections before entering it.
Similarly, just for ease of setting up, also write the rest of the book's details before you submit to the store. We'll take you through the steps to submit books to Kindle and Amazon shortly but you will make it an easier ride if you prepare these in advance:
- Book Title
- Subtitle (Optional)
- Edition Number (Optional)
- Primary Author or Contributor
- Contributors (Optional)
- Description
- Keywords
You'll spend longest on the description and the keywords, although you can come back to edit those at any point, even after publication.
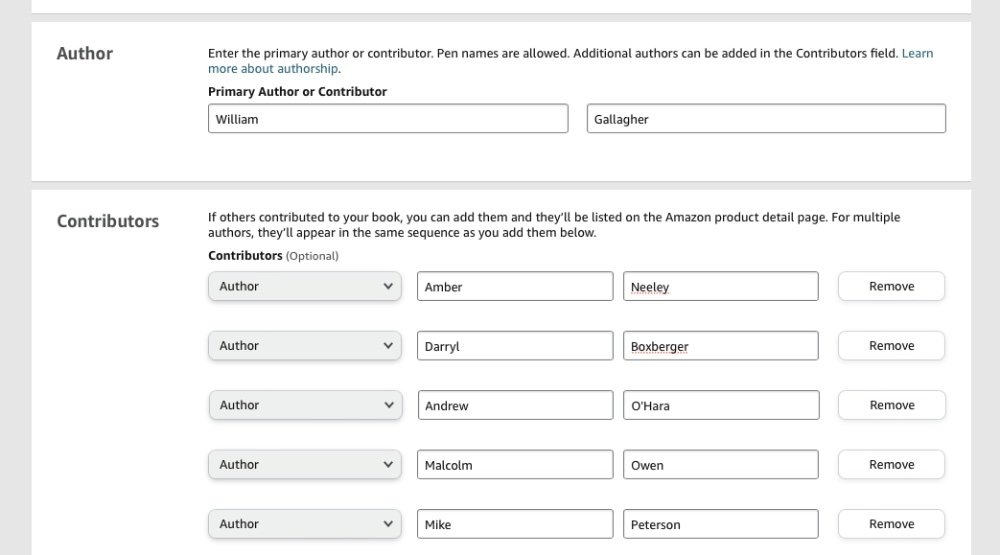
It's best to have thought of these things and written them in advance because it will take you a time, and when they're pre-written, you so swiftly go through the publishing processing copying-and-pasting.
There are some points you might want to wait until you are at the right stage in the submission, such as the publishing rights, the pricing, and the release date.
WIth publishing rights, you're saying whether you have the rights to publish this book because it's yours, or because it is in the public domain and therefore free. Typically the best release date is right now, as soon as possible.
That's because, frankly, no one's going to see it just because it appears on Kindle and Apple Books. There are too many books, and there are too many new ones.
So you can let the book come out immediately, knowing that it won't be noticed until you start promoting it. Let the book come out as fast as possible, then when you're ready with, say, a related website, start announcing the book as having been released.
Designing the cover
Every ebook has to have a cover and every ebook, paperback and hardback, faces the same core challenge. It has to be attractive, but it also has to be recognizable when seen as a tiny thumbnail in the Amazon Kindle or Apple Books stores.
Other than that, Apple and Amazon treat covers differently, and there are good and bad choices you can make.
Apple Books covers
If you don't do something to stop it, Apple Books will take the first page of your Pages document and make that be your book's cover. Trust us: do something to stop it.
Even if you have dragged a perfect image onto page 1 of your Pages document, and painstakingly figured out the right sizes to have it look the very best it can on your screen, Apple can ignore you. The front page does become the front cover, but it might be inset so that the final cover is actually white with a small image in the center.
So for Apple Books, prepare a separate cover image. Do it in any image editor you like, and we recommend 1,873 pixels high by 1,400 pixels wide.
That would be a good size for a regular paperback book, so it also looks good on a typical ebook. You can have different sized paperbacks which require different size covers, but if you know you need something different for your ebook, you probably know what it is.
Save the cover image in PNG format and keep it ready to upload when you get to the stage of submitting books to Apple and Amazon.
Amazon Kindle covers
Amazon Kindle has the extra concern that hardware Kindles display the cover in grayscale. So now your cover has to look nice in color full size and thumbnail on Amazon's website, but also good in monochrome and as a thumbnail on Kindle devices.
Kindle also requires the cover to be a separate file, you don't get the option to automatically use the first page. In this case, though, Amazon requires you to save the cover in JPEG or TIFF format.
Amazon does also offer a Cover Generator. With a few clicks, a cover can be produced for you using various existing templates and styles.
Don't ever do it.
Even if you defied the odds and happened to find a cover template that was just perfection for your book, dozens, hundreds, possibly thousands of other people have already used it. The chances of your book appearing in a search next to theirs is slim, but it's there.
And, not to knock Amazon's artists, but the generated book covers are rubbish. They practically have to be: they are artworks designed to be appropriate, or at least not obviously wrong, for utterly countless different books.
You could create the cover entirely by yourself, using any image or art app you have on your Mac. Or you could look for local artists and brief them on what you want.
Submitting the book to Amazon Kindle and Apple
From here, the two services are remarkably similar: they need the same things from you, and they will take about the same amount of time to publish the book online.
Or rather, they will take the around the same time to publish your book once you've done everything else about setting up as a publisher on the services. In that case, the time they take can vary enormously and frustratingly.
Setting up as a publisher
Even if you never plan to have a sequel, you are now a publisher and you have to be registered as such with the two services. It's free, but it's mandatory, and it can also be quite involved.
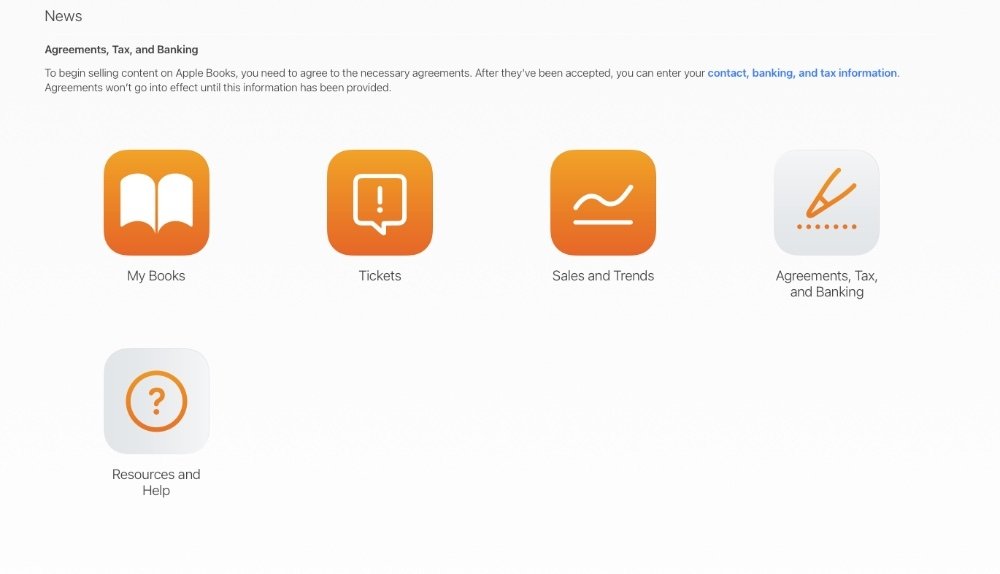
For Apple Books, you need a free iTunes Connect account. You can get details of how to do that on Apple's authors.apple.com site. For Amazon Kindle, you need a Kindle Direct Publishing (KDP) account, and Amazon, too, has details of how to sign up for free.
Note that Apple Books requires bank and tax details before it will allow you to upload books. And note well that it can take Apple up to seven days from your entering this detail to your being able to upload to Apple Books.
Only, that's up to seven days from when you have correctly entered all of the required information about your tax status, your bank details and so on.
Plus you will get confused by Apple Books. For all the glossiness of the Apple Books Store, behind the scenes it looks like a hotchpotch of ancient database software. Just for one example, you are likely to enter a lot of tax details before you realise that you're really just entering it into an elaborate search box.
There's also that iTunes Connect is surprisingly delicate. If you are based overseas but you need your account to be an American one because that's where you usually are, iTunes Connect can wobble.
If it hasn't happened to you, or if it doesn't happen to you the next time you try uploading anything, be very glad. Somehow iTunes Connect can get stuck in a loop of not recognizing Apple IDs that you try to log in.
But.
If you have the Apple ID and password you want to use as a publisher, if you have all of the tax details ready, then it's reasonably easy to go through the steps with Apple Books.
And when it isn't, when it is going wrong, there is a workaround. Ideally, you do everything about submitting a book to Apple Books directly from Pages on your Mac — but you can do the same thing from Pages on iCloud instead.
Submitting to Apple Books
There are a couple of ways to upload your book to Apple Books and, if it only worked every time, the best is to publish directly from Pages.
- On your Mac, open Pages
- Open the book
- Choose the File menu, then Publish to Apple Books...
Pages documents that you want to publish on Apple Books have to be stored in iCloud Drive. But if yours isn't, your Mac will now tell you so and offer to move it there.
Let it do so and then follow the prompts to log in to iTunes Connect — if it lets you. Obviously it should, obviously if you have created an iTunes Connect account with an Apple ID, then logging in to this service with those details should be fine.
Only, sometimes it isn't. Maybe it's a problem with Pages, maybe it's just that the wind is in the east, but sometimes logging in from within Pages will fail with a timeout.
The one thing it can't be is a problem with Apple's iTunes Connect servers, because when it goes wrong in Pages on your Mac, that's when you try it in Pages on iCloud and it works.
Go to icloud.com and sign in. Then click to open Pages.
Since your document has to be in iCloud Drive before you can publish to Apple Books, it's easy to click on Browse, and then find your book. Open it up in Pages right there in your browser.
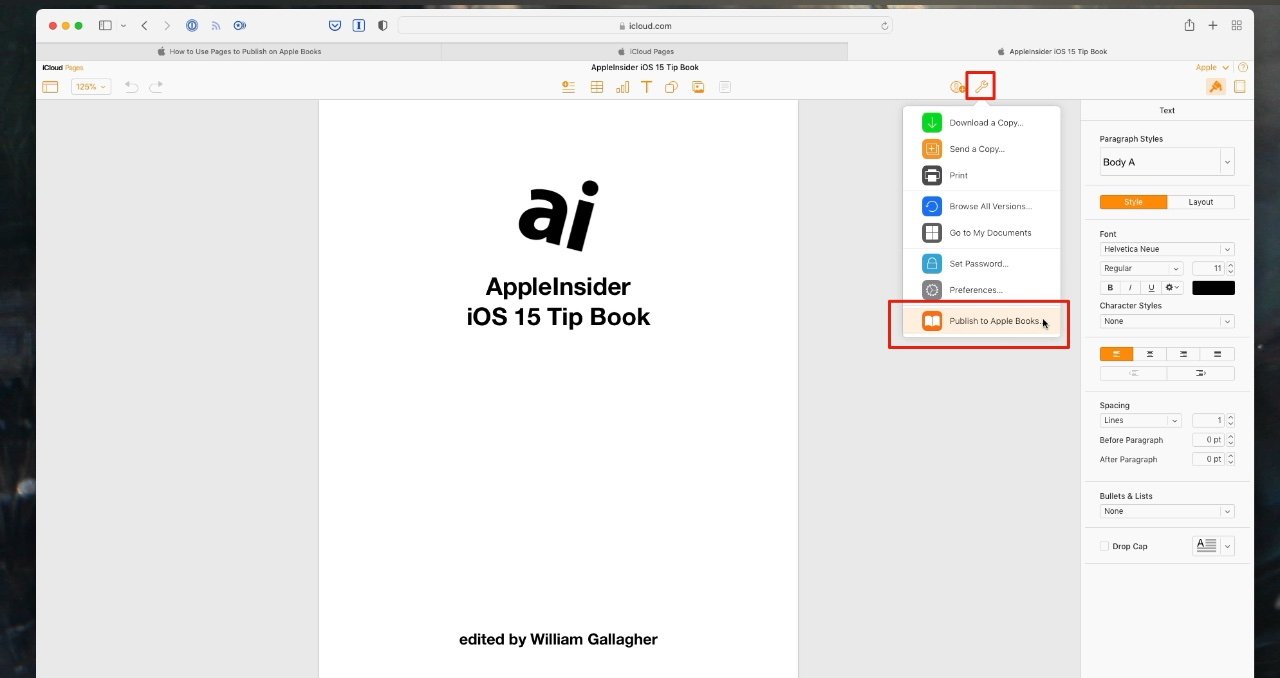
Click on Tools, the icon of a spanner toward the top right of the document screen. From the dropdown that appears, choose the bottom one, Publish to Apple Books.
Whether you go via iCloud or the Pages app on your Mac, you end up signing in to Apple's iTunes Connect service. You can instead skip Page and go straight to iTunes Connect and upload a file directly.
If you do that, it's best if the file is in ePub format, as you would get from a production app like Vellum.
Either way, once you are in iTunes Connect, you can work through adding in all of the details such as title, description and so on. This part is simple enough — until you reach the price.
Submitting to Amazon Kindle
- Go to kdp.amazon.com and log in
- Click on the Create button
If you can't see a large, yellow Create button, you may be in a different section of Kindle Direct Publishing. In the menu at the top, click on Bookshelf.
That will take you to a page that shows the Create button, plus any previous books you've worked on.
Remember that for Amazon Kindle you need one Word document and one JPEG cover image. With everything ready, you can quickly work through the steps — until you get to pricing.
Pricing for Kindle and Apple Books
There are people whose careers are spent in pricing, it is that complicated a subject. Fortunately, it's complicated enough that you're unlikely to figure out some incredibly perfect price, so you might as well just pick one that seems right.
See what other books like yours are charging, and also remember that you can change the price at any time you want.
Though speaking of price changes... Amazon Kindle operates an algorithm that starts with what price you've chosen, then works through some alchemy to come out with a different figure.
Presumably that figure gives Amazon a cut of your earnings, but good luck figuring it out. There are tales of people spending hours trying different suggested prices in order to make their final product come out as $9.99.
Things are simpler on Apple Books where you set a price and it's sold for what you set.
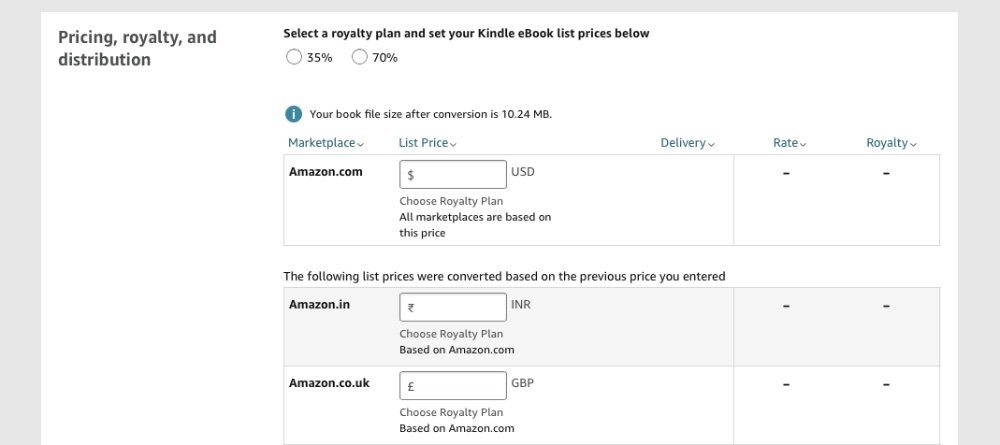
Also, Apple will take 30% of your earnings and there's no option, no negotiation. That sounds bad, but Amazon instead dangles a tricky choice in front of you.
You can elect to earn either 35% or 70% of your book sales, and naturally you know which you would prefer. But choosing to keep most for yourself comes with limitations, including how in some countries Amazon will ignore your setting and take the fuller amount.
That's down to tax and other financial considerations in the various countries, but wherever you publish, you can only earn the higher amount if you own the book. Reprinted public domain titles won't get it.
Also, the book currently has to be priced between $2.99 and $9.99. There are other considerations, too, but your head is spinning now.
Short version: if you are okay with selling the book between those prices, choose the higher royalty percentage. If you're not, choose the lower.
Lastly, Apple and Kindle both sell worldwide but fortunately you don't have go through this complication for every currency in every country. Instead, you can choose to set the US one and let Apple and Amazon figure out the nearest equivalent for everywhere else.
Once you've gone through the steps, you get the opportunity to proofread your book on screen. Do it. You will find mistakes you missed.
After that, once you've clicked the last button, your book goes off to Amazon and Apple to be checked over. They both say it will take about 72 hours before your book is on sale, and generally speaking, they are both being conservative as it will typically be faster.
You're not done yet
Maybe we should've said this before you wrote an 80,000 word novel. But there are good and bad reasons to self-publish an ebook.
The worst reason is because it's easy. It certainly is and you can have a book on sale very rapidly.
But having a traditional publisher doesn't just mean you can forget all of these details and simply email them your manuscript. It means having a firm and an editor on your back, a firm and an editor that knows this business better than any else.
That can improve your writing, it will improve how your book is marketed.
Except you'd be surprised how some publishers will put a book out with no publicity, no marketing effort. You may not be surprised to learn that even when they do promote it, they are leaning on you to give interviews and talk the book up.
If they're going to leave that to you anyway, you could just go do it all yourself. But the best reason for doing an ebook from your Mac is that you can write a book for a niche audience, and you can write it the way you want.
Just remember that even niche audiences of people with extraordinary interest in your topic, won't buy your book if they don't know about it.
So tweet about your book, blog about it. Or perhaps you can write an ebook such as the "AppleInsider iOS 15 Tip Book," and then write about it in a feature.
Remember, too that the "AppleInsider iOS 15 Tip Book" isn't just some example idea. It's a real book, now available for $2.99, on both Apple Books and Amazon Kindle.


 Malcolm Owen
 Christine McKee
 Amber Neely