How to make an external bootable working drive in macOS Ventura
 William Gallagher
When something goes wrong with your Mac, it's a boon to have a separate, external drive that you can work from — but Apple no longer makes that easy. Here's how to do it.
The short answer to how you make a bootable external working drive is very, very carefully. You're going to completely wipe that external drive, for one thing, so you really need to be sure that you've copied off any important data from it.
It's also possible that if you make a mistake along the way, it's conceivable that you could end up wiping your Mac's internal drive. It's possibly fortunate, then, that Apple throws many hurdles in the way to stop you making a macOS Ventura external bootable drive.
Or rather, it really wants to stop other people making such a startup drive and plugging it into your Mac. Apple has taken steps to secure your Mac from bad actors, it's just a shame it means you have to go through two broad steps to make this work.
- Allow your Mac to boot from external drives at all
- Prepare a bootable external drive
That first part is crucial, and it is crucial that you do it before you have any problems. For if your Mac won't startup, you cannot get in to enable booting from an external.
So this is something to do now, while your Mac is running fine. And the way you do it depends on whether you have an Intel-based Mac, or an Apple Silicon one.
How to allow external startup drives on Intel Macs
Intel Macs come with a T2 security chip which blocks what might be unauthorized access to your Mac. To allow the use of an external drive on an Intel Mac, you have to:
- Restart your Intel Mac
- Hold down Command-R the moment you see the Apple logo
- When prompted, choose your username from the list shown
- Enter your admin password for that user
- From the menu bar, choose Utilities, Startup Security Utility
- Log in
- Click to select Allow booting from external or removable media
How to allow external startup drives on Apple Silicon Macs
It's the same principle, but telling an Apple Silicon Mac to allow external drives takes a different process.
- Shut down the Mac
- Press the power button and keep it pressed
- Let go when you see one or more drives and an Options section
- Select Options and click Continue
- When the Mac boots into Recovery Mode, select a Mac user you know the password for
- Log in as that user
- Ignore all of the options in the pop-up list and instead choose Startup Security Utility from the Utilities menu
- Click to select the Mac's internal drive and then click Unlock
- Follow the prompts concerning passwords, and select Security Policy
- In the Security Policy window that appears, click to select Reduced Security
- Then click OK
- Under the Recovery menu, choose Shut Down
How to create an external, bootable work disk with macOS Ventura
First, choose your external drive. It is in your best interest to use the fastest drive you can for this. Make sure you've copied off any data from it that you need.
The drive you select can be spinning metal or an SSD, but inexpensive flash drives are a bad idea.
You can make some of them work, but you can't tell if it will work completely, until you get through the process. USB sticks labeled "portable SSD" or the like are probably fine.
You can't boot from a RAID array of any sort either.
With a compatible SSD or a hard drive, you need to format it and then to put macOS Ventura on it.
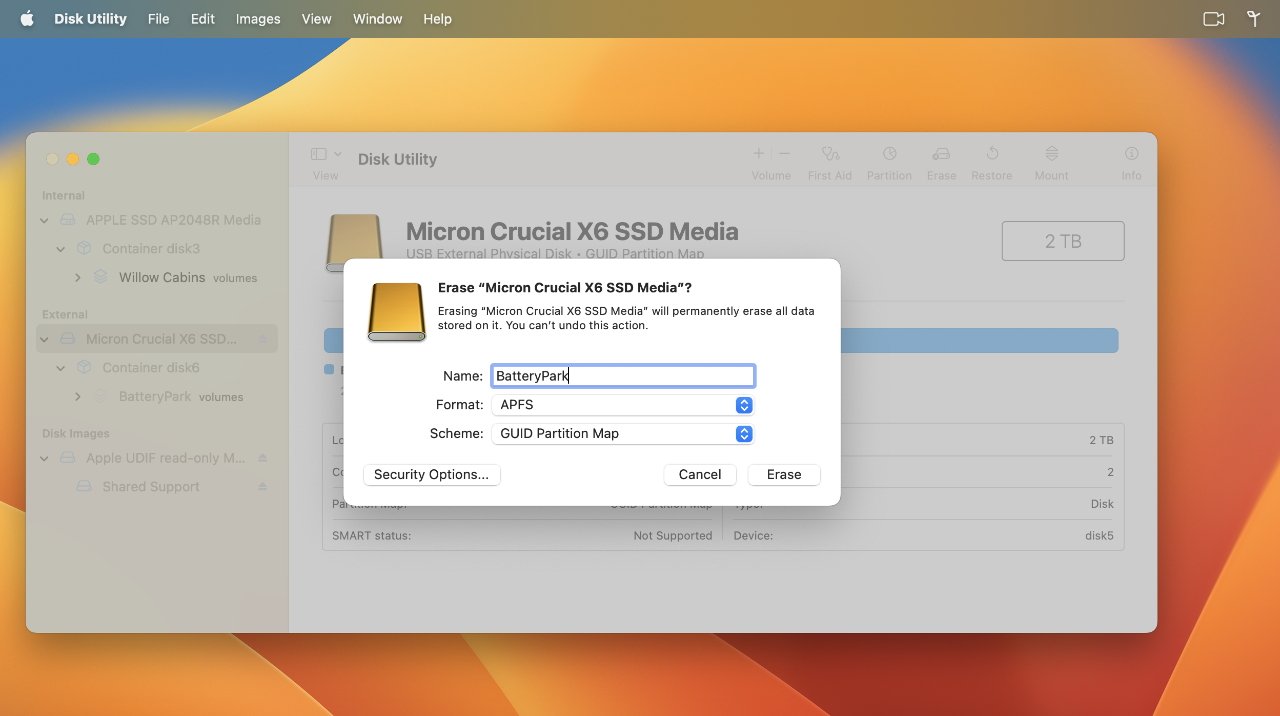
How to format an external drive on macOS Ventura
- Connect your external drive to your Mac
- Open Disk Utility in Applications, Utilities on your Mac
- Carefully select the external drive from the list that appears
- Click on Erase
- Give the drive a name
- From the dropdown menus that appear, choose APFS
- Click on Erase
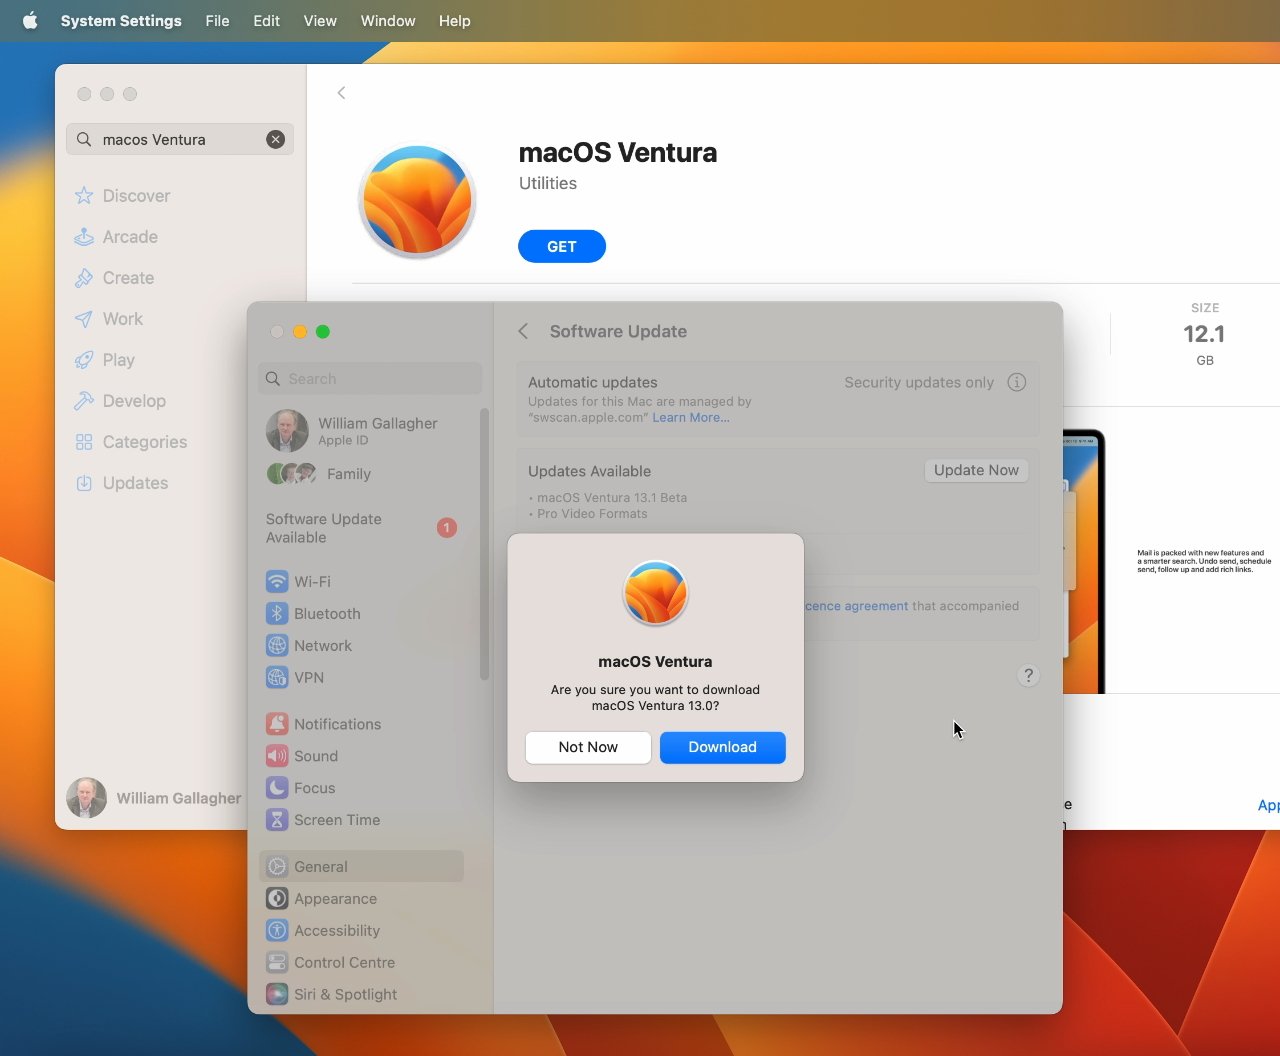
This will take a few moments. While that's happening, get macOS Ventura from the Mac App Store.
Apple doesn't list it directly, but if you search the Mac App Store for the words "macOS Ventura," it will be one of the results. Click on View to see more details, then click Get.
If you're already running Ventura on your Mac then what will happen next is that you are bounced over to System Settings and Software Update. At first, this looks like you're updating your current Mac, but wait a moment.
After a short while, a popup dialog asks whether you want to download macOS Ventura. Click on Download to say yes.
Once it is downloaded — and it's just over a 12GB file — then the update will run and prompt you to let it install Ventura. If your external drive is formatted by now, follow the prompts to install Ventura — but be exceptionally careful to make sure you select the external drive.
After several minutes of preparing the external drive, your Mac will ask you to restart it. Even though you are not installing Ventura onto that Mac's own drive, you still need to let it restart to work through the process.
You now have an external startup disk with macOS Ventura on it
Strictly speaking, you're done once you've let the installer do its work on that external drive. In practice, you're also going to be prompted through half a dozen or more questions about, for instance, setting up Siri.
You can skip through most of these, even if sometimes it's as if Apple hides the "not now" button.
What you can find after you go through this the first time is that, yes, you have an external startup disk and you have started from it. But it also then launches the macOS Ventura installer.
If it does, just quit that installer.
Making that external startup disk useful
If you're using an external start up drive because there's some problem with your Mac's own internal one, the odds are that you need to start by copying off any data from that failing drive.
That means that you need an external drive with enough capacity to take all the internal drive's data. Or at least large enough that you don't have to copy off data just a few gigabytes at time.
So a fast and a large drive are good to have. But since you will hopefully not need this external startup disk every day, you can settle for the fastest and the largest that budgets allow.
If you are only using this to effect repairs on the internal drive, you could keep a copy of the Install macOS Ventura app on it. Run Disk Utility that from the external drive and you can reformat the internal drive, then reinstall Ventura.
When you need to use it for more than emergencies, though, you do need to prepare more. Logging into iCloud is a must, in that case. Or, maybe you have a set of applications your company uses, in which case keep copies of those on the external drive so that you can install them when you need.
And if it's not a question of repair, but rather a question of booting from the external drive more often, you need to set it up the same way you would any Mac.
In that case, if you know that's what the drive is going to be used for, then the best step is to answer all of the Install macOS Ventura app's questions. Do all of those either through the install process, or later by stepping through System Settings.
Apple has made it so that bad actors can't easily boot your Mac. You can make it easy so that you are able to boot it, and work from that external startup disk too.


 Malcolm Owen
 Andrew Orr

 Mike Wuerthele
 Christine McKee