 William Gallagher
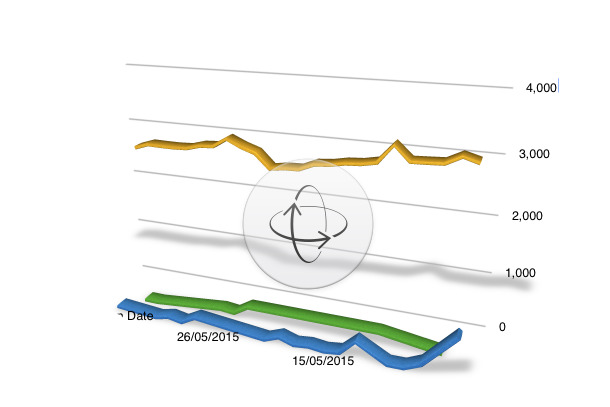
Numbers is still seen as a lite version of Excel but Apple's spreadsheet is exceptionally powerful — it just keeps as much of that power hidden away as it can. AppleInsider adds up all the time-saving benefits that are just a click away.
We are all so used to how Excel works — and how Lotus 1-2-3 did before it, how everything back to the original Visicalc functioned too — that we can miss the fact that Numbers is different.
It's typical Apple design in that it appears so simple that you assume it's limited. Then the basics of using it are typically so obvious that you just get on with what you need to do. That's a rather remarkable fact, that a spreadsheet can be made obvious, but instead of appreciating Apple's design, we don't think about it at all.
Sheets and tables
In all other spreadsheet apps, you get a sheet to work on. You might add another one, two or even hundreds, but at any given time, what you see on screen is a single sheet. Your screen holds a single spreadsheet and it's filled with empty rows and columns.
In Numbers, you get tables instead. These are spreadsheet occurrences: you can have as many tables as you like and they each work as separate spreadsheets. At the top of the screen you could make a 10 x 10 grid and then next to it a 15 x 15 one for something else.
It makes little difference to you when you're using Numbers as a tool for yourself but when you need to show other people, it can be significant. Where Excel and the others will show you a chart by popping it over the grid of cells, Numbers just puts the chart next to a table.
Rather than a sea of empty cells, you make the Numbers tables be exactly the width and height you need for your data.
It's easy for you to see what you're working on and it's simple for other people to both grasp and be certain that they're seeing all they need.
Plus this means that Numbers requires fewer steps to make a presentable or appealing document. There is more you can do, though, and it's again something that you don't think of if you're used to other spreadsheets.
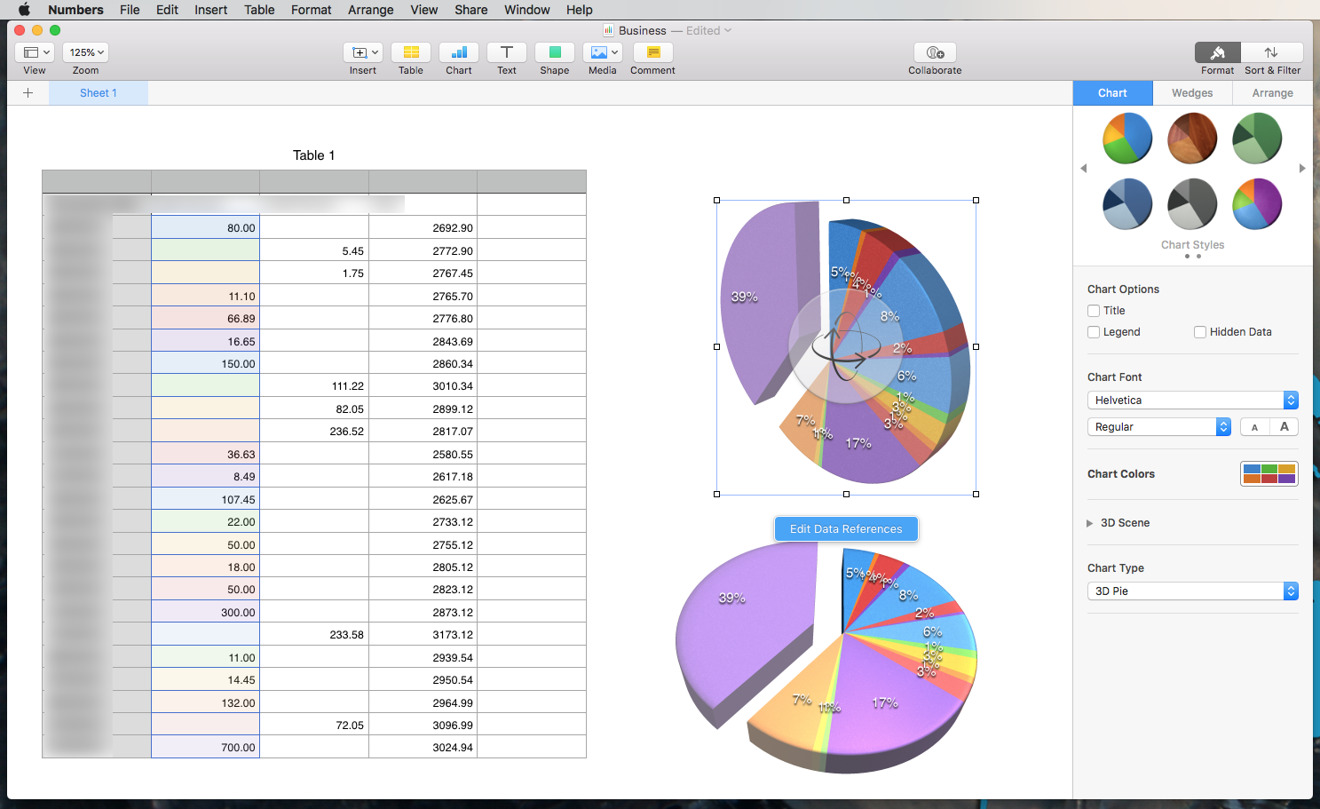
For instance, you'll know that you can change a chart by going back to the figures and altering those. In Numbers, though, you can click on a chart to get an option to Edit Data References. Click on that and then every line in the table gets a color label. Click on any part of the chart and the relevant line of figures is highlighted.
It's a fast way to see where a particular number is on the table when something looks wrong. When you've got all the figures right, though, you can then do more with the chart itself.
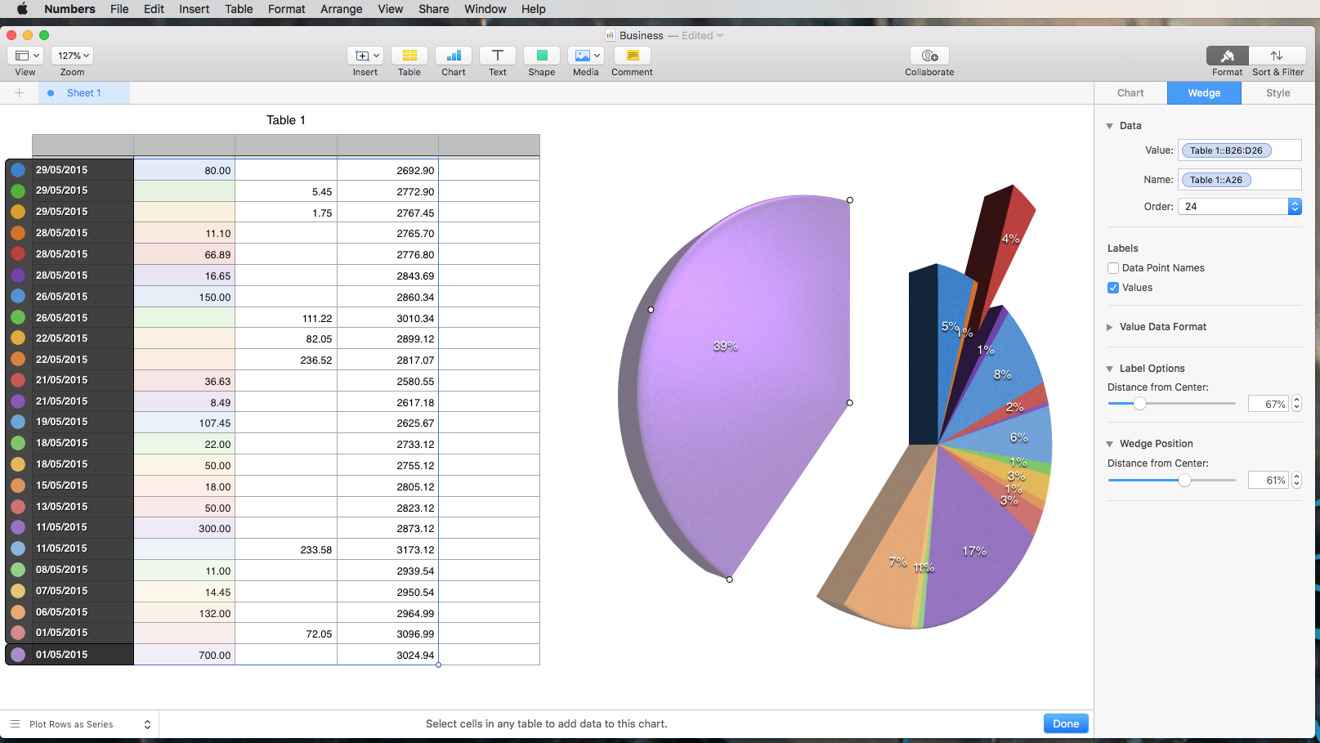
Click once to select it. Then double-click on a segment such as part of a pie chart. If that double click is on the label then you'll get options for altering the appearance of that.
However, if you double click away from the label, the segment itself highlights with grab handles. There are four handles, arranged equidistantly around the segment, but they all do the same thing. They let you drag the segment out from the chart. It doesn't matter which handle you grab and drag on, the segment moves.
It would be good to be able to make a segment bigger for emphasis but you can't. Except that if you click and hold in the middle of the chart, you can then rotate the entire piece and affect what's emphasized.
You can't change the segment size without altering the numbers behind it but you can present the exact same chart in ways that emphasize or reduce points for you.
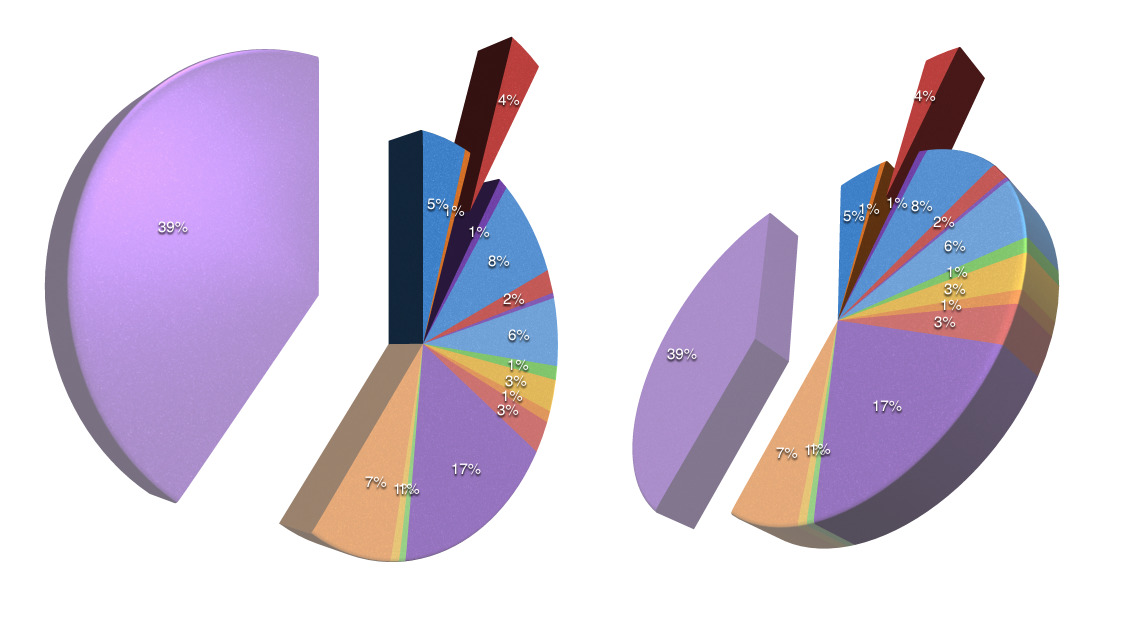
Not that we're saying you would choose the chart that best backs up your position, but you can. You can do it by pulling out segments from a pie chart like this or just going through the 27 possible chart types.
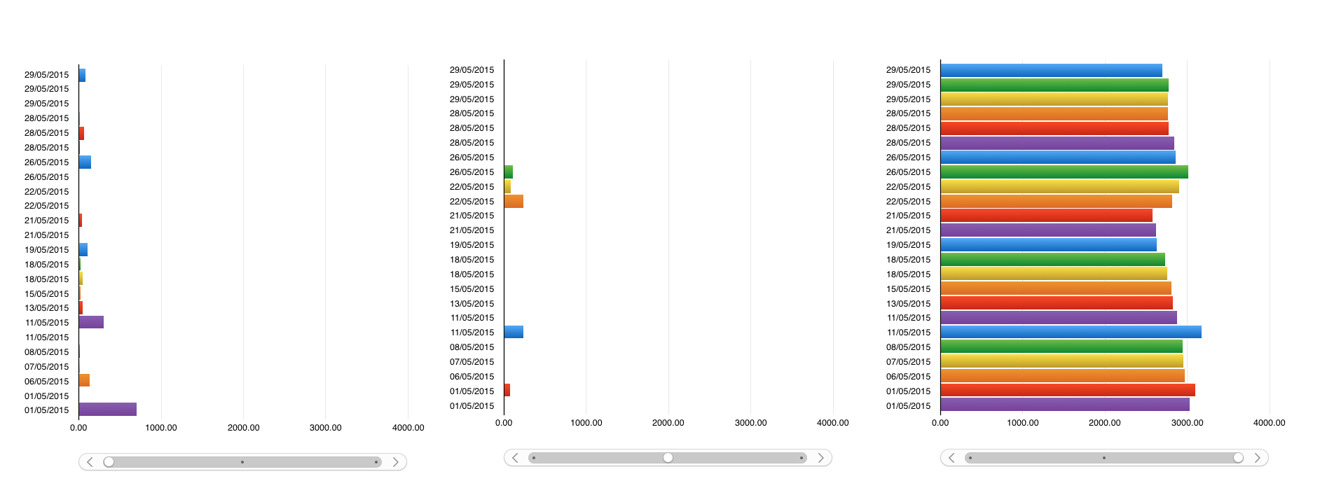
Those 27 include several that are interactive: you get the chart plus a slider that shows the data over time.
Keyboard shortcuts
To increase the number of rows or columns, you can click on the icons at the edges of the spreadsheet. However, if you're currently typing into the bottom right cell, you can use the keyboard instead.
Just press Tab and you both create an extra column and move the cursor into the new bottom right cell.
Or press Return and you've now got an extra row with, again, the cursor moved to the last cell.
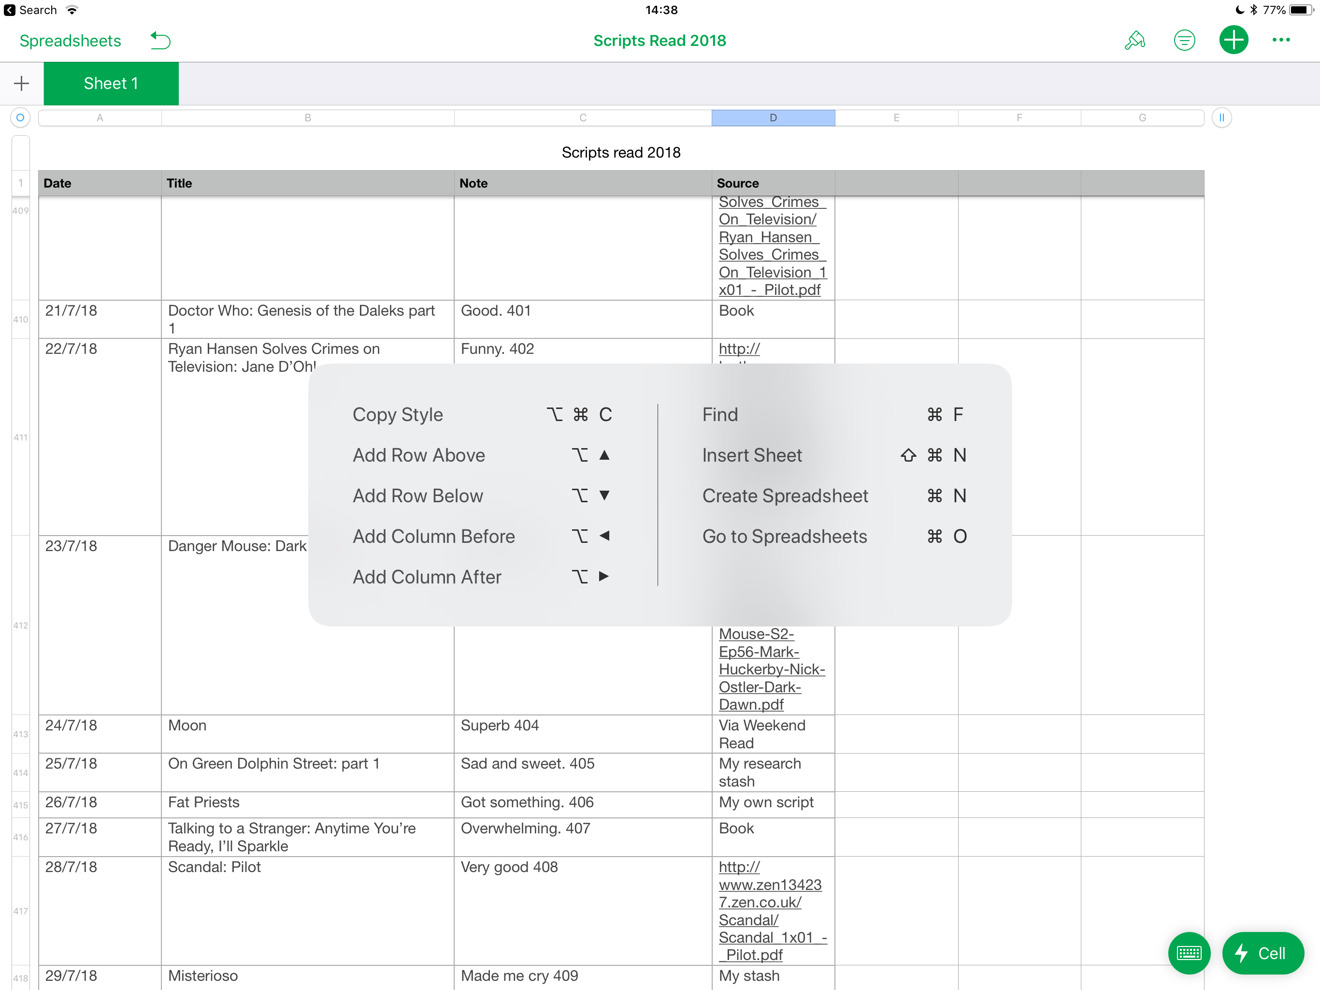
These same shortcuts work on Numbers for iPad, too. If you have an external keyboard for your iPad, hold the Command key down for a moment and you'll see a list of the most commonly used keystrokes.
Header columns
You can freeze a column or a row so that it stays where it is even as you scroll down or across through everything else. These are called header columns or rows and are handy for when you so much data that the sheet necessarily scrolls off the bottom of the screen.
Only, there's a limit of how many header columns or rows you can have. The maximum number is five and though that should be plenty, you can very easily create them without realising.
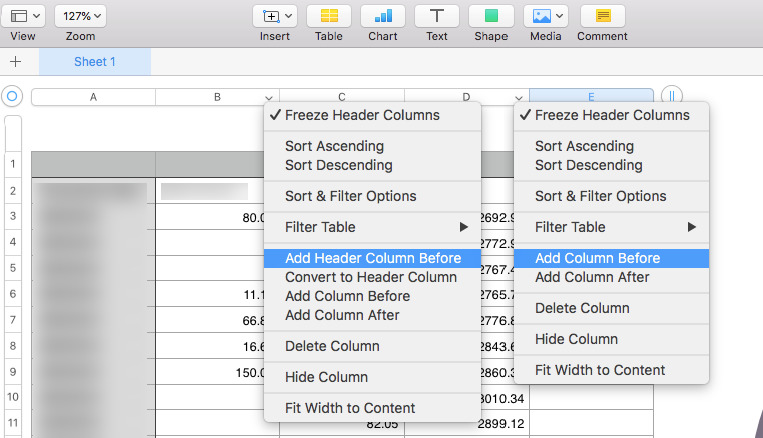
When click on a column, say, and then on the arrow that gets you a dropdown menu, it's remarkably easy to choose Add New Header Column Before because the menu changes.
If you click on a dropdown arrow on any column that isn't a header one, the option reads Add Column Before instead. Every Numbers spreadsheet has a header column, row A, so if you don't set one and haven't even heard of them, you get this difference in the menus.
This means the first time you become aware of header columns could be when you've accidentally created five. In that case you continue trying to add another column and can't see why it won't happen. There's no warning dialog when you do this, so you have to know.
Oddly, there is an option called Convert to Header Column but there isn't the opposite. The only way to undo having created a header column is to select all of the cells and paste them into a regular column. Then delete the header one.
Give people options
When it's just you working on the spreadsheet, that kind of fiddling between header and regular columns is a mild pain. When you're instead creating a spreadsheet for other people to fill in, you need to make all as simple as possible for them.
Even if it's their job to enter data into your sheet, you can still make the difference between them enjoying it or finding it a chore. You can make the difference them being accurate or not, too.
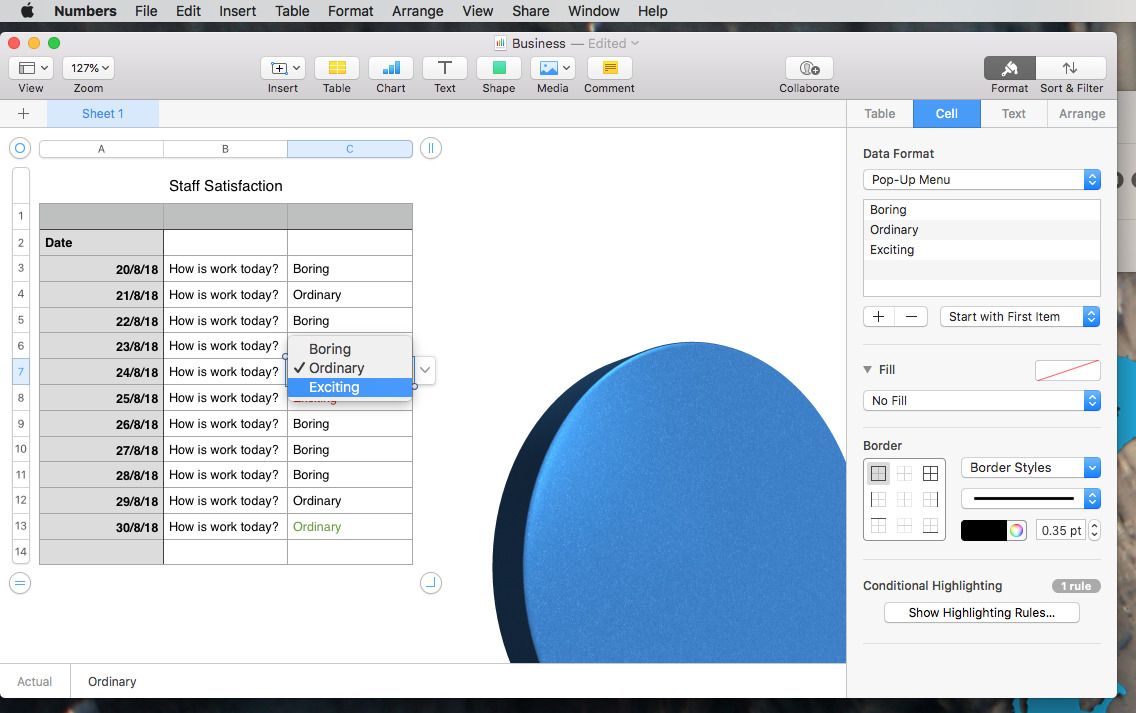
Click in a cell or in a column. Then click the Formatting button and choose the Cell tab. UnderData Format you can choose Pop-Up Menu.
By default, this offers you three options that you can retitle to anything you need. You can also add or remove options.
However, you can then also apply conditional highlighting. Give people a set of pop up options they can choose and then have the sheet automatically change the color or font of them.
This means you and they immediately see important details but it also means they can't mistype what they enter. So you know the sheet is as accurate as it can be.
Do use Numbers for text
That example of pop-up menus and conditional formatting is of text in a staff survey form. Text. Usually if you show us a spreadsheet that's just text, we shake our heads and start telling you that you should move to a database.
However, there are times when Numbers is the right choice for text.
For instance, we worked with a large table in Apple Notes — that's a table in the regular, word processing sense instead of Numbers' version of a spreadsheet — and it was a problem.
After perhaps 60 rows of data, the note became slow to open and prone to crashing.
We moved that same data over to a Numbers spreadsheet where it's currently holding just under 450 entries with not the slightest hiccup.
We should still move it to a database. Yet Numbers is so simple to use, it has such well-designed extra touches and it's so reliable that it's irresistible.
Keep up with AppleInsider by downloading the AppleInsider app for iOS, and follow us on YouTube, Twitter @appleinsider and Facebook for live, late-breaking coverage. You can also check out our official Instagram account for exclusive photos.


-m.jpg)


 Malcolm Owen
 Amber Neely


 Oliver Haslam
 Thomas Sibilly


-m.jpg)


18 Comments
I love Numbers. I've used Excel since it first came out on the Mac back in the '80s, through a couple decades on Windows for Intel and Alpha, and have learned to loathe the ribbon and user-hostile interface it has. However, I do have one gripe, and one hidden power feature not touched on above, regarding Numbers.
First, the gripe. Numbers has never had pivot tables. In the iWork 9 version of Numbers, it had Table Categories, and that was a brilliant way of viewing the same detail. Sadly, that was stripped out during the iCloud-enabling rewrite and no longer exists. I'd love for Table Categories to come back!
Not mentioned above: when laying out your sheet full of tables and charts and pictures and text boxes, you can easily arrange things that don't print out well. Turn on your rulers and drag guide lines to match your print space so that you can be sure to place elements where they'll not be ignominiously chopped up in little bits when transferred to paper or PDF. Just calculate your print space as your paper size minus your margins (top + bottom, or left + right) and divide by your print scale factor. I've not found an automated way to do that -- perhaps Apple could add such a feature?
Oh, one more gripe. (Sorry.)
32,768? Really Apple? These machines have gobs of virtual memory. I deal with spreadsheets that frequently have more than 2^15 rows. This is a 64 bit machine -- would 2^32 rows really be too much to ask for? ;)
I use excel at work but Numbers at home. Numbers is way nicer IMO, just pleasant to use. Using free-form tables within sheets rather than one giant table that is the sheet (excel) is so much better. This allows you to stack multiple tables each with different column widths and have them all look great and precisely as they should.
The web client via iCloud.com is nice. Free iOS clients is great. I won’t be paying for microsoft’s ransomeware.