-xl.jpg)
Getting started with video on the iPhone is easy, but mastering the capture of it can be difficult. AppleInsider has five tips for you to make the most of your iPhone's video camera.
Smartphone technology has been growing faster than most people could have ever imagined, especially in terms of smartphone cameras.
Professional-grade camera sales are falling with the rise of the smartphone era, with many people realizing that smartphone cameras are now good enough to get the job done. With the iPhone 8 and X, we are now seeing some camera features that are only available on a small amount of professional cameras, namely 4K60 video recording, but the features don't come cheap.
You'll be paying at least $2000 for a professional camera that can shoot in 4K 60p, and at least $5,500 for the cheapest Canon camera with the feature.
iPhones, and other smartphones, are undoubtedly the mainstream cameras of the future, so here's 5 tips on how to shoot better video on your iPhone.

Tip one: stop shooting video vertically
There are now some apps that are properly utilizing vertical video. Even if the app you're currently using does, remember that not all apps do, and in that case, there will be a black frame covering most of the screen.
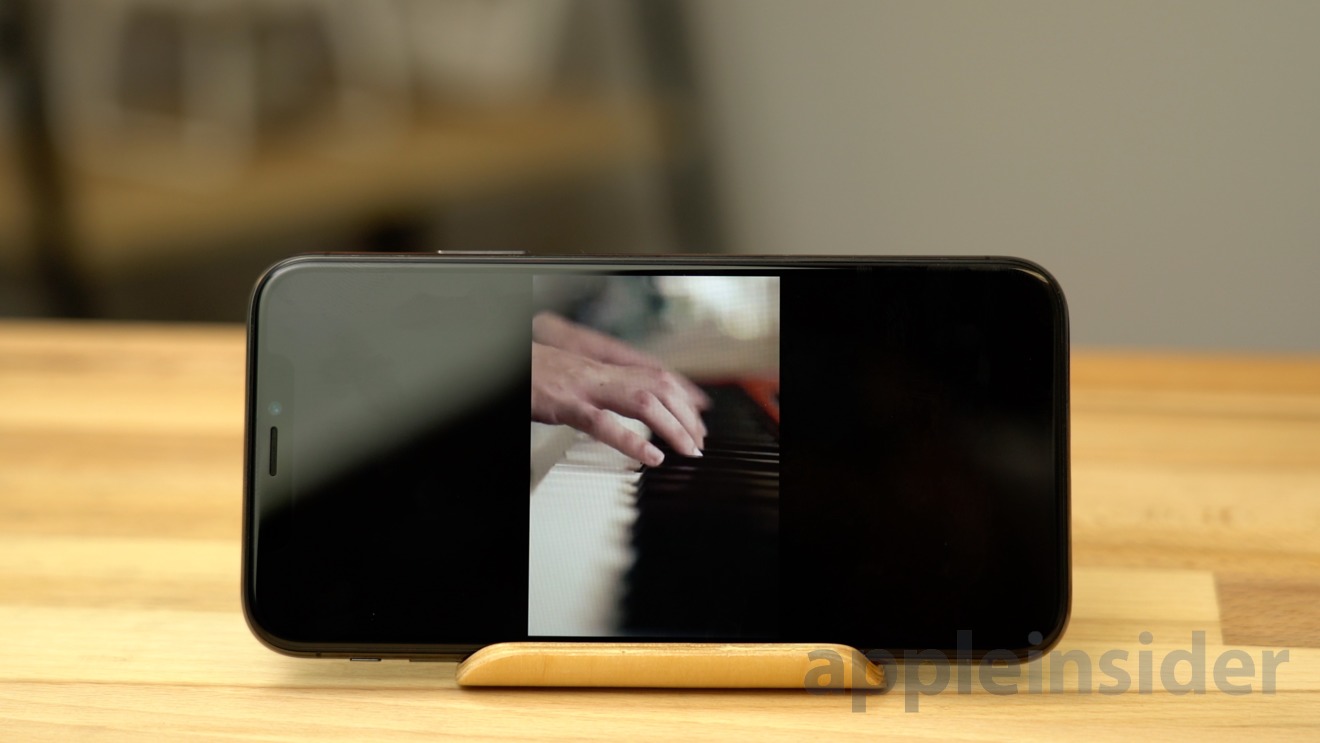
The best part about shooting horizontally is that pretty much all apps support fullscreen video in landscape mode, and you won't have any issues showing your videos off on a tv or computer screen.
So, always remember to flip your phone to a horizontal orientation before you start recording.
Tip two: choose your settings wisely
It's remarkable that the latest iPhone 8 and iPhone X can shoot 4K at 60 frames per second. It gives incredibly smooth motion, and can be slowed down for an awesome slow-mo effect, while keeping the ultra-sharp 4K resolution.
The issue with it is that shooting at 60 frames per second requires a higher shutter speed to keep motion looking smooth, but that in turn requires more light. In low light situations, the shutter speed could be lowered, the quality can get worse, or the video will just be too dark compared to shooting at 30 frames per second.
So if you're not planning on slowing down the video, and you find yourself in a low-light situation, just switch to 4K30. It'll save storage space as well.
If you really want to get a slow-mo shot, just shoot in the actual slow-motion mode.
Tip three: be strategic with your lens choices
The iPhone X is the first iPhone with optical image stabilization on both camera lenses. This means that we no longer get really shaky footage while using the telephoto lens.
On previous dual lens iPhones, it may be worth it to shoot with the wide lens and use digital zoom instead. Although the image quality goes down, at least you don't have a bunch of camera shake in your footage. If you've got something like a smartphone gimbal that can stabilize the footage, the telephoto lens will look a lot smoother.
The telephoto lens also gives a different look compared to the wide lens. It has less lens distortion, which makes objects and people on the edge of the frame look wider. The longer lens also increases the amount of background compression, providing a more pleasing image when recording people or objects.
On the other hand, if you want to show off the background or are shooting in low light conditions, go with the wide lens.
Tip four: Stabilize your video
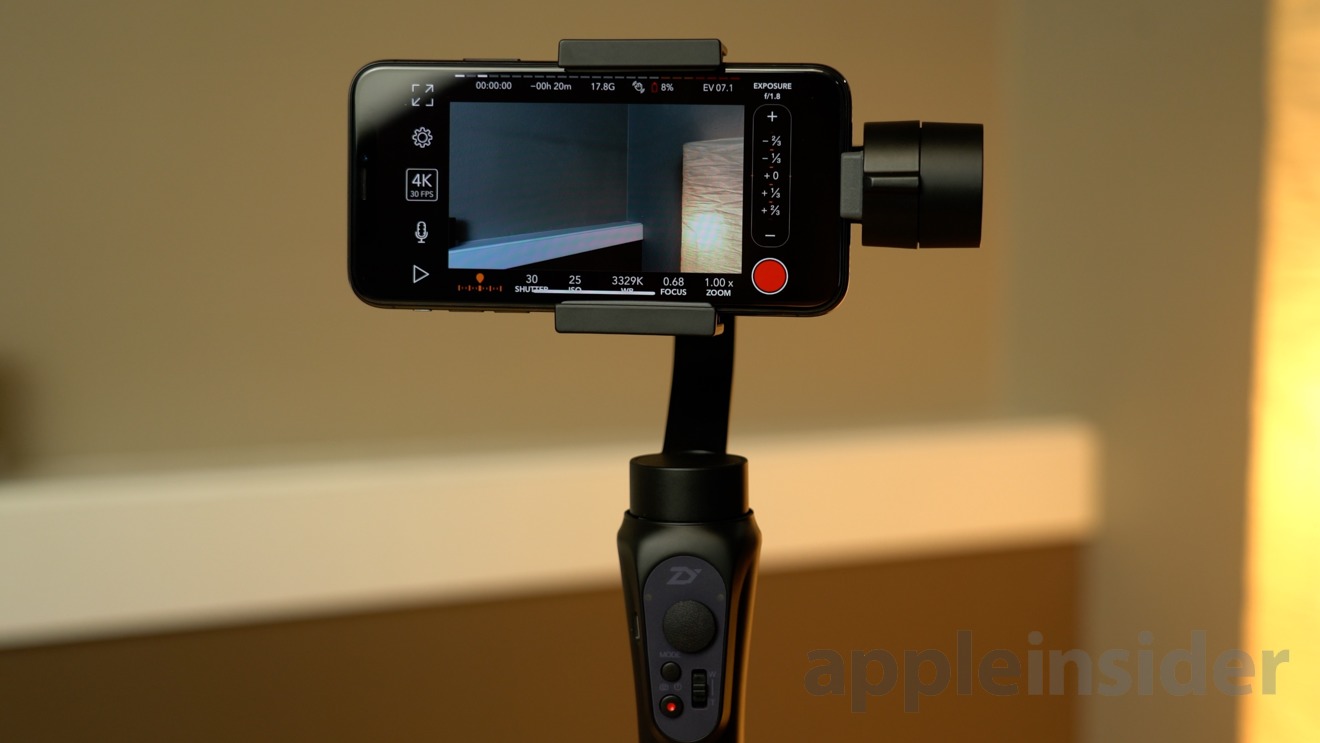
Another way to shoot better video is to use a stabilizer. You can use a tripod or monopod for static footage, but our favorite option is a gimbal, since you're free to move around while recording. This is the best option for vlogging and recording things like skateboarding videos, for example.
These used to cost thousands of dollars when they were introduced, but now we have great phone gimbal options like the Zhiyun Smooth Q, for only about $100.
With a bit of practice, you can get smooth shots with cinematic motion. You can choose to shoot in 24 frames per second for the cinematic style, or shoot in 4K 60, and slow it down for some pretty awesome shots.
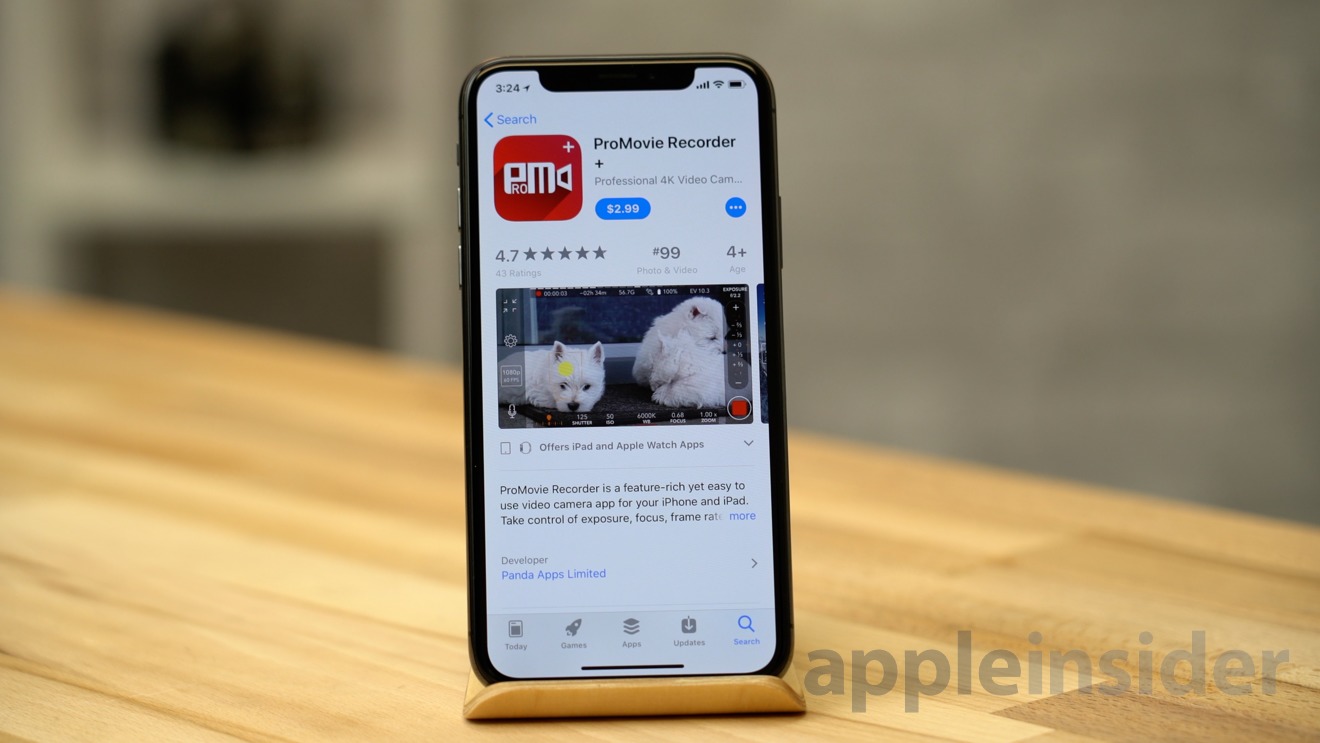
Tip five: use a third-party app
While Apple's app does the job for regular shooting, the settings constantly change, especially if you're using a gimbal. The white balance and exposure can constantly change while moving around, which can easily ruin some shots.
With a third-party app, you can set those settings manually.
One of our favorites is ProMovie Recorder +, which offers a ton of controls for only $2.99.
To manually set the white balance in ProMovie so it doesn't shift while recording, tap the WB button near the bottom of the UI, then choose the option that fits your lighting conditions. If you don't know which one to use, try each one, and then choose the one that correctly represents white the best.
You can also fine tune the white balance by using the slider on the right side of the UI. Just make sure True Tone is off before doing so.
If you want to lock the exposure, just tap on an object, and hit the lock button. If the image still looks too bright, you can use the slider to fine tune it, which will adjust both the shutter speed and ISO. You can also adjust them independently by tapping on each option.
When in brightly lit conditions, set the ISO to the lowest setting and adjust the exposure using the shutter speed, this will reduce noise in your footage.
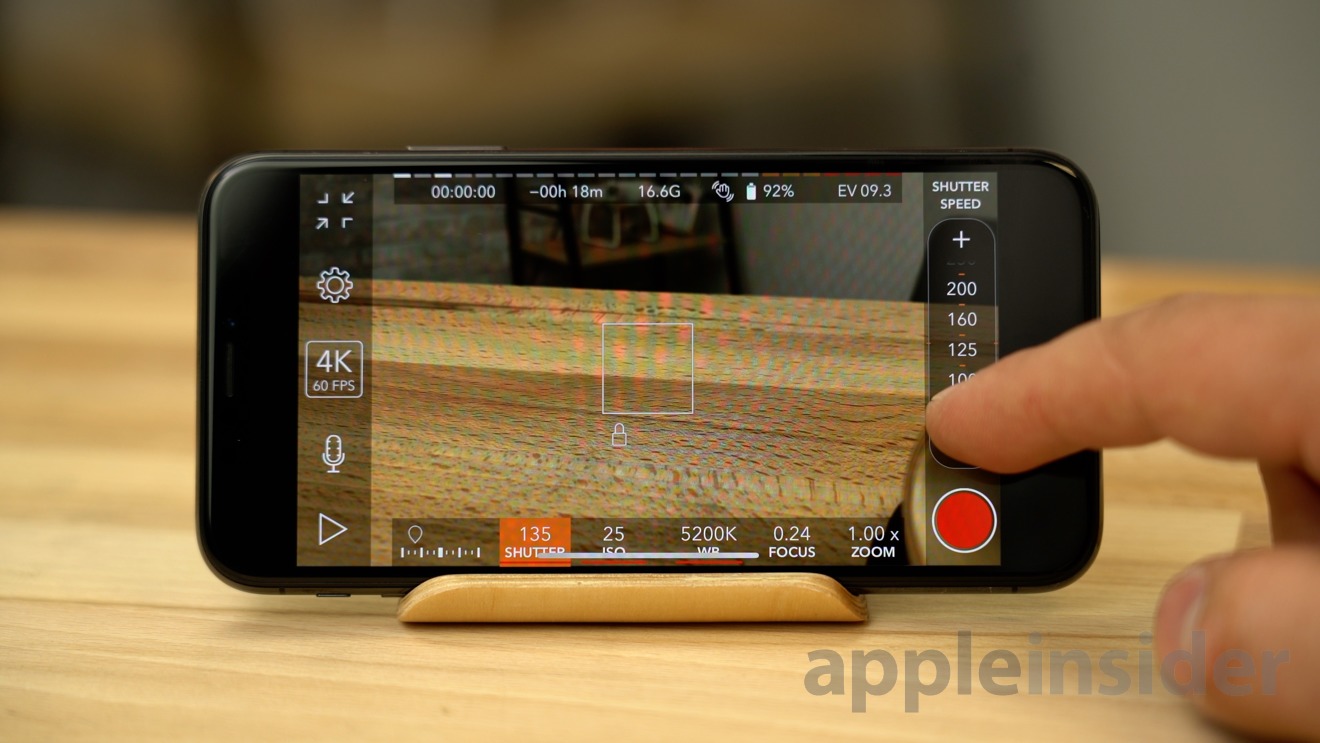
In low light, set the shutter speed no lower than the frames per second you're shooting in and adjust your exposure using the ISO setting.
If you're planning on shooting in 4K60 and slowing down your footage, always make sure your shutter speed is at least twice your frame rate or else the video will have too much motion blur.
If you tap on the resolution settings, you can adjust your video bit rate to a much higher 120 Mbps, compared to the standard 25 Mbps that the Apple camera app records in. This will increase your video quality by reducing the amount of compression, but at the same time, take up a lot more storage space.
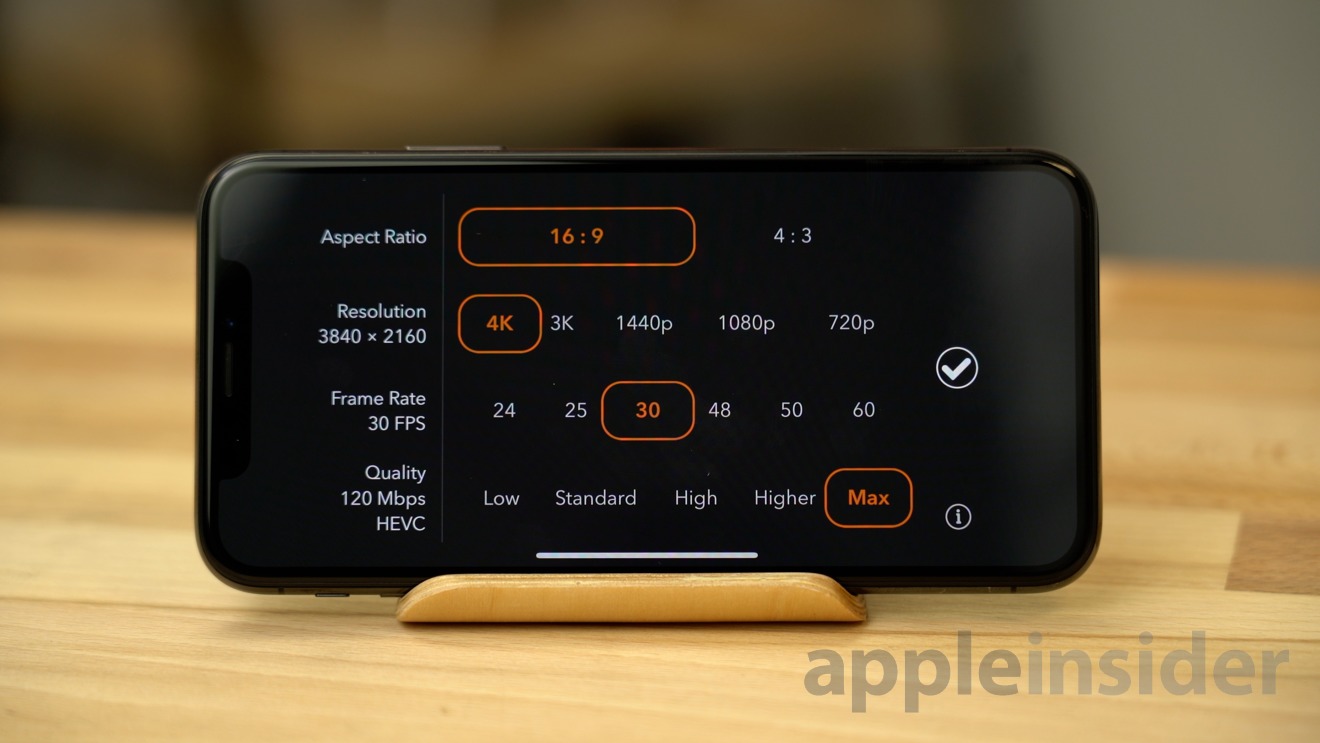
We suggest maxing this setting out when shooting 4K at 60 frames per second, and setting it to around 50Mbps when shooting 4K at 30 frames per second to save space. But if you have a lot of extra storage space and aren't worried about using it, then just leave it maxed out.