When selling or giving away your iPad, you need to make sure to protect your data and leave a clean slate for the next owner. Appleinsider takes you through all the steps you need to take to ensure your iPad is safely wiped before passing it on to its next owner.
The first step is to backup all of your data. There are two options to do so, the first being iCloud backup, and the second being iTunes.
Backup to iCloud
To backup your iPad to iCloud, head to Settings, tap on your name, and tap on iCloud. As you scroll down, you'll see all of the apps that are being backed up to iCloud. Make sure that your Photos and Contacts are being backed up, as those are the most important things you want to transfer over to your new iPad.
Now tap iCloud Backup, enable, and tap Back Up Now.
You may receive an error message saying there is not enough iCloud Storage space available to backup your iPad. There are a few ways to fix this.
The first is to simply upgrade your iCloud storage plan so you'll have enough available storage for your backup. You can do this by going to your iCloud settings page and tapping change storage plan.
The second fix is to reduce the amount of saved data on your iPad's internal storage. Videos undoubtedly take up the most storage. You can review them by going to Settings, General, iPad Storage, Photos, and then Review Personal Videos.
Videos usually take up the most space and will be at the top. Tap on one to see a preview. Now you can swipe through each video, and if you see one you don't care for, tap the screen, tap pause, and tap delete.
You can also head into your iCloud storage settings, and tap Backups. There may be some backups of other devices that are taking up a lot of iCloud storage space. There may even be backups of devices you no longer own. Simply tap on unneeded backups and delete them.
If you're using Family Sharing, there may be other users who are taking up the bulk of your iCloud Storage. Head to the iCloud Storage settings, and tap Family Usage. You can now see which users are using up the most space, and ask them to review their photos and videos to reduce the amount of iCloud storage space they're using.
Once you have enough space available in iCloud, you can head back to your iCloud backup settings and tap Back Up Now.
...or backup with iTunes
The second great option for backing up your iPads data is to use iTunes, and it's completely free!
Download iTunes on a PC or a Mac and update it to the latest version. Then, use a lightning to USB cable to connect your iPad to your computer.
Click continue on your computer, and then tap Trust on your iPad, and enter your passcode. Your iPad should now be connected to your computer, and the system summary page should show up.
Within the Backups section, click on This Computer. You should also click the checkbox below it to encrypt your backup. This will allow your passwords and other sensitive data to be synced.
You'll have to enter a password to protect your iPad backup. Make sure to write this password down and store it in a safe place. You should also click Remember this password in my keychain in case you forget it. Now click Set password.
Your iPad should now start backing up. Once finished, click the eject button next to your device's name in iTunes, and unplug it from your computer.
Wiping the iPad
Before resetting your iPad, head into your iCloud Settings, tap Find My iPad, and disable it. This will disassociate your iPad from your device after you reset it.
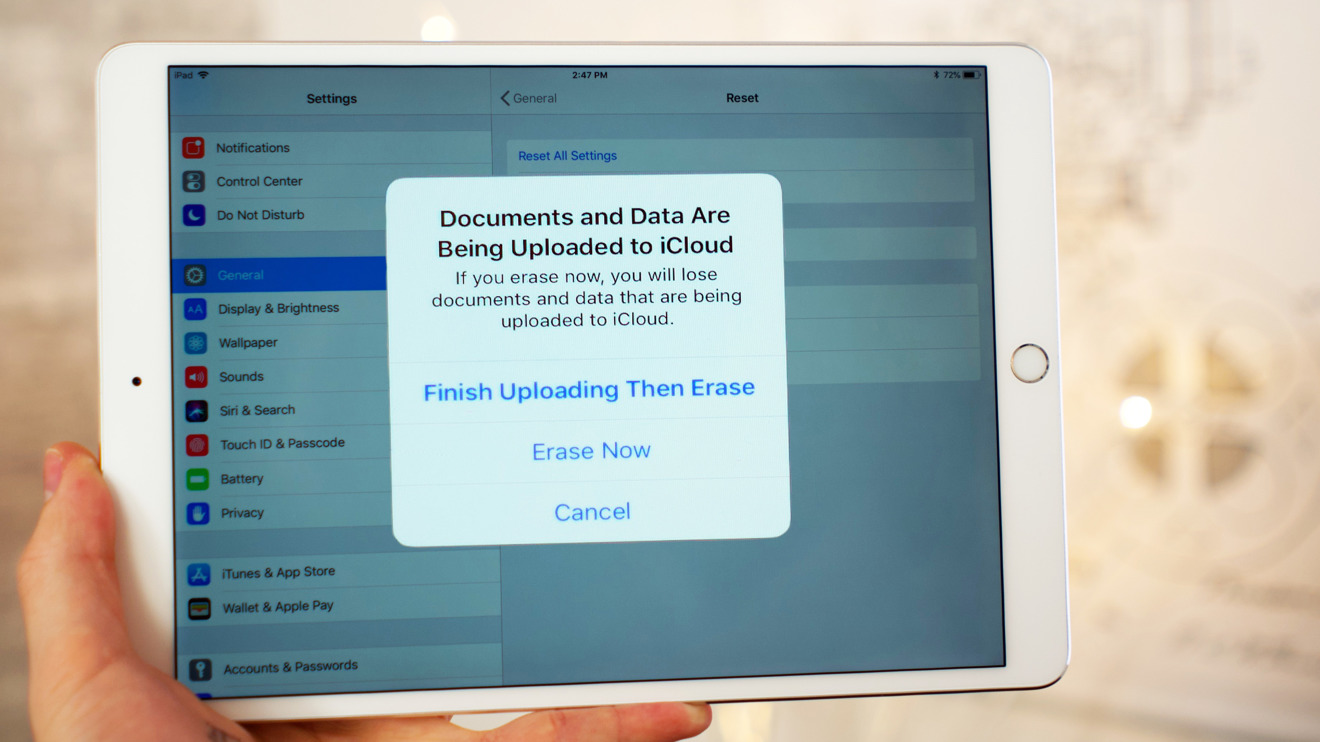
To erase and factory reset your iPad, head into Settings, General, scroll to the bottom of the page. Tap Reset, and then tap Erase All Content and Settings.
You can tap Backup then erase if you want the most up-to-date iCloud backup, or just click erase now if you just finished backing up your data.
Enter your password, and tap erase.
When it's finished resetting, it'll be back to the installation screen, and ready to sell or give away. This is also the same screen you will see when you purchase a new iPad.
Putting your data back on
To restore your data onto your new iPad, continue through the installation process. You can choose to set it up using Quick Start, by bringing another iPhone to iPad next to the device, but we'll choose set up manually.
Connect to WiFi and continue through the installation until you reach the Apps & Data screen. Choose restore from iCloud Backup, sign into your iCloud, and accept the terms and conditions.
Choose your desired backup and continue through the rest of the installation. Your iPad should start restoring from iCloud. After the backup concludes, the device will restart and be ready for use. All of your apps should start downloading from the App Store.
To restore your data using iTunes, tap Restore from iTunes backup, then connect your iPad to your computer. You can now choose the desired backup to restore from, and click continue. Enter your password and click ok. Your iPad will start restoring.
Once finished, press the home button, and type in your passcode. Continue through the rest of the installation, and your iPad should be ready to use.
 Vadim Yuryev


-m.jpg)


 Christine McKee
 Amber Neely
 Andrew Orr
 Sponsored Content

 William Gallagher



9 Comments
Ok, good info. What do I do about an iPad for which I no longer have the password? My dad died last year, and my mom would like to give it to someone, but is unable to find the password for it. The Apple Store has not been helpful in this regard. Any help is apppreciated.