Once you understand how it works — and know the right sequence of steps to go through — then file sharing with iCloud Drive is tremendous when it's working. It's just that setting it up is surprisingly confusing, so let's walk through it.
This should be easier than it is. Yet if Apple makes it slightly awkward to share documents or files with other people — and still won't let you share a folder — it is at least possible. Once it's set up, it's even smooth and both you and your collaborators will not have to think about where the file is or who has most recently updated it, either.
Or at least, this is all true if the file you want to share is in iCloud Drive. And if every one of the people you want to collaborate with use iCloud.
In practice, that's a little less of an issue than you might imagine. If you're chiefly an iOS user and so is the rest of your team, you're all using iCloud Drive already whether you know or think about it. If you're a Mac user wanting to do this, things get slightly more complicated in that you have to make sure you put the document into your iCloud Drive.
And if you're working with a bunch of PC users, you have to look to alternatives such as Dropbox. You could have them use Pages or other Apple apps via iCloud.com and that would get them access to your files. However, as good as those online apps are, you wouldn't want to use them in favor of the Mac or iOS apps, so you can't expect your Windows colleagues will switch over to them either.
What you can do in that situation is create a shared folder in Dropbox so that anyone, regardless of device and regardless of app, can share the documents. Only, without you moving to a paid business Dropbox subscription, you don't get the same ability for multiple people to work on a document at the same time — but this is a topic for another day.
Is your journey really necessary?
Sometimes you want to all be actually working on the same document at the same time. You need to be doing true collaboration. Yet other times, it's enough that people can just add to a group document from time to time. It can even be enough that they can just see the contents of the file without ever editing it.
Apple's iCloud sharing does handle that last well, as it gives you an option to choose whether people you share a document with can do anything more than read it. Nonetheless, if you have a situation where someone simply needs to know where you are with a document, think about emailing it to them instead.
We've now got AirDrop for easily sending files to someone near you. We've got Mail Drop, which means you can email individual documents up to 5GB to people.
Yet if we're serious that you can just email documents every once in a while, you know that it can end up in confusion. At least with iCloud file sharing, there's no wondering which is the latest version or who has it.
The principle is the same
The way that you share files from iCloud Drive varies slightly between iOS and Mac, but the principle is exactly the same on both. You find your file, choose Share and then specify who you're sharing it with.
Remember that your file has to be in iCloud Drive and remember that you cannot do this with a folder. You can't even select two or more files and share those. It's one file at a time, as tedious as that is.
On iOS
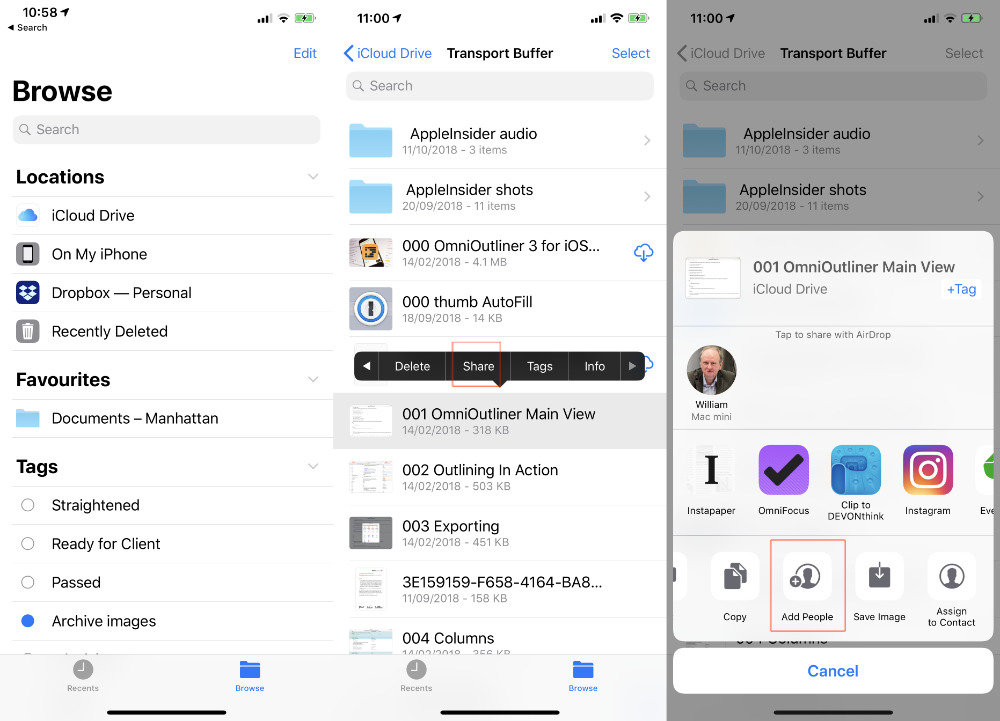
Open the Files app on your iPhone or iPad. Files opens at the point you were when you last used it, so you may already be in the right spot for what you want to share. To make sure, though, tap on the Browse icon at bottom right and then, if you're shown a list of Locations, tap on iCloud Drive.
This could be unfamiliar territory if you're more used to opening and saving documents within applications such as Pages. Most applications that use iCloud Drive will save their documents to their own folder within it. So if it is a Numbers sheet that you need to share, you start by finding the Numbers folder and opening that.
When you find the document you want to share, press and hold on it for a moment. When you get a pop-up with commands, it will include one called Share — but you may not be able to see it yet. On an iPhone, especially, there may be enough such commands that they can't all be shown at once. In that case, Share is always in the second group. Tap the arrow at the right of the pop-up and you'll get this second set of commands.
Then tap on Share and you get a regular iOS share sheet. It's almost as if Apple wants you to AirDrop or email files rather than Share them, because that's what you'll see first.
At the bottom of the share sheet, though, there is a row of actions that you can take with the file. You can change and re-order these, but by default, Add People will be in the ones you can see. If it isn't, you've either selected a folder or need to swipe across to reach Add People.
When you find it, tap on that and you get a new screen for inviting people to have this document you want to share with them. This is a clunky section of the process because if you are going to send someone an invitation, you're presumably going to do it over a messaging app. Yet as well as ones such as Mail, Message, Slack or Facebook, you're given options for apps that are solely for you.
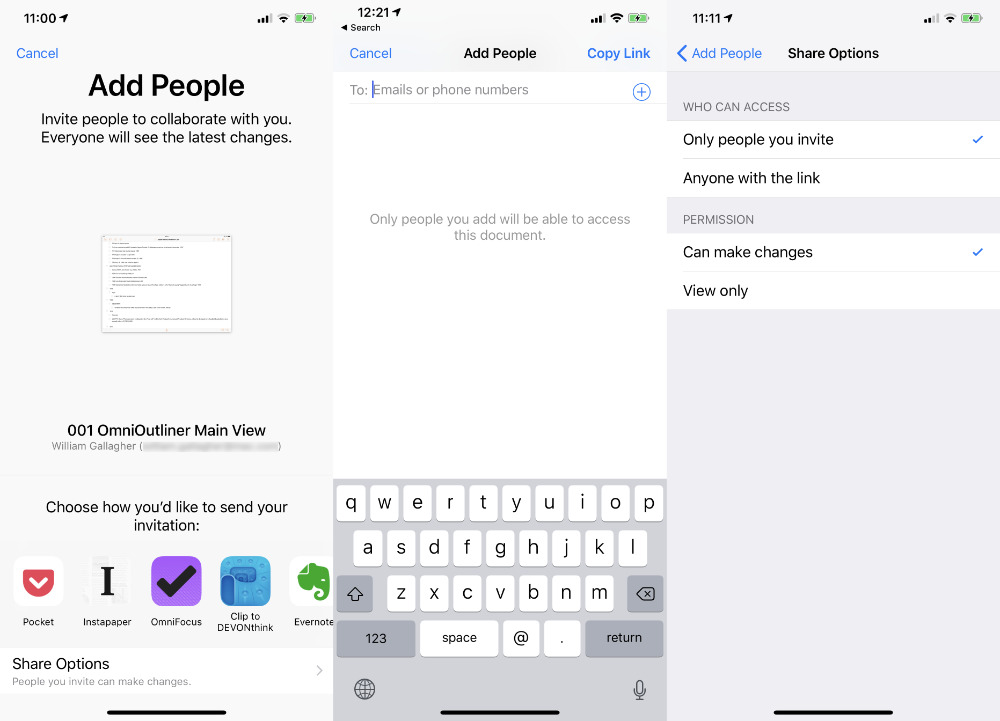 You can invite people over email, messages or more. Be certain to set the constrains in Share Options, though.
It depends on what apps you have installed, but in this example, none of the ones you can see on the page are actually for sending invitations. Pocket and Instapaper are Read It Later apps you use for saving articles, for instance, while OmniFocus is a To Do app and DEVONthink is a research tool.
Swipe across those apps until you see Mail, Messages or any other way you have to getting invitations to people.
Don't invite anyone
Sometimes, though, you don't know who you need to invite. Sometimes you need to be able to email a group of colleagues and ask who wants to be in on this Fantasy Football spreadsheet of yours. In that case, what you need is not a way to invite people, but instead a link to the document. A link that you can later send to anyone, in any way.
So it's good that there is also always an option here called Copy Links. It's usually at the end of the row of apps and it's exactly what you want. It just doesn't look like it is.
Tapping on Copy Link, does not copy the link to your document. Instead, it opens up a basic message beginning To: and prompting you for email addresses or phone numbers.
Ignore that and just tap the button marked Copy Link which is now at top right. Tapping that closes the message-like window and returns you to the Files app, but with the link in your clipboard.
Unfortunately, the link you just copied won't work. Not by default.
This feature defaults to only allowing access to people you specifically invite via sharing. To make Copy Link work, you have to allow that first. In the screen that shows a row of app icons for sharing, there is also a line at the very bottom called Sharing Options. Tap that, then in the Who Can Access section, tap on Anyone with the link.
This is also where you can decide how much access someone has. Your choices are just Can make changes, which is the default, and View only.
It makes sense to have these limits on access and, actually, iOS has a go at explaining this. In the Copy Link section, there is a message on screen that says "Only people you add will be able to access this document." However, it's in grey, it's positioned in the middle of the screen when your eye is directed to the top.
And there's no way to do anything about it from here. You have to cancel and start all over again.
Sharing from the Mac
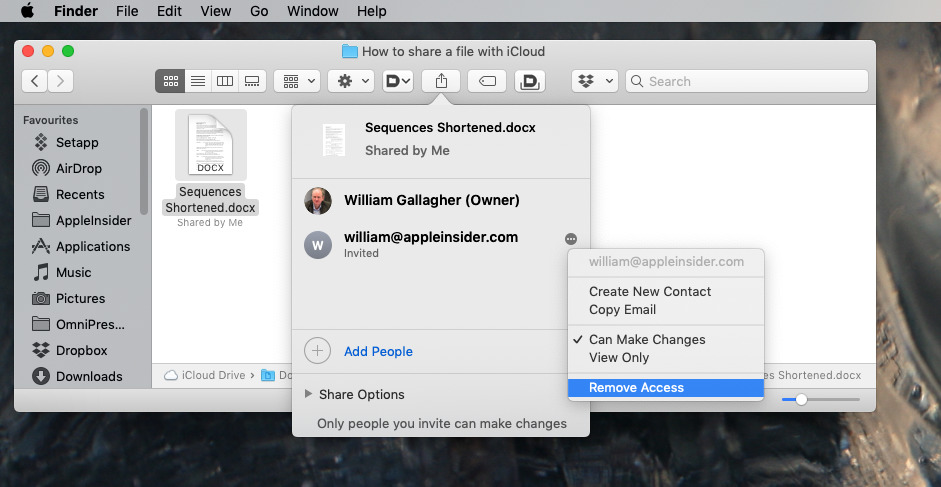
Remember that you can only share documents or any file so long as it's in iCloud Drive. Find your document in that, select it, and either click on the Share icon in the window, or right-click and choose it from the pop-up menu.
Then choose Add People and you get what looks very much like the same option in iOS.
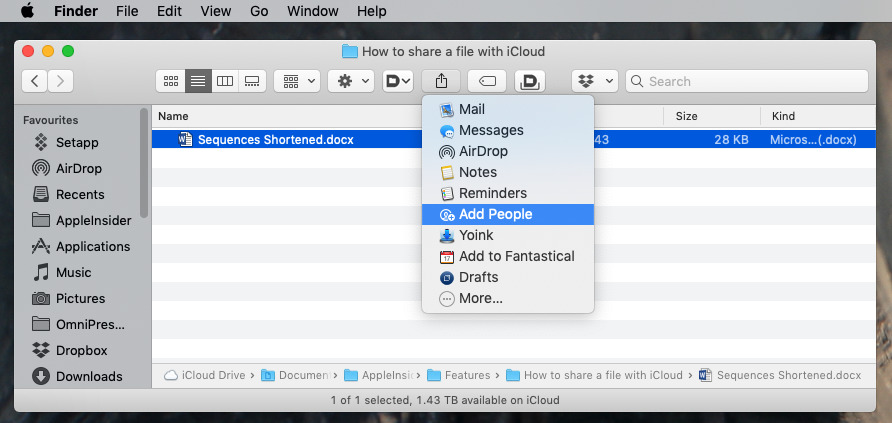 On Mac, you can click the Share icon in the window or right-click on the file and choose it from the pop-up menu
There's a row of ways to invite people, which may again include apps that aren't messaging ones. There's also a Share Options section.
If you are going to invite someone by Mail, Message or whatever, then everything really is the same as on iOS and you can just go ahead.
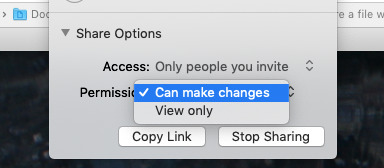
It's when you only want to copy the link to this file that things are different — and irritating. While there is a Copy Link option, you can click it all you like, you ain't going to copy the link — unless you've already set Share Options to allow it.
Unless you've done that, the first time you click on Copy Link, you get a new section that's similar to the To: part in iOS, except here it's called Add:.
You have to put an email address or a phone number in here. You have to. It can't be your own email address, either, or at least not the one associated with this iCloud account. Only when you've entered an address does a Share button become available.
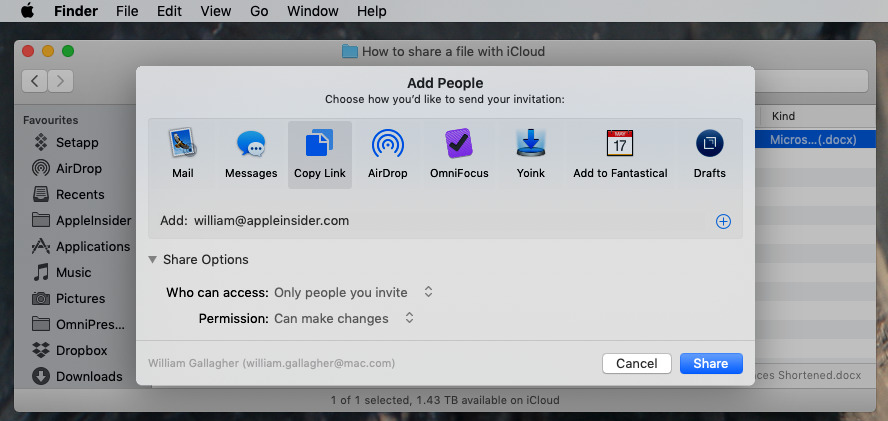 When you choose Copy Link, you have to enter an address - or specify in Share Options that anyone can open the file.
Click that and nothing appears to happen. Despite being forced to add an address or phone number, no email or Message is sent. But the link is copied to the clipboard, you could send it on to anyone — and only the named person could open it.
Who's there
After you've done all this, on either macOS or iOS, you have a file that you've shared with one or more people. On the Mac, if you have the Finder on Icon view, you'll see the words "Shared by Me" written underneath the file name.
In any Finder view, you can choose a file, click on Share, and now where there was an Add People option, you instead get a Show People instead.
On iOS, the Files app will show the same words next to the last modified date of the file.
Clunky but good
This is not the smoothest part of macOS or iOS. The fact that you need to know about the sharing options and that you can't get to them after you've chosen Copy Link is a chore. The fact that you have to enter someone's email address on the Mac even when you don't believe you're going to use it, is just perplexing.
And then there's the fact that this only works with individual files. That's the real royal pain here, the way that you cannot share a folder with someone.
Yet for the odd file, being able to have anyone you choose work on the same one is a boon. Once it's set up and they've accepted the invitation, it works really well.
Keep up with AppleInsider by downloading the AppleInsider app for iOS, and follow us on YouTube, Twitter @appleinsider and Facebook for live, late-breaking coverage. You can also check out our official Instagram account for exclusive photos.
 William Gallagher





-m.jpg)






 Amber Neely
 Andrew Orr

 Sponsored Content





24 Comments
Yikes. Yeah this is a nitemare when it comes to ease of use. They need to refactor...
There has to be an easier way.
No one at Apple minding the store here. But it’s been that way forever with iCloud and the home office suite. Why should we expect anything different?
Over the past decade the Mac OS and iOS have become less intuitive, at least for me. I used to guess at how to do things and it would usually work the way I expected it to. These days I find myself Googling "How to..." more often.
The process to share documents would be a lot less of an issue if it were possible to actually share a folder like Dropbox. We've been using Dropbox for years and love it. Does anyone know if there is a specific reason why Apple doesn't allow folders to be shared? Sharing individual files is a pain in the ass.