You can use the macOS Finder's Copy command to copy and paste files. But here's how to use the same command to copy file icons into Preview.
You've probably used the macOS Finder's popup contextual menu to Copy and paste files in the Finder from one location to another in the filesystem.
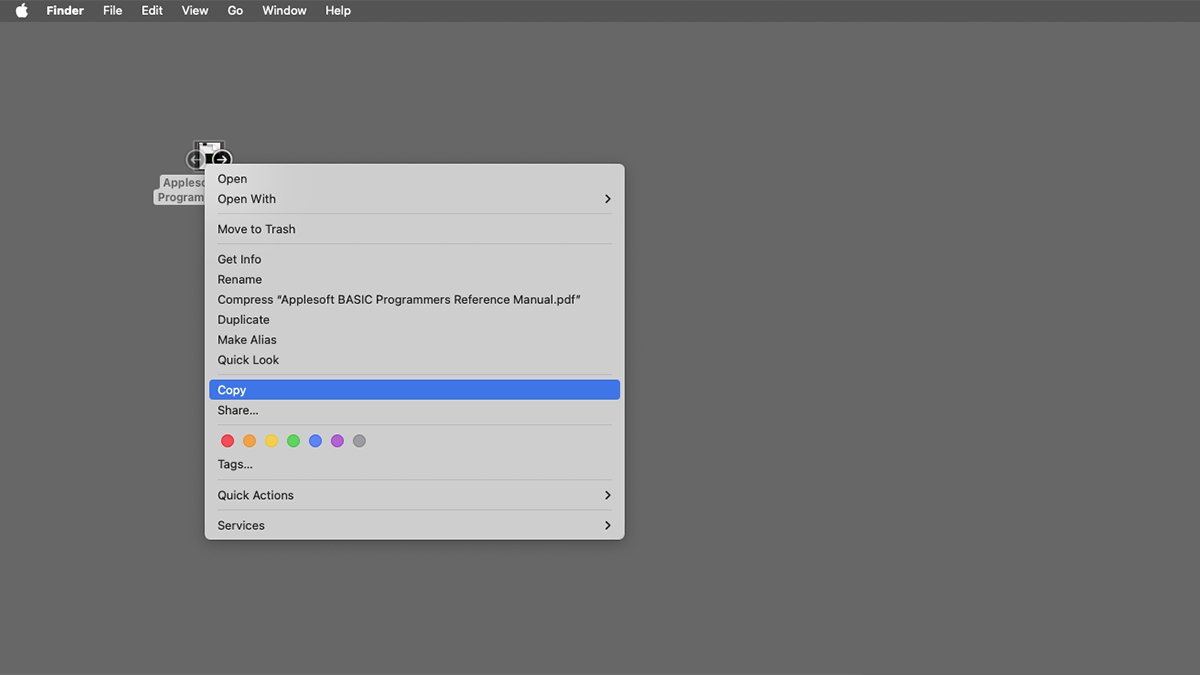
To do so, you select a file or files first in the Finder, then Control-click (or right-click) the items to see the Finder's popup contextual menu:
Usually, you'd then use the Paste Item(s) command from the popup menu to make a copy for the files in some other folder or drive on your system.
But if you just want to make an image of the copied file's icon and not the file itself, you can do that too. All by pasting the item into macOS's Preview app.
Pasting into Preview
To do so, Copy an item in the Finder from the contextual menu just as you would if you were going to Paste Item, but instead of selecting Paste Item, open the Preview app and select File->New from Clipboard.
If the item you copied in the Finder was an app, or a known, built-in file type for which macOS has a system icon, you willl get a new full-size icon image complete with alpha in a new window in Preview. You can then save the image as a file or copy it to another app.
For some file types (such as PDF and other documents) doing this doesn't create a file icon, but a complete new copy of the document itself.
For PDF files if you want the generic PDF icon and not a copy of the file itself, you'll first need to do a File->Get Info, select the icon in the Get Info window, press Command-C on your keyboard, and then do a File->New from Clipboard in Preview.
This method also works for most Finder alias files - giving you the generic icon image of the thing the alias points to.
Preview makes large, clean, perfect images from the copies and it's far quicker and easier to make icon images this way than to try to copy an app's .icns file from its bundle, or screenshot a file and then edit in an image editing app.
In macOS Sonoma, Preview can now also save the images as HEIF files.
 Chip Loder




-m.jpg)


 Charles Martin

 Christine McKee
 Amber Neely
 Malcolm Owen

 William Gallagher

 Andrew O'Hara
 William Gallagher and Mike Wuerthele







3 Comments
Huh. I’ve been using Preview wrong… Thanks Chip!
I’m much more fond of sifting through the app’s package Resources folder for .icns files and using the “iconutil -c iconset [path-to-icns-file]” command to convert all of their instances to separate image files or for .car files and opening them with Asset Catalog Tinkerer, which allows for easy drag-and-drop export of said instances. But hey, for easy copy-and-paste access, you really can’t beat Preview…
Isn't it slightly easier to use the old, trusty method of highlighting the icon to be used as the source, hitting command-I (get info), clicking on the icon in the Get Info window, hitting command-C to copy the icon, then highlighting the file whose icon you want to change, command-I, click on the old icon, then command-V to copy the icon from the other file? Pretty much muscle memory for me for quite a few years now.