 Charles Martin
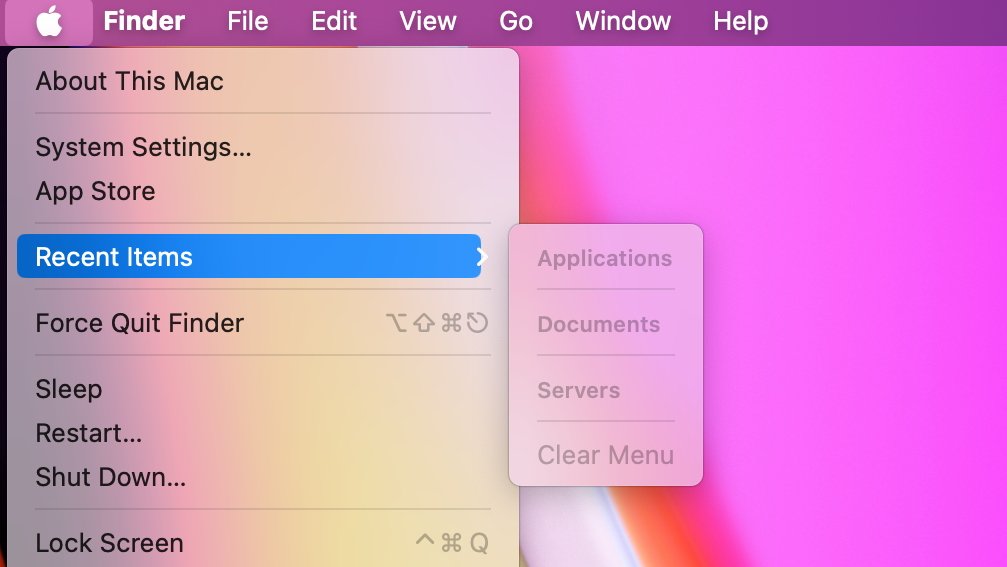
Your most recently-opened files are easily accessible from multiple places on a Mac, making it easy to get back to them.
Typically, when you want to resume working on a file you have previously created, you open the app first and then move to the "Open Recent" command from the File menu, if available. This shows only recent files compatible with the app you are in.
However, a "recents" folder can be found or placed in several spots accessible via the Finder. If you select a file from one of these "Recents" spots instead, the app that created the document will generally open and load the file, saving you a step.
Recents in a Finder window
Any open Finder window will have a sidebar showing, unless you've opted to hide it. By default, the second item in the list in the sidebar is "Recents." It shows a chronological list of any files you've recently opened, regardless of type.
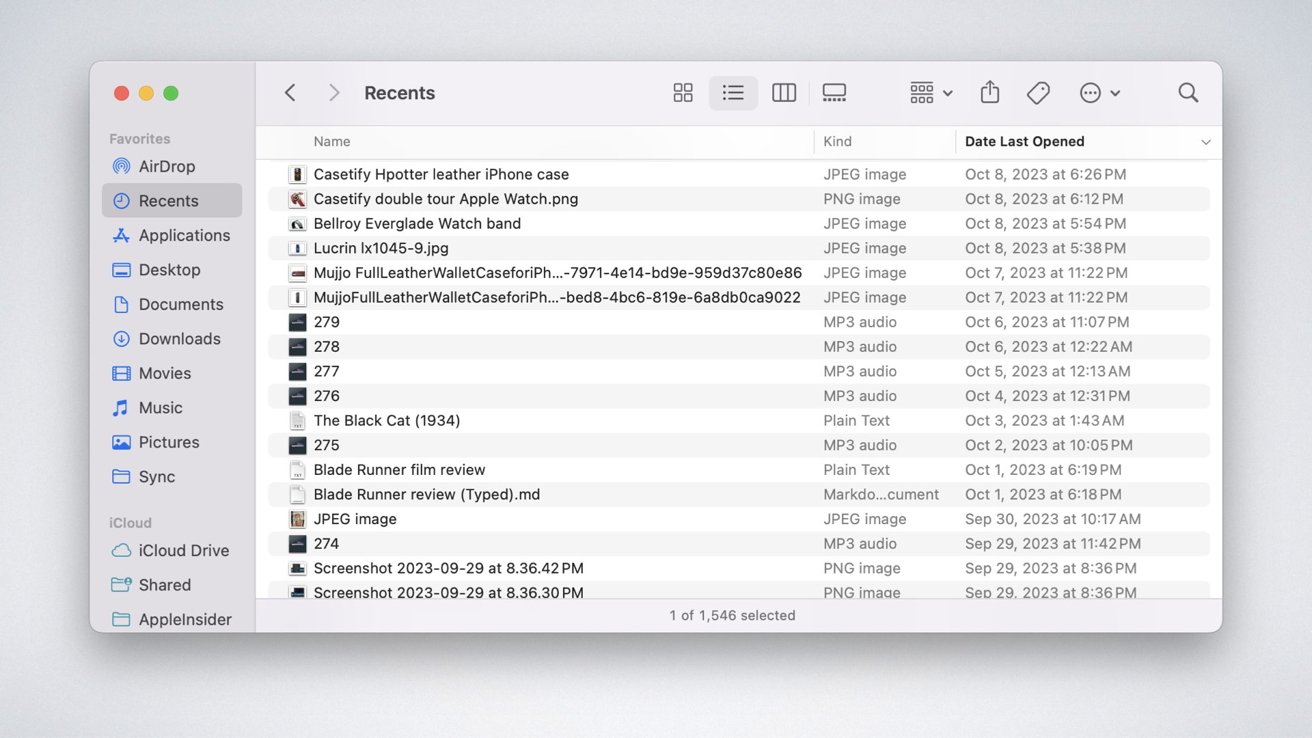 Recents from the Finder sidebar shows every recently-opened item.
Double-clicking any of those files will either open then in the app you created them in, or in the default app for that file extension. So a .rtf file you save from Pages, might then open in TextEdit when you double click.
You can set your preferred app as the default for that file extension to prevent this from happening, however. Find an example file using the Finder, select the file without opening it, choose "Get Info" from the File menu in the menubar, and change the default app you prefer to open that type of file with from there.
This way of accessing recent files tends to be overlooked, in comparison to the more prominent File menu option in most apps. But it has a huge advantage in that where an app's Open Recent will list a few items, the Recents folder can even go back years.
Recents in the Apple Menu
There's a "Recent Items" command available in the Apple Menu as well. It shows not only recent files you've opened or created, but also recent apps you've used, and even recent servers you've accessed.
You have the option, at the very bottom of the "Recent Items" list, to clear the menu of files, apps, and servers. It will repopulate once you start opening things again.
You can even customize the number of items the "Recent Items" list shows. It involves making a small change to the preferences using the Terminal.
By default, it will list the 10 most recent apps opened, the 10 most recent files opened, and up to 10 of the most recent servers accessed, if any.
Recents in the Dock
By default, the three most recently-opened non-Dock applications show up on the far right side of your Dock, next to the trashcan icon. They are separated from your usual program icons by a thin gray line.
This is intended to help you get quickly back into apps you've used recently. However, if your Dock is already overcrowded, you can turn this feature off.
In macOS Sonoma, you can do this by going to System Settings -> Desktop and Dock, and turn off the "Show suggested and recent apps in Dock." Recently-opened programs that are still open in the background will still appear, but once they are closed they also disappear from the separated area of the right side of the Dock.
If you frequently access files from a single folder, you can add that folder to the Dock on the right side for quick access. Just drag the folder from its real location to the dock on the right side, and that creates a shortcut to it.
Creating a customized "Recents" Smart Folder
You can also create a "Smart Folder" to put in the Dock permanently that will show your recently-opened items. You can even customize this folder to only show recently-opened files of a certain type, and/or choose how far back the recents in this Smart Folder will go back.
To do this, right-click or control-click on the Finder icon on the far left side of the Dock. You'll see an option to create a new smart folder.
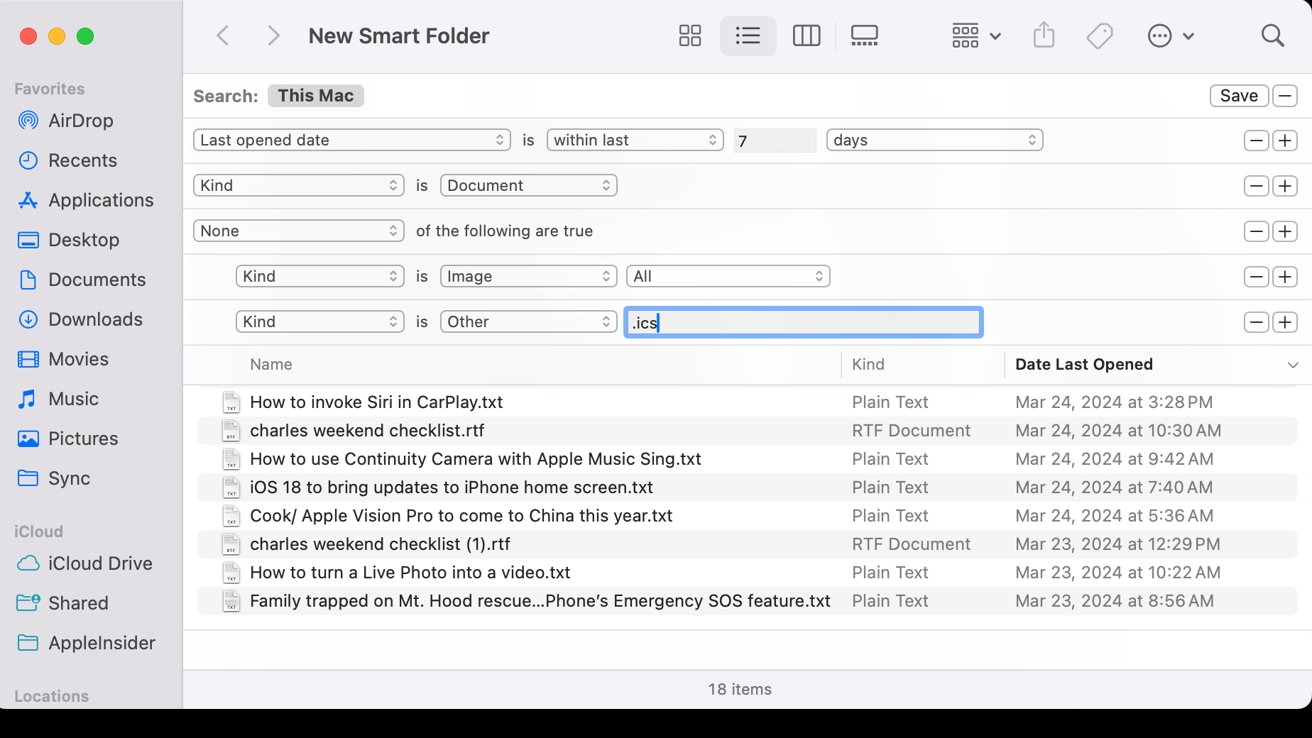 Creating a custom "Recents" Smart Folder
In the window this action creates, you should first choose "This Mac" as the search criteria for the Smart Folder. Then, click the "+" icon next to "Save" on the right.
In the options for the search that appear, you should choose "Last Opened Date" for the first field, "within last" for the middle field, and specify the number of days, weeks, or months you want the search to include.
If you want to limit this custom Smart Folder to search only certain file types, you can click on the "+" next to the existing search terms to add another row of options. If you wanted, for example, only text documents, you could specify that "Kind" is "Document."
You can also exclude some "document" file types by adding a third row of conditions, specifying that "none" are true, and then adding file extensions and types — like Images or .ics calendar files — that should be excluded from this particular search.
Once you've got it how you want it, save it wherever you would like, and then drag it to the Dock. One quick click, and you can easily see your custom search folder's results.


 Marko Zivkovic
 Andrew Orr
 Amber Neely
 William Gallagher and Mike Wuerthele


1 Comment
Thank you very much, creating your own smart folder is really very helpful. One more question about this. If I also display the smart folder on the dock, it is no longer possible to copy and paste from the dock (I can only open the files). However, if I view the smart folder with the Finder, I can also copy files. Am I doing something wrong or is this more of a macOS feature?
wishes
ryder