Chip Loder
Apple's macOS, through UNIX, provides a variety of tools to keep your drives healthy, with one of them being the fsck Terminal command. Here's how to use it.
fsck, or "file system consistency check," is a UNIX tool that has been around for a long time. It checks storage disks for errors, and attempts to repair any problems. It's also run at macOS startup behind the scenes if your Mac was shut down improperly, or hard-powered off via holding down the power button.
On the Mac, fsck lives in the root of your Startup Disk at: /sbin/fsck
You can run fsck in automatic or interactive mode.
Modern macOS volume formats which use journaling are considered to not need fsck, because the journaling feature allows the operating system to occasionally silently check and keep the consistency of disk volumes working correctly.
But you may still want to run fsck on journaled volumes from time to time and there is a flag for fsck to force it to check journaled volumes.
By default fsck diagnoses your Mac's internal startup disk unless you tell it otherwise.
Start with diskutil
To get started, open the Terminal app in /Applications/Utilities/Terminal, and type: diskutil list and press Return.
If you have many drives attached to your Mac it may take a few moments.
When done, diskutil will list all the storage devices attached to your Mac:
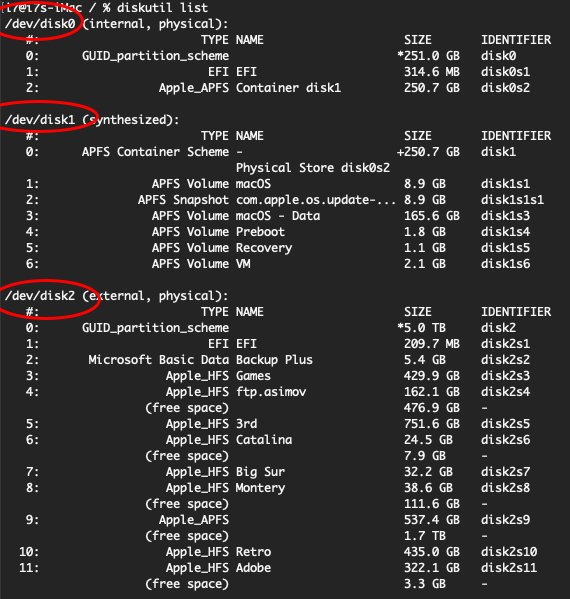
"dev/" stands for "device" and is the default mount point directory for devices in FreeBSD (which macOS is based on).
Each physical device has a name such as "disk0", "disk1", etc. So your Mac's Startup Disk is usually "/dev/disk0", and then next attached device is "/dev/disk1", and so on.
Each volume, or partition on each device is listed next, indented by index number, with info displayed for volume type, name, size, and full identity name on the far right side. So for example, the first volume on your Startup Disk is labeled "disk0s1", the second one is labeled "disk0s2", and each volume follows with a similar name and volume number appended to the end.
In most UNIX commands you can specify an entire device (such as "/dev/disk0"), or a specific volume on a device (such as "/dev/disk0s1" or "/dev/disk0s2"), etc.
fsck options
Two of the most useful flags to use with the fsck command are the "-f" flag (force), and the "-y" flag (automatically respond with "yes" to any displayed prompts). You can combine flags into one along with the fsck command in Terminal to tell it how to run.
For example, to force a check on the internal drive without interaction, in Terminal you would type: /sbin/fsck -fy and press Return.
You can view all options for fsck, and more information about the command in Terminal by typing: man fsck and pressing Return.
If you are not running as an admin user on your Mac, you may need to preface the fsck command with sudo ' ("superuser do"), and then enter an admin password after pressing Return.
Running fsck
Using the device list info returned by diskutil above, you can tell fsck to check only a specific volume. For example: sudo fsck -fy /dev/disk4s2 tells fsck to check and attempt to repair the second volume on device 4 attached to your Mac.
Note that each volume to be checked must be unmounted first before fsck can run on it. You can use Apple's Disk Utility app in /Applications/Utilities/Disk Utility to manually unmount volumes by selecting them from the list on the left in Disk Utility's main window, then clicking the Unmount button at the top of the window:

Doing so will remove a volume's icon from the Desktop in Finder. When you're done, you can similarly remounta volume in Finder by clicking the Mount button in Disk Utility (assuming, of course that the volume hasn't been corrupted and is still mountable).
fsck results
Once fsck starts, it will run its checks on the specified drive or volume, and if you specified the -y option, it will attempt to repair each volume without prompting. If you didn't specify the -y option, you will be prompted what to do at each step in the verification process. Each volume name, and its type will be listed as fsck runs.
If for some reason, fsck couldn't repair or read a disk or volume, it will print a message in Terminal telling you so. For example, a common and vague error is " The volume Untitled HD could not be verified completely."
If fsck finds any problems with the drive/volume or any of its data structures, it will print a message and attempt to repair any problems.
Once fsck completes, it's a good idea to Restart your Mac - either from the Apple menu->Restart command, or in Terminal by typing: reboot now and pressing Return.
Note restarting in Terminal may quit any other apps you have running without warning.
Keeping your Mac's disks healthy and working properly is critical to your workflow, and is in general a good idea. fsck helps you do just that.


 William Gallagher and Mike Wuerthele
 Andrew Orr
 Malcolm Owen
 Amber Neely

 Wesley Hilliard
 William Gallagher