The Mac has several third-party package managers for installing additional software. Here's how to use the Nix package manager with macOS.
What is Nix?
Nix is a package manager that provides container-based development environments across platforms. Similar to container systems such as Docker and Kubernetes, Nix allows you to install configured development environments across machines and networks with less configuration and trouble.
Traditionally on the Mac, users used either MacPorts or Homebrew to install third-party packages. Both systems have benefits and drawbacks.
Homebrew has been popular in the Mac community because of its ease of use and installation: packages can be installed from the Terminal app in macOS with just a few commands, and updates are automatic and just as easy.
However, both Homebrew and MacPorts lack portability across machines. You can write Terminal (shell) scripts to install Homebrew or MacPorts packages across systems, but script maintenance can become complex and often it's difficult to write scripts that are aware of all possible machine configurations.
Nix solves this by containerizing development environments and making them more portable across systems.
The tradeoff cost you pay with Nix is a slightly more complex configuration - and a steeper learning curve.
Nix ecosystem
NixOS from the NixOS Foundation is actually several things: it's a Linux distribution that uses the Nix package manager. Nixpkgs is a collection of over 80,000 packages that can be installed using the Nix package manager.
You install Nixpkgs using the Nix package manager.
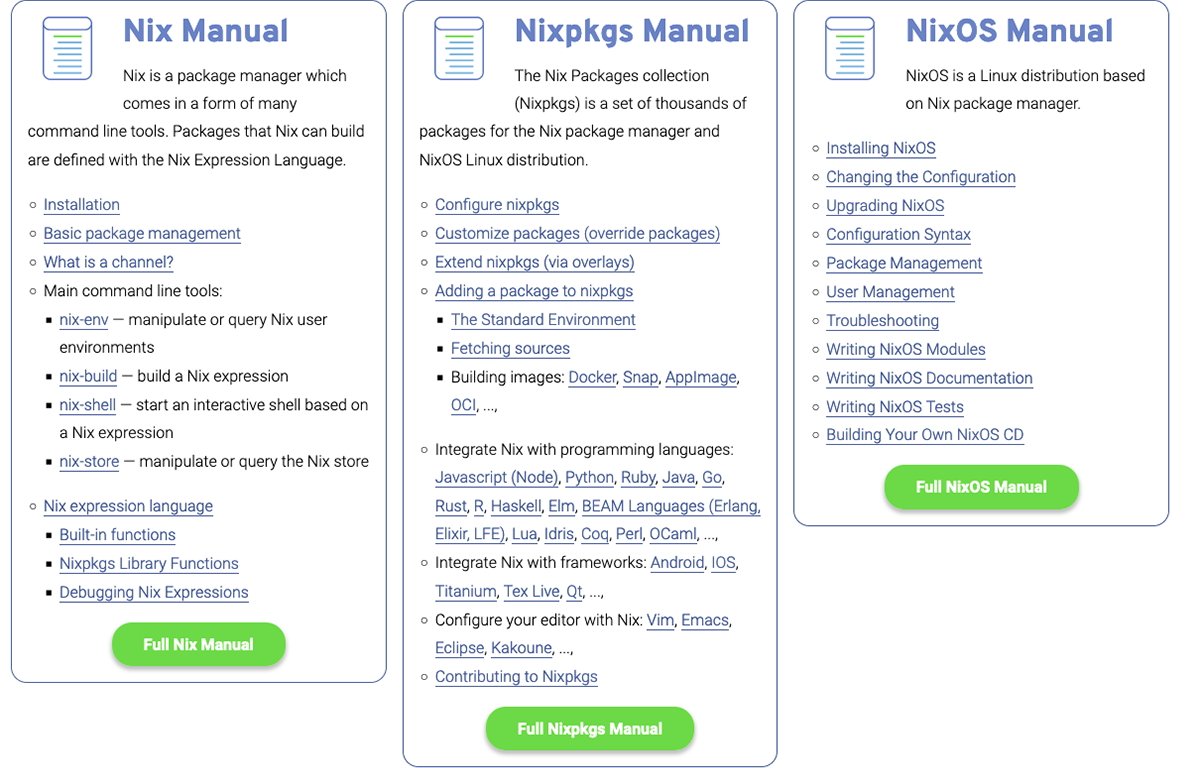
There are three separate manuals for Nix: the Nix Manual, the Nixpkgs Manual, and the NixOS Manual.
There is also a Nix Reference Manual.
A community-maintained unofficial NixOS Wiki is available and a Nix development site is located at nix.dev. The NixOS Wiki has info on the package manager, the Nix language, Nixpkgs, and NixOS itself.
There is also a Nix Language you can use to create and copy parts of packages for new installations.
You'll probably want to read the entire Nix Manual at least before you begin installing and using Nix.
Definitions
There are a few new terms you'll need to understand to use Nix.
Nix is based on declarative programming - creating programs based on describing what a piece of software is supposed to do rather than how to do it. Long story short, declarative programming tries to avoid software based on state and changing state to achieve some outcome.
Expressions. Nix expressions are basically subcomponents of installable software that are predefined for later retrieval and installation. The idea with expressions is the component is already defined so that when it is installed, it works the same way across all systems.
Each expression also has a search path.
Channels. A Nix channel is a specific path to one or more predefined Nix expressions that can be remotely retrieved and installed. There is a list of official channels at channels.nixos.org.
Most channels have versions. A channel can also be subscribed or unsubscribed.
Each channel has downloadable content which gets installed when the channel is installed.
Store. Unlike Homebrew and UNIX itself, Nix doesn't install packages into the standard UNIX directories such as /usr, /bin, /sbin, or /opt.
Instead, it creates its own store - a special directory and volume used to store all installed packages. By using a store, Nix packages are much more portable because the entire store can be moved as a unit.
Nix does install a configuration file into /etc/nixos/configuration.nix, which is normally invisible unless you turn on macOS Finder's hidden files feature.
Flakes are an experimental Nix feature which are files used to define and control the dependencies among packages. Although popular, Nix flakes are still experimental and lacking strong documentation so use them at your own risk.
Garbage collection. As in some programming environments, when you remove a Nix package it doesn't actually get uninstalled right away. To do that you run the Nix Garbage Collector.
Think of a garbage collector as a process that runs silently in the background, one which cleans up any unused or stale components that are no longer needed.
Many modern systems use garbage collectors - including the Java VM, and the Swift and Objective-C runtimes from Apple.
You can invoke the Nix garbage collector any time after installation in Terminal with:
nix-collect-garbage
Command-line tools
The Nix installation includes several command-line tools (CLI) you can run from the Terminal app. These include:
nix-env- used to manipulate Nix user environmentsnix-build- used to build Nix expressionsnix-shell- an interactive command environment based on a Nix expressionnix-store- manipulate or query the Nix store
All these commands and more are detailed in the Nix Manual.
A Nix user environment is simply a set of software and tools installed by Nix.
Installing Nix
Nix normally installs to /nix but since macOS Catalina, the root of the macOS Startup Disk is read-only.
Instead, on post-Catalina systems, Nix will create a new volume to hold the Nix store and mount it as a volume in the hidden macOS folder Volumes at the root of the Startup Disk.
If you do have admin access, the installer will prompt you for sudo (superuser) permission when you run it in order to create the new volume.
To run the interactive Nix installer in Terminal, type:
curl -L https://nixos.org/nix/install | sh
And press Return.
When the installer runs, it gives you a short message about what it is about to do and where things will be installed. It also creates a new UNIX user and UUID for the user - which are used during Nix container and package builds.
The Nix installer stores a reference to the Nix store volume in /etc/fstab.
Note the Nix store volume mounts, but not on the Finder's desktop - you won't see it on your Mac's Desktop but it's still there nonetheless.
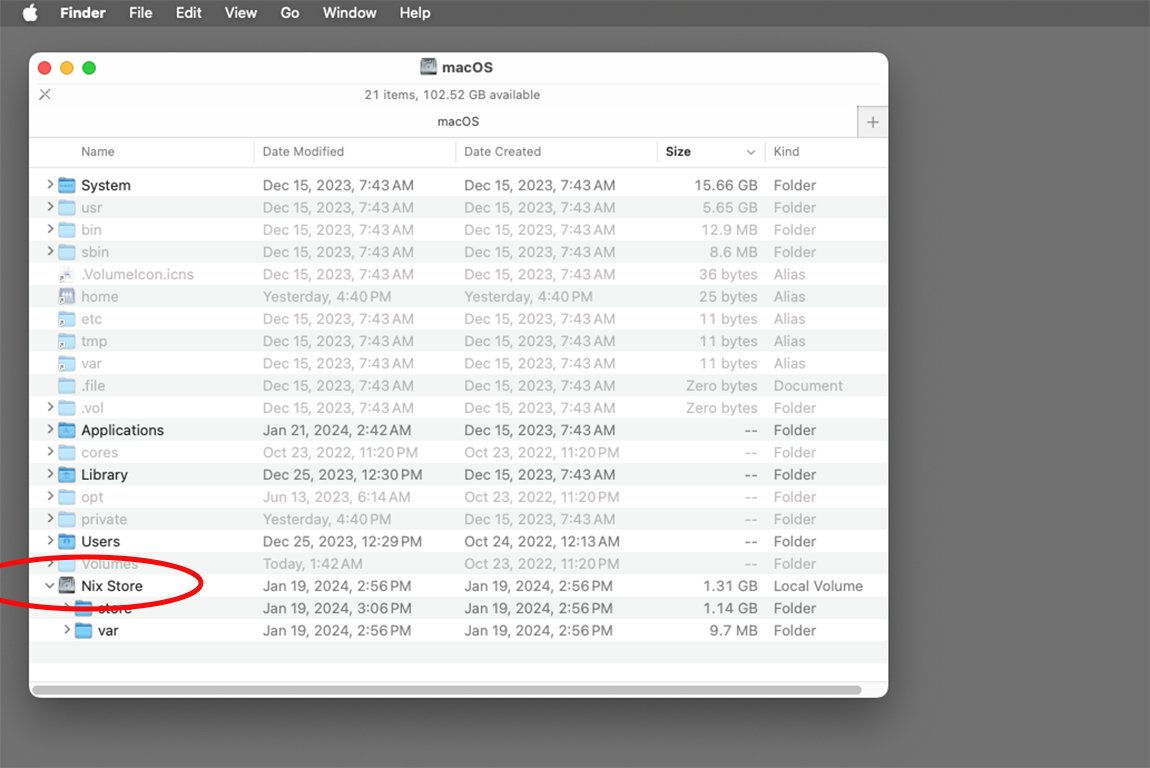
Instead, Nix mounts it at the root of your Startup Disk in a directory named "Nix Store". Inside of this directory, there's a store and a var folder.
The store folder contains all the packages and channels NIX downloaded and installed, the var folder contains a log folder, and the nix folder which contains the DB, profiles, a connection to the background daemon, the user pools and other parts.
fstab is the File System Table file which tells UNIX where all the filesystems and their volumes live.
When you are ready to continue with the installer, enter an admin password in Terminal and press Return.
You'll see the Nix installer run and as it does it will describe what it is creating.
If the Nix installed has sudo access, it will also try to add some configuration options to the hidden user profile files on your Mac's startup disk in the user and etc folders, namely:
/etc/bashrc /etc/profile.d/nix.sh /etc/zshrc /etc/bash.bashrc /etc/zsh/zshrc
These profile files get loaded by macOS when you log in and they contain environment variables and paths to installed software.
Finally, the Nix installer sets up a background process, or daemon named nix-daemon which manages the Nix store in the background silently.
Once the installer finishes, you'll either need to quit Terminal and re-open it, or else open a new Terminal shell in order for Terminal to load all the new Nix configurations.
After the installer finishes you can initialize the default Nix packages and test the Nix installation in Terminal with:
nix-shell -p nix-info --run "nix-info -m"
You should see a message about fetching paths and then a list of all the packages installed in the local Nix store.
At the bottom of the message, you should see the current Nix and Darwin version number, channel name, and the path to the packages profile file.
You can also manually install any existing Nix package in Terminal by using the nix-env --install command followed by the package name. For example:
nix-env --install firefox
Package uninstallation is the same, except you use the --uninstall flag to the nix-env command
Additional resources
There are several good third-party Nix sites available - be sure to check them out.
Zero-to-nix.com is a guide to using Nix and includes a Quick Start and a Concepts section which gives a good overview of each part of Nix and how they fit together.
Determinate.systems is a Nix-centric site that contains many Nix tutorials as well as a standalone Nix installer in case you don't want to use the Terminal-based install.
The Nix and Flakes Book from Ryan Yin is an online tutorial and GitHub repo for beginners full of useful Nix-related info.
The nix-darwin repo contains all the modules, packages, and documentation for the Darwin (macOS) port of the Nix package manager.
Nixpacks is a utility that can take any directory of files and containerize it for reuse.
Finally, be sure to visit the Open Container Initiative at opencontainers.org.
Nix pros and cons
Once you get past the learning curve, Nix can be quite effective and useful. The ability to configure and reinstall portable containers across systems is very powerful.
You can configure any set of environments and tools, and then package it for redeployment on most systems.
The ability to create your own custom Nix packages and containers which can then be reused saves a lot of time whenever you need to configure a new machine.
The main downside of Nix as a package manager is increased complexity and its learning curve. There also currently is no Windows version.
Homebrew is still simpler than Nix, but except for writing your own custom shell scripts for installation, Homebrew lacks portability. Trying to write custom install shell scripts for every possible system is impractical.
Once you learn and master Nix, it will become a powerful tool in your development arsenal.
 Chip Loder







 Marko Zivkovic

 Malcolm Owen


 William Gallagher
 Amber Neely
 Sponsored Content


-m.jpg)




There are no Comments Here, Yet
Be "First!" to Reply on Our Forums ->