With iPhone 6s' 12MP iSight and 5MP FaceTime cameras, Apple bumped the specs of the world's most popular digital shooter, giving users a good excuse to create mountains of data. Using iOS 9's built-in Photos app can help you manage this flood of photographs from the moment you press the shutter button.
I take a couple hundred photos per day. Most are landscapes, animals and sky scenes, mixed in with sometimes hundreds of screenshots. No matter how much content you generate, the "fire and forget" nature of mobile photography can quickly lead to unmanageable photo libraries. The problem is most pronounced in iPhones with large storage capacities, which let you shoot with reckless abandon.
Fortunately for heavy users like myself, the aggregation and collation features Apple built into the iOS 9 Photos app can help with basic organization before you even think about comprehensive cataloging.
When you first open the Photos app in iOS 9, you are presented with up to three navigation options: Photos, Albums and, if you are sharing photos with a friend, Shared. In previous versions of Photos, when you clicked on Albums you were presented with Camera Roll, which is a collection of every photo and video on your iPhone, a Favorites album, Bursts for photos taken in rapid succession and Recently Deleted.
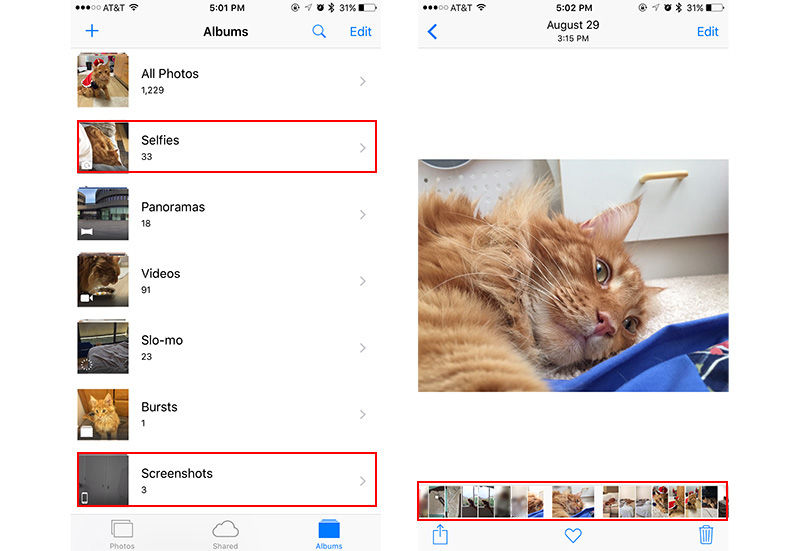
In addition to Camera Roll's name change to "All Photos," two new albums have been added to Albums in iOS 9: Selfies and Screenshots. The Selfies album contains shots taken with the front-facing FaceTime camera and the Screenshots album contains images captured by pressing the sleep/wake and home buttons simultaneously. iOS 9 automatically populates Favorites, Bursts, Selfies and Screenshots with associated content.
These albums are hard coded into iOS 9 and cannot be renamed, reordered or removed. Albums will, however, hide if you do not have any photos of that type. I usually don't have selfies on my iPhone, therefore that album never shows up.
It should be noted that all stored photos will be placed in their respective albums based on metadata, even those not captured by your iPhone. For example, selfies taken on a friend's phone and imported via Messages or AirDrop go into your Selfies album.
When you open a single photo in iOS 9 there is now a "scrub bar" at the bottom of the screen to quickly browse through photos in the album you are viewing. You can "scrub" left and right through your entire collection or single albums. At the bottom of the screen are icons to share, favorite, or delete.
One way to quickly add photos to an easily accessible album is to tap on the heart-shaped icon that appears below individual pictures. Doing so sends that photo, Live Photo or video to the Favorites album, which is near the top of Photos' file hierarchy. Further, content can be automatically removed from Favorites by deselecting the heart button.
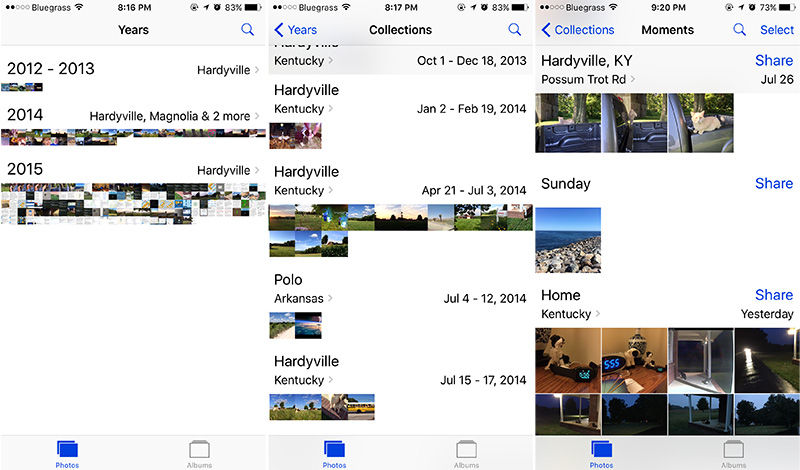
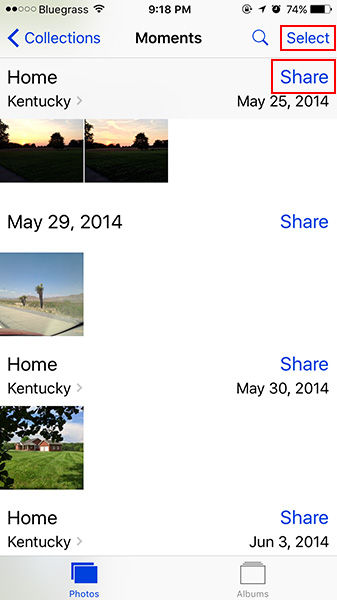
For an aggregated view of all your content, select Photos at the lower left of the main Photos app screen to browse by date and location, broken down by Year, Collections (groupings by location and date) and Moments (specific dates). From the Moments screen you can click Share to share a block of photos the app has grouped together. If you tap Select at the upper right, you can select each group of photos to delete if desired.
You can add as many additional albums by clicking on the "+" icon in the top left-hand corner and selecting pictures from Years, Collections and Moments. These newly created albums are not smart, however, meaning you have to add and delete photos manually.
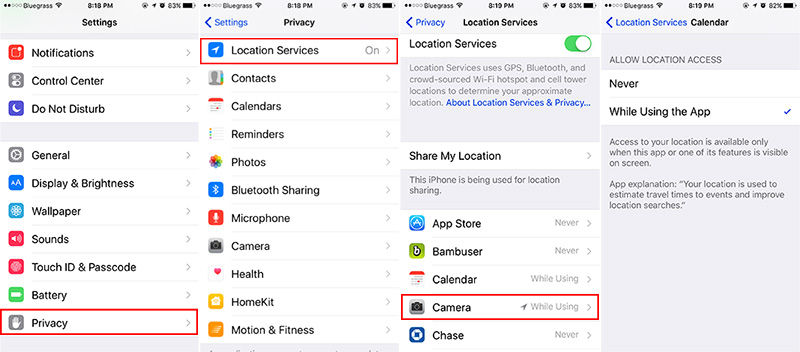
The locations of photos are extremely accurate which really help you remember where you took that photo of a beautiful sunset or mountain vista. Photos shared with you show up on this map as well if the sender had location turned on. Location can easily be turned off if you want to share photos, but not your location. Navigate to Settings > Privacy > Location Services > Camera > Never to disable location sharing.
 Marty Edwards




-m.jpg)




 Wesley Hilliard
 Oliver Haslam
 Marko Zivkovic
 William Gallagher
 Amber Neely

 Sponsored Content

 Christine McKee

 William Gallagher and Mike Wuerthele







19 Comments
On the Albums screen, when you copy a photo from All Photos to a distinct album (e.g., "Family"), does it create a separate instance of that photo or is the album just a logical grouping of a subset of photos that actually exist in All Photos? I ask because deleting a photo from All Photos apparently also deletes that same photo from any album where the photo exists. In my experiment last night, I created the Family album and then copied 5 photos to Family. In the interest of keeping my All Photos small(ish), I then deleted those 5 photos from All Photos, thinking that I already had another (safe) copy of the photos in Family, but... no. The photos disappeared from both albums.
That is correct. All Photos is the bucket of all your pictures, and each photo in an album contains a reference to that original photo (not really the photo itself or even a copy of it). If you delete a 'photo' in an album, it has simply forgotten that reference, but the original photo remains in All Photos. However, if you delete a photo in All Photos, it is gone from your collection, and therefore from any album that might have referenced it.
... if you delete a photo in All Photos, it is gone from your collection, and therefore from any album that might have referenced it.
Thanks.
One final clarification:
Traditionally, when I connected to iTunes and uploaded photos to my computer, I would select the option to delete those same photos from my iPhone after the upload finishes. I did that for housekeeking reasons; clean up my device to create space for NEW photos. But based on your explanation above, I should NOT do that for any photos that I want to remain in an album (such as the Family one I mentioned), right? I guess the right procedure is to upload the photos, not select the 'delete from device' option (which applies to ALL photos in that upload batch), and instead go into my iPhone Photos app and manually delete the photos that I truly want to delete because they're not in the Family album. Is that correct?
WTF?! Hundreds of photos a day?
My albums still say "camera roll" not "all photos" and I'm in current version of iOS. Also, the method for putting a photo into a new folder is not intuitive, and is grossly inadequate. In email, when you open an individual email a folder icon displays in the tool bar, and when you click on that folder it displays a list of all folders. When you then click on the folder in the list that you want to file that email in, it automatically transfers that email into it. Why the hell didn't they use that method for easily sorting photos? Currently in photos, if you want to put a specific photo manually into a folder you can't simply copy and paste, you have to go to that folder then hit edit at the top, then click "add" at the very bottom, then again it takes you all the way to the bottom of all photos, then once again you have to scroll through all your 100's of photos to find the one you want to add to that folder. THIS IS ASS BACKWARDS AND TOTALLY Fk'd UP! Basically, there is no real way to EASILY AND EFFECTIVELY manage photos on the iOS device itself.