As the AppleInsider podcast approaches 160 episodes, one of the most common questions we still receive is how the show itself is produced. Our host Victor Marks offers a rundown of his process, including the hardware and software used to bring the weekly news program to life.
The official AppleInsider podcast regularly ranks among the top 10 technology-related podcasts available on iTunes, and has been a weekly production for over a year now.
If you're a regular listener, you know that the sound quality of the podcast hasn't always been as listenable as it is today. With that in mind, let's talk about what we've settled on for making a decent quality podcast.
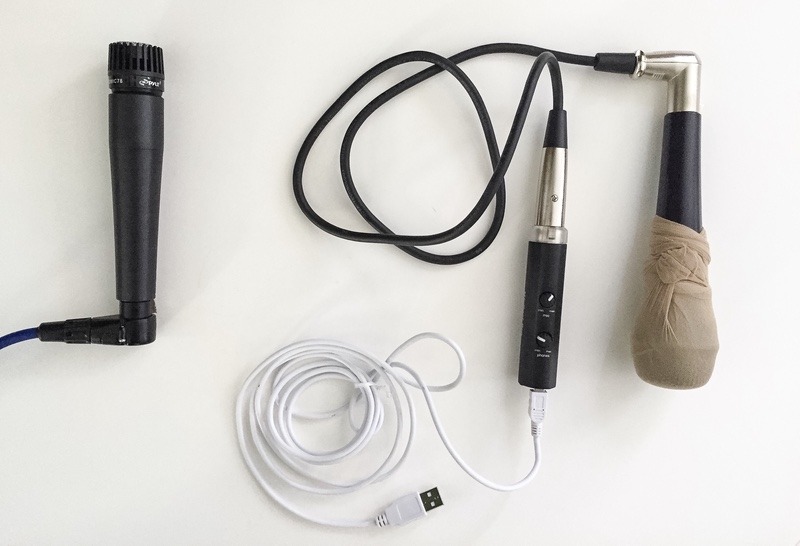
Microphones
Microphone Quality is where the audio signal starts. If you haven't got a good microphone, you can't begin to capture good audio. We tried a number of microphones from a number of different manufacturers using a number of different ways to connect them.
Managing editor Neil Hughes has settled on using IK multimedia's iRig Mic ($99.99 on Amazon.com). Editor Mikey Campbell prefers to use a MiC 96K by Apogee ($229 on Amazon).
My own microphone is either an Electro-Voice Cobalt 7 ($59.99 on Amazon) or a Pyle PDM78 ($9.99 on Amazon), which is an affordable Shure SM57 clone. I used to use a MicPortPro as my XLR to USB interface, but currently have been using the IK Multimedia iRig Pro I/O. Mike Wuerthele uses the long-lived Blue Snowball.
When we're doing a mobile interview show, we've used the iRig Mic Lav, which is a simple lavalier mic that clips to a shirt. These mics aren't amazing, but they're easy to use, reliable, and do a competent job under somewhat noisy conditions. Our episodes 155, 156, and 157 have interviews that were recorded with them, in a hotel suite, a CES show-floor booth, and a conference room.
The iMic Lav allows two mics to be daisy-chained to each other, with headphones connected to monitor them both. The downside to this product is that it uses the headphone jack. I have not yet tested them using the Apple Headphone Lightning adapter, although I am inclined to think that they'd work. I just use them with an iPhone 6 at this time, and they're excellent. At some point, I'd like to try using better lav mics with a Zoom H6, but in terms of the ultimate in portability, the iPhone and iMac Lav is where it's at.
The recording process
How we record is just as important as the microphones and equipment we use.
Early on, we recorded ourselves locally using QuickTime or audacity and then gave me links to the files to download and try and synchronize. If you remember, we had three or four participants in each episode at that time. Trying to synchronize the audio was madness.
Later, we used Skype and Ecamm's Skype recorder application. This allowed us to have my audio in one file and every other participant's audio combined together in one file. Synchronization was much easier, but the sound quality meant that my audio sounded better than everyone else's audio.
What we've arrived at today is a different approach. We use Skype to hold the call, Zencastr.com to record the call, and either Zencastr's mixdown which uses Auphonic.com's processing to adjust levels and minimize noise, or Auphonic's desktop applications to do it.
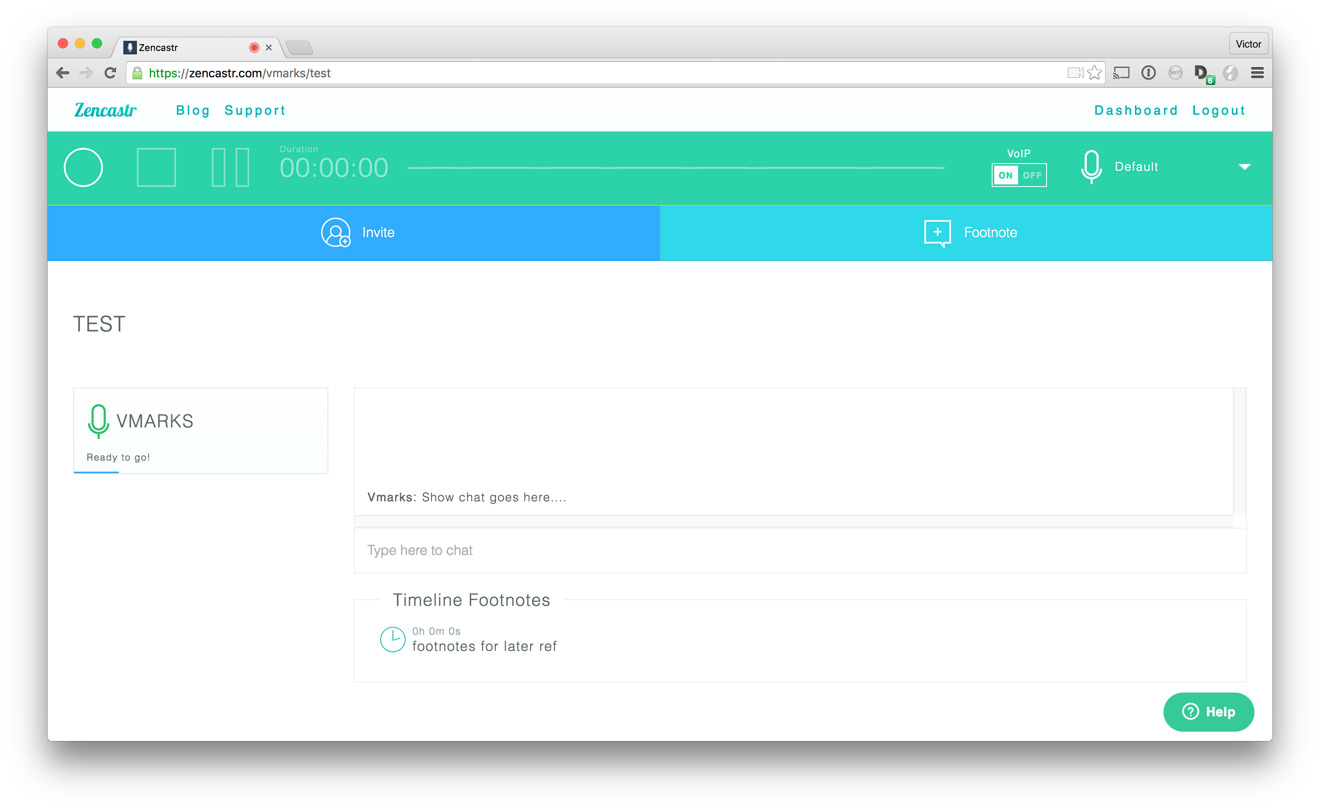
Zencastr has the benefit of recording everyone's audio locally in HTML5 cache, and then synchronizing and uploading it to the host's Dropbox account and local machine. It's first utility for us is as a synchronized record button so we all start recording at the same time. If we took advantage of all of its features, we could post-produce directly in it, use it for VOIP, and even insert sound effects while recording. We don't do all these things, preferring to do them separately or in post. That's the beauty of a flexible tool; you use it how it best fits your workflow.
Under low bandwidth conditions, when one of us is traveling, Zencastr's VOIP seems to have issues. Then, we set Zencastr to disable the VOIP and use external audio for the call. It happily uses Skype audio, which works well for low-bandwidth calls. One of the issues with Skype is that it's begun to introduce low-level audio noise into the signal. For this reason, we're going to explore Discord in conjunction with Zencastr.
For mobile recording using the iMic Lav products, with two iMic Lav daisy-chained to each other, I record directly into Ferrite. I have thought about also using iZotope's Spire, and it's something we're going to experiment with.
Post-production
At this point we're almost done, but sometimes there are unnatural pauses or things we would rather leave unsaid on the podcast.
I'll import the audio into ferrite on iOS. Ferrite is an audio editor that allows me to detect the silence, fine-tune how aggressively I want to detect the silence and then using a "tighten" option, will shrink the audio across the whole podcast. The "tighten" feature is going to appear in a future app release, and will only be available if you purchase one of the in-app upgrades.
I use iZotope RX5 for cleaning up audio (reverb, extra background noise) and intend to use RX6 soon, which adds a de-essing plugin among other changes. One of the great things about the RX software is that iZotope publishes a cookbook website to aid people in solving immediate problems, with examples addressing how to remove a siren, cat meow, or other noise. It's difficult, but sometimes the only place to meet people is at a caf, and you just have to live with the background noise. We do our best to try and minimize it, and RX is a huge help.
Then we edit in Audacity. I just haven't gotten comfortable using an iOS-only editor for adding in intro/outro music, or making precise edits. This is partly due to my using Ferrite on iPhone rather than a larger screen like iPad, and partly down to the maturity of the tools and my skill with them. I am focused on getting episodes out rather than being patient with touch input.
The last step to making the podcast ready for publication is to add chapter markers. Chapter markers work well in Marco Arment's Overcast app, and while we don't make chapter markers for every episode, it's something we've done for a few episodes by listener request.
The feedback you give us really does make a difference. We've tried using Audacity for chapter markers, and settled on Thomas Pritchard's Podcast Chapters for Mac as the best solution.
Zencastr
Zencastr is the project of Josh Nielsen, and it exists to solve both the audio quality of participants not local to the host, and solve the synchronization problem.
It's not always perfect, in that audio clocks are independent to the computer and not in perfect sync. If you record for long periods of times, the clocks can drift and audio can get out of sync. Zencastr handles this pretty well. They both record the audio of Skype or other voip apps, and also record over it's own VOIP service. Only one participant needs to have a login account for Zencastr, making it easy to use with guests. You login, create an episode, give the link to the guest or other participants, and as soon as everyone's got their mic inputs sorted out (built-in versus external mic), start recording.
One benefit of Zencastr is that even if the VoIP connection is shaky, as long as the connection holds up at all, the local recordings will be good.
There have been times where I've been traveling, and I haven't been able to actually hear the other people on the call and have had to guess at what they've said, but because they kept talking, the local recording cache that Zencastr uses has saved the show. When you stop recording, it uploads everyone's audio to your dropbox, and then allows you to kick off post-production. The post-production used is powered by Auphonic.
Auphonic
Auphonic, made by Georg Holzmann, is many things. It's a website: Auphonic.com. There, you can buy credits for minutes of audio to be processed. You can process a single audio file, or you can upload multiple files of the exact same length (thanks, Zencastr!) and process them into a single file - it will adjust the levels of each, and remove noise from them, making the gain reasonable for our listeners who like to hear us while running, for example.
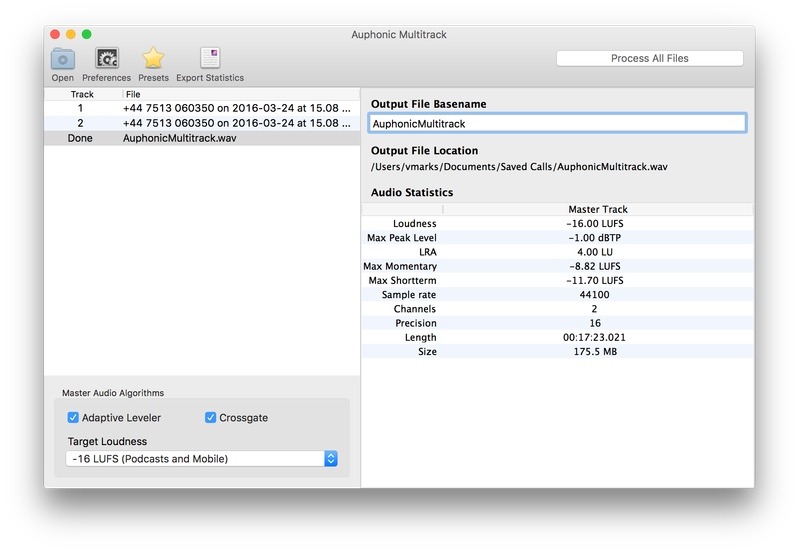
But Auphonic is also a pair of desktop apps. I've used Auphonic Multitrack when I wasn't aware that Zencastr used it behind the scenes, and before we used Zencastr. The desktop app doesn't have all the features of the web app, but it works offline, and once purchased, it doesn't require the reloading of credits for processing.
The Auphonic web app can take a text file of chapter markers generated by an audio editor like Audacity to make podcast chapters. The AppleInsider podcast used this feature once, but Audacity is the linux of audio editors, and isn't always the easiest thing to work with. It's good, but it's got some rough spots. Kudos to Auphonic for being compatible.
All tracks have to start and stop at the same time. Use one person per audio track, and put music in separate tracks. It processes the tracks individually as well as combined, to result in the fastest way to get to a good mix. The desktop app is barebones - you drag tracks in, you choose the target loudness, and select whether or not to use the adaptive leveler and crossgate options, and process the audio. There's very little to go wrong.
Being able to process audio when I'm mid-flight is also a great benefit.
Georg is prolific, and Auphonic doesn't stop there. It's also an app for iOS, and acts as a recorder. This app is great, but it doesn't work as well for our podcast needs because we have difficulty getting VoIP audio to use a microphone external to the iOS device. Some of this is because we were using lightning connections, and some of it is because even after getting a headphone jack compatible audio interface, we ran out of patience for trying additional microphones.
The biggest credit of getting our levels right, and right from speaker to speaker, keeping the noise minimal, and cross-gating so we don't speak over each other as much, goes to Auphonic.
Ferrite
Ferrite is a new addition to my toolbox. I used it in January 2016 to record the interview with iMovie team lead and Marathon Laundry founder, Glenn Reid. It does an excellent job of being both a recorder and audio editor.
As an audio recorder, if I use a microphone source like a pair of the IK Multimedia iRig Lavaliers daisy-chained, I can record one participant in the left channel and the other in the right- which makes it easy to take both tracks to Auphonic if I haven't got levels adjusted well from the start.
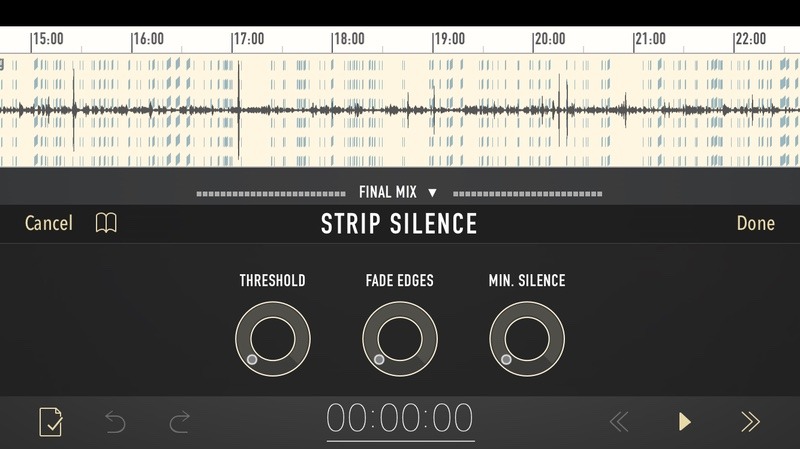
One of the features I use the most, even when I'm not using it as a recorder, is for quickly detecting and removing silence. I import the audio from the laptop using the old iTunes method.
You click on your iOS device in iTunes, scroll down past the installed apps to the ones that have storage you can save from or upload to. I select Ferrite on the left and drag the audio into the right pane, and then on the iOS device import the audio from iTunes. Tap and hold on the audio in Ferrite to select it all, tap on Strip silence, and adjust the controls at the bottom of the screen until you see the silence you want to get rid of highlighted.
The problem is, you now have all this silence between audio clips you want to keep.How do you compress them to pack the audio in tighter?
Purchasing either one of the two available in-app upgrades will enable the "tighten" feature. This feature was made available to us through TestFlight betas of the app and should be available soon. In the app's settings, I turned on two-finger-swipe to select the audio, and swiped across the whole audio, then tapped on "tighten" to collapse it all. There's an easier way, like using a keyboard and pressing Command-A, but this is how I get it done on the fly.
Podcast Chapters
We had a few requests for chapters in Overcast. You people who listen are the best, most handsome, and in possession of a taste for the finer things in life that I could ever hope to meet.
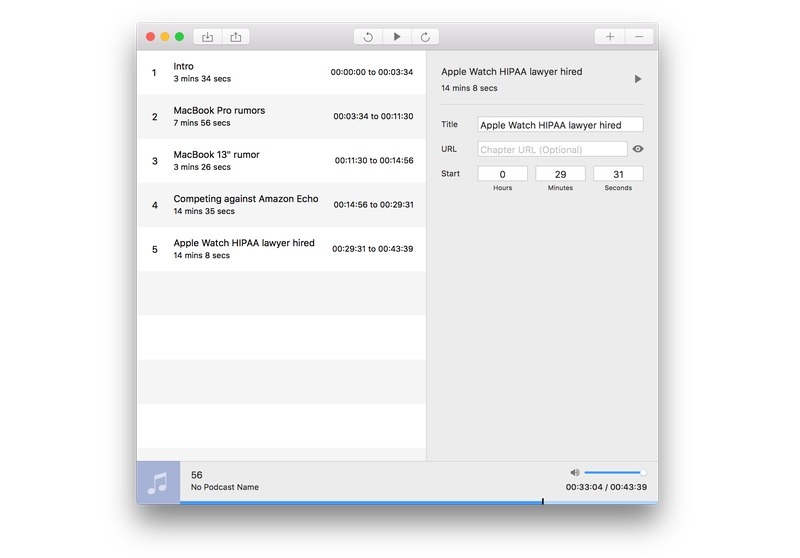
I was happy to attempt to put chapters on the podcast, and Thomas Pritchard of Podcast Chapters helped. Pritchard makes the one of the finest applications for reviewing at high speed and adding chapter markers suitable for use with Overcast.
The process is really simple. Import the MP3, being playing it, and Command-N to add a chapter at the appropriate point. Give the chapter a title, optionally a URL, and that's it. Export it, and upload the resulting file to the Web server. It's simple, without a lot of features, but it doesn't need that many - it just does the one thing well. I do like that it allows for playback at higher speeds, so I can listen through it to find the places in the audio that should be chapters that much faster.
Another method of adding chapters is Forecast. I have yet to use it, but I have it installed and am looking into it. The benefits I see here are, long silence warnings (if for some reason I've forgotten to use Ferrite to strip them out), and the ability to mark and export sponsor air checks (short MP3s of just the advertising reads, so that sponsors can hear that their ad was read the way they hoped.) It lacks instructions, and is still very young, but if I can more easily add it to my workflow with few steps, it makes good sense.
Conclusion
This is how we podcast. It's perhaps not the most streamlined of things, but all of the apps are affordable in the scheme of things, and are easy to use. It is possible to get decent audio on a budget with a combination of easy to use applications.
It took us a while to arrive at this workflow, and we considered more expensive products you recommended to us, but this seems to be the best route we could put together on an intentionally very low budget.
The real takeaway here is: support the independent developer. Every one of these applications was made by just a handful of people, frequently consisting of one-person teams. The value for money is hard to argue with, and the results are ones you can hear for yourself.