Apart from one flaw that Apple keeps not fixing, the standard Mail app on your Mac has superb ways to help you manage your messages. AppleInsider works around the flaw and examines the power of automating your inbox.
You're wondering about the flaw. It's this: Apple Mail has truly excellent tools on the Mac for helping you automatically deal with your email — but they are only on your Mac. They're not on iOS. So since Apple Mail tries to push emails to all of your devices at the same time, you could set up rules on your Mac to delete or forward some. You'd just still see them all on your iPhone before Mail could do anything for you.
That's not quite all, though. If you're using an Apple email account then everything goes through iCloud before it gets to your devices so maybe you could set up rules there. Have iCloud deal with deletions or forwarding or out-of-office auto replies.
You can. To our mind, though, the flaw is that the rules you can set up in iCloud are so limited that they're close to useless — and we just don't use them and just can't recommend you do.
However, you can work around this a little and if you do, you can also use the excellent Mail rules on your Mac to help you wherever you are.
So for instance, you can tell Mail to send a vaguely-worded automated out-of-office if you receive an email from someone you don't know. At the same time, if that email comes in from your boss, you could tell Mail to instead send an out-of-office that includes the phone number of your vacation hotel.
Or you could have Mail simply trash every message from your boss — when those messages are also CCd to your assistant.
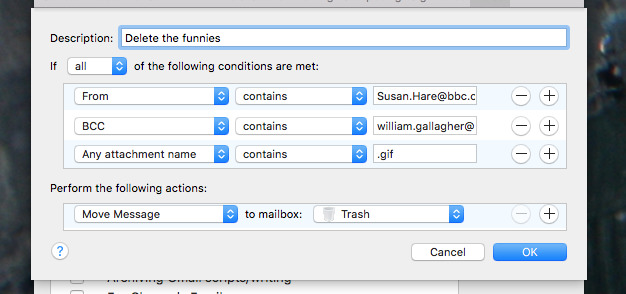
It's not just a work tool, either. You've got that friend you like but who keeps sending everyone funny GIFs. Mail can look to see if you were CCd or BCCd on her message and if you were, delete it automatically. You can do this. We do indeed do this.
All done the same way
Whatever you want to do, you first open Mail, then choose Preferences and click on Rules.
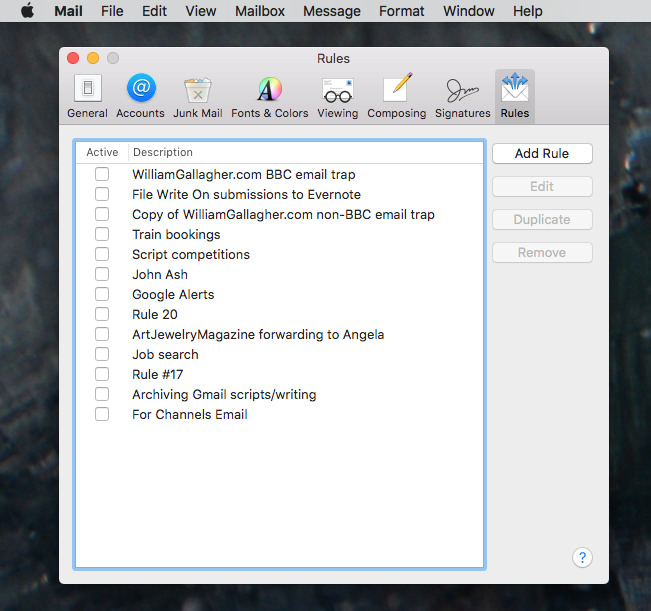
You get a list of all the rules you've set up. We've set up a lot so our Rules screen looks like this:
Each one is a separate rule and actually none of these are working. We have switched them all off: to make a rule active, you tick the box to the left of its name. Once you do that, Mail will apply that rule to every single email you ever get — until you switch it off.
Every rule also works exactly the same way. You tell Mail what to look out for such as a particular email address. Then you tell it what to do when it spots that, such as sending an automatic reply or forwarding the email to someone else.
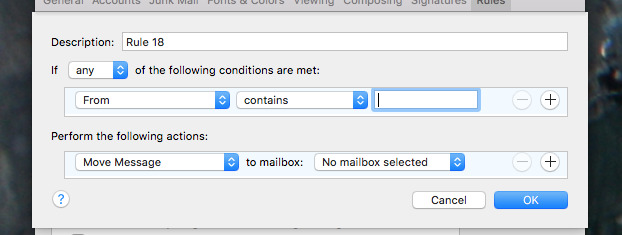
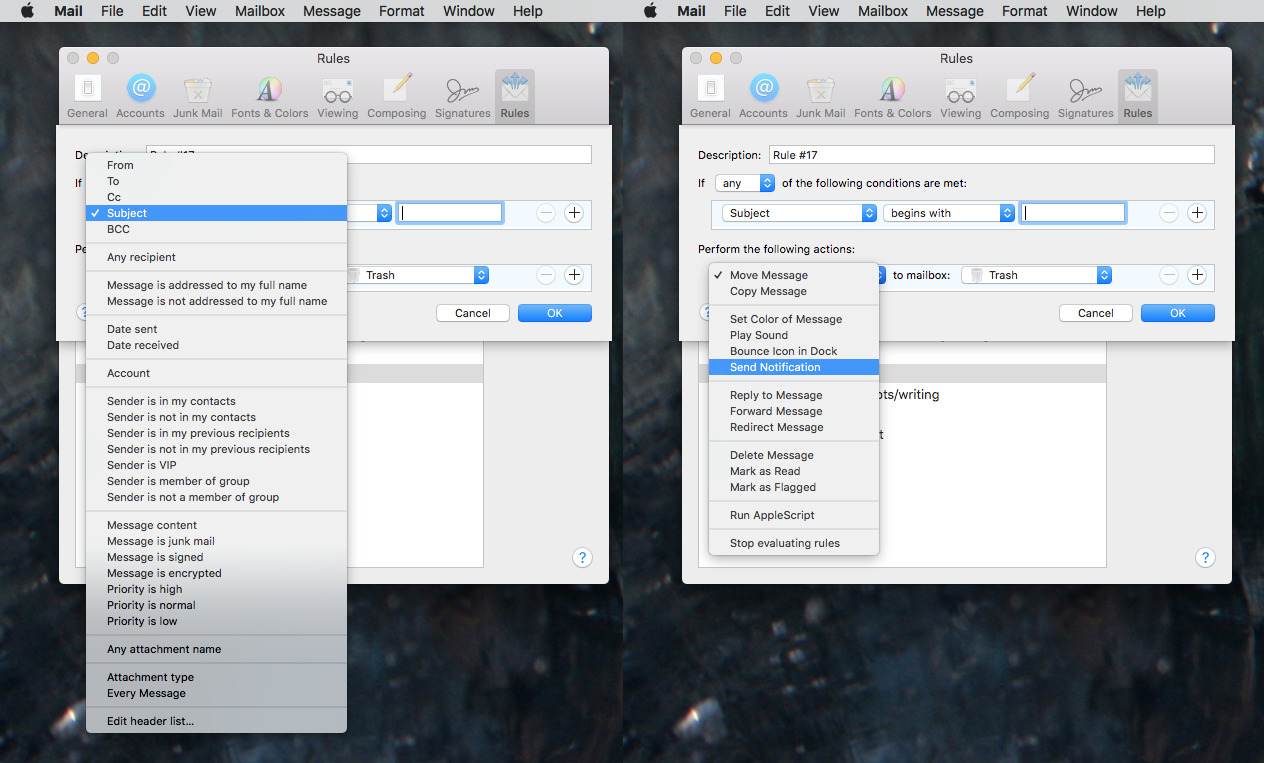
Click Add Rule and you get a dialog box full of dropdown menus.
This dialog is really in two sections with the first beginning "If any of the following conditions are met" and then those options including "From" and so on.
Then underneath that is where you tell Mail what to do.
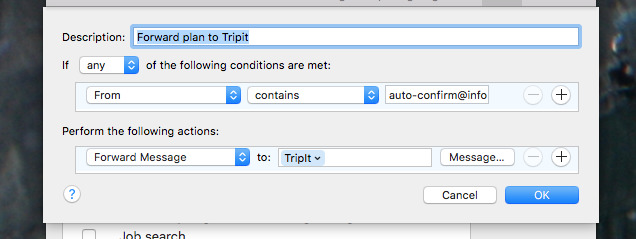
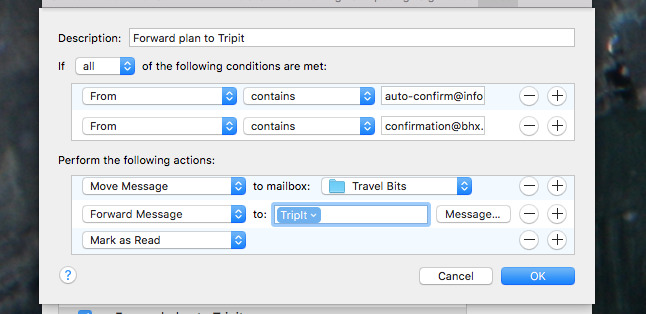
Here's that same screen set to look out for a confirmation email that we get from a train company each time we buy a rail ticket. Every time we do this, we forward that confirmation to a service called TripIt which keeps all our travel details together in one itinerary.
Click OK and the rule is saved. From now on, the rule will check every message as it comes in but you may have a pile of emails already in your inbox. One very nice touch is that Mail figures you created this rule now for a reason so it offers to run it on the existing inbox messages.
Another small but nice touch is that if you select a message before you start a rule, Mail reckons that email is what you want to deal with. So instead of our having to type in the email address of the train company, Apple Mail pops that in automatically.
Then whatever you want, you do by picking from dropdown lists. You've seen how we used them for this rule but you haven't seen how comprehensive they are.
So setting up these things is quick and the result is that you don't have to deal with every single email you ever get. You can instead get Mail to do repetitive tasks like forwarding them or to automatically reply when you're away.
This rule we've created, though, forwards the email and then leaves it there in our inbox for us to read or delete.
Plus it only works with emails that come in from this one train company and we also buy air tickets.
What we really want is for this rule to forward any travel emails to TripIt and mark them as read so that we don't have to look at them. We also have a mailbox just for travel tickets so it'd be good to have the message moved there. Like this:
This one rule now does all we want. You just add more things for it to watch out for and more actions for it to take.
To add either, you click on the plus sign at the end of the condition or the action. There's no limit to the number you add and Mail will work through them all in sequence.
Note the very first dropdown menu, though, the one that begins "If any of the following conditions are met." That dropdown on the word "any" gives you a choice of that word or "all".
In our case, we want "any" selected. That's because the rule is supposed to work when we get an email from any of the travel companies we've specified.
If instead we wanted to ditch our friend with the GIFs, we would set a rule to look for "all" conditions like this:
Hampered by Apple
Once you know you can do this, you set up rules for everything — and then you stop because of the limitations.
These rules work brilliantly but they only work at all if your Mac is on. So if you solely use a MacBook Pro then the rules only apply when you sit down somewhere and open the lid.
That's actually not a dreadful thing: it still works the rules, it still deals with the emails. It's just that you'll have seen those emails arrive on your phone. This means that you're being unnecessarily distracted by emails you don't actually need to read at all.
Worse, if you do read them, they get marked as read and Mail rules only work on unread messages as they arrive in your inbox. So you can set up all of this and have it defeated just because you happened to see the messages on your iPhone.
The two best solutions to this are to have a Mac running 24/7 somewhere and to lay off checking your email every time it bleeps at you. If you can do both, then whenever you do look at your email, the rules will have worked and all that's left are messages that need your attention.
If you can't do this or the idea of leaving a Mac on permanently troubles you for green or electricity bill reasons, you can use iCloud's Mail rules.
But you won't
You've seen how comprehensive Apple Mail rules are on your Mac. Now go to iCloud.com, log in and choose Mail.
Look for the gear icon at the bottom left of your screen and click on that. From the brief menu that pops up, choose Rules.
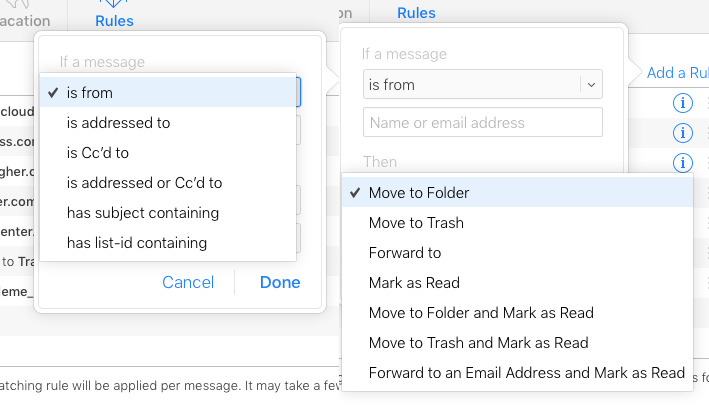
So far it all seems much the same as you now get a list of any rules you've already created. Only, click on Add a rule and you'll see the limitations immediately.
On the left is just about all you can tell Mail to look for and on the right is all you can get it to do.
So you iCloud Mail rules will watch for messages coming from a certain person or has certain words in its subject. Then it can delete them, forward and mark it unread, but that's it.
It's even less than you think, too, because you can't have more than one action in response to any one email. That TripIt rule of ours simply cannot be done in iCloud Mail.
This is so anaemic that we would completely disregard iCloud's mail rules but for this fact that they work all the time. They work whether you have a Mac switched on or not. Plus the work on all your messages before they get to your devices.
That's a very powerful feature — but it needs to have Mac mail's very powerful options to make it worth using.
 William Gallagher

-m.jpg)


 Andrew Orr
 Christine McKee
 Malcolm Owen


 Sponsored Content


25 Comments
One thing I want Apple to fix in mail is when you accidentally hit the junk mail button for a mail that some way you can stop your emails from that person from always going to junk. I have tried and tried to get it to stop going there....
The best solution is to run Server on a Mac and set up sieveshell scripts to manage incoming messages before they're actually delivered.
Except Apple has supposedly deprecated support for smtp and imap on future versions of macOS.
I have tried a couple of times and in ge end always have up with the rules due to its limitations as mentioned in the article. In the end these make them quite useless to me.
Server-side rules, anyone?Oh, and OT: is there a way to forward iOS push notifications from arriving st one account to another?
Does this work for ALL mail going through Apple Mail (including forwarded mail) or only Apple's email addresses (.me, .mac, .icloud)?
Also the same question for iCloud's rules....