Apple's note-taking app went from a toy to an indispensable tool when it was revamped in 2015. Yet three years on, there is still more to discover in it. AppleInsider looks at ways to make a superb app even better.
Not to be cruel here, but Apple Notes used to be a joke. You can't remember if was even on the Mac, you just knew it as this iPhone app for typing shopping lists. Anything you typed was written in Comic Sans, too, so this was a toy app in looks as well as features.
At least, it was until 2015 when it was radically revamped.
In one move, Apple Notes appeared to equal and maybe even exceed the rivals that had sprung up in the meantime. Evernote, OneNote and more had demonstrated that there is a demand for a great note-taking app and Apple was late to the party.
Apple often is. Usually, it succeeds anyway because it takes what others have done and makes a better, more compelling, and easier to use offering.
This time, though, there were two issues. For one thing, it wasn't clear whether Evernote fans would or even could swap to it. Then more seriously, all of the rivals had years upon years in which users were continuously adding notes. There was no way to be sure that the new and improved Apple Notes could work well when loaded down with thousands of notes.
Now we know what it can do, and how it handles volumes of information. It handles most things very well — but not everything. Apple Notes also handles moving people over from Evernote, but not flawlessly.
It's also added shortcuts that are the kind of boon that makes a native Apple app succeed over third-party rivals — but some of those shortcuts are clunky to set up.
Nonetheless, with these five tips Apple Notes has made it into the app we turn to nearly every time on both iOS and Mac.
1. Best-ever shortcut (iOS)
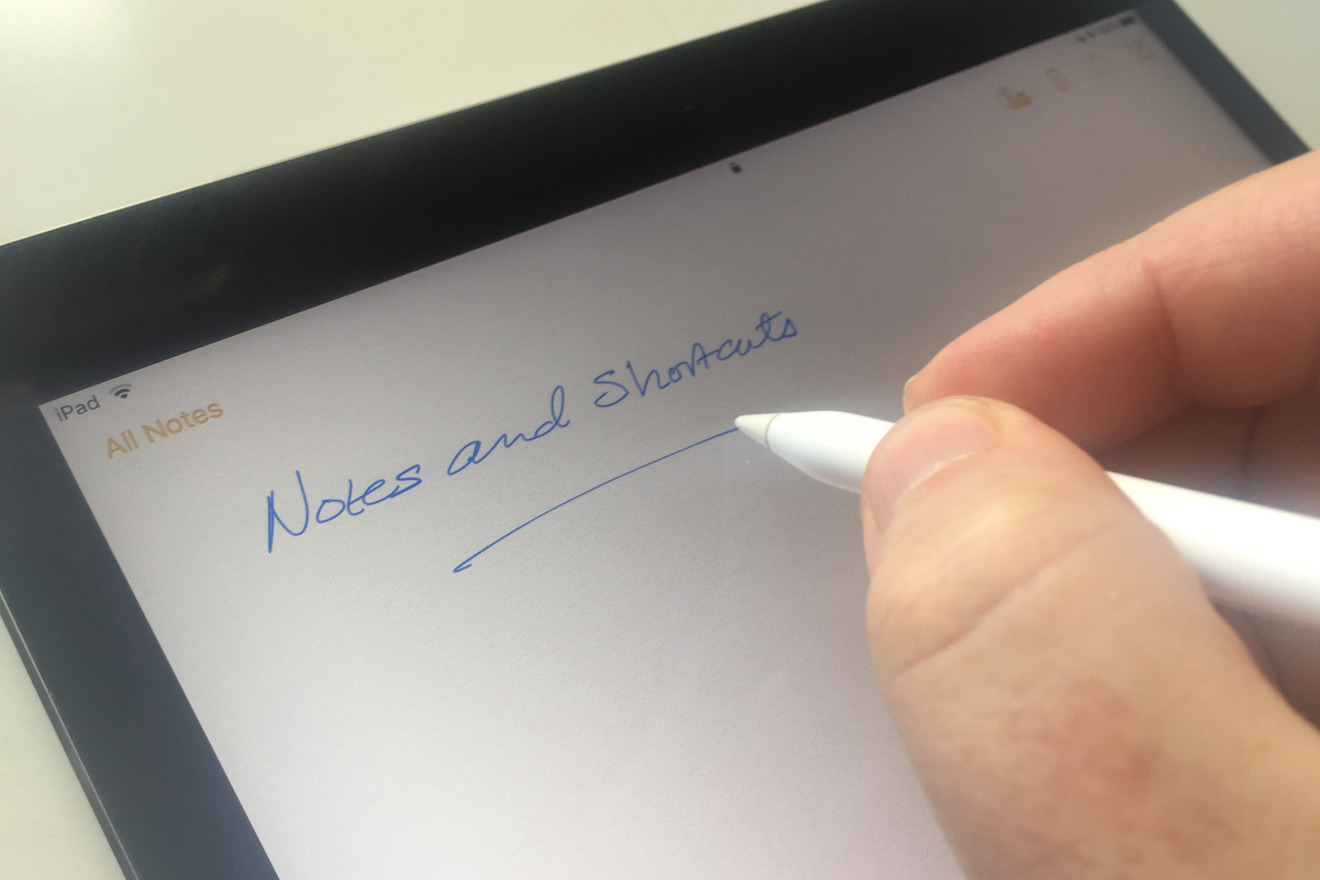
Switch on your iPad, tap your Apple Pencil on the lock screen and Apple Notes opens immediately. This is the fastest of our five tips and we simply never get tired of it. This makes the iPad feel as quick as paper. We pick it up and we're scribbling in a new note.
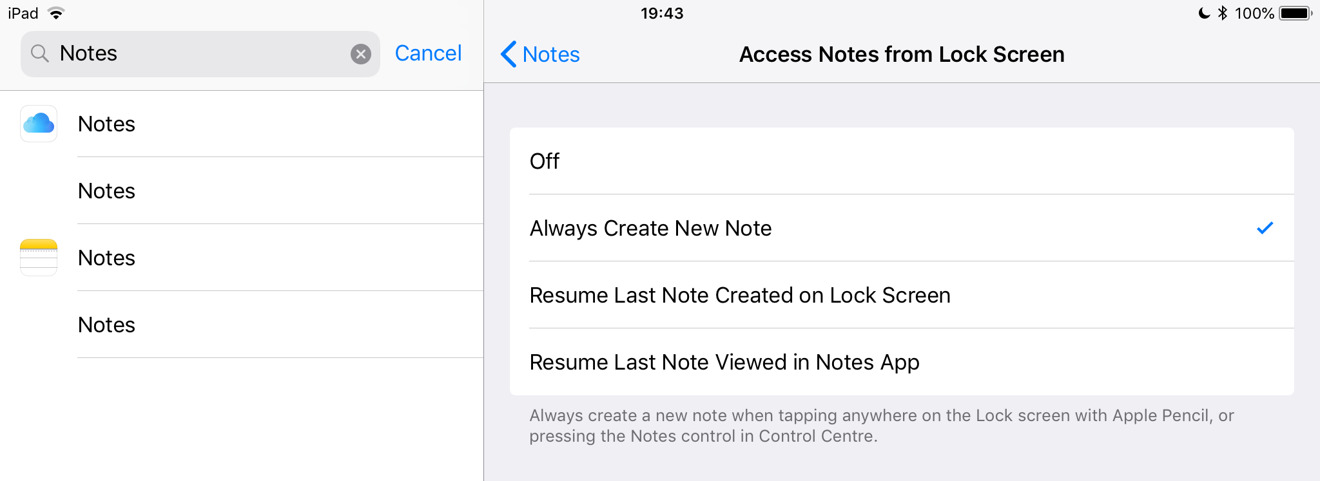
There is a little more you can do, however. We have this set to the default which is that when you open the app this way, it always creates a new note.
You can instead, though set it to resume the last note you wrote. There's even a choice of just what note this 'last' one is. You can set it to Resume Last Note Viewed in Notes App so that you always pick up whatever you were doing before.
Or you can select Resume Last Note Created on Lock Screen. That means you could keep one note that you only scribble on by doing this. You could keep adding or amending a check list of what you're doing today, and have that always available to you regardless of what other work you're doing in the Notes app.
2. Clunky but good shortcut (iOS)
As well as today's notes and anything we create via the lock screen tip, we do also have many notes that we keep coming back to. Rather than searching for them, however, we create a shortcut.
You can make a shortcut to any note: you can create an icon you tap to take you straight into it.
It does take some setting up, though. First you create or pick the note, then you go through the same steps you would if you wanted to collaborate on it with someone.
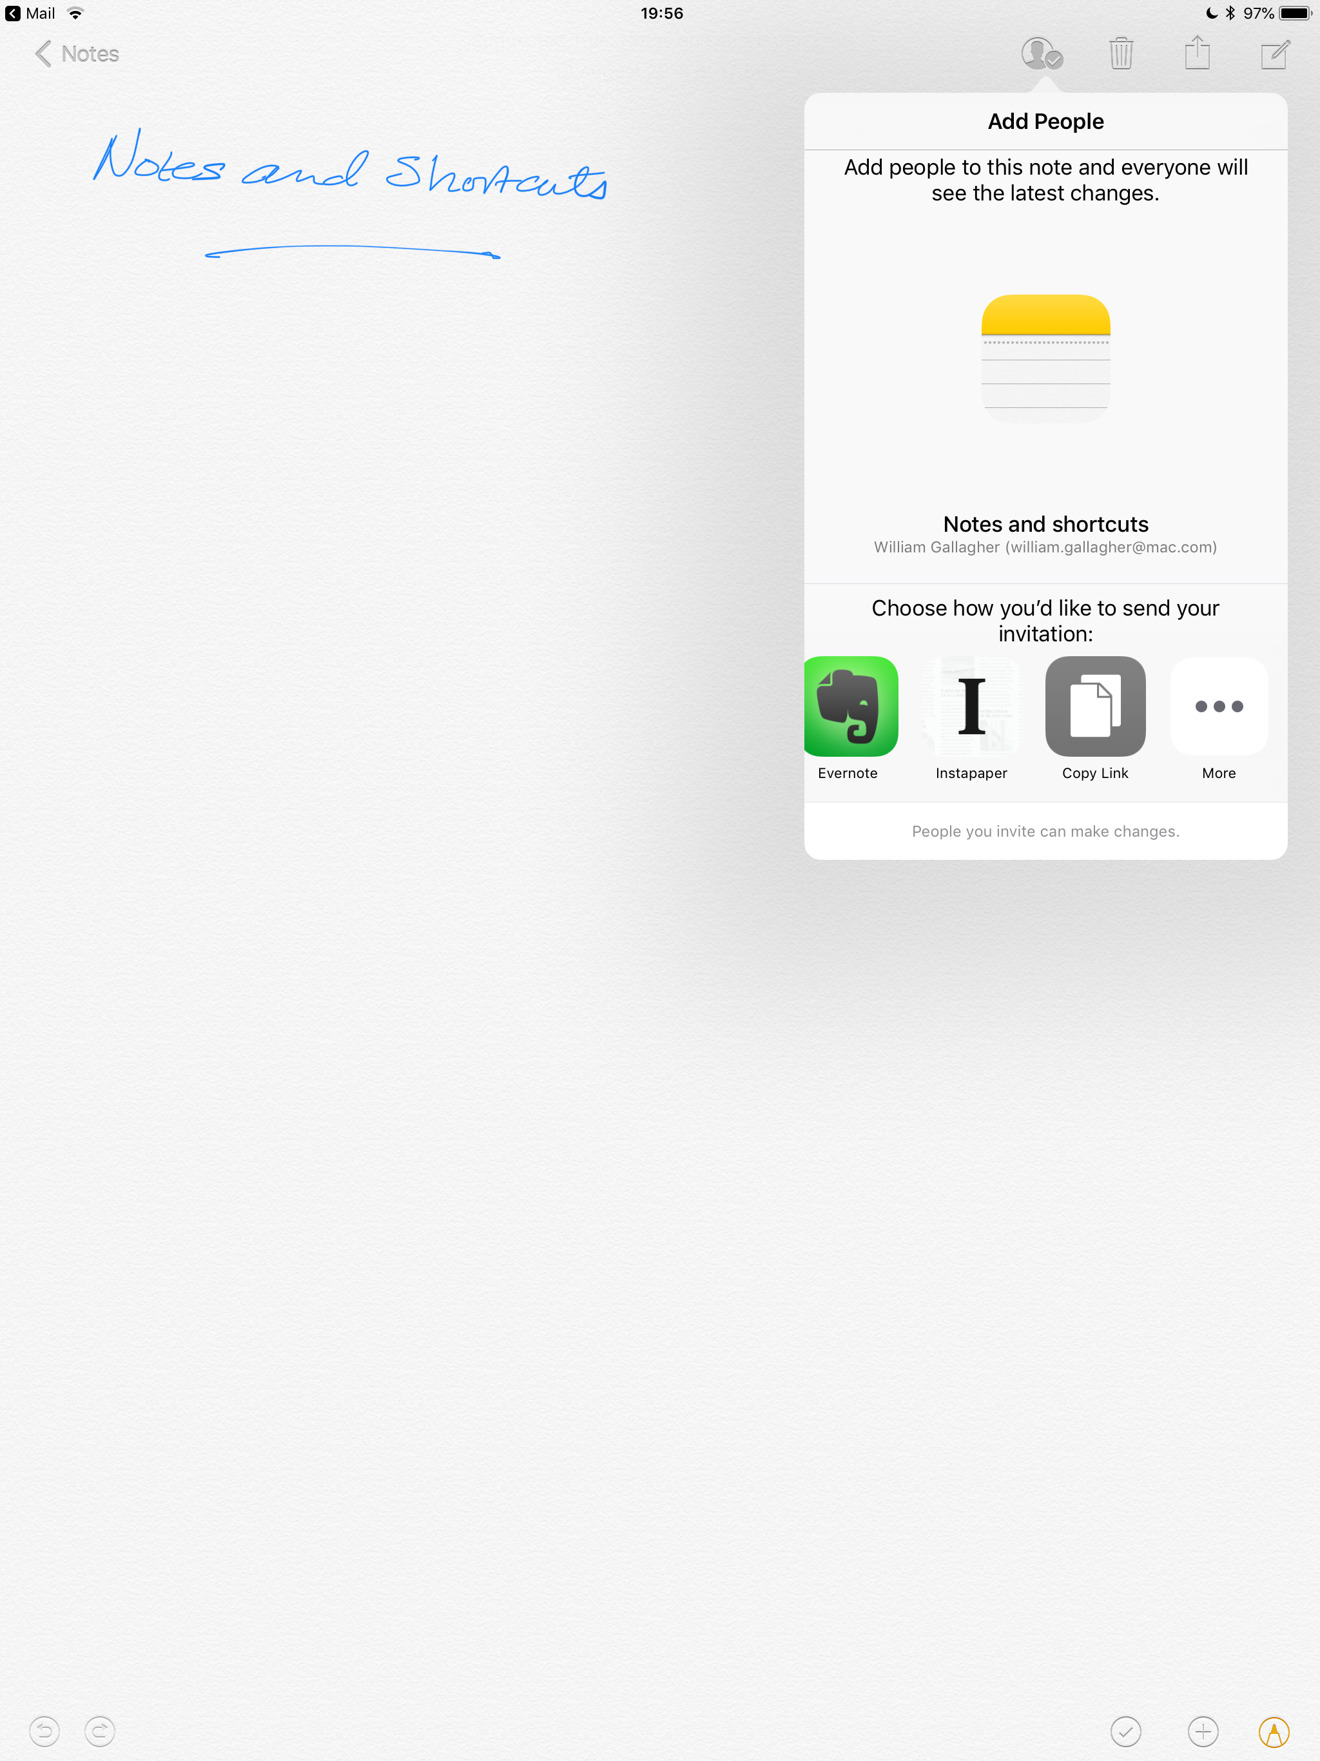
Toward the top right of Apple Notes on the iPad or iPhone, tap the Collaborate button.
Arguably, we're collaborating with ourselves, we're making this easy for us to go back into the note later. Yet this feature is really intended to be for collaborating with other people so you have to go through a rigmarole of adding these people.
First you have to tap the Copy Link button — except you probably won't see it. At the foot of the Collaborate pane there is a section headed "Choose how you'd like to send your invitation" and under that there are icons for various apps including Mail.
Swipe to the right and you'll find Copy Link. It's probably the last one: if you end up using this a lot then press-and-hold on its icon and drag it to somewhere nearer the front of the list. For now, though, tap on it.
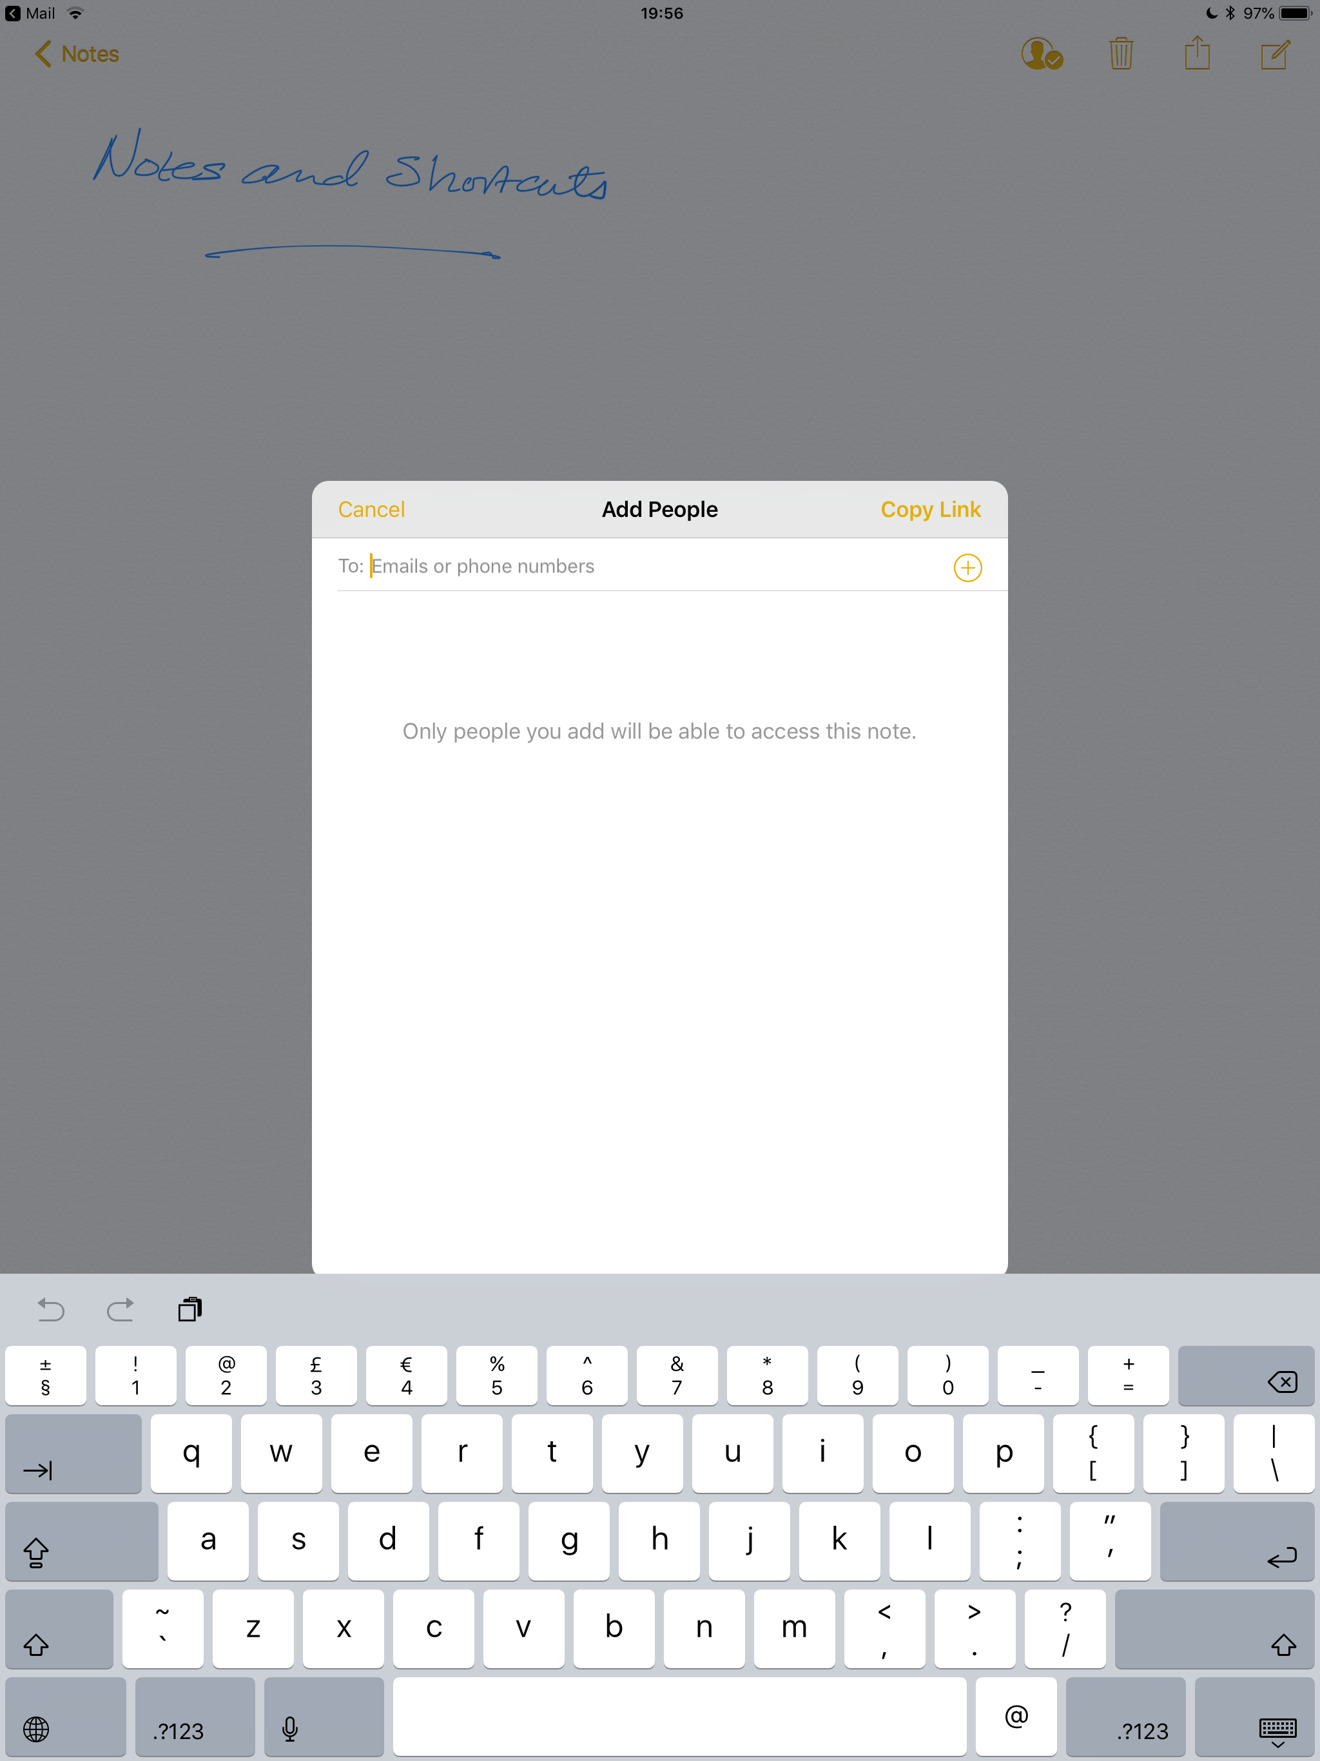
Apple Notes displays an email-like form called Add People and with the cursor at a To: field. Ignore it for now, you want the Copy Link button at the top right.
Tap on it. This email-like form goes away and the direct link to this specific note is now on your clipboard.
Test it out by opening Safari and pasting it into the address bar. You'll briefly see the word "Retrieving" and then Safari will switch over to Apple Notes and your note will be in front of you.
It would be great if you could pause Safari while it had this link and use the browser's Add to Home Screen feature. You can't, though, so you've got a link and nowhere to put it.
Not to be meta about this, but you could save that link in Apple Notes. You could create one note that has many such links acting effectively an index to them all. That one note will work equally well on macOS as it does on iOS.
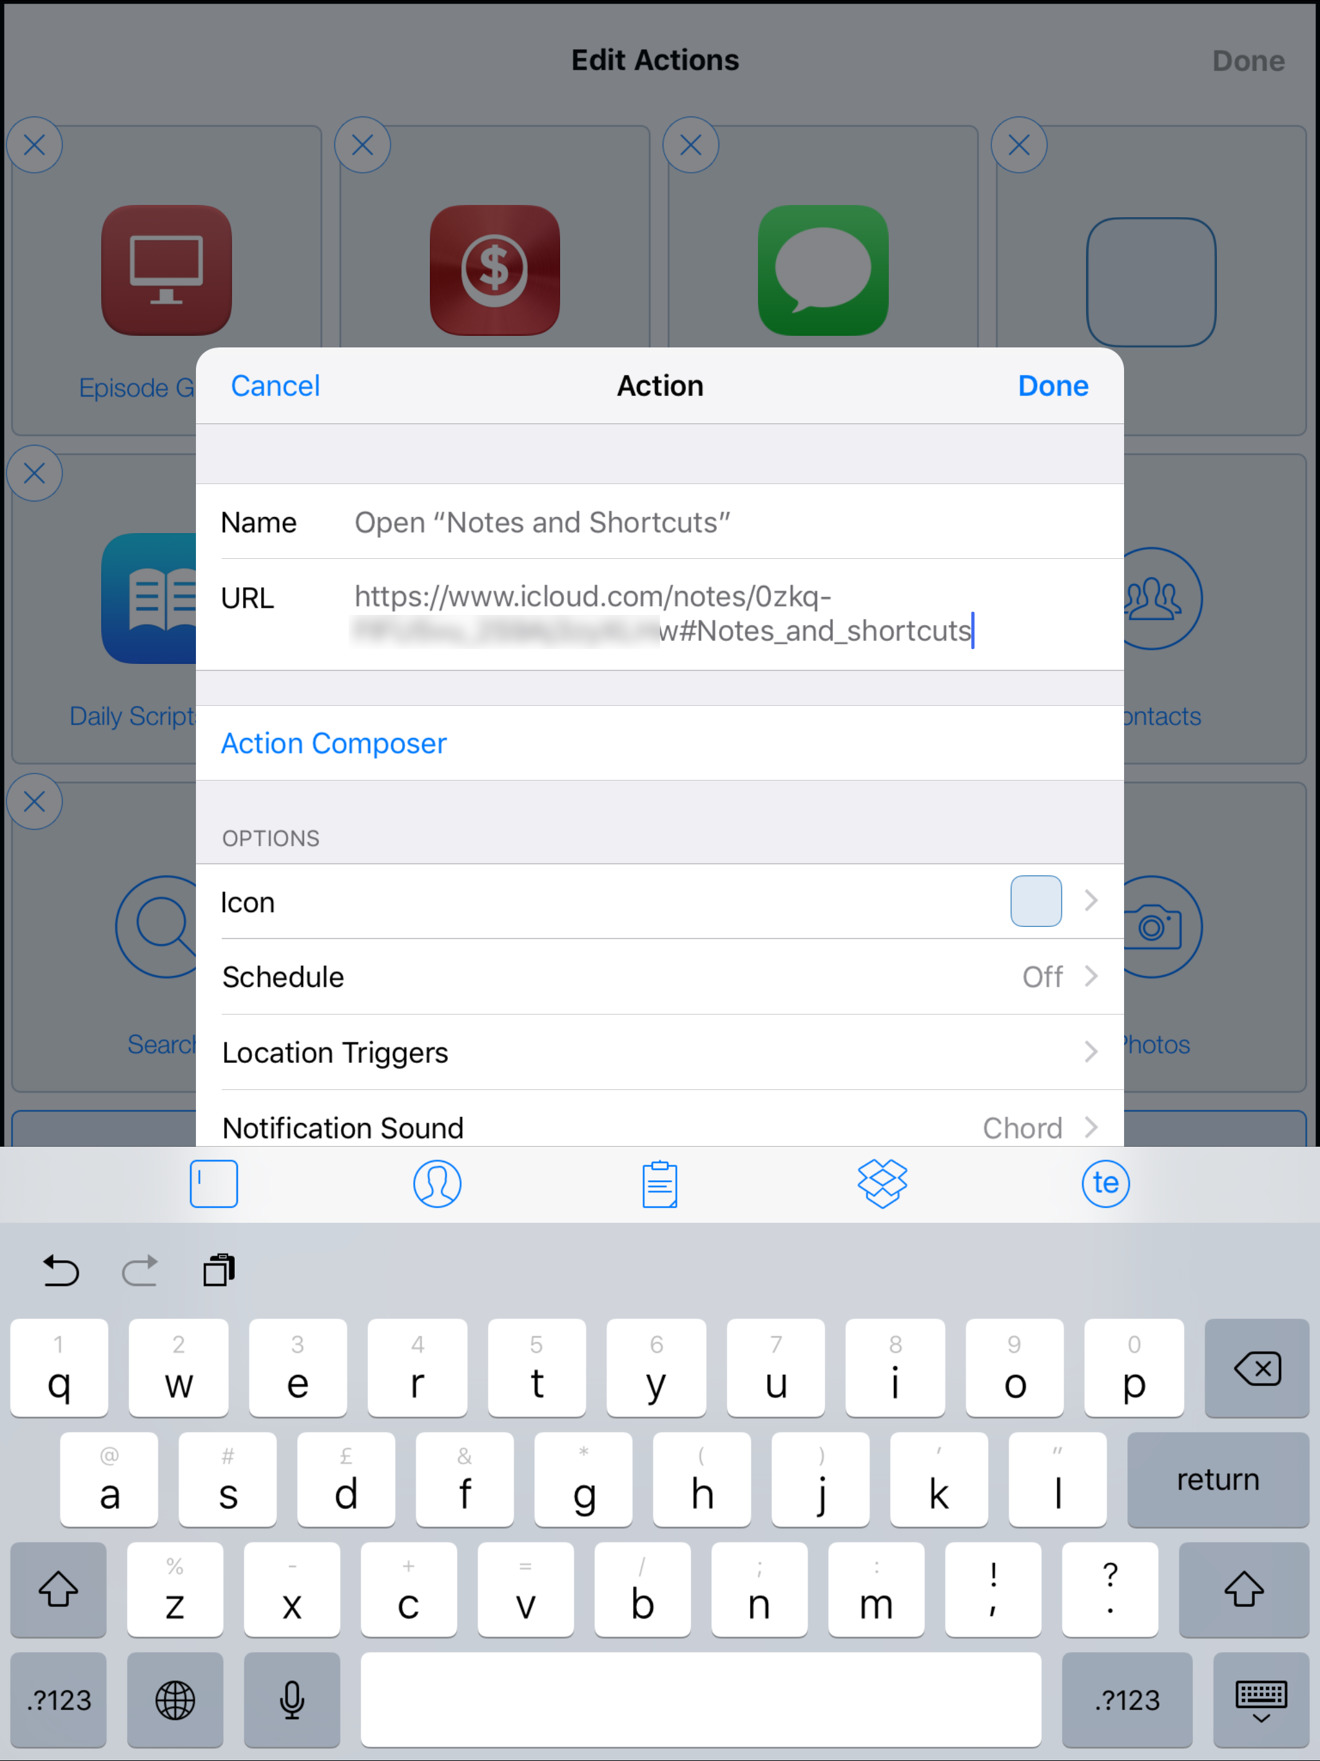
Or, you could use another app like LaunchCenter Pro. Open that, tap the edit icon, and add a new Action.
Actions in LaunchCenter Pro can be quite elaborate but they center on a URL. This link in your clipboard is perfect so paste that in. Give the action a name, choose an icon if you want, and then save it.
Now any time you open LaunchCenter Pro you have a button to press that will take you into the specific Apple Notes.
That's handy yet it's still not handy enough for us. It doesn't feel sufficiently quicker than opening Notes ourselves, although it does then save us searching for this particular one.
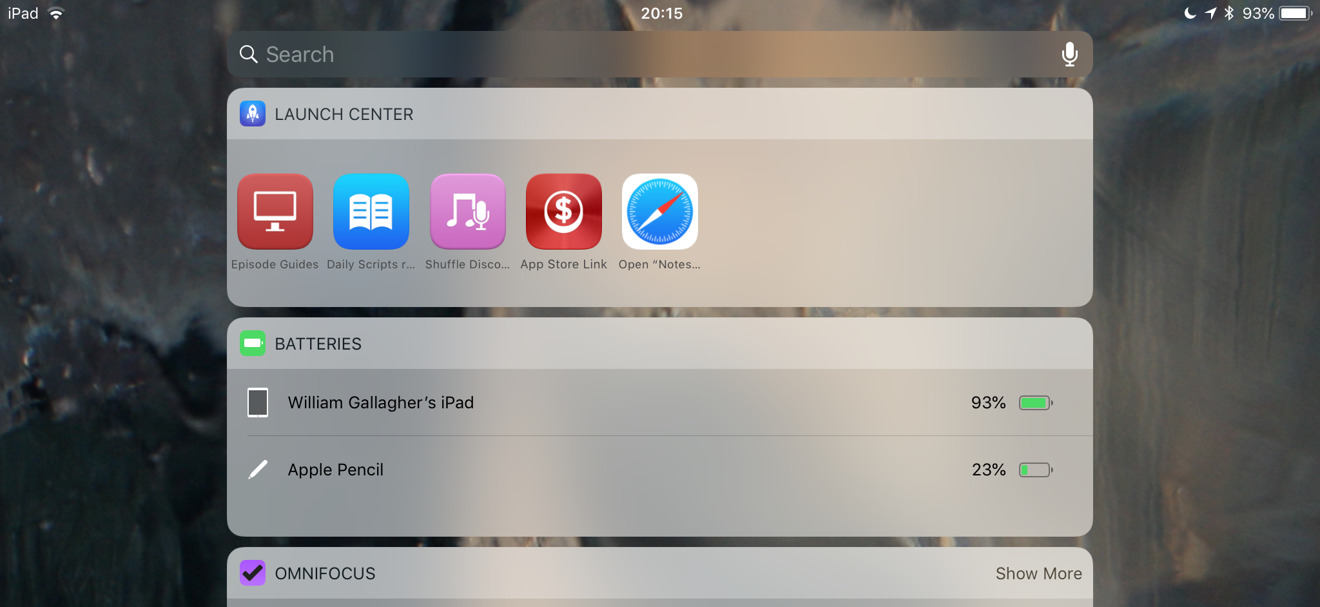
Instead, we take the LaunchCenter Pro idea and go just one step further. Go back into LaunchCenter Pro, tap the Gear icon at top left and choose Today Widget.
On the pane that appears, choose the plus sign. A list pops up of all the LaunchCenter Pro actions you have. Find the one you just made for this note and tap the radio button next to it. Now tap Add. Close this all by tapping Settings and Close.
That's created an icon within the LaunchCenter Pro Today widget. So long as that widget is active in Today, you can open your iPhone or iPad, swipe to the left and tap on the button to just go straight to this note.
This is the longest of our five top tips and it's definitely the one with the most steps. But, it is also by far the handiest.
3. Mass import from Evernote (Mac)
This has to be done on the Mac and we quite understand why. It could potentially involve thousands of notes all at once.
In theory, you can move completely from Evernote to Apple Notes in one swift move. It's just that the only speedy part is in how little you have to do to start the process.
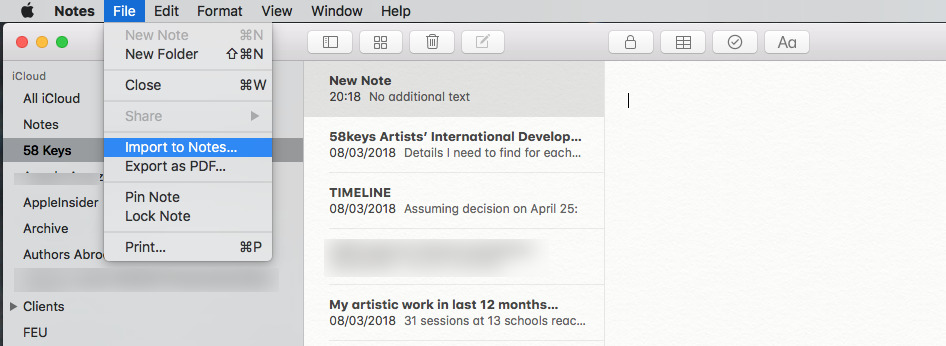
Open Apple Notes on your Mac and choose the File menu, then Import to Notes and that's it. An Open dialog appears and you use that to find your Evernote notes. That's slightly harder than it sounds, though.
First you have to create your Evernote notes, and take the notes you have and turn them into a form Apple Notes can understand. You do that in Evernote: open that app on your Mac, choose File then Export note and you're done.
If you do that, you export one single note into a file that Apple Notes can then import. You're not very likely to have one single note to move over. So, you have to select multiple notes or open Evernote's folder-like stack and select those first.
Think about whether you need to move at all. We've been running both Apple Notes and Evernote in parallel for three years because the move is more tricky and there is still a feature Apple's app lacks.
What's tricky is that when you move over a lot of notes, we found we'd sometimes end up with garbled text. It was only occasionally and it was never predictable, but we preferred to find out by importing a few at a time. Then, too Apple Notes even warns you that notes may look different.
That missing feature is also an issue. As of now, Apple Notes still can't record audio directly into a note the way you can in Evernote. You can drag an audio file in, and if you import an Evernote note with audio then that survives the move.
For this reason, we move over notes as we think of it and we still go to Evernote to record audio when we need both that and text together.
This sounds like a tip saying you should stay with Evernote, but it really isn't. Whenever we're creating anything new that doesn't involve audio, we automatically do it in Apple Notes. We do it because it's easy, because we like it, and because Apple Notes turns out to be perfectly good when you have a lot of data in it.
Or nearly always.
4. Be careful with tables (Mac and iOS)
There's always a Tables button in the top icon bar of the macOS version. On the iPhone or iPad, you have to start a note and tap on the pencil icon first. Then you get a Tables icon above the top row of the on-screen keyboard.
Tap it. You immediately get a blank table of two rows and two columns. It looks like the way you do tables in Numbers but it's not as clear. The quickest way to get a third row, for instance, is to click in the bottom right cell of the table and hit Return.
To create new columns, the quickest way is to click or tap on the small icon floating over the column. On the iPad or iPhone, you immediately get options to add or delete columns. On the Mac, you have to then click on a dropdown menu before you get the same.
That would be the tip: how to quickly create tables and then make them the size you need. Unfortunately, we have another Tables tip and it's that you shouldn't use them very much.
The concern over how Apple Notes would behave when you have thousands of notes has turned out to be unnecessary but it was still sensible to be cautious before committing a lot of data. We've had no problems with countless notes but we did very swiftly hit severe trouble with a table.
We had one table that typically had one row per day: sometimes more than one, occasionally as many as ten, but typically just the one. Each day we added various bits of information, around three short entries in columns and by March it was unusable.
The note would take a long time to open, it would take even longer to tap to add a new line to the table — and Apple Notes would regularly crash.
We tried splitting the table up into months so one table for January instead of one for that, February and March. This helped but by the time we got to the fifth table in May, we were back to the same problems.
We didn't solve it, either. Or rather, we did, but only by moving this document over into a new Numbers spreadsheet and continuing to work on it there.
5. Scanning (iOS)
This is another one where theory and practice don't entirely tally but still, it's to do with the one feature you show Android users who are annoying you.
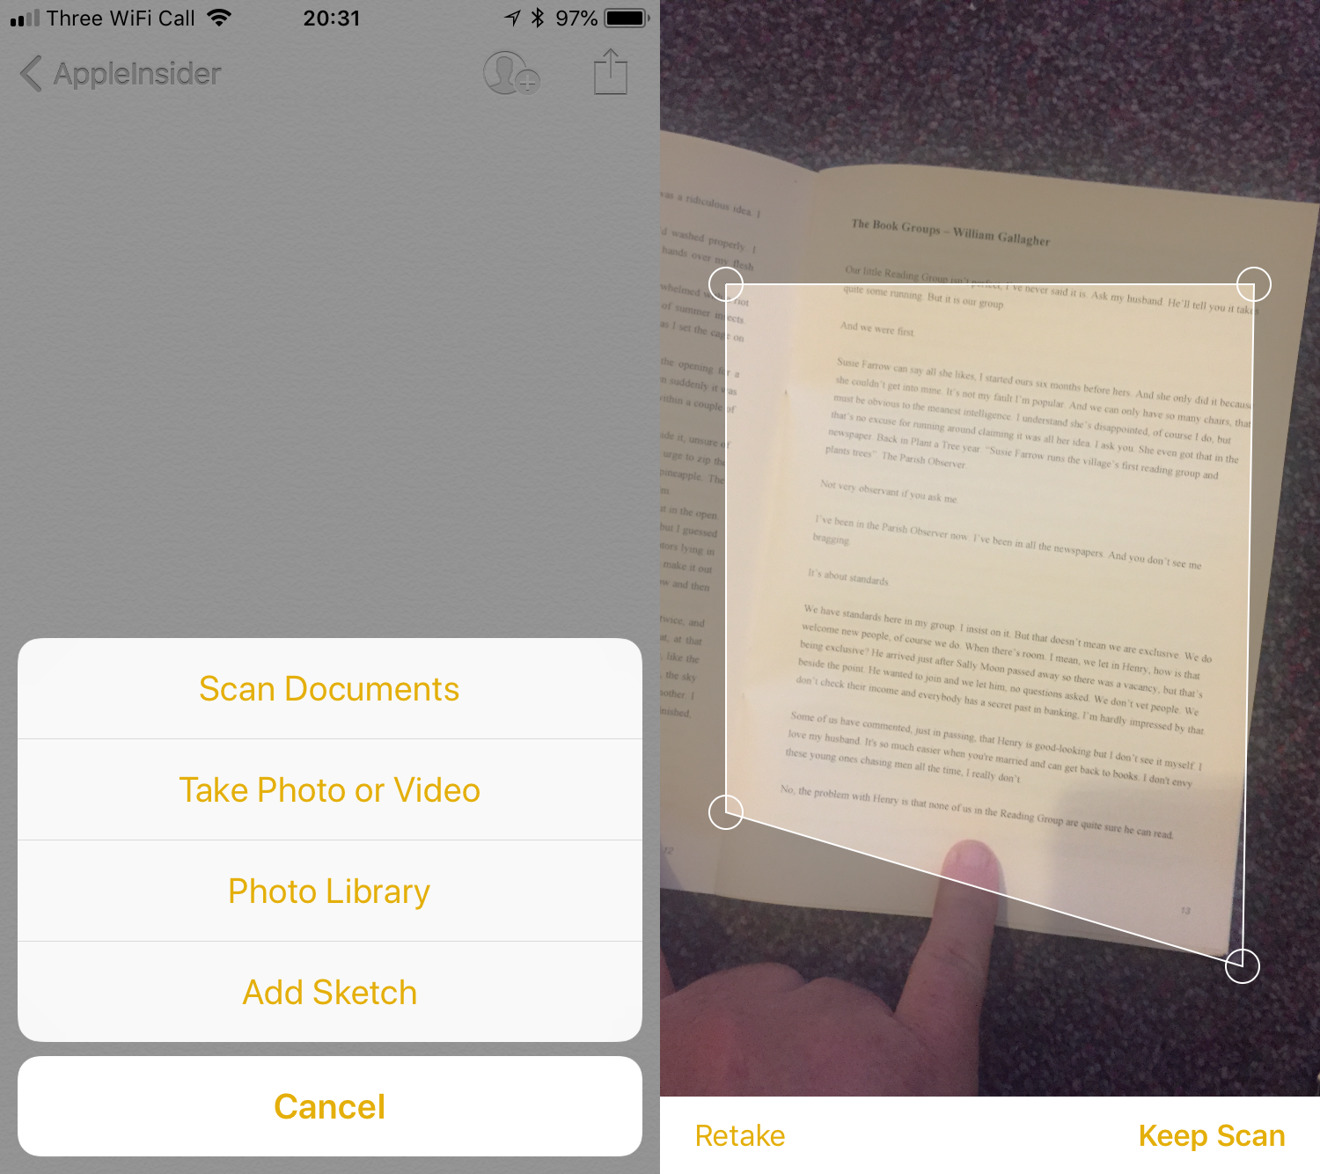
In a note on your iPhone, tap the round plus sign at the foot and choose Scan Documents from the menu that appears. If you've ever scanned a document using your iPhone, you recognize what happens next. The camera switches on and as you move the phone over a document, Apple Notes attempts to find the edges.
You can do this at an angle and Apple Notes will interpret the scan so that it straightens everything out like magic.
Except when it doesn't. When it struggles, it's usually over trying to work out what is the document and what is the background. Most commonly, it's because you're doing this when there isn't enough light so you'd be best waiting or moving to a better lit room.
If you can't, though, you can tell Apple Notes where the edges of the document are by moving handles and creating a shape over what you want to scan. Then just tap and that scan is taken.
You can take scan after scan without going back to the note so it's quick to fly through a document, knowing that it's been captured and saved in a Note.
That's the whole point
You know that it's been saved to a Note — and you know without thinking that you will always be able to retrieve that scan or anything else you like.
Truly the benefit of all note-taking apps is when you can forget the app and just reach for the nearest screen, unthinkingly sure that what you want is there.
Apple Notes gives us that and we'd be impressed no matter what. Yet considering the toy that Apple Notes used to be, if you use these tips then it is astonishing how powerful this app now is.
 William Gallagher








-m.jpg)




 Charles Martin

 Malcolm Owen

 Christine McKee

 Marko Zivkovic
 Mike Wuerthele





6 Comments
Re tip #2, you can add the shortcut as a home screen button if you use the Workflow app. From inside your workflow, just tap the gear and then the “add to home screen” link. In this case, tapping that newly created button on your home screen will auto-launch the Workflow app, then switch to Safari, and then finally the Notes app, so it feels a little clunky, but it gets the job done.
I’m an architect and tried sketching with it. (Rough ideas when on the go - sitting at a cafe, on a bus, that type of thing.)
Once you’ve drawn a basic house plan (say the basic walls of the existing house), you can copy and paste it several times. You can then edit/add to each version as you work out different ideas.
It works great...up until the third plan...then the glitches make it unusable. It’s as though the original and the different copies are still interlinked in some way - drawing or deleting on one just often changes (only sometimes...which is even weirder) the others.
I’m finding notes folders rather useful, as long as I don’t overdo the number of folders that is.
My best tip is to supplement Notes with AnyList. Those two apps compliment one another nicely.
Another tip is use Siri - Say "Hey Siri, open my todo note", or "Hey Siri, add get milk to my todo note" I think this might be faster than the today widget for a specific note, but it does require you to remember what you called a particular note. Or you could ask siri to search notes for specific word,