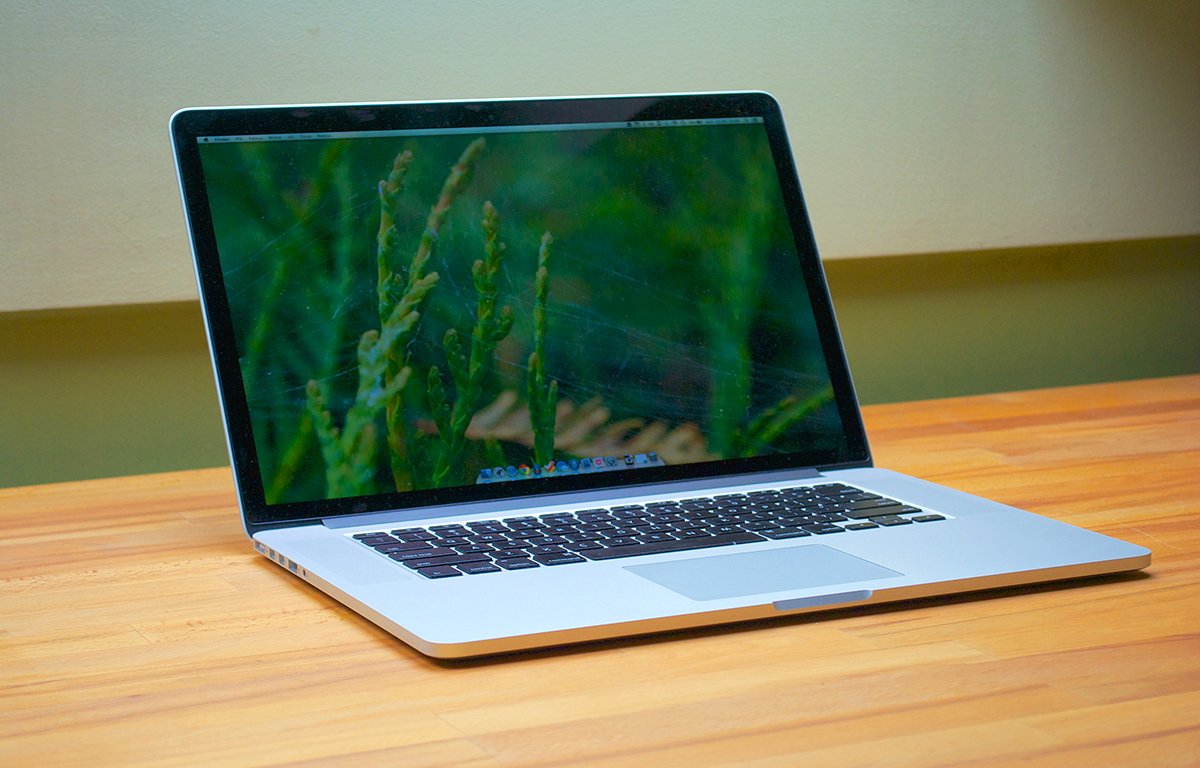
Older MacBook Pros are still a viable option for mobile work in this day and age. Here's how to refurbish a 13-inch MacBook Pro from 2012 and bring it up to scratch.
In this refurbishment tutorial, we'll look at how to refurbish a 2012 MacBook Pro 13-inch. The model we'll be looking at is the MacBook Pro Core i7 2.9 GHz Mid-2012 model with Apple identifiers of MD102LL/A - MacBookPro9,2 - A1278 - 2554.
You can read the full specs for this model on everymac.com
There are a number of these models used on eBay for around $300 today. Although they can't do everything modern Macs can, they can still be useful considering the low cost.
Essentially the same process and steps apply to the 15-inch non-Retina 2012 MacBook Pro as well, although they may vary slightly.
These models are limited to running macOS 10.15 Catalina maximum and can be upgraded to 16GB of RAM. Older RAM is cheap now and you can get a 16GB upgrade on Amazon for around $17.
You'll also need a new 2.5-inch SATA SSD drive to replace the existing hard drive. 1TB SSDs are cheap currently - ranging between $35 and $60 dollars on most online retailers.
Getting started
To begin you'll need several items: a small screwdriver and Torx toolkit, a soft surface such as a bath or beach towel or large soldering mat, an X-Acto hobby knife, and some 1/4-inch wide Kapton tape for electronics.
You'll also need a pair of tweezers, and a bright light source since some of the components are incredibly tiny.
You'll probably also need a can of compressed air or an air compressor to blow any dust and dirt out of the machine as you remove parts.
The plastics and materials in older computers are known to degrade over time and it is extremely easy to damage your computer while repairing it. Proceed at your own risk.
Step 1: Remove the rear cover
To begin, use a tiny screw bit from your toolkit and a screwdriver to remove the ten tiny rear cover screws. Flip the computer over on its face and lay it on a soft surface:
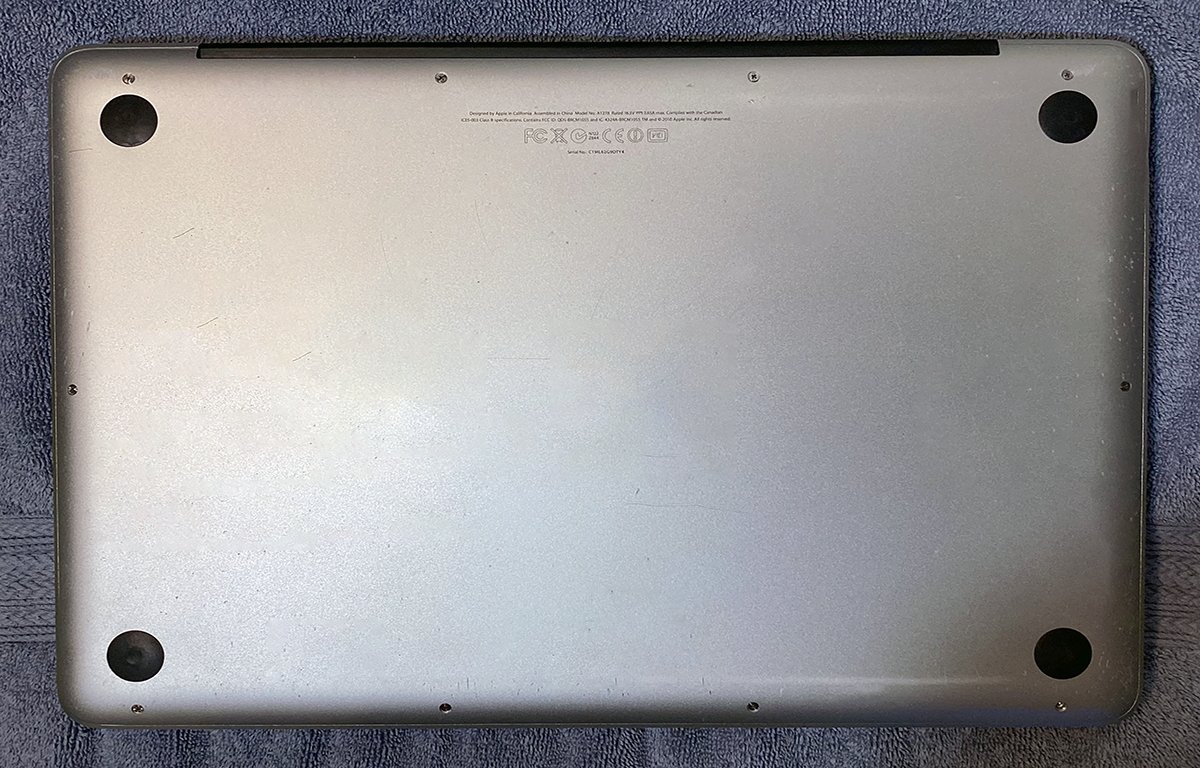
The rear of the MacBook Pro. Note the ten tiny screws.
You may want to lay out the screws on your work surface in the same arrangement as they are on the computer after removal so you can remember where to re-install them.
Note the three screws in the upper right corner are longer than the others, so make note of where they get reinstalled.
Place the cover aside.
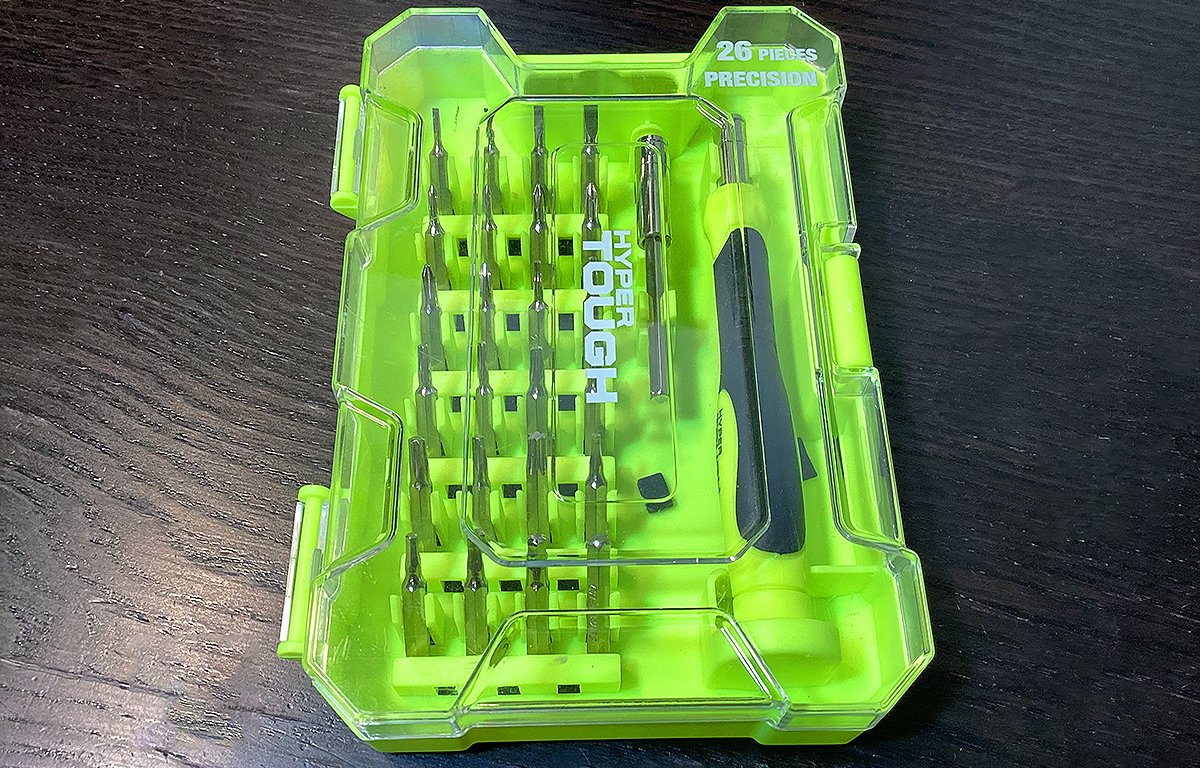
Use a small repair toolkit such as this one for repairs.
Step 2: Remove the hard drive
The 2.5-inch hard drive is located in the lower-left corner of the computer. Remove the two small black captive screws in the plastic bar holding the drive in and remove the bar:
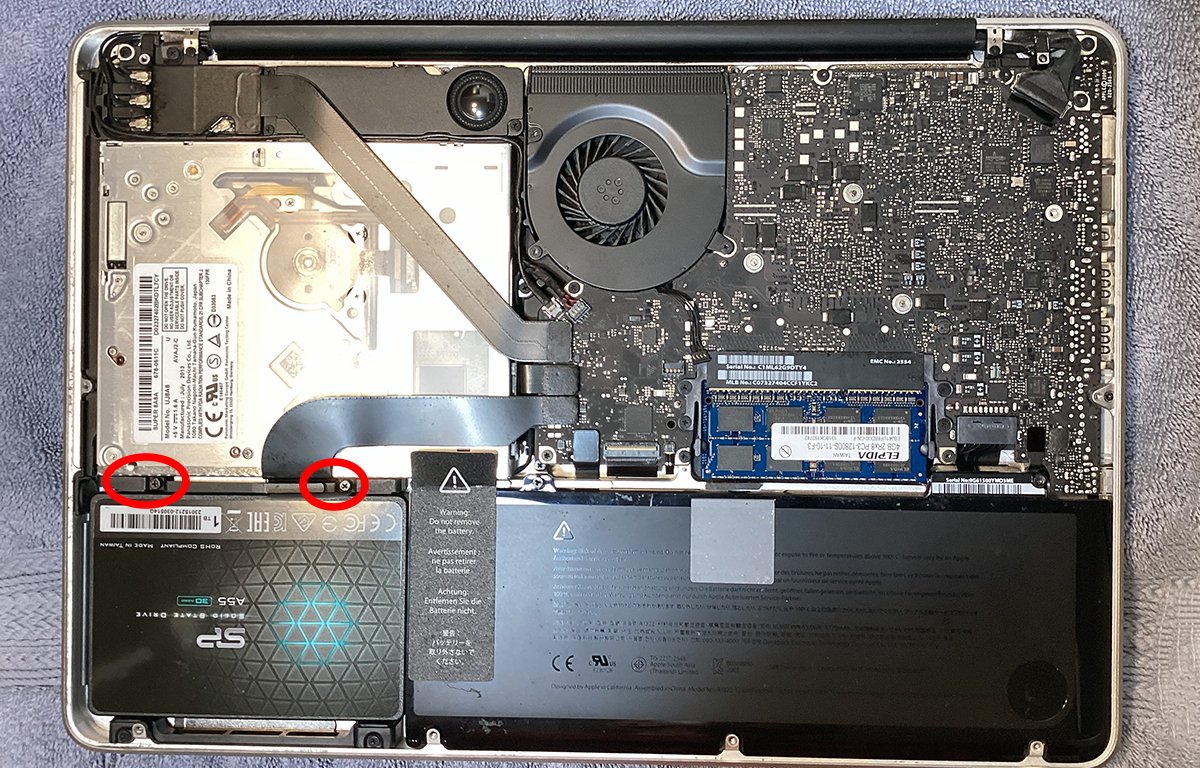
Remove the two drive screws.
Lift the drive out and carefully disconnect the cable from the left side. Use compressed air to blow out any dust and dirt under the drive.
Note that there are four tiny chrome-plated screws attached to both sides of the old drive. You'll need to remove these screws and install them on the new SSD before you install it.
These screws don't attach to anything on the computer's case: they sit in small rubber mounting brackets on the case and are held in only by friction.
Install your new SSD drive in the reverse order, reinstalling the plastic bar and two screws after re-attaching the data cable.
Note that some companies sell M.2 to standard 2.5-inch drive adapters that fit into standard 2.5-inch drive bays. If you want to use an M.2 SSD drive you can use one of these adapters to install it into your MacBook.
Step 3: Remove the fan
The machine's fan is held in by three screws at the top. Don't confuse these with motherboard screws. The fan screws are black and installed directly on the fan:
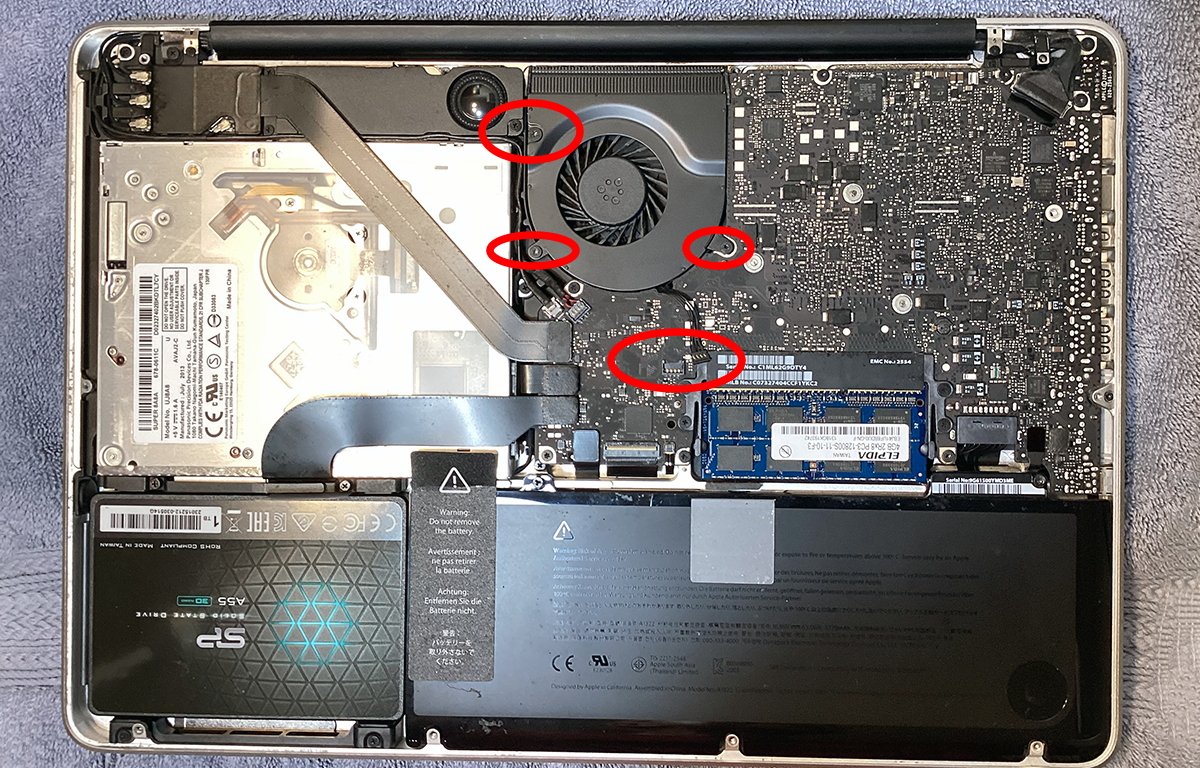
The fan's three mounting screws and cable connector.
The top screw is longer than the other two so note where it gets reinstalled. Remove all three screws, then gently pull up on the fan cable connector to disconnect it.
Note these tiny black plastic cable connectors are extremely fragile and it's easy to damage them due to plastic oxidation over time. Don't pull forward on the fan connector - lift it straight up.
You may want to use a hobby knife or plastic spudger to lift the connector, but be careful not to touch the fan cables with a knife.
If there is a small piece of black insulating tape over the connector remove it first and set it aside.
Once the fan is removed, blast it with compressed air to remove any dust. You may also want to clean it with a little spray of isopropyl alcohol to kill any remaining microorganisms living inside the fan. Don't use too much.
Set the fan and its screws aside.
Step 4: Disconnect all motherboard cables
Next, disconnect the eleven motherboard cables. Some of these cables are incredibly tiny so you must use great care in removing them or else you'll damage them:
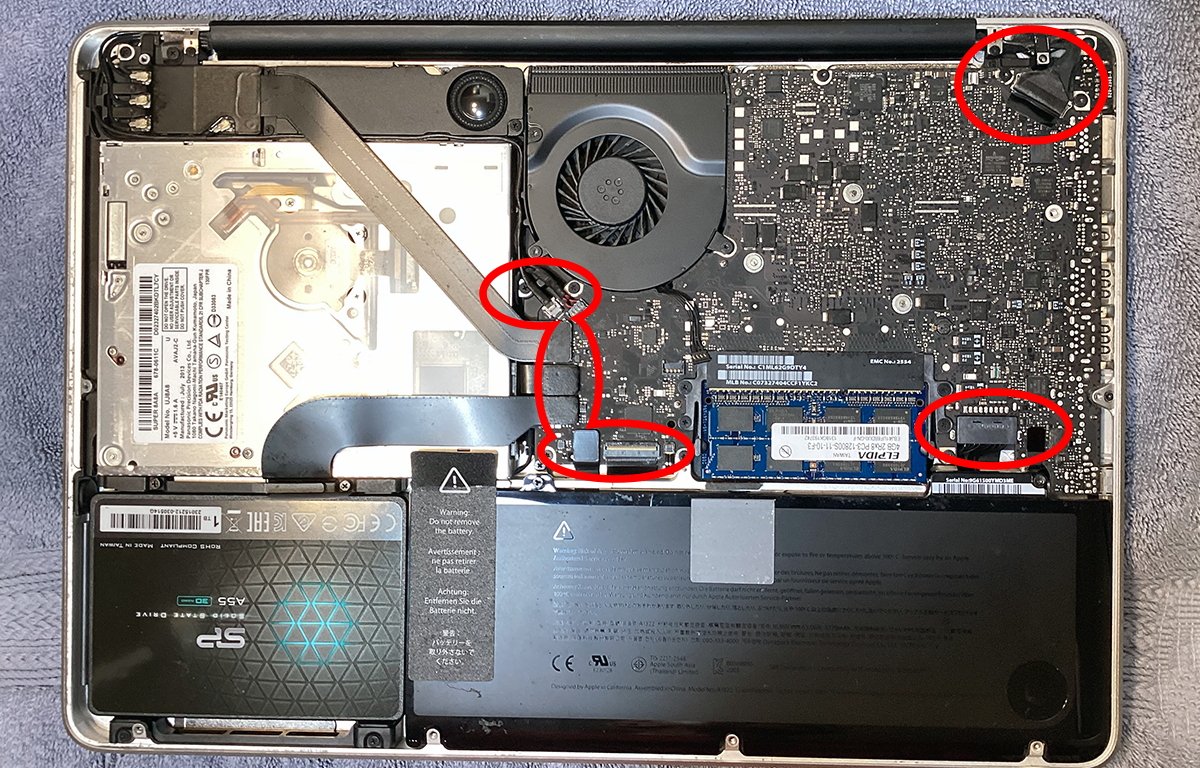
Motherboard cables.
Two of the cables are held in by small folding latches: the large cable in the upper-right corner, and the tiny flat ribbon cable at the bottom.
You may need to use a magnifier on the latter, or a microscope if you have one. It's incredibly tiny.
The flat ribbon cable just to the left of the tiny flat one at the bottom is held in by nothing but friction.
Its connector is minuscule and you'll need to use a round screwdriver or a plastic spudger, if you have one, to very gently get under the cable and rock it slowly free from its connector.
Many of the motherboard cables are simply held into their connectors by friction, so it should be fairly easy to pry them loose. But be careful.
Step 5: Remove motherboard screws
Next, you'll remove all screws from the motherboard. There are ten of them as shown below:
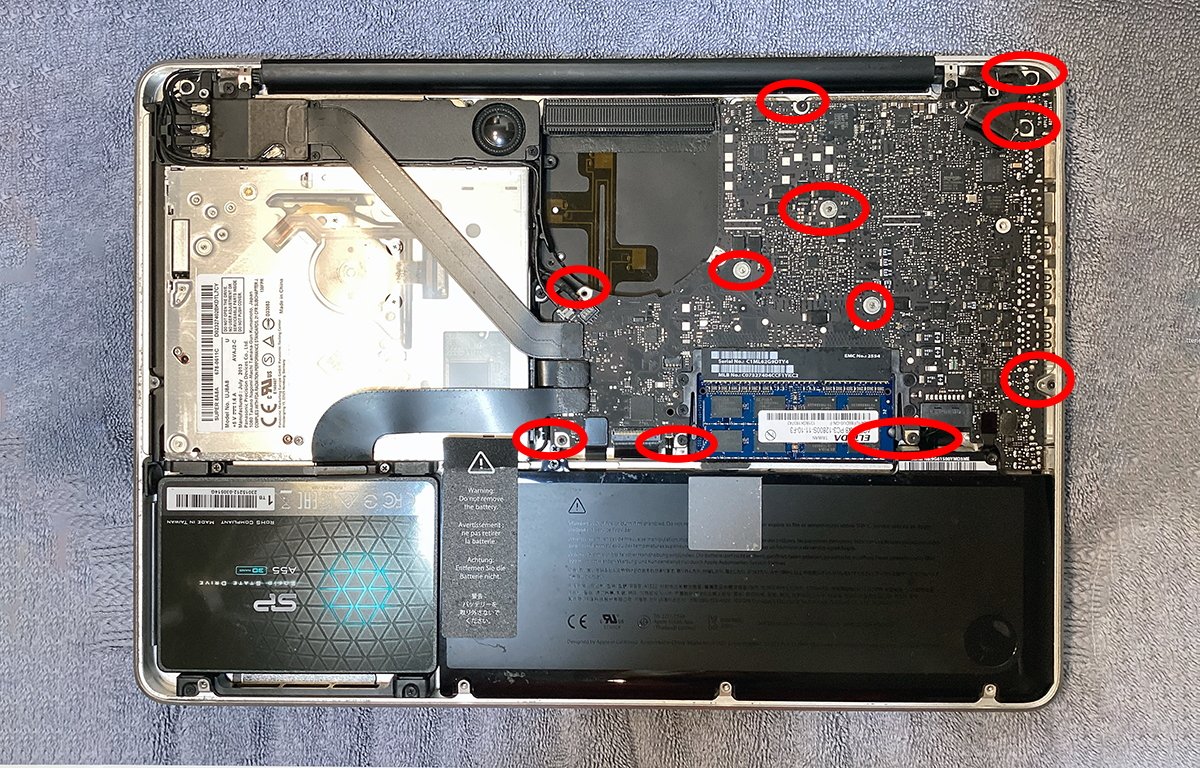
Motherbaord screws.
Also, remove the two somewhat larger two screws holding the charging port in place at the machine's upper-right corner as shown.
You may want to lay all the screws out on your work surface in the same arrangement as they were installed on the motherboard so that when you go to reassemble everything you will know where each screw goes.
Step 6: Carefully lift the motherboard from the computer
Note that the motherboard is connected to the display by two tiny cables, and the charge port cable is on the right side.
For this reason, you can't lift the motherboard entirely free of the computer. You can try to disconnect the two tiny cables which run along the speaker module, but we don't recommend it.
Underside of the motherboard. Note the two cables which run along the speaker module. The dangling charge port is shown at the top.
Why? Because the two connectors these cables use to attach to the motherboard's underside are incredibly tiny and it's highly likely you'll damage the connectors if you try to remove them.
So instead of lifting the motherboard totally free of the computer, slide it slightly to the left to free all the ports on the right side from the case. Then, gently tilt the motherboard upwards towards the back of the machine so it's standing vertically.
This is the best you can do without disconnecting the two tiny cables on the underside. It's a bit awkward, but if you go slow and take your time you'll see how it's done.
Step 7: Disconnect the charge port and install a new one
The charging port on the corner of the computer attaches to the underside of the motherboard with a small plastic connector, but compared to the other two connectors on the underside, it's huge.
Using a tiny flat-blade screwdriver or plastic spudger, slowly pry the charge port connector free from the underside of the motherboard. At this point, the charge port and its cable will come free of the machine.
Note that the charge port is magnetized and will stick to any other metal part it comes in contact with. So remove it and set it aside.
Over time, the plastic insulator around the MagSafe charge port will degrade and come loose, possibly even falling off. If this happens the computer won't charge because the MagSafe charging cable will short on the connector.
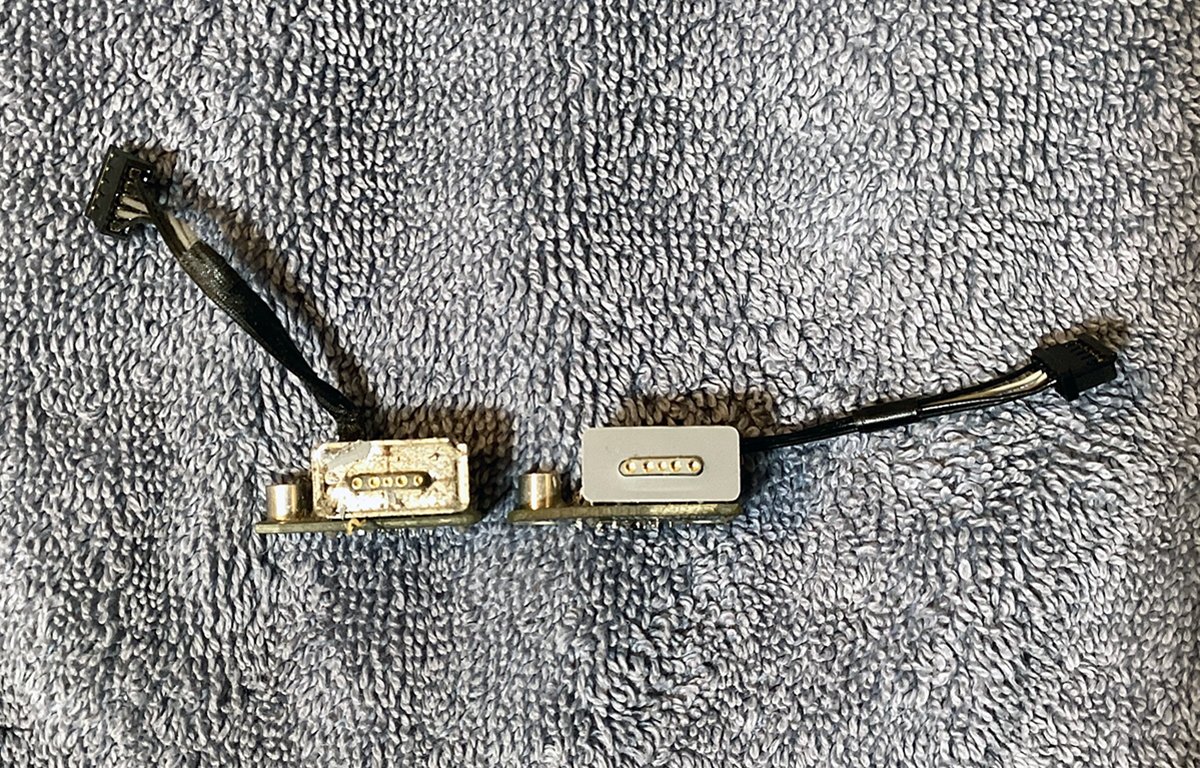
Old MagSafe charge port, left, and new refurbished one ready to install, right.
New or refurbished MagSafe ports can be found on Amazon, eBay, AliExpress and other online retailers. You'll need to source a new one to replace the old one.
We found ours on Amazon for $12 refurbished.
Once you've sourced the new MagSafe port and cable, first blow any remaining dust from the underside of the motherboard using compressed air.
Once that's done, connect the new charge port cable to the underside of the motherboard where you removed the old cable. Set the new charge port assembly onto its two metal mounting posts in the case's upper right corner.
If you like, you can partially reinstall one of the charge port's screws now to hold it in place, but don't totally secure it yet.
Step 8: Reinstall the motherboard
Reassembly is basically the reverse of disassembly. You'll need to lay the motherboard flat on the machine again, and lifting up slightly on the left side, slide it down and to the right to make sure all the ports line up on the right side of the machine.
Once reinstalled, secure both charge port screws first, securing it to the computer's case. Then reinstall all motherboard screws in the same order you removed them.
Be sure everything lines up perfectly and ensure none of the wires which run under the motherboard are out of place or protruding.
Step 9: Upgrade the RAM
If your MacBook Pro has 4GB or 8GB of RAM an upgrade is in order. Currently, you can get two 8GB SO-DIMMs on Amazon that match for around $17 for a total of 16GB. At that price why wouldn't you want to upgrade?
Note there are two identical SO-DIMMs, one on top of the other.
To replace the RAM, very carefully remove the old SO-DIMMs from their slots by slightly bending the two plastic clips on either side holding them in and lifting up on each one.
Note the plastics will be extremely brittle and it's easy to break the clips - so only press them as far as they need to go to remove the RAM.
Lift up and slide each SO-DIMM toward the bottom of the case to remove them. Install the new SO-DIMMs by sliding them down into the two plastic clips and pressing down on them until they snap into their sockets. You'll hear each one click.
Step 10: Reinstall the fan
Finally, reinstall the motherboard fan by reinserting it and reinstalling its three screws. Don't forget to reconnect the fan cable to its connector on the motherboard.
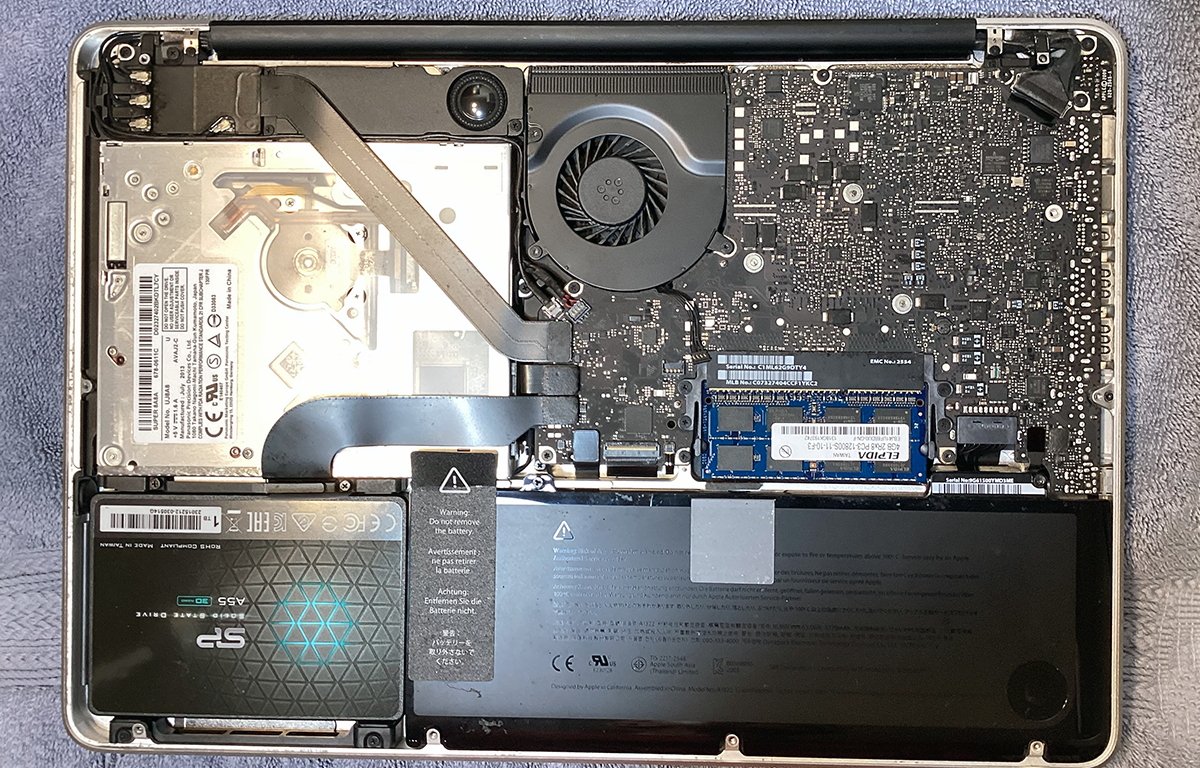
Everything fully reassembled.
Extra credit for advanced users only
If you possess extreme electrical and soldering mastery, then this next step is for you. But be warned: this step is extremely difficult and dangerous to the computer, so you should only attempt it if you are 100% sure of your electrical repair and soldering skills.
In this step, you'll remove the MCP chip's heatsink and add new thermal paste. You'll also replace all the electrolytic capacitors on the underside of the motherboard.
On most of the A1278 MacBook Pro models, Apple uses an integrated MCP chip which provides the graphics and integrated power control functions into one chip.
You'll need a hot air soldering station to remove the capacitors.
First, you'll need to remove the motherboard entirely. We'll assume you'll do this step after removing the charge port in the step above.
To remove the motherboard, follow all the steps above, but also remove the two tiny wires from the underside of the board as well. On both, use a small plastic spudger or hobby knife to lift the wires' connectors from the motherboard.
Don't pull on the cables - instead, gently pry the two connectors up from the motherboard by lifting up vertically on them as close to where their wires connect as possible.
Note how the wires are installed before removing them. You'll also need to wiggle the long wire loose from the speaker module to the side on which it sits.
Be extremely careful when disconnecting these two wires.
Once you do this and remove the charge port, the motherboard will come totally free of the machine. Set it on your soft work surface face-down.
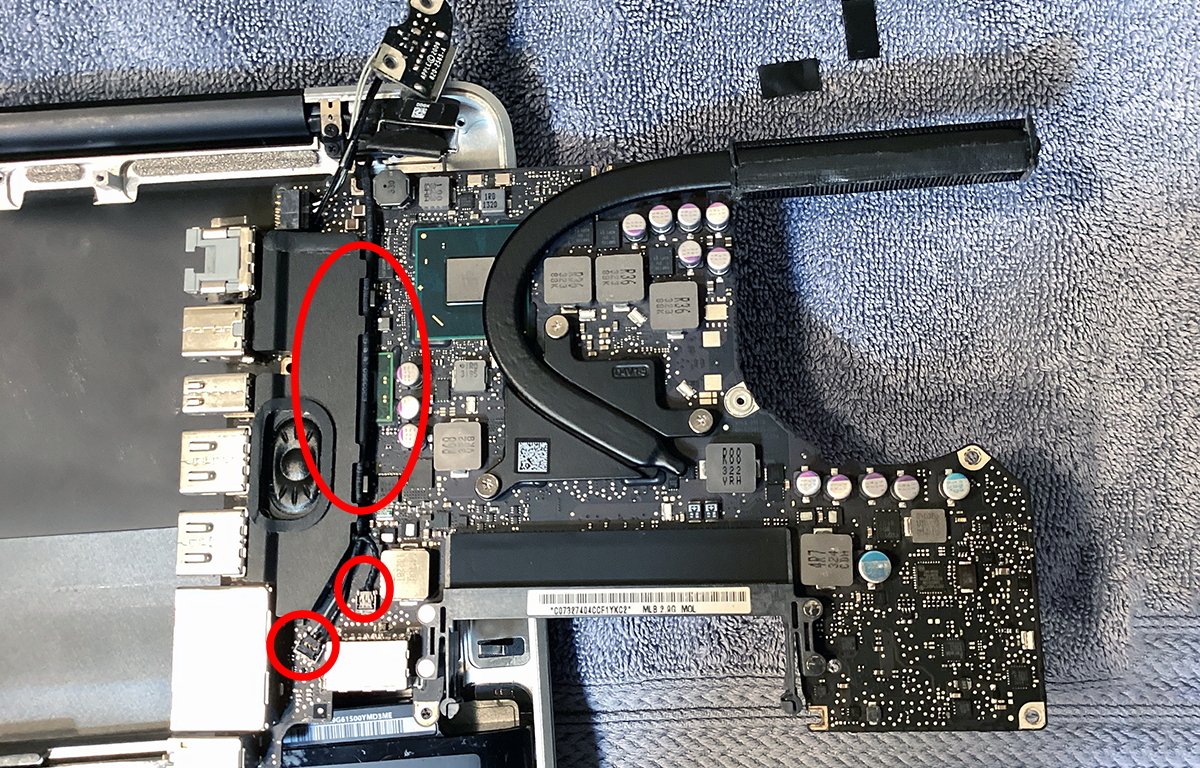
To remove the MCP's heat sink, first, remove the three large chrome-plated screws holding the heat sink to the motherboard. The heat sink is the long black curved metal bar that runs from the MCP to the fan's exhaust port:
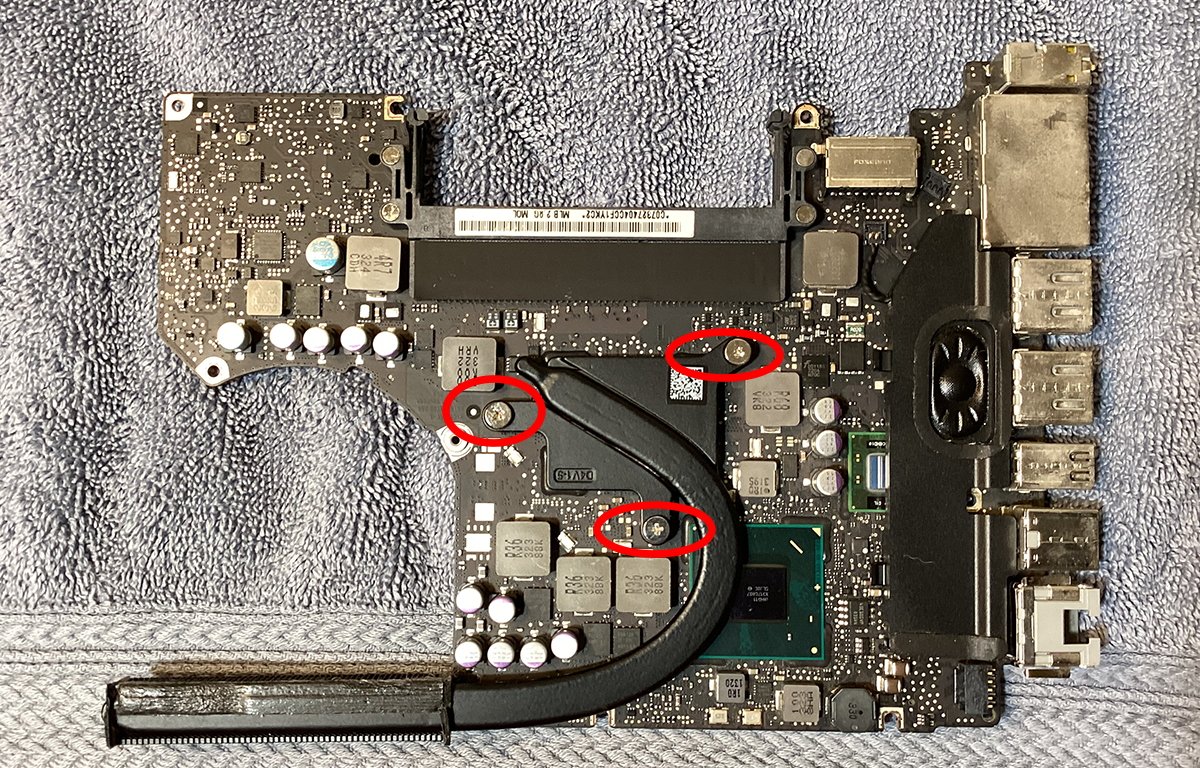
Three heat-sink screws.
Clean the old thermal paste off the MCP chip with a paper towel and isopropyl alcohol. Reapply new thermal paste and reinstall the heat sink with the three screws:
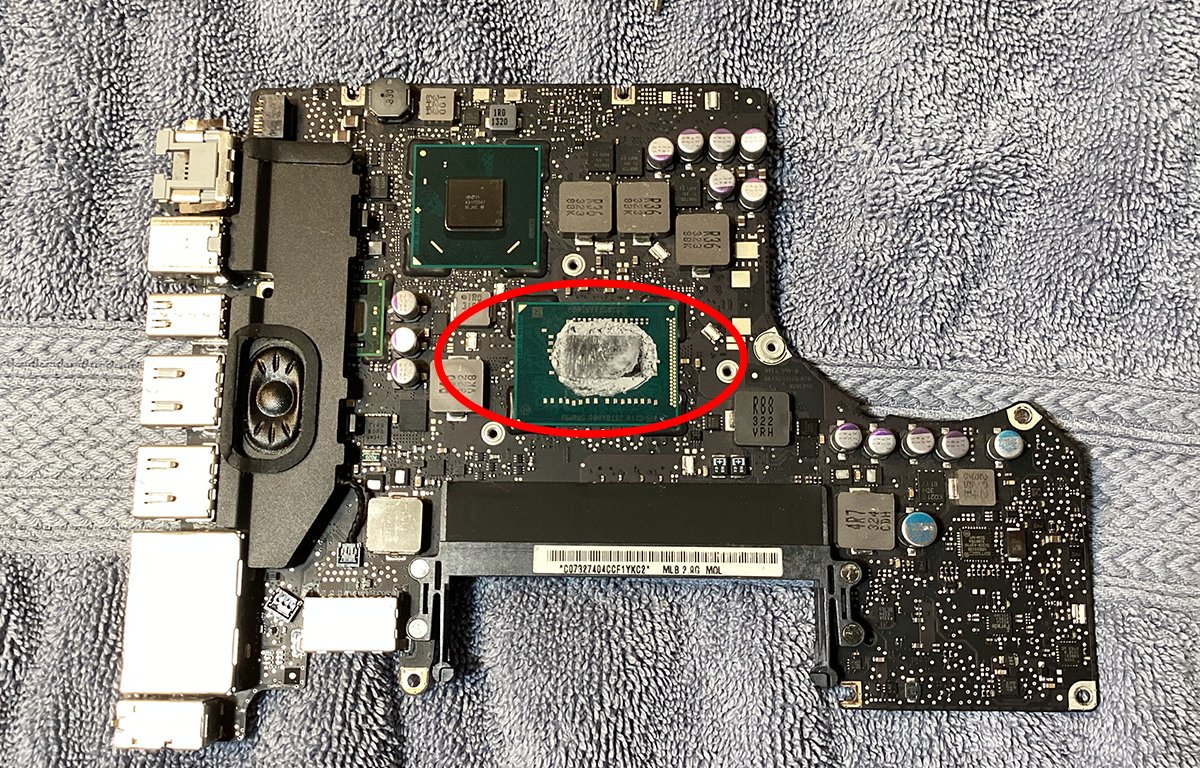
Clean and reapply thermal paste.
The heat sink absorbs all the MCP's heat and thermally transfers it to its metal, where, when the fan comes on gets sucked out of the metal and sent out the back of the computer by the fan.
Next, you'll need to inspect and replace all fifteen electrolytic capacitors surface-mounted to the motherboard. This step is also very dangerous and you can easily damage the motherboard if you're not careful.
These capacitors are aluminum-style "can" caps that are mounted to the surface of the motherboard with solder on two solder pads each.
To remove them you'll need to use a hot air soldering station. Blow hot air onto each and remove them with tweezers by pulling up on them as the solder comes loose.
Use the hot air gun in a circular motion and blow hot air on each capacitor one by one while pulling up on each with tweezers. As the solder melts the capacitor will come free from the motherboard.
Don't keep the hot air gun in one spot too long or you risk frying or melting components or the motherboard itself.
Use a solder wick to remove any excess solder by applying the wick and pressing your soldering iron onto it to absorb any excess solder from the motherboard.
A full Bill Of Materials (BOM) for each part on the motherboard is beyond the scope of this tutorial, so you'll need to find a BOM online for your motherboard to find which new capacitors to purchase.
Online outlets such as Mouser and Digikey are great sources to look up and order electronic parts online.
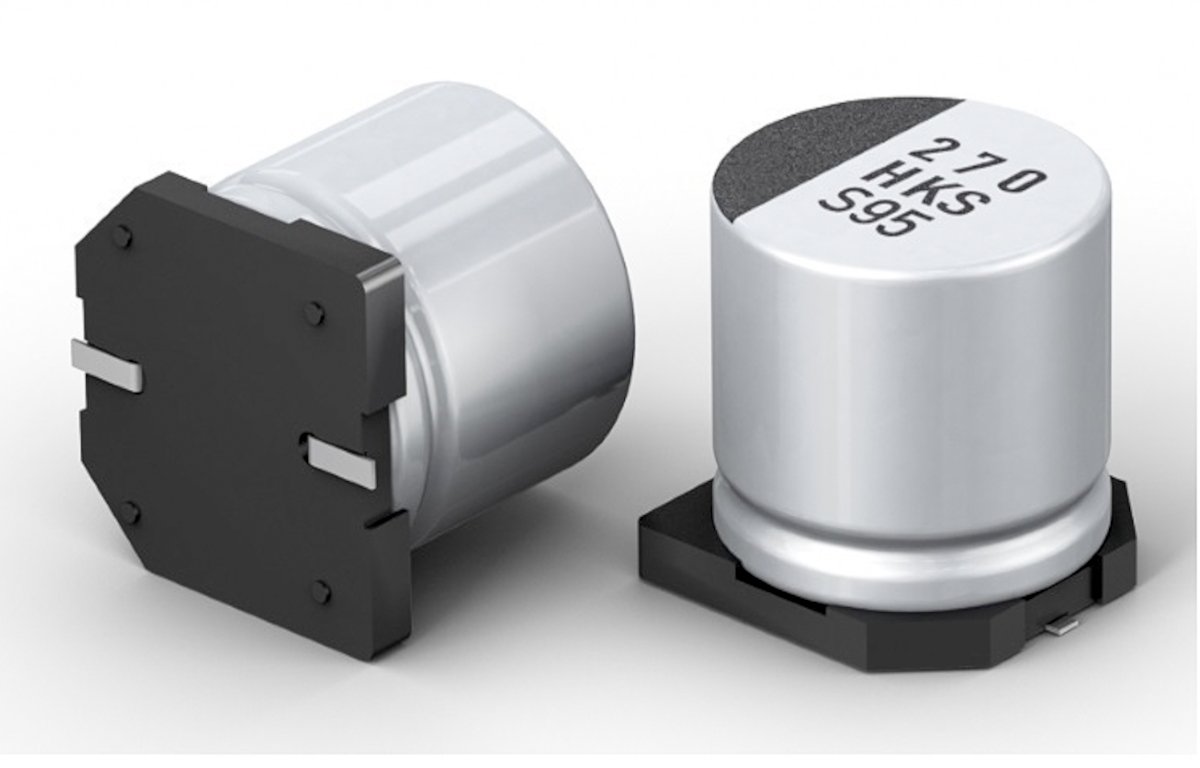
Can-style electrolytic capacitors.
Once you have new matching capacitors in hand, solder each new one onto the motherboard carefully in their respective locations. In some cases, you can pre-apply new solder to the motherboard's solder pads, hold new capacitors in place on the pads with tweezers, then solder them by using the hot air gun.
Usually, can-style SMD capacitors have two attachment points, one on each side: one for positive, and one for negative. Usually, the negative side is marked with a colored or black stripe.
Some capacitors don't have a polarity so you'll need to check the specs on each first.
Step 11: Reinstall the rear cover
Now that the upgrade is complete, replace the machine's rear cover and reinstall all ten rear cover screws in the order you removed them.
Flip the computer over, plug in its charging cable, and power the machine on. Hold down Command-R on startup to enter Recovery Mode.
Run Disk Utility, format the internal SSD as an APFS volume, then exit Disk Utility and run the macOS installer from the Recovery Mode menu.
Once macOS finishes installing, Restart the computer again to boot into macOS Catalina.
Your refurbishment and upgrade is now complete.
An additional option: add a second hard drive
If you never use your MacBook Pro's optical drive you can remove it and instead use the internal space for a second 2.5-inch drive.
Various vendors such as OWC, iFixit, and others sell special adapters that fit in the optical bay and plug into its cable but have a space for a standard 2.5-inch drive inside them.
Using one of these allows you to add a second hard drive or SSD internally.
To do so, first, remove the three small optical drive mounting screws from around its edges, then carefully lift the optical drive out and to the left. As you do you'll notice its small flat ribbon cable on one side.
If your MacBook Pro has a small flat speaker assembly ribbon cable that crosses the optical drive, you'll also need to disconnect it from the motherboard.
Gently remove the optical drive cable's connector, making sure not to pull on the cable itself.
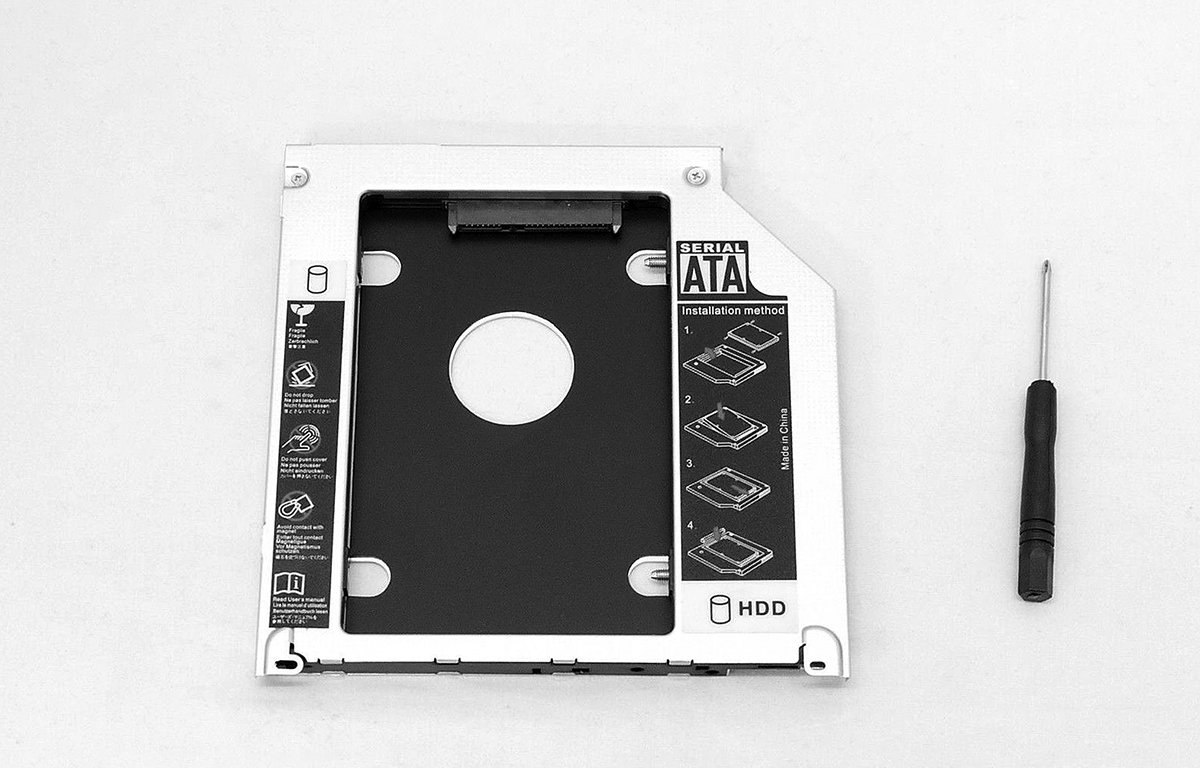
A typical optical to 2.5-inch drive adapter.
Next, install your second 2.5-inch drive inside your optical bay drive adapter, then install the drive adapter just as if it was an optical drive. Reinstall the three optical drive screws to secure the adapter.
You now have two internal drives in your MacBook Pro.
The final frontier: a new battery
We left out one step in this tutorial because it's mostly self-explanatory: installing a new battery into your MacBook Pro. The battery is only held in by three screws and replacing it is simple.
Several vendors online sell new higher-capacity batteries for your MacBook for around $35.
Even an eleven-year-old Mac will still run well given a new SSD and a new RAM upgrade. You'll be surprised how much better your machine's performance is with these new upgrades installed.