Chip Loder
Disk Utility ships with macOS and has been part of the operating system since its first release. Here's how to use it.
Disk Utility provides various tasks such as formatting storage devices, mounting and unmounting volumes, creating disk images, and copying drives. First, we'll define some terminology, then dive into what you can do with Disk Utility.
Understanding devices and volumes
First, a few storage terms to know are:
- Device - A storage device such as an SSD, hard disk, RAID array, or controller card.
- SSD - Solid state drive - a storage device which uses memory instead of platters to store data.
- Hard disk - A storage device (drive) containing spinning magnetic platters.
- Bus - A circuit that connects devices and arbitrates communication between them and a computer.
- Controller - An interface device that connects another device to a computer. Many controllers are built-in.
- Startup Disk - In macOS, the volume on which the OS is installed.
Sometimes the terms "device" and "drive" are used interchangeably.
Each physical storage device connects to your Mac in one of several possible ways.
This could be through an internal connection such as SATA, or via an external connector such as USB, Thunderbolt, or on older Macs, FireWire. For Macs which can accept internal expansion cards, other kinds of bus connectors on internal cards such as SATA, eSATA, SCSI, iSCSI, or FiberChannel could be used.
Most expansion cards today are based on PCI (Peripheral Component Interconnect) a computing standard used for internal cards. Some storage devices can also connect via networking standards such as Ethernet or over WiFi or Bluetooth.
Filesystems
A filesystem is a piece of software that knows how to read and write data using a specific volume format on a drive.
Each drive can contain one or more volumes. Think of a volume as a container of storage on a device that can contain folders (directories) and files: a logical subsection of a physical disk that is formatted with a filesystem to store files and data on.
A volume is also sometimes called a partition. A device can have multiple volumes. In macOS, volumes can be mounted or unmounted. When a volume is mounted its icon appears on the Desktop in the Finder app.
The operating system has to know how to communicate with the corresponding filesystem on a volume in order for it to read or write to it.
Examples of filesystems include APFS, HFS+ (macOS Extended), FAT16 and FAT32, exFAT, NTFS, NFS, and on Linux operating systems, ext4. In macOS, APFS, HFS+, FAT, and exFAT are built-in.
Additional filesystems can be used in macOS by installing filesystem plugins, which allow macOS to read or write to non-supported filesystems and mount volumes formatted with them.
When a drive is new, it is unformatted. Before it can be used, it has to be connected and then formatted with a supported filesystem in order for it to be mounted on the Desktop.
Once a device is formatted, it can be partitioned with one or more volumes, each of which can be mounted on the Desktop. Volumes can be read-only, or read/write. In the case of read-only volumes, files can be read from the volume, but not written to it.
Compact Discs and Blu-Ray optical disks are examples of read-only volumes.
A writable volume can also be locked or unlocked - usually with software permissions, but sometimes with a hardware switch, as in the case of SD camera cards. When a volume is locked, it becomes read-only. Files can be read from it, but not written to it.
Each volume on a device contains certain data structures which tell the filesystem about the volume: its start and end locations on the device, what kind of volume it is, how large it is, and other information such as how many files and folders are on the volume.
Some of these data structures are:
- Mount Point - In the UNIX OS a directory in the filesystem in which a volume is mounted for input/output (I/O) access.
- Block - A single I/O unit of data on a volume. For hard disks and SSDs, a block is usually, but not always 512 bytes in length.
- File - A single unit of organized data located on a volume that can be read or written to by an app.
- Volume header - A data section of a volume that describes the volume or partition.
- Catalog - A data section of a volume that stores a list of files and folders and their locations on the volume.
- B-Tree - An additional data section of a volume that works in concert with a catalog to describe files and folders.
Think of a B-Tree as a tree with branches, with each branch being a subfolder and its contents as further branches and files as leaves. B-Trees help the filesystem track files across the drive's blocks.
Some volumes also contain extents files - additional files which contain information about the locations of files on a volume if the catalog files become too full.
If you want detailed info on how macOS' HFS+ (Extended) filesystem stores these data structures, see the book Inside Macintosh: Files published by Apple and Addison-Wesley in the early 1990s. Apple also published a Technote on HFS+ nearly twenty years ago.
Some, but not all volumes can also contain indexing and database information. Storing file and folder details in a database makes searching volume contents much faster. One such indexed filesystem from the past was BFS, or the Be File System.
Apple's own APFS also uses indexing to store file and folder details. Unfortunately, Apple decided to keep the details of APFS closed, and the company doesn't publish any technical details about APFS - mainly to make it harder for malicious actors to hack it.
As a footnote, if you're a developer, you can use the method unmountVolumeAtURL:options:completionHandler: to programmatically unmount mounted volumes by URL.
Understanding RAID
RAID is an acronym for Redundant Array of Independent Disks - an array of drives that acts like a single drive to a computer.
RAID volumes use multiple devices to store file information and present it to the computer as a single volume. There are different RAID levels which include levels zero through six.
RAID 0, or striping, combines multiple physical devices into a single volume. RAID 1, or mirroring, creates identical redundant volumes on multiple devices.
Additional RAID levels combine striping or mirroring with verification, or parity, - bits or blocks to check reads and writes for increased reliability.
RAID 0 is fast because when data is read or written to an array, the I/O goes through multiple devices at once. Some RAID systems use multiple disk controllers in concert for even greater performance.
RAID 1 is more reliable because data is written to multiple volumes at once - creating redundant copies of the data.
The downside of RAID 0 is that if a single device in the array fails, the entire volume is lost and becomes inaccessible.
Other types of RAID can build upon the concepts of mirroring and striping into different structures, depending on the user's needs. They are well worth exploring, but you'll go far in understanding RAID 0 and RAID 1 alone.
Understanding BSD disk identifiers
Since macOS is built on top of the BSD distribution of UNIX, under the hood it uses BSD's device nomenclature to describe disks and volumes. In BSD, each volume is attached as an inode in the core OS when it is mounted.
In BSD, storage devices are identified with the word "disk" with a number attached to it - for example "disk0" or "disk1". Each volume on a disk is identified with the "s" character with a number attached to it - for example "disk0s1" or "disk0s2".
To get a full list of all BSD devices and volumes attached to your Mac, in Terminal, type:
diskutil list and press Return.
This produces a tree of each device and all its volumes in Terminal. Additional info for each device and volume is listed, including filesystem, size, name, partition scheme, and BSD identifier:
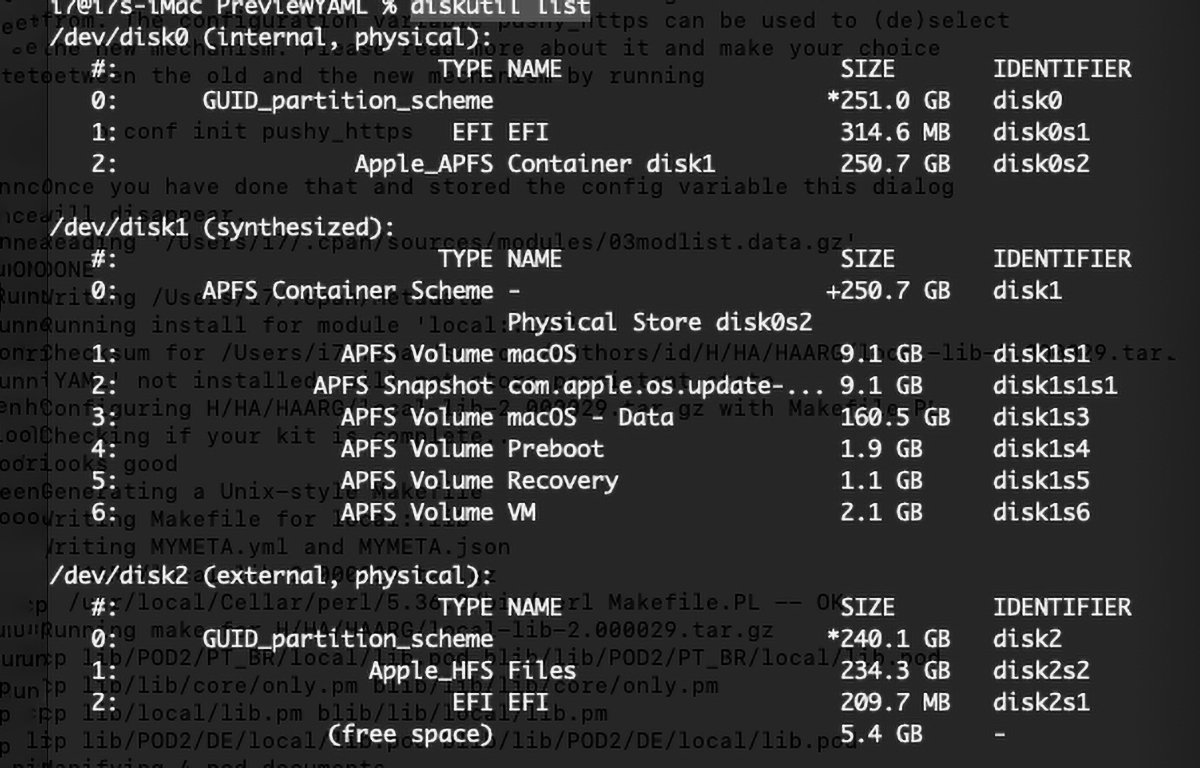 Listing devices and volumes in Terminal with diskutil.
A partition scheme or partition map simply indicates which volume format a device uses. Currently, Disk Utility supports GUID, Apple Partition Map (APM), and Microsoft Master Boot Record (MBR) schemes.
A volume map, or partition map describes all the volumes on a device.
Understanding how files are stored on volumes
When a file is first created on a volume, an entry is made in the volume's file catalog, and if necessary, in the extents files. Extents files are additional catalog files that describe where parts of the file live on a volume if the file grows to a size that can't be described in the catalog alone.
One key point to keep in mind about files is that their data may not be stored in contiguous blocks on a volume. In fact, in most cases, the blocks on disk which make up a file will be scattered across non-contiguous blocks on the device. This is called fragmentation.
When a file is read from or written to, the filesystem looks in the catalog and extents files to locate the blocks which make up the file. In the case of reads, the blocks are read from the device and then reassembled in sequence in memory before being delivered to the requested app.
When an app reads or writes to a file, it usually never does so directly. Instead, it asks the operating system API (Application Programming Interface) to do the device block access for it. Most apps are insulated from having to know details about every kind of filesystem.
The OS, in turn, asks the corresponding filesystem to do the block I/O to the volume to read or write the file. The filesystem in turn makes block I/O calls to the device driver - the piece of software that knows how to do physical data access to the device itself.
A device driver is simply a piece of software that knows how to communicate with and control a device directly. The OS loads and uses device drivers whenever it needs access to a device.
So in summary, the path of a file I/O through the system is roughly: app->OS API->filesystem->device driver. And back.
Whenever an app reads or writes to a file on a device, the data travels through this path, ending up as a collection of raw blocks of data on the device. It is only via the filesystem that the blocks are reassembled into meaningful file organization - finally at the app level.
Show volumes first
Out of the box, your Mac doesn't show storage volumes on the Desktop. This was an odd decision by Apple when macOS was first released in 2000. Steve Jobs himself debated whether or not to display Mac storage volumes on the Desktop.
The original Mac operating system had always displayed volumes on the Desktop from the Mac's first release in 1984. But in later years Steve had come to believe systems should work more like appliances - without providing users with direct access to internal parts of the software such as the filesystem.
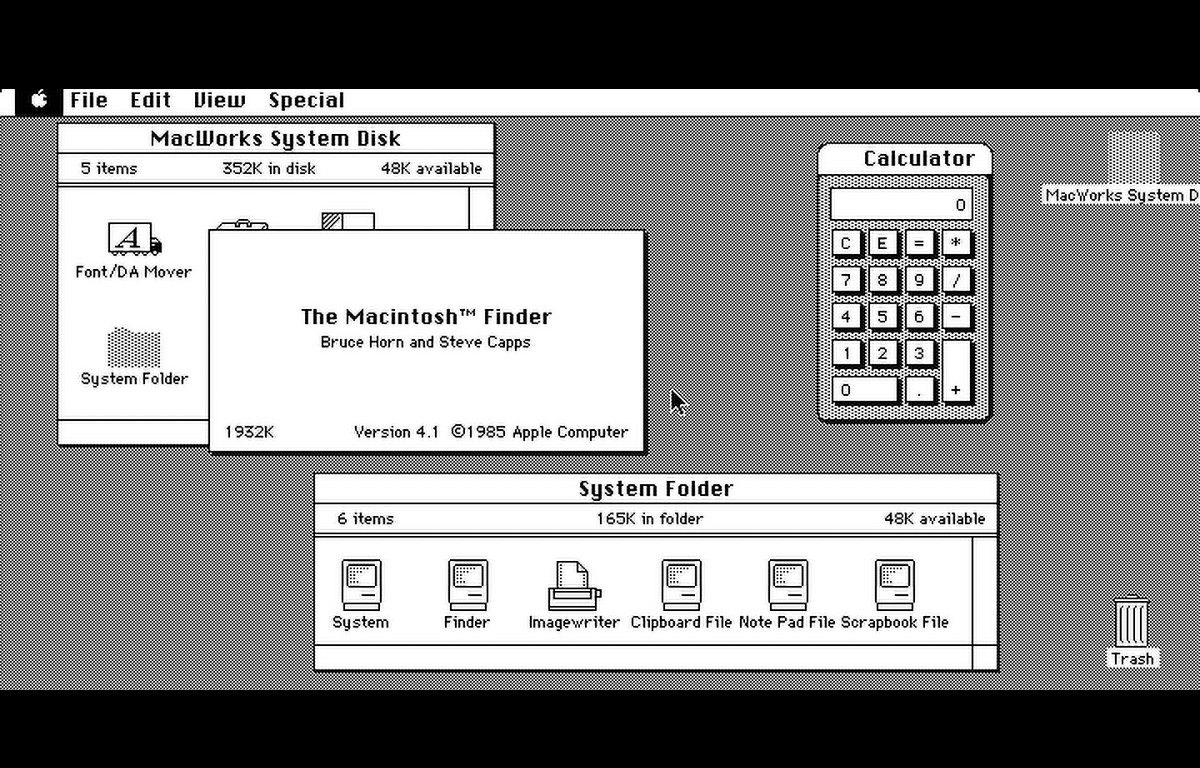 The original Mac Desktop.
Indeed we see this approach used with iPhones and iPads - with the filesystem being closed off except through official installation channels such as the App Store.
In the end, Apple and Steve decided to continue to provide direct Desktop access to volumes because this was the way the Mac had always worked.
But there's a catch: on modern macOS, the display of storage volumes on the Desktop is turned off by default.
To show volumes on the Desktop, you'll need to access Finder->Settings and then under "Show these items on the desktop:" turn on the four check boxes for storage volumes.
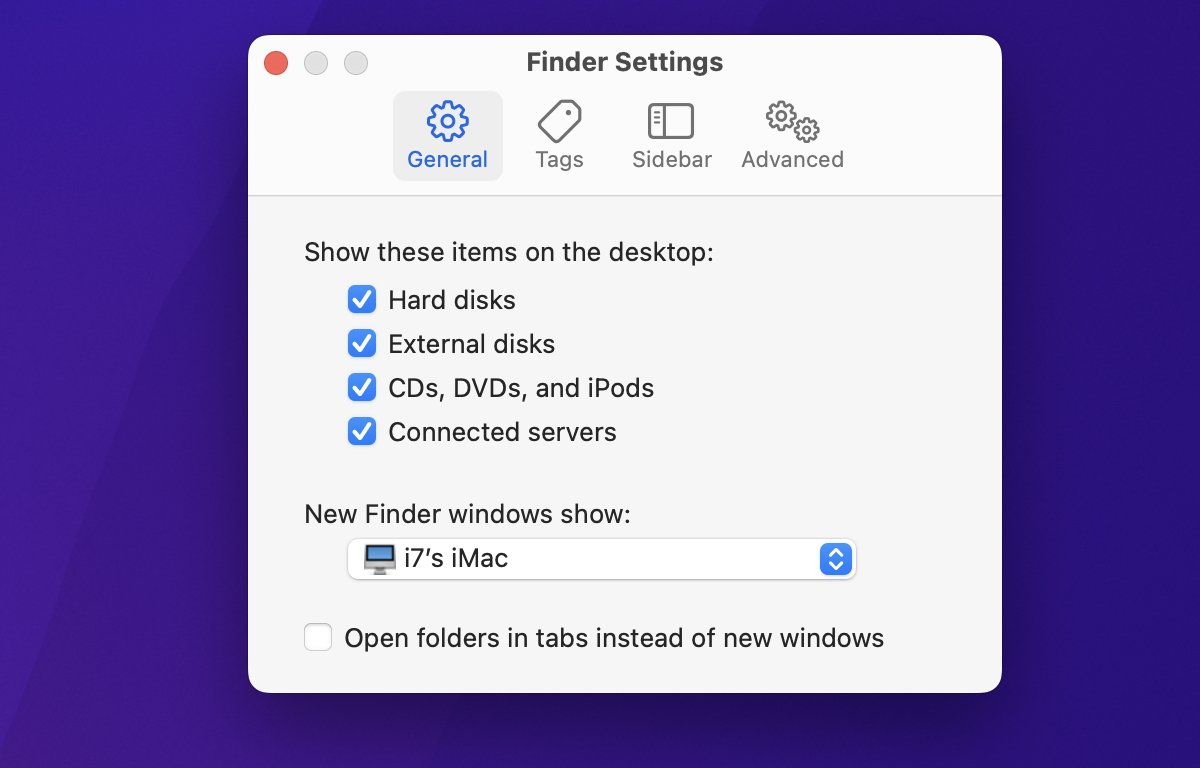 Finder Settings. Turn on the four volume checkboxes near the top.
Once these options are turned on, all mounted volumes will appear as icons on the Finder's Desktop. Without doing this first, volumes are still there but their icons don't display in Finder.
This can be confusing for newcomers to macOS.
Basic Disk Utility usage
Next, let's launch Disk Utility and look at the basic UI and what the controls do:
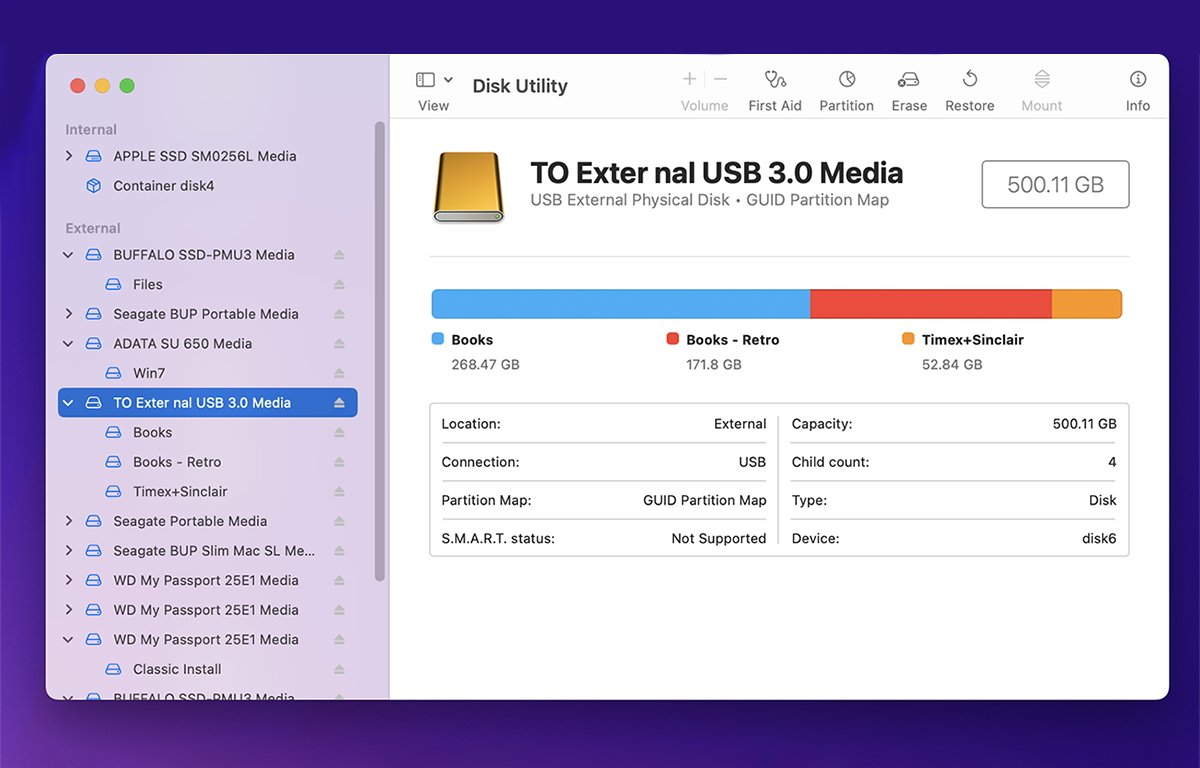
 Main Disk Utility window.
On the left side of the Disk Utility window, is a list of storage volumes. All known volumes connected to your Mac are listed here, whether they are mounted or unmounted.
Mounted volumes are volumes that have been loaded into the BSD core's inode tree and connected to the I/O subsystem. Unmounted volumes are volumes that reside on storage devices, but are not connected to the BSD core.
macOS's Finder monitors the BSD inode tree and watches for inodes as they are mounted and unmounted. When a volume becomes mounted, Finder displays its icon on the Mac's Desktop.
When the volume is unmounted, Finder removes the icon from the Desktop. This is what happens behind the scenes when you drag a volume to the Trash, or Control-click on it and select "Eject".
Internal device volumes are listed first at the top of the Disk Utility window, and volumes on external devices are listed below that.
Unmounted volumes in the list are indicated by being greyed out. If the boot volume is formatted as an APFS volume, it will contain a list of volumes as indicated by a turnable arrow since APFS supports sub-volumes - known as container volumes.
If a disk doesn't contain any volumes which macOS knows how to read, or a volume is corrupted and unreadable, Disk Utility lists the volume by BSD name greyed out in the volume list.
If you Control-click or right-click on a volume in the volumes list in Disk Utility, you get a popup menu with various features. These include Get Info, Show in Finder, Rename, Unmount, Eject, Image from, and Erase - as well as a few other items.
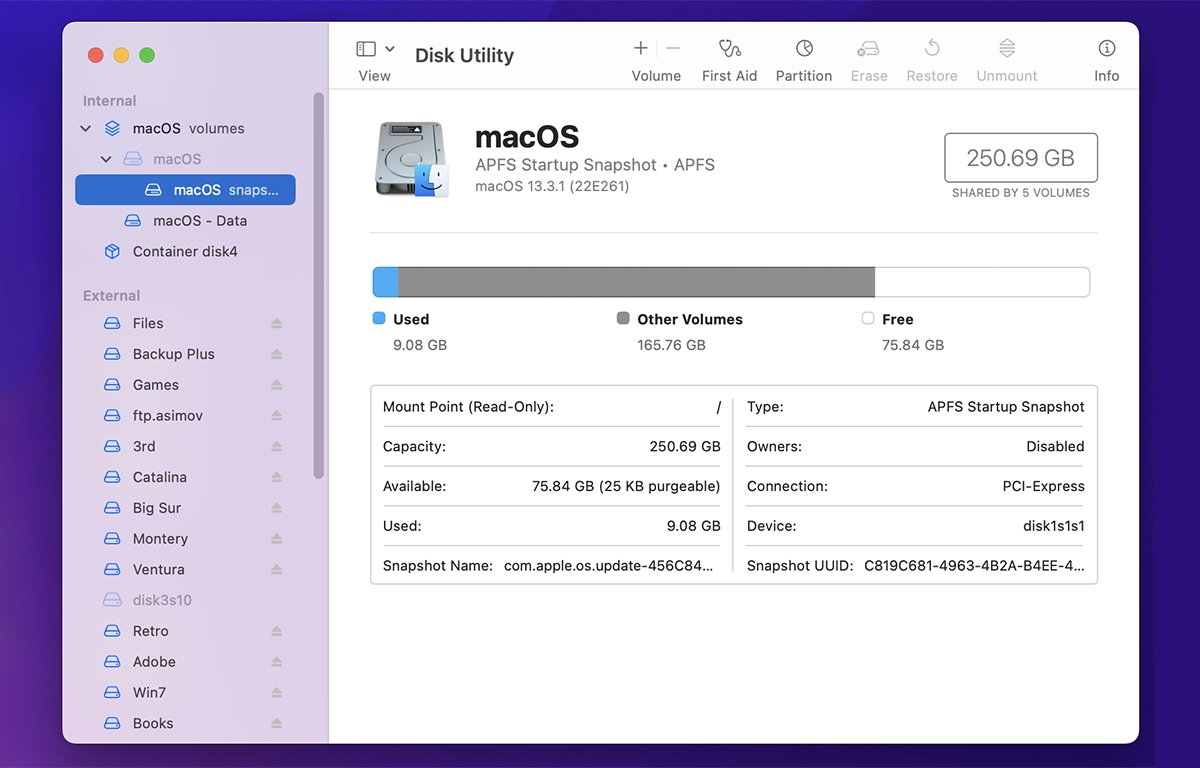
Selecting Get Info displays a window with some basic info about the volume:
 The Get Info window.
Of note are the BSD device name, capacity, encryption level, if any, if the volume is bootable, and its S.M.A.R.T status. A variety of other info is included.
Also of note is the Device tree path. All connected devices, not just storage devices, are enumerated in software in macOS in the IORegistry - a hierarchical tree of devices from the Mac's motherboard on down.
The IORegistry is part of macOS's IOKit and is far too complex and technical for the scope of the article so we won't cover it here. If you want to read more about the IORegistry, see Apple's developer documentation.
To get a full view of the entire device IORegistry on your Mac, you can use an older Apple developer tool called the IORegistryExplorer. However, you will need an Apple developer account to log in to the additional downloads area of the Mac developer tools and download the app.
Apple hasn't updated the IORegistryExplorer since 2013, but as of macOS Ventura, it still works.
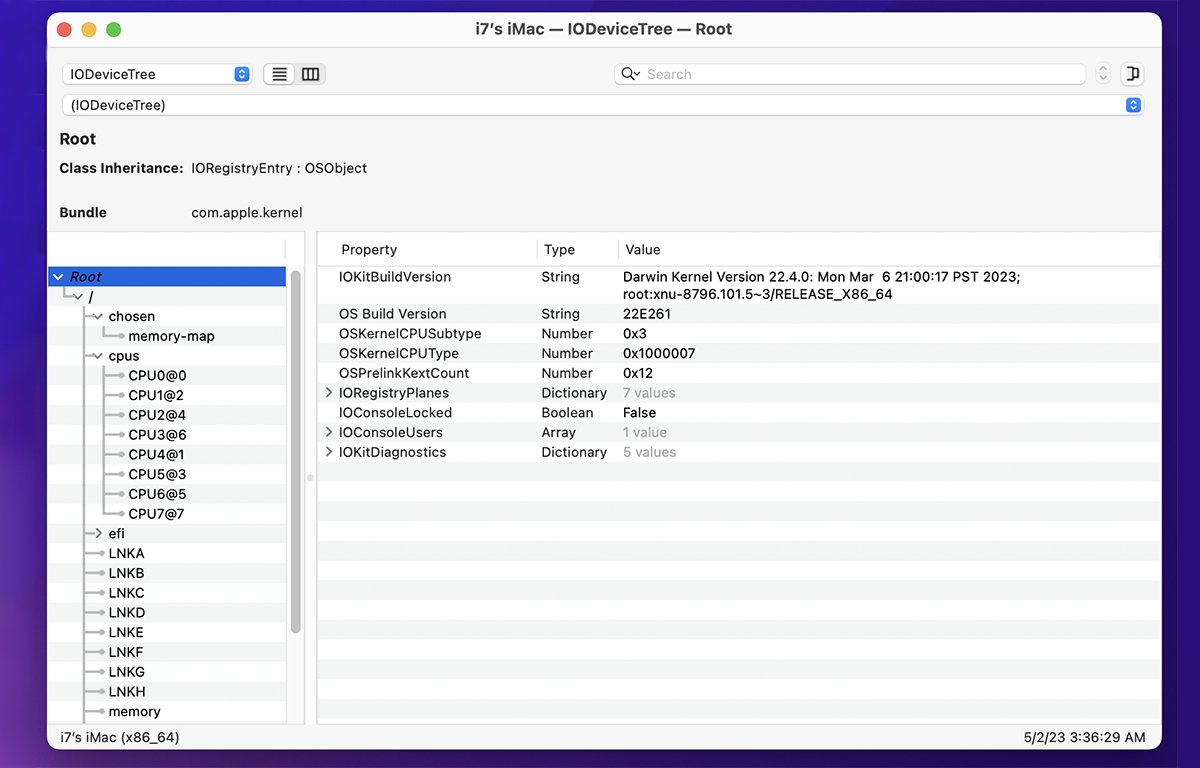 The IORegistryExplorer app.
Using the contextual popup menu in Disk Utility, you can mount and unmount (Eject) volumes from the sidebar, and you can also rename them directly in the list, as well as format (Erase) them, and perform other options.
You can also drag-reorder volumes in the sidebar to suit your preferences by dragging them up or down in the sidebar.
Note that if you rename a volume in the sidebar or in Finder directly without reformatting it, it's a good idea to restart your Mac as soon as possible in order to force the IORegistry and BSD core OS to fully reload all info about volumes into the OS.
At the top of the Disk Utility window, there is also a small sidebar icon next to the name "Disk Utility":
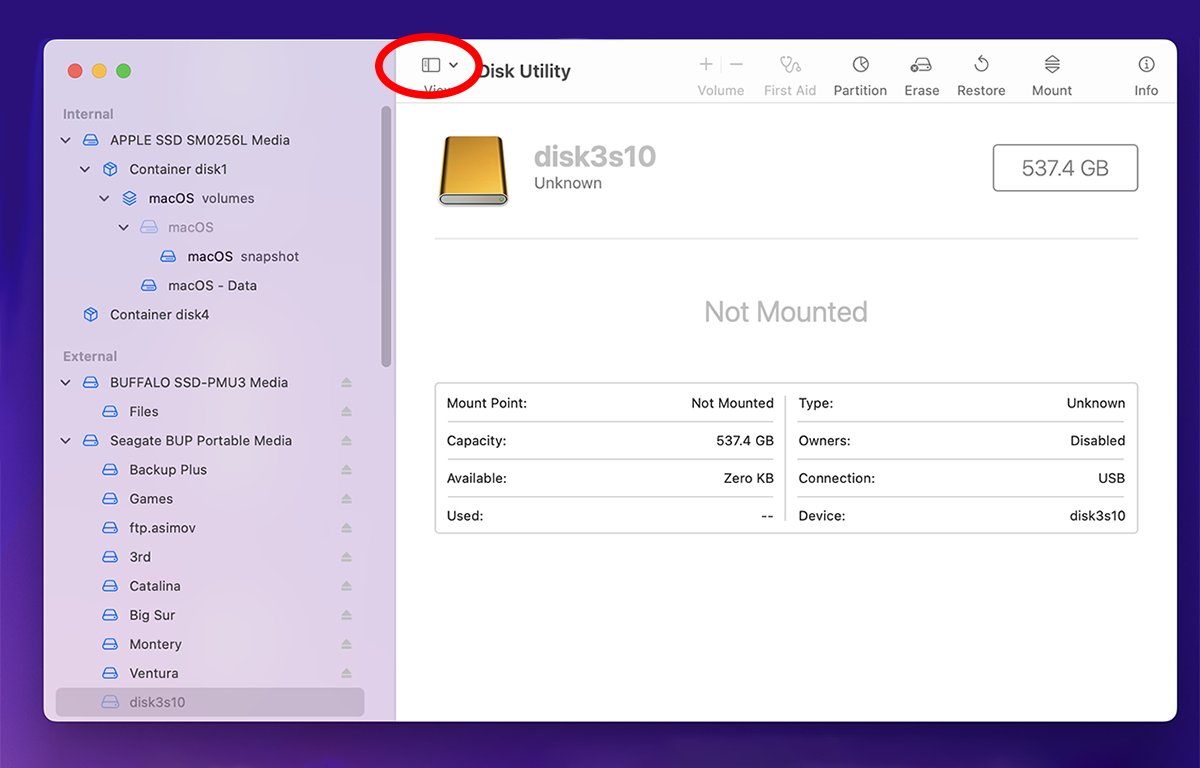 The sidebar control. Click to hide or show the sidebar.
Clicking the sidebar icon displays a popup menu with three options: Hide Sidebar, Show Only Volumes, and Show All Devices. If you select "Show All Devices", the sidebar also shows the name of each physical storage device as listed in the device's firmware - with all volumes on the device listed beneath the device name:
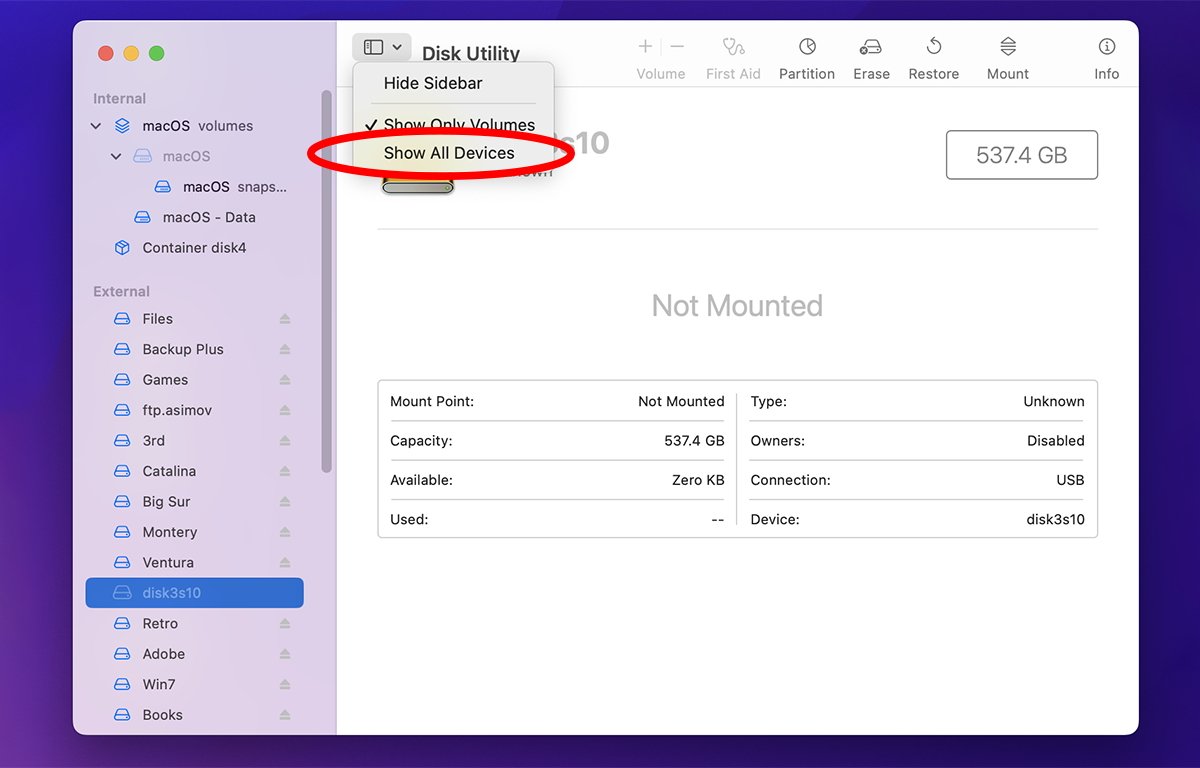 Select Show All Devices from the sidebar popup menu.
When showing devices, you can collapse each device name by turning the arrow next to it, making the list shorter by hiding volumes for that device.
Toolbar buttons
Across the top of the Disk Utility window are several toolbar buttons:
- Volume add and remove
- First Aid
- Partition
- Erase
- Restore
- Mount or Unmount
- Get Info
You can customize the items in the toolbar by selecting View->Customize Toolbar... from the main menu:
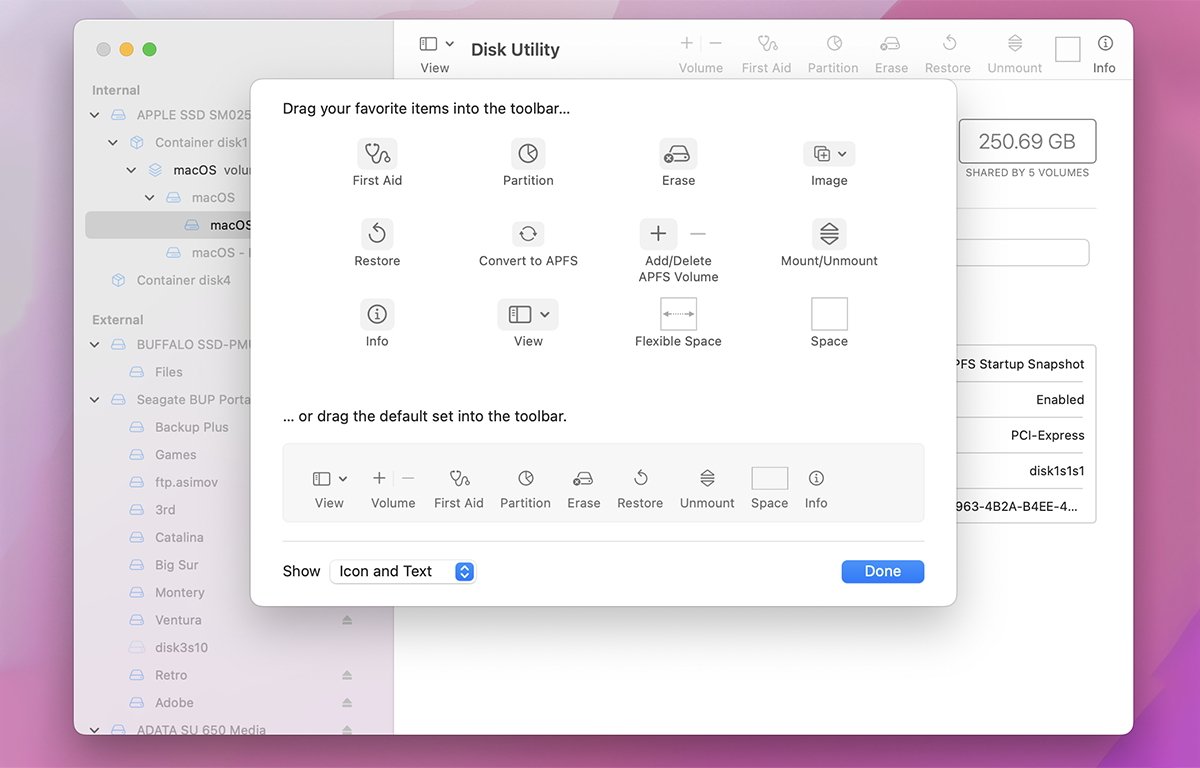 Customizing the toolbar.
Beneath the toolbar, the selected volume or device's icon, bus, partition map, and capacity are shown.
Below that, a bar graph is shown with a colored legend for each kind of file stored on the volume, and the total space used by each file type. If you select a device instead of a volume in the sidebar, the bar graph displays each volume on the device with a color-coded legend and the capacity of each volume.
 Devices and volumes bar graph displays file usage on disk.
The final item in the Disk Utility window is a text pane with a subset of the important data displayed in the Get Info window - making it easy to see important device or volume info at a glance.
Most of Disk Utility's menus in the main menubar are similar to the toolbar buttons, and the context popup menus, although the main menu items' organization is slightly different than in the context menus and icons.
There is also an Images menu in the main menubar, which has items for manipulating disk images, which we'll cover in a later article.
Basic formatting
In Disk Utility there are two basic approaches to preparing a storage device for use in macOS.
You can do a simple Erase (format) of a device, which creates a single large volume on the device. Or you can partition the device into multiple volumes, each of which mounts individually on the Finder's Desktop.
Note that if you want to erase the built-in internal drive on your Mac, you'll need to either restart your Mac from an external volume containing macOS, or else boot into the Mac's built-in Recovery Mode by restarting then holding down Command-R on the keyboard. Once in Recovery Mode, you can run Disk Utility from the Recovery menu.
On Apple Silicon-based Macs you can also boot into Recovery Mode by holding down your Mac's power button until the Recovery Mode screen appears.
You can choose which external macOS volume to boot into by holding down Command-Option on your Mac's keyboard after restarting, then selecting a bootable volume and clicking the arrow or OK button.
Once booted, you can select your Mac's internal drive in the Disk Utility window sidebar and select "Erase" from the sidebar's context popup menu to format it. Beware, as this will completely delete and erase anything that was on the internal drive.
For more information on Mac startup key combos see Apple's tech note page.
For other devices, to do a simple single-volume erase, select "Show All Devices" from Disk Utility's sidebar popup menu icon, then select a device in the sidebar and Control-click or right-click the device and select "Erase" from the popup menu. You can also select a device and click the "Erase" toolbar icon instead or choose "Erase" from the Edit menu or context popup menu:
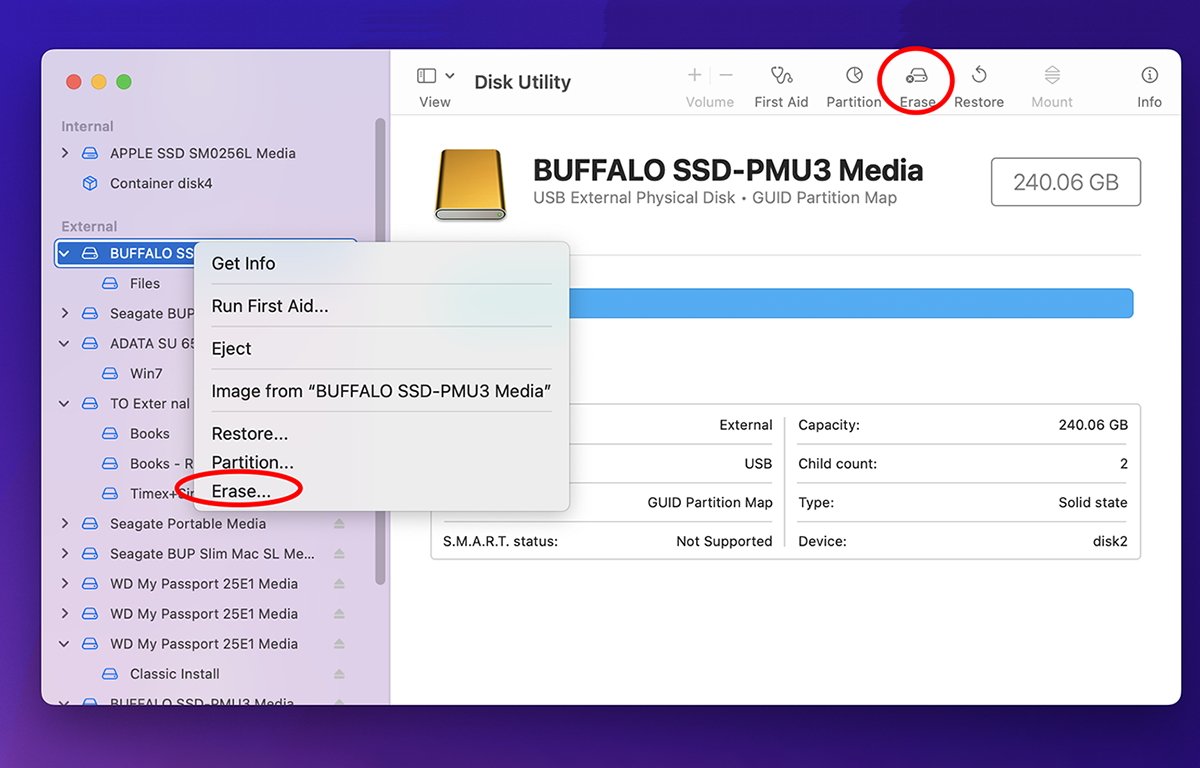 Click the "Erase" toolbar button, or select "Erase" from the context popup menu.
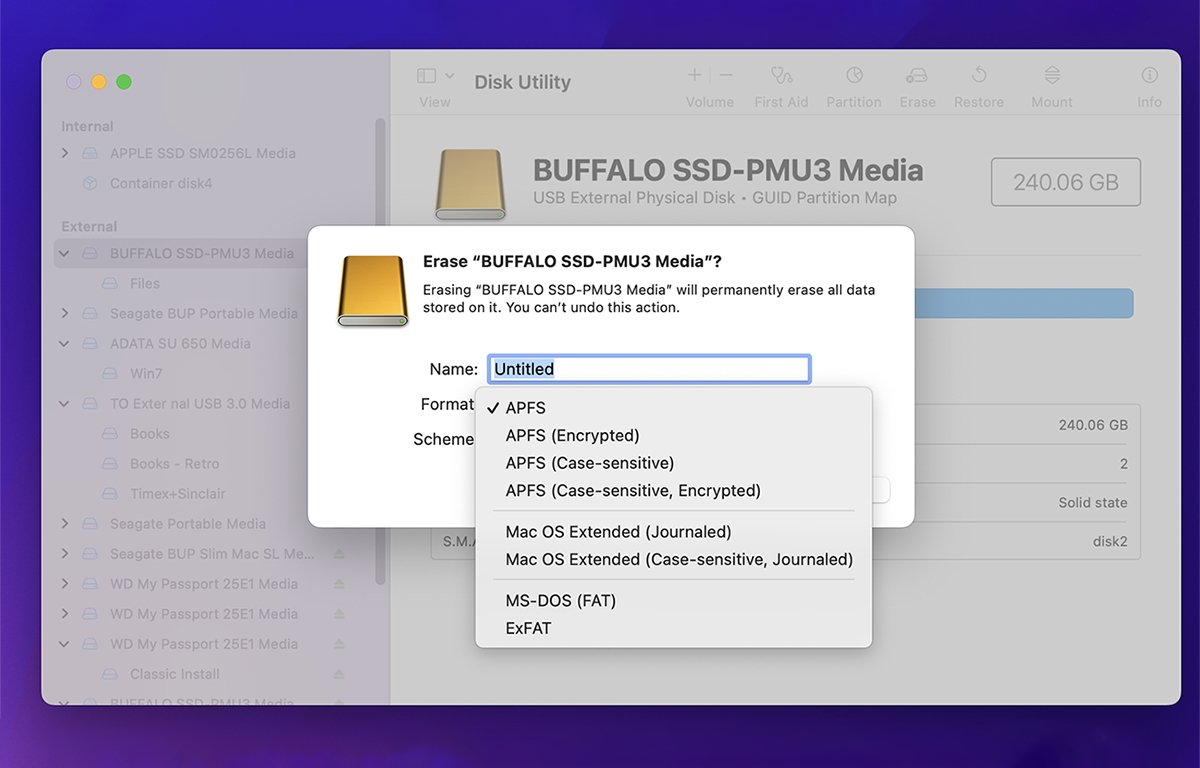
An Erase sheet will appear with three fields: volume Name, Format, and Scheme. Give the new volume a name, then select a format and a partition scheme to format it with.
The Format: field is the volume format for the new volume. Currently, Disk Utility supports Apple File System (APFS), Mac OS Extended (HFS+), FAT (MS-DOS), and exFAT (Extended FAT).
You can also choose to make an encrypted version of APFS, and choose whether or not the volume will support case-sensitive filenames.
HFS Plus (HFS+) is an older but still supported Mac OS volume format from Mac OS 8 and 9. The original Mac had a volume format called MFS - Macintosh File System - which didn't support folders or file hierarchies. Apple later introduced folders with HFS, and when 2TB drives came along in the late 1990s extended HFS to support them with HFS+.
FAT is an acronym for File Allocation Table - an old but still supported DOS/Windows volume format.
 Erase options.
"Scheme" refers to which partition map format to use. As mentioned earlier, this is the format of the device's volume header which contains info about volumes on the device. For a modern standard bootable macOS volume format, choose "GUID Partition Map".
For a Windows-bootable volume choose "Master Boot Record" (MBR), which is a Microsoft PC volume format. Apple provides MBR mainly for use with the Boot Camp utility which allows you to install Microsoft Windows onto a partition on your Mac.
In order for Windows to boot on a Mac, a device must contain an MBR.
Also use MBR if you want to format, for example, a USB thumb drive that can be mounted on both macOS and Windows computers.
Apple Partition Map (APM) is an older, but still supported partition map scheme. APM was used on early versions of Mac OS which ran on PowerPC-based Macs, and is still supported mainly for purposes of mounting newer drives on older Macs.
But to make a modern bootable macOS volume, choose "GUID Partition Map" instead.
Apple provided support for GUID Partition Map when it made the switch to Intel processors in Macs years ago mainly because parts of the Intel architecture expect GUID Partition Map for booting when using EFI firmware used in most modern PCs.
Once you have made all your selections in the Erase sheet, click the "Erase" button. Beware this starts the formatting process and all data on the selected device or volume will be destroyed.
Also note that from the sidebar, you can format an entire device, which destroys all existing volumes on the device. Or, you can select an individual volume and erase just that one volume, which destroys all data on the volume, but leaves the other volumes on the device intact.
Be sure to make your selection carefully when intending to only erase a single volume so that you don't inadvertently destroy other volumes on the device.
On completion, Disk Utility will display a result window with either success or an error explaining why the erase failed. If it succeeds, the newly-created volume will also be automatically mounted on the Finder's Desktop, where you can access it as you would any other storage volume.
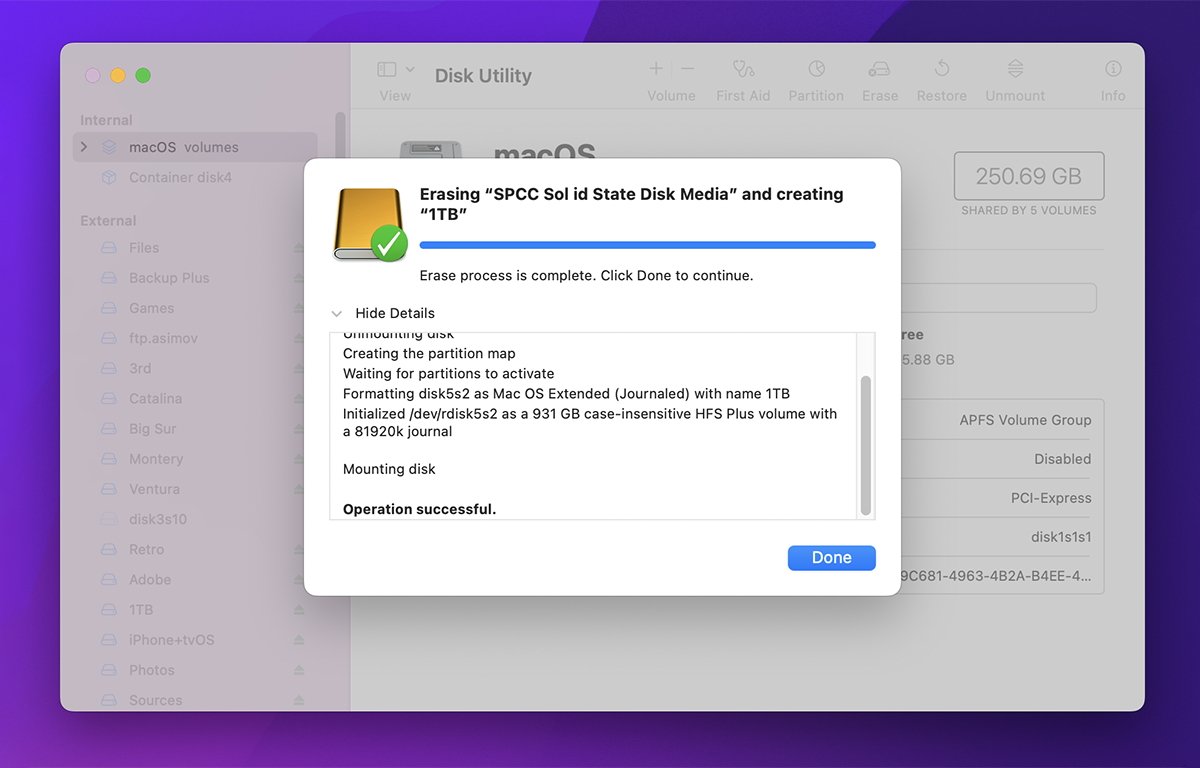 Erase result - in this case success.
Partitioning
If instead of creating a single large volume on the device, you want to create multiple volumes, click the "Partition" icon in the toolbar, or Control-click or right-click the device in the Disk Utility sidebar and select "Partition" from the popup menu. This brings up the main Partitioning sheet:
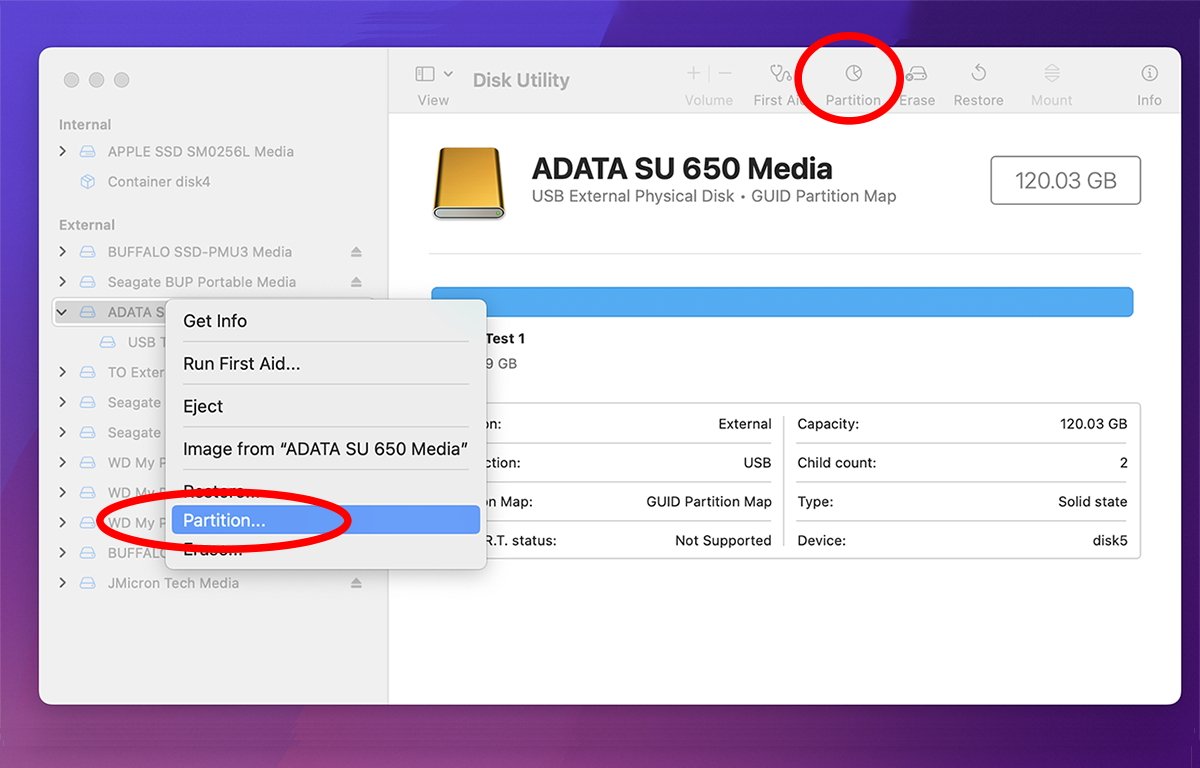 Click the "Partition" toolbar button or "Partition..." from the context popup menu in the sidebar.
In this sheet, you can either format the device as a single large partition, or you can click the "+" button below the pie graph to add an additional volume. This splits the volume into two equal volumes.
You can then select each volume individually by clicking on it, and then setting its parameters using the controls to the right. Click the "Apply" button to modify the device to contain the multiple volumes indicated.
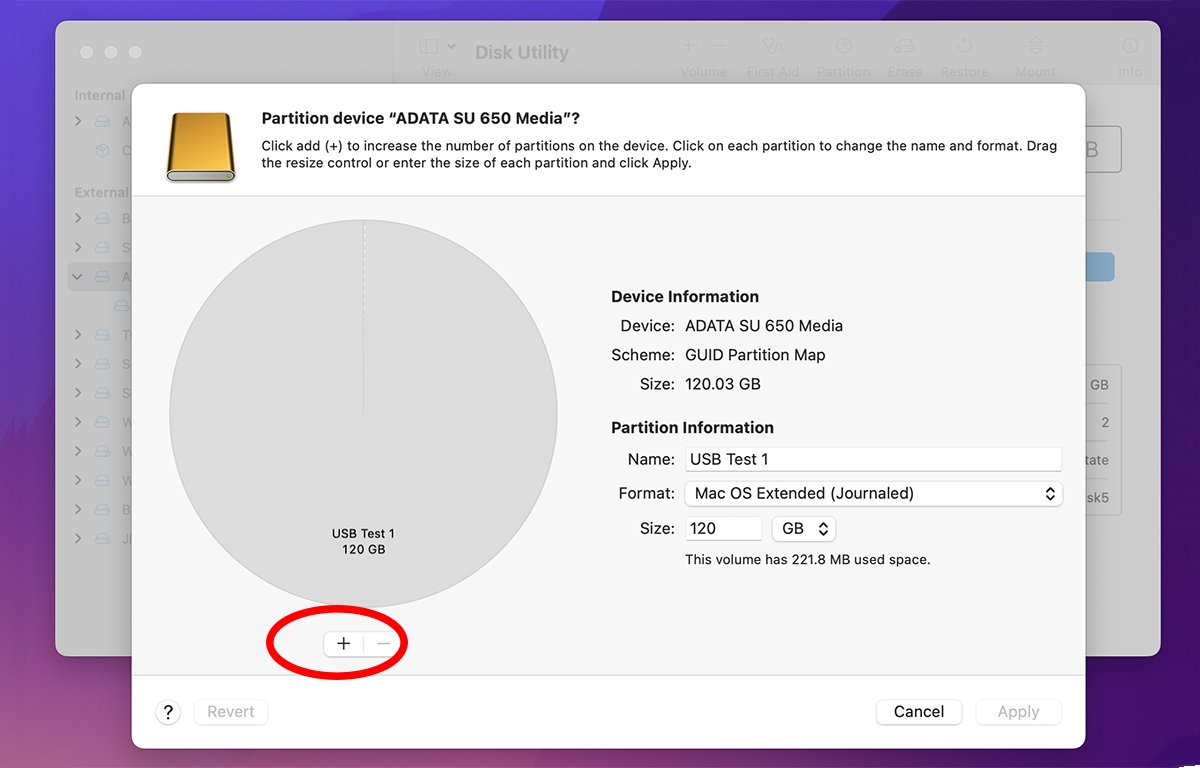 Click the "+" button to add a volume.
If you re-select the original volume, you can continue to click the "+" button, which will halve the volume again each time, creating two smaller volumes from the selected one. You can continue this process to create as many volumes as you like until you click the "Apply" button to make the changes.
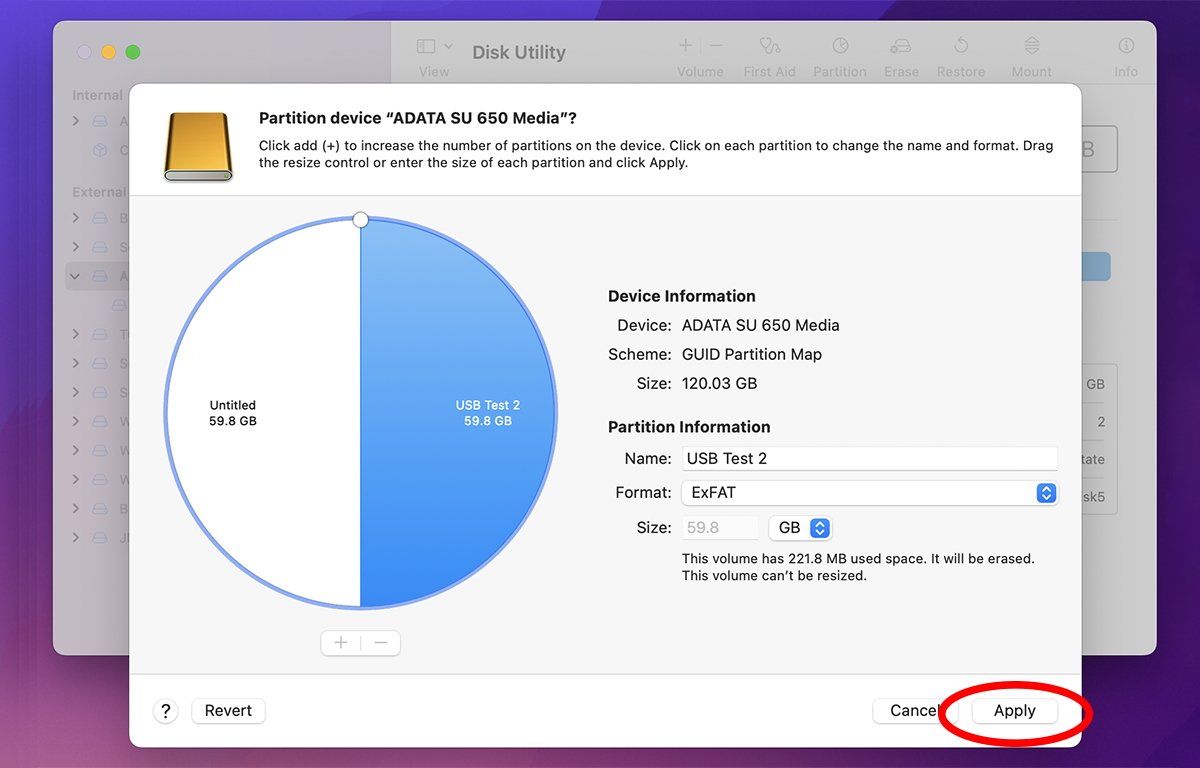 Click "Apply" to save changes to the device's partition map.
Once the volumes are created, Disk Utility will update the device's partition map to contain the new volumes, and mount each one on the Desktop.
We've barely scratched the surface of what Disk Utility can do. In Part 2, we'll cover working with disk images, restoring volumes from images, Disk First Aid, security options, and RAID.


 Christine McKee
 Marko Zivkovic
 Mike Wuerthele

 Amber Neely
 Sponsored Content
 Wesley Hilliard