Chip Loder
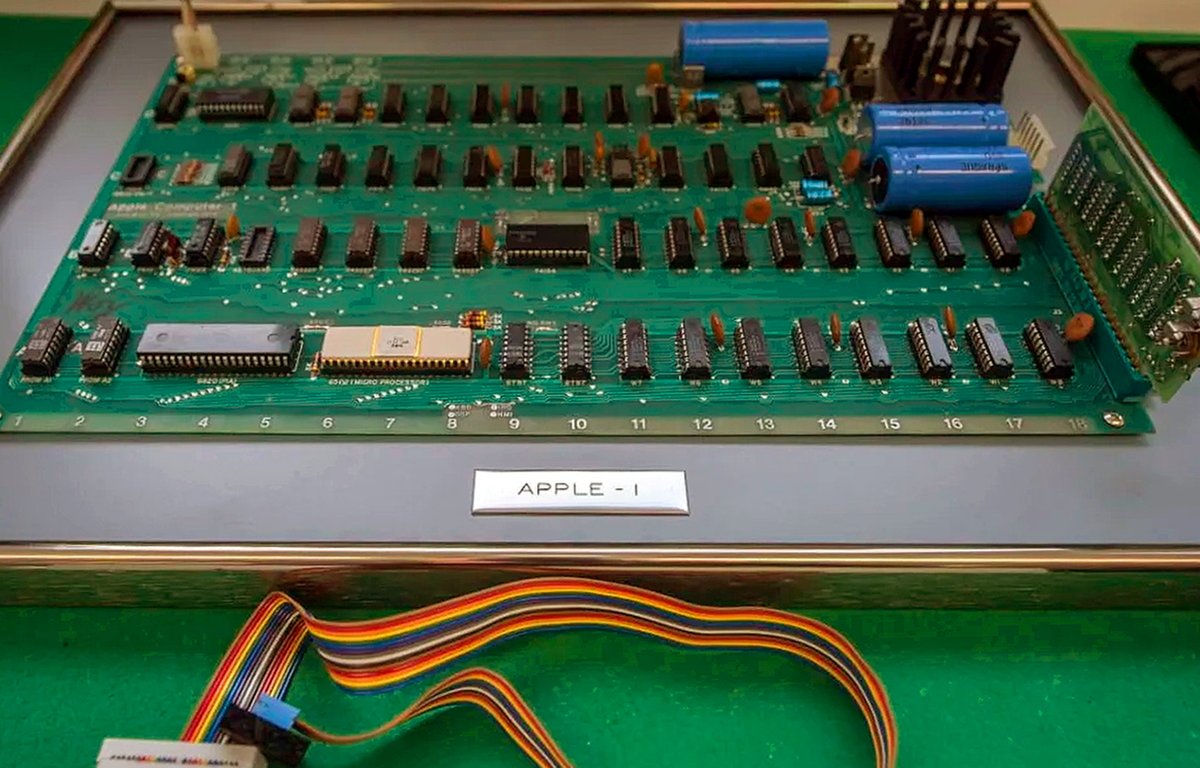
The Apple I was Apple's first-ever computer, and you can try out computing history by emulating it using OpenEmulator. Here's how.
The Apple I was Apple's first computer, created by Steve Wozniak and Steve Jobs in 1976 in Job's parents' garage. The Apple I was based on a low-cost CPU from MOS Technology called the 6502 running at 1MHz.
Many personal computers and game consoles of the 1970s and 1980s were based on the 6502. In fact, because it was the first low-cost CPU of the time, the 6502 was what allowed the personal computing revolution to happen at all.
The Apple I was rudimentary - a single large motherboard sold in kit form, without a power supply, keyboard, or display - those parts were left up to the user to build or supply.
The Apple I had limited graphics capabilities and no sound. Displays used at the time were mostly closed-circuit CRT monitors with green or amber text displays.
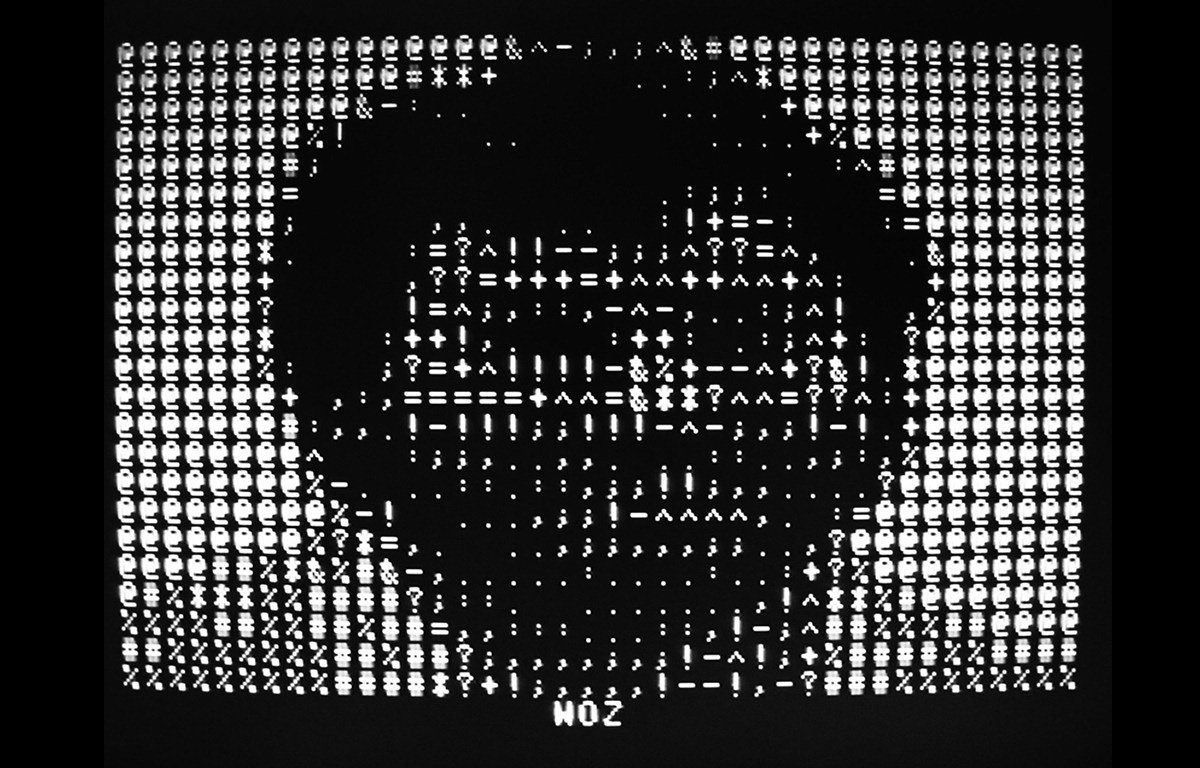 A digitized image of Steve Wozniak displayed as text.
For I/O, the Apple I had a single separate edge connector designed to work with a cassette tape port. Programs could be saved to and loaded back into the machine from tape. Disk drives were not in use at the time, except with large mainframe systems.
The Apple I had essentially no built-in OS or software - powering the machine on ran an assembly-language monitor prompt, and the user had to know how to use 6502 assembly language. A BASIC programming interpreter could also be loaded if needed.
Clones
Several modern printed circuit board (PCB) clones of the Apple I have appeared recently, including one we covered in a previous article.
Today, you can build your own working Apple I replica on a PCB using modern parts and a ROM flashed from original sources.
But building an Apple I clone requires at least rudimentary knowledge of electronics, how to solder components, and a bit about serial communication - something not everyone may possess.
Emulation
If you're not up for building your own Apple I clone, there's a much simpler and faster way to run Apple I software: emulation.
Emulator apps let you run old operating systems and software on modern hardware, including on the Mac. There are many emulators available, but for Apple I software, by far the best one on the Mac today is OpenEmulator from the OpenEmulator Project.
Originally written by Marc Ressl in 2009, OpenEmulator also allows you to emulate the follow-on to the Apple I - the Apple II and Apple II Plus - and the third model, the Apple III, which was one of Apple's biggest failures.
The OpenEmulator site's download link connects you to an Internet Archive page, where you can download the latest snapshot of the OpenEmulator, and its sources.
Using OpenEmulator
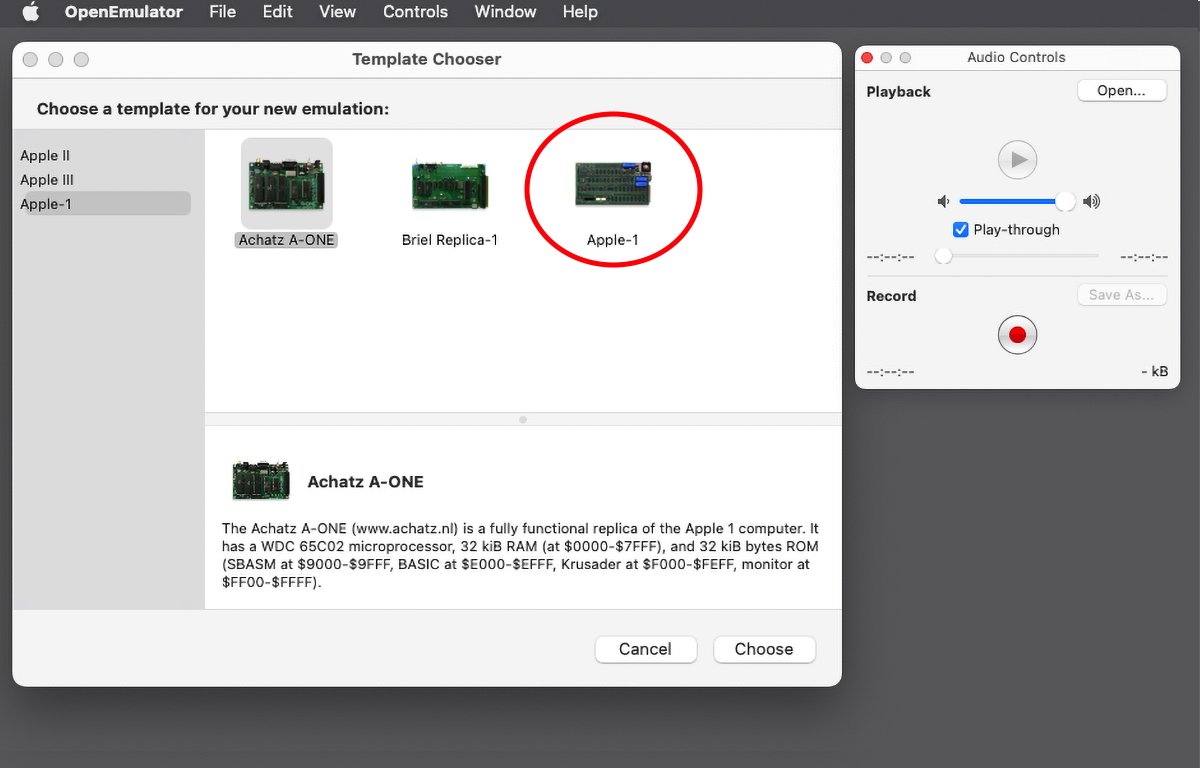
OpenEmulator comes with three built-in Apple I emulators:
- The original 'Woz' Apple I
- Achatz A-ONE modern Apple I replica
- Briel Replica-1
The second and third of the models are modern Apple I hardware recreations by third-party companies which you can purchase online.
In this article, we'll use the original "Woz" model. Run OpenEmulator, and select its icon from the chooser, then click Choose.
 OpenEmulator in action.
This boots the Apple I in a window and leaves you at the monitor prompt (also known as Wozmon back in the day). You'll need to know 6502 assembly language, and how to use hexadecimal numbers to enter code or load programs from a file, which we'll get to in a moment.
Apple I documentation
Apple originally shipped a user guide, a cassette guide, and a BASIC programming guide for the Apple I. You can still find many of these documents online today.
It's a good idea to take a look at the user guide to become familiar with how the Apple I worked.
One such good source for documentation is the DigiBarn computer museum. DigiBarn has a host of great info on the Apple I including links to other sites, photos, and additional info. DigiBarn also has fully restored versions of the original documentation including the original cassette guide.
Another incredibly cool Apple I site is the Apple-1 Registry, which has all kinds of background info on the Apple I. This includes prototype info, an amazing collection of original Apple I photos, and an insanely great Apple I museum section which shows original Apple I computers in museums around the world today.
One such museum is the Computer History Museum in Mountain View, CA just north of Cupertino. There is also an original Apple I on the Apple Park campus itself in Cupertino.
Loading cassette programs
The original Apple I had an optional cassette PCB which connected to the motherboard's edge connector on the right side. Officially known as Compact Cassette at the time, cassettes were a new analog audio tape format for music in the 1970s.
Portable cassette recorders soon appeared, along with cassette players for home sound systems, and in vehicles. Sony's world-famous Walkman music player was based on the Compact Cassette.
Cassettes worked by encoding sound electrically onto magnetic tape and running the tape past an electromagnetic record/playback head inside cassette players. The tape was driven by a small motorized rubber wheel and metal spindle which pinched and pulled the tape inside the cassette during playback/record.
Cassettes could be fast-forwarded or rewound using controls on cassette players.
Computer makers of the 1970s soon figured out that they could encode computer program data via audio and store it on cassettes just like music. During playback, the computer could listen on the cassette player's headphone port and decode programs from the recorded audio.
If you play a computer program cassette back on a cassette player and listen to it, you'll hear an electronic shrieking sound - which is the data in electromagnetic form.
This was all before data began to be stored directly in digital format.
 Early Apple program on cassette.
The Apple I cassette PCB had both record and playback analog audio ports for connecting to standard cassette players via an audio cable.
Most personal computers of the 1980s worked this way and cassette storage soon became a format standard for computers of the era. All of this was before disk-based storage went mainstream.
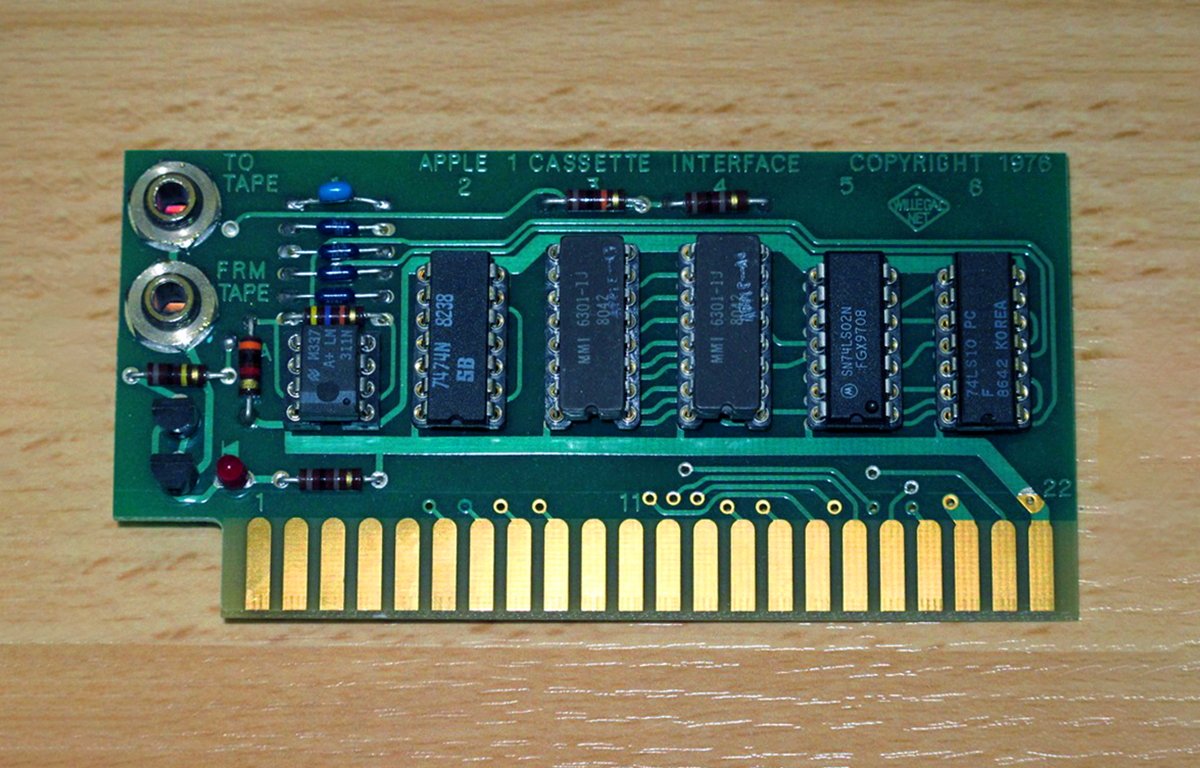 Apple I cassette PCB.
Apple itself sold several Apple I programs on cassette which users could buy and load into their Apple I computers. Most Apple I cassette programs on tape had initial program info in a header, followed by the actual program code which the user could execute by entering a hex address into Wozmon on the Apple I.
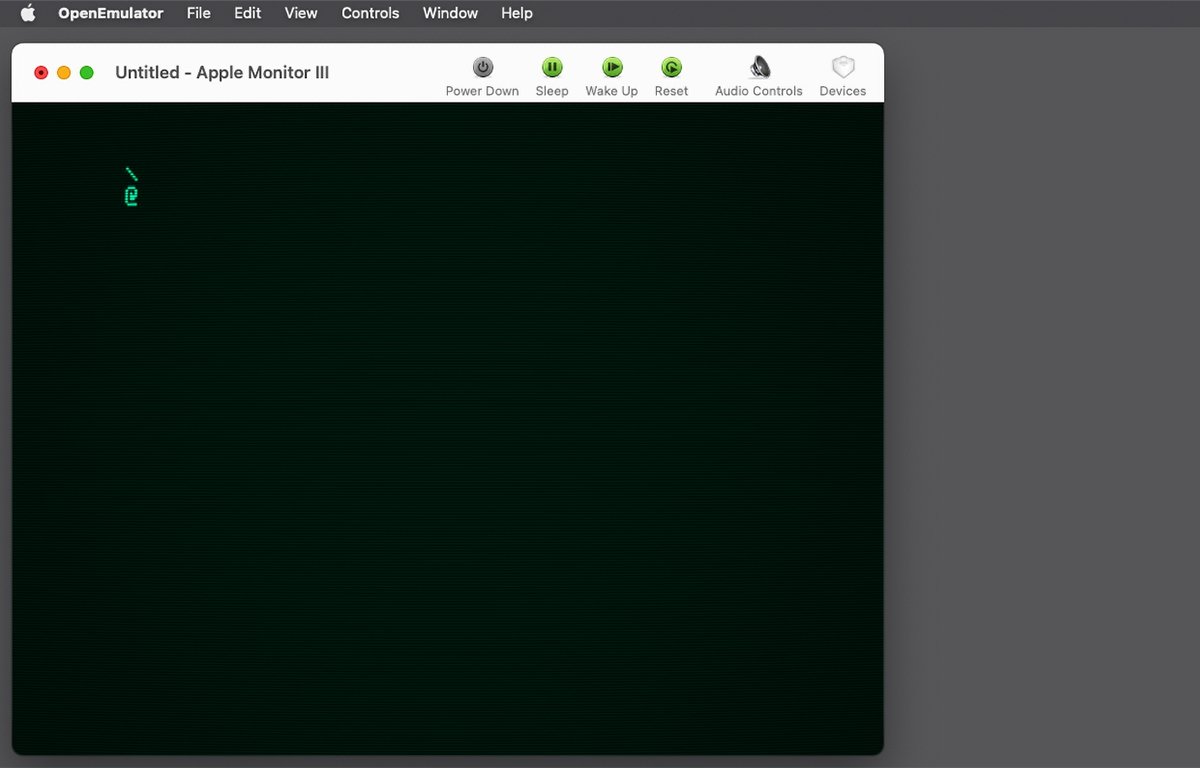 Wozmon running in OpenEmulator.
The start address of the program code in Apple I binaries is known as the origin address. Typing the origin address followed by "R" (for "Run") into Wozmon after loading the program from tape or disk and then pressing Return runs the program.
Want to play a game?
By default, in OpenEmulator the cassette player is already connected and active.
To load a program from a binary or text file on disk as if it was loaded from a cassette, all you need do is select File->Open from the menu bar and select any appropriate Apple I program file and run it.
As an example, we'll run an Apple I clone of the Wordle game called Worple written by Jeff Jetton.
To get the Worple program, first go to its GitHub page, then use git to clone the repository or download its .zip file and decompress it on your Mac's drive.
Open the resulting "apple1-worple" folder, and open the file worple.txt in TextEdit. Don't change any of the text. This file contains 6502 assembly code which runs on the Apple I.
Note the first two bytes in the file: "0300", this is the origin address in hexadecimal. Jumping to this address in Wozmon runs the program.
Also, note at the very end of the file is the text "0300R". When OpenEmulator loads the file, it executes any run commands automatically found at the end - in this case, the instruction to run the code at hex 0300.
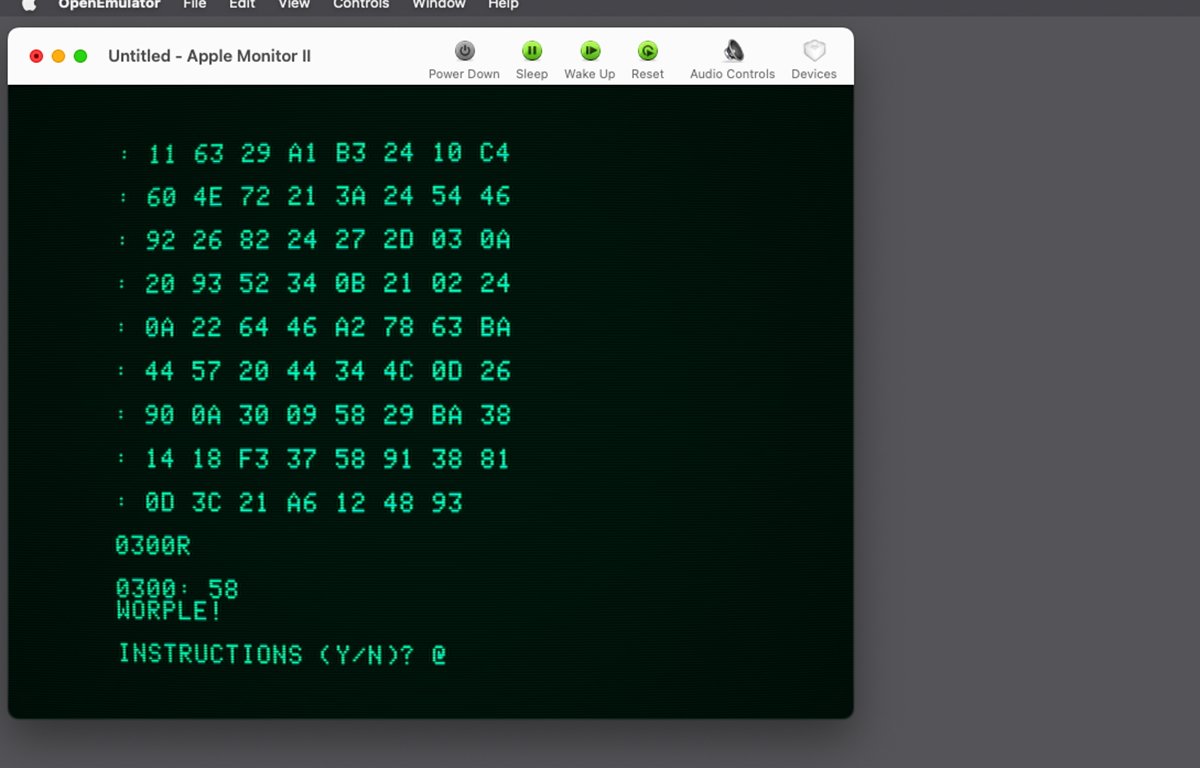 Worple for Apple I running in OpenEmulator.
Although Worple is only 11K in size, if you load it into the original Apple I emulator in OpenEmulator, it will take some time to load. Instead, use the Achatz A-ONE emulator by selecting File->New from the OpenEmulator menu bar and then choosing that emulator from the template chooser.
Once Achatz A-ONE loads, select File->Open from the menu bar, then choose the worple.txt file in the open file pane. Achatz A-ONE will load and run the file just as if it's running on a real Apple I. Very cool.
OpenEmulator's hardware library
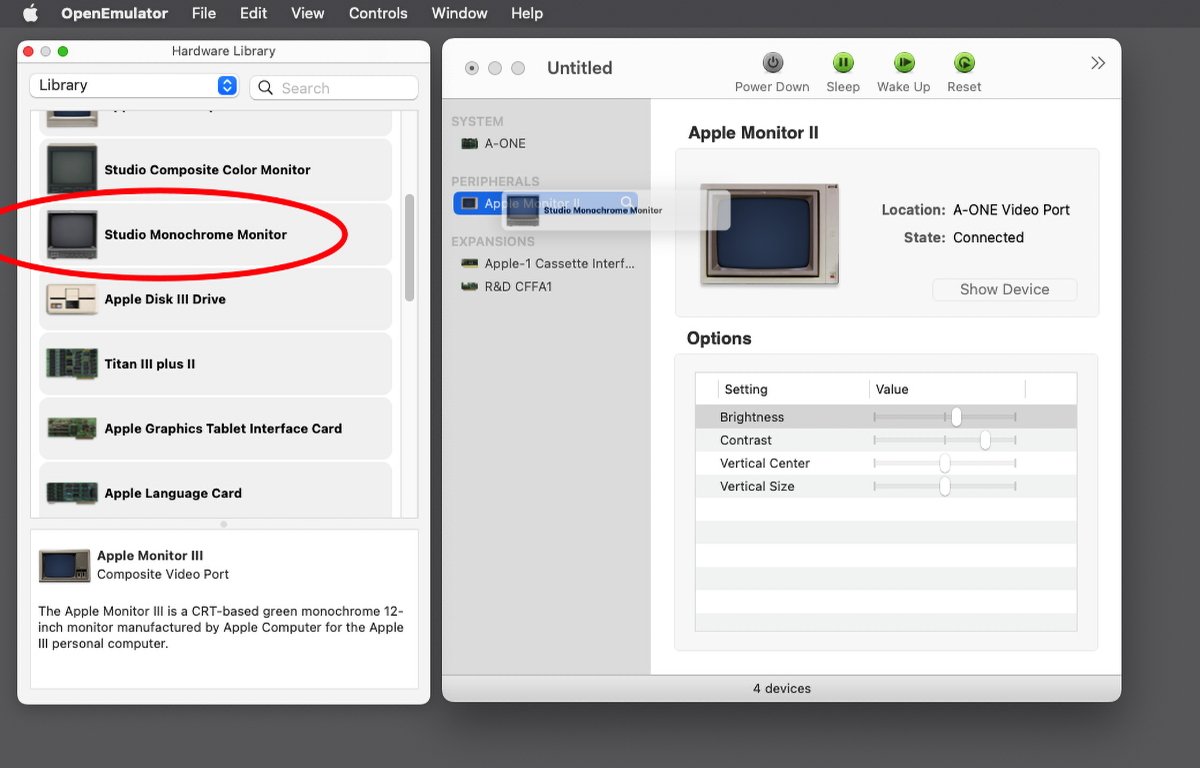
In OpenEmulator, if you select Window->Show Devices then View->Show Hardware Library from the menu bar, you get two additional windows.
Show Devices displays a new window that shows all the devices currently running or connected, including the current emulator, all peripherals, and expansion cards.
In the Peripherals section, the window shows which display is currently being used. By using the display's slider controls you can even change the display's characteristics such as brightness, contrast, etc.
The Hardware Library window shows all possible built-in devices you can use with Open Emulator - and not just displays. The Hardware Library window also shows other peripherals such as disk drives, printers, input controllers, and other expansion cards.
What isn't immediately obvious is that to use one of the other peripherals, simply click and drag it from the Hardware Library window and drop it on a new position in the Devices window:
 Drag and drop a device.
In the case of displays, you can only use one display at a time, and if you drag a new one into the Devices window, the existing one will be replaced, although its contents will remain the same.
If you use the Studio Monochrome Monitor as the display, you even get retro CRT glass tube display distortion and scan lines!
Just like the real thing from back in 1976.
Save your configuration
Finally, when you've got your OpenEmulator set up just the way you want it, you can save the entire configuration to a file, with an extension of ".emulation". To do so, select File->Save from the File menu, then select a location on disk, give the file a name, and click Save.
When you want to reload your emulator setup later, double-click the .emulation file in the Finder and everything is restored to its previous state.
A few additional resources
There's a lot of Apple I information on the web and a lot of sites with vast amounts of information about the computer.
If you want to know more about writing 6502 assembly programs, grab a good book on the subject and then head over to the dasm 6502 assembler site. dasm dates back to the 1980s and is still going strong today.
There is an Apple I page on the Apple II History Site, including lots of development info, how the machine was marketed, hardware, and other notes.
There is a large Apple I documentation archive on the Apple II Documentation Project site, including info on the A-One and Replica 1 computers as well as the original Apple I.
A cool personal Apple I blog dating all the way back to 2009 is at apple1computer.blogspot.com, which contains a lot of information.
There is a bit of additional information on the Apple I cassette interface card for the Replica I on Hans Otten's site in the Netherlands.
Finally, for a quick online way to run Apple I software without having to run a dedicated app, check out Will Scullin's Apple I JavaScript emulator. It even includes some built-in Apple I programs.
OpenEmulator is a masterpiece - one of the best emulators available for Apple I, II, and III computers. It will provide you with enjoyment of these legendary retro machines on your modern Mac for years to come.


 Amber Neely
 Marko Zivkovic and Mike Wuerthele
 Andrew Orr
 Malcolm Owen

 Wesley Hilliard