Chip Loder
Apple removes support for old Mac hardware in new macOS releases. Here's how to run modern macOS on older Macs using OpenCore.
Years ago enterprising modders and hackers began working on software tools that allow you to install macOS on standard PCs. Known as the Hackintosh community, this group of enterprising individuals found a way to modify the macOS installer to allow installation of macOS on standard Intel-based PCs.
The idea is you can run macOS but without having to pay for a new Apple Mac, which saves money.
There are several groups of developers making Hackintosh installers for non-Apple computers, and by far the most popular of these is OpenCore which is an open repository on acidanthera's GitHub page.
OpenCore is essentially a boot loader that installs and modifies the boot blocks on a PC's storage device to allow the startup of multiple operating systems.
Bootloaders work by installing a small bit of code onto a computer's drive alongside one or more operating systems, which at startup prompts the user to select an OS to run. After OS selection, the bootloader jumps to the selected OS and begins startup.
A bit of firmware trickery is usually involved too - in the case of modern PCs or Intel Macs, UEFI (Unified Extensible Firmware Interface) is used.
One of the big advantages of building a Hackintosh or using OpenCore is that doing so allows you to run newer versions of macOS on older Macs or PCs. So if you have an old Mac hanging around, you may be able to use it to run a modern version of macOS.
Apple sunsets support for older Macs in newer versions of macOS every few years so newer versions won't run on old Macs.
In particular, macOS Sonoma and Ventura won't run on any Mac from roughly 2012 or earlier - and certainly not on Macs from 2008 or 2009.
Caveats
Currently, OpenCore is still under development and unsupported. As such, keep in mind it may be unstable, wipe out your hard drive, and destroy all your data.
In any case, be sure to make a full backup of your Mac or PC before attempting to use OpenCore.
Also, be aware that in some cases, using a modified version of Apple's macOS installer within the US may be illegal under US law. In particular, the Digital Millennium Copyright Act (DMCA) passed in 1998 at the height of the dot-com boom makes it illegal to modify any copyrighted compiled binary software that is available from commercial vendors.
Hence using a modified version of the macOS installer, any software that changes it, or any installed modified version of macOS may violate the DMCA.
For these and other reasons, we don't recommend installing or using OpenCore or its associated utilities.
This article is for informational purposes only. Install and use OpenCore at your own risk.
Getting Started
We won't go into all the details of how to install OpenCore directly because there are plenty of other guides for doing that online.
It's a complex process. There are several pages and GitHub repositories with instructions and tools for how to install and use OpenCore.
A much better way to run newer macOS versions on older Macs (should you decide to do so) is to use the OpenCore Legacy Patcher (OLP) from dortania.
OLP allows you to install and run macOS versions back to Big Sur on Intel-based Macs as old as 2008 and later. It does this by building a custom macOS installer for a specific older Mac with all the correct drivers and hardware-related code built it.
It patches and builds a new installer with all the changes included - which get installed during installation.
When you run the patched macOS installer for your Mac, it knows how to install macOS on the older machine even if Apple doesn't support it.
The result is you can install any macOS from Big Sur to Sonoma on older, slower, and less-capable Macs.
You probably want to use an older Mac with at least 4GB of RAM, but 8GB or more is best. Both macOS Sonoma and Ventura really don't run well on Intel Macs with less than 16GB or 8GB of RAM minimum.
Downloading
To use OpenCore, you'll need an older Mac, and a USB thumb drive of 16GB or larger. You'll build a macOS installer onto the USB thumb drive, plug it into your older Mac, then boot into it and run the macOS installer from there.
Only clean installs and upgrades to macOS are supported by OpenCore.
To build the USB installer, you'll want to read dortania's OpenCore-Install-Guide linked from the main GitHub page. There is a guide for the OLP which details how to get started.
There's also a terminology and a Supported Models page.
Keep in mind there are several steps involved in using OLP and building the installer for your Mac. You'll need to read the instructions thoroughly as it's not a simple one-click install.
From the main start page, click on "Download and build macOS Installer". From there go to the releases page by clicking on "OpenCore Legacy Patchers Release Apps".
The current version of OLP as of this writing is 1.1. Scroll down and under "Assets" click "AutoPkg-Assets.pkg" and "OpenCore-Patcher-GUI.app.zip". Source code is also available in .zip and .gzip formats.
Or you can clone the entire repo to your drive using git.
Once you have all the OLP assets, you'll need to unzip them to your Mac's storage. You'll also need an Apple copy of the macOS installer for the version of macOS that you want to install onto your old Mac.
Any local copies of macOS installers you intend to use must be in the /Applications folder at the root of your Mac's Startup Disk or OLP won't find them.
If you don't have a copy of the macOS installer you want to use, fear not - OLP knows how to download one for you if you wish.
Building the installer
Once you've gathered and unzipped all the software, run the Open Legacy Patcher app.
You'll be presented with a single window with four buttons:
- Build and Install OpenCore
- Create macOS Installer
- Post-Install Root Patch
- Support
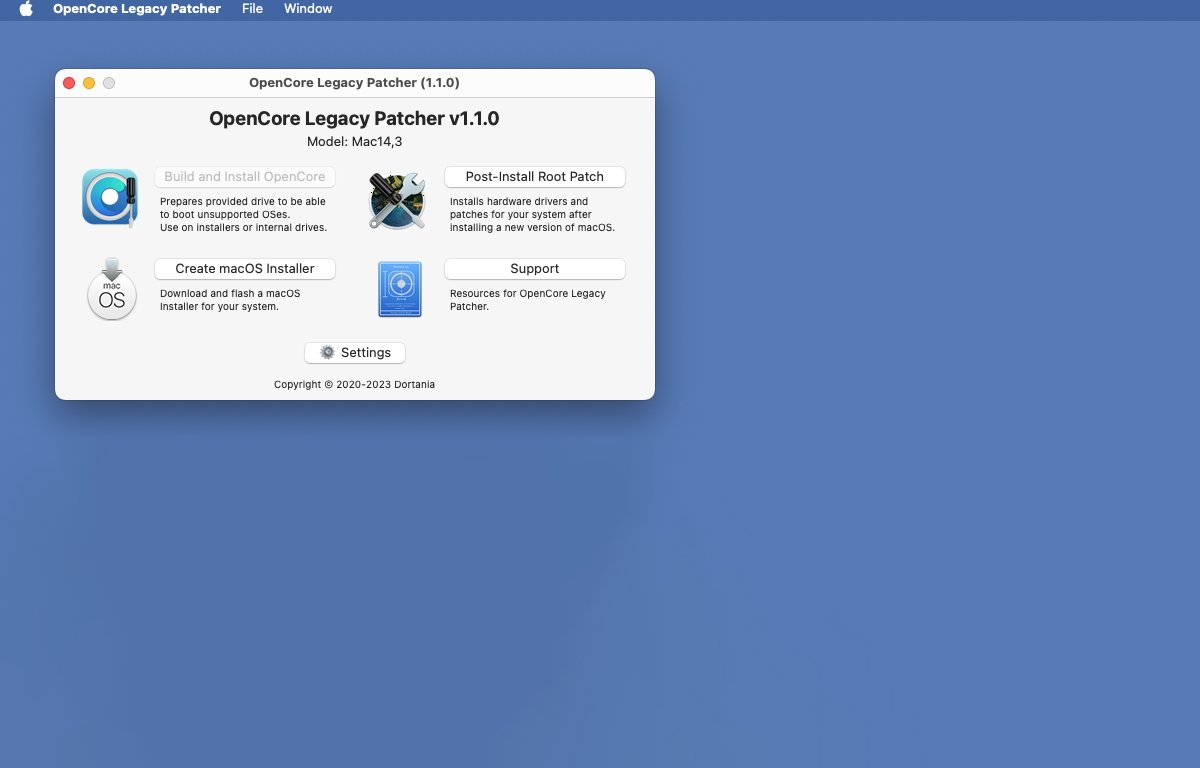 OLP 1.1's main window.
Don't bother clicking the Support button - it's a joke and you'll be Rickrolled if you do. OLP is currently unsupported.
Next, click Create macOS Installer. This gives you three more buttons:
- Download macOS Installer
- Use existing macOS Installer
- Return to Main Menu
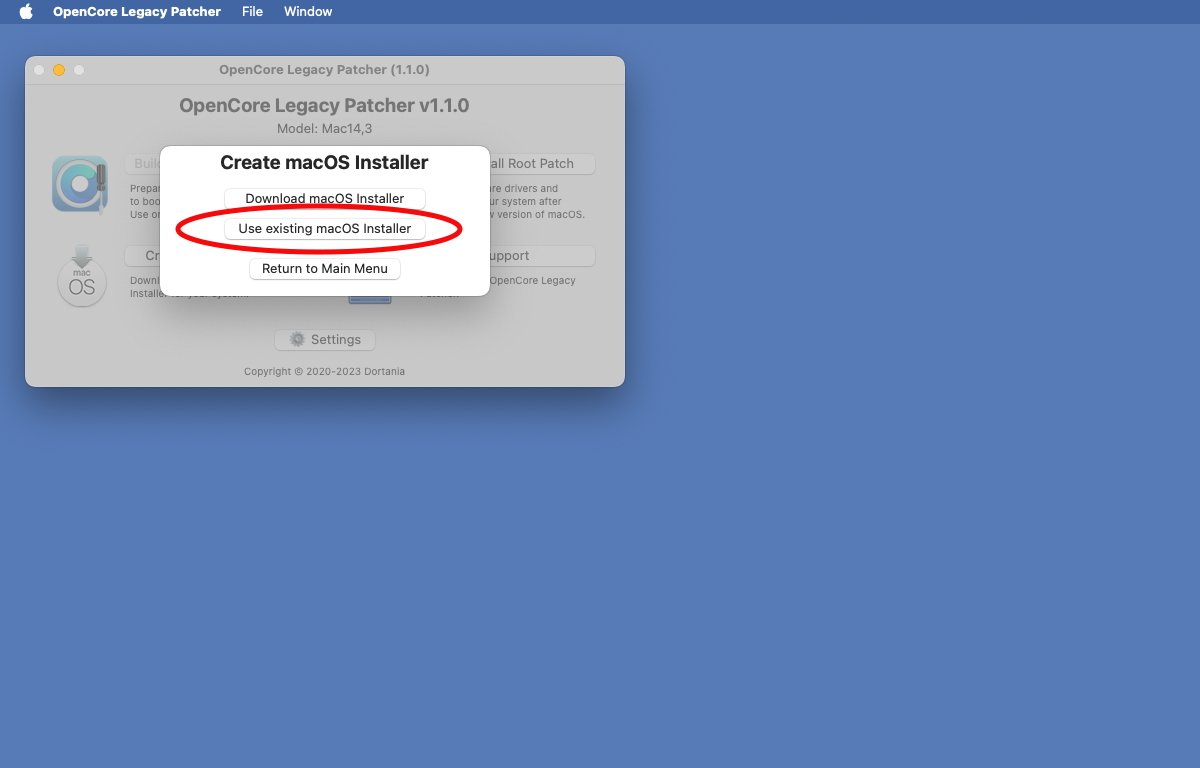 Choose a macOS installer.
Using these buttons, either select an existing macOS installer app you have or download a new one from Apple's servers.
If you choose to download a macOS installer, you'll be presented with two or three more windows asking you to select a macOS version to download, and whether it's supported or not.
If you are running OLP from the older Mac you intend to patch or install onto you'll be informed whether the machine is supported for the macOS installer selected.
If not you can run OLP on a modern Mac and then install it onto an external USB drive - as long as OLP knows which Mac model you want to install onto. You can also see all supported models in the Settings window in the popup list at the top:
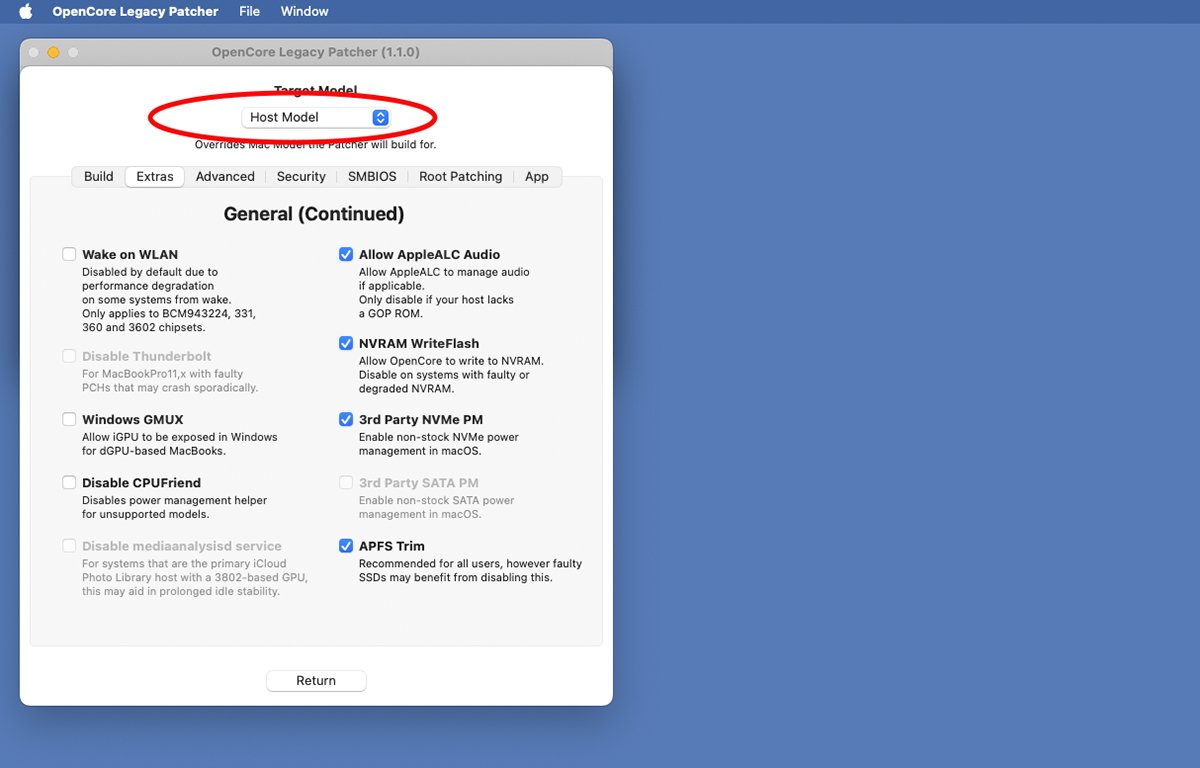 Set the target Mac model in the Settings window.
Once you have an installer downloaded or set, plug in a USB drive to you Mac and continue.
Note OLP will erase the entire USB drive and build the patched installer onto it - so make sure you don't have any data you want to keep on the USB drive before proceeding.
In the next two steps, you'll select which installer to use, and which USB drive to write it onto. BSD USB disk device names are used along with the manufacturer's drive description embedded in the USB drive's firmware.
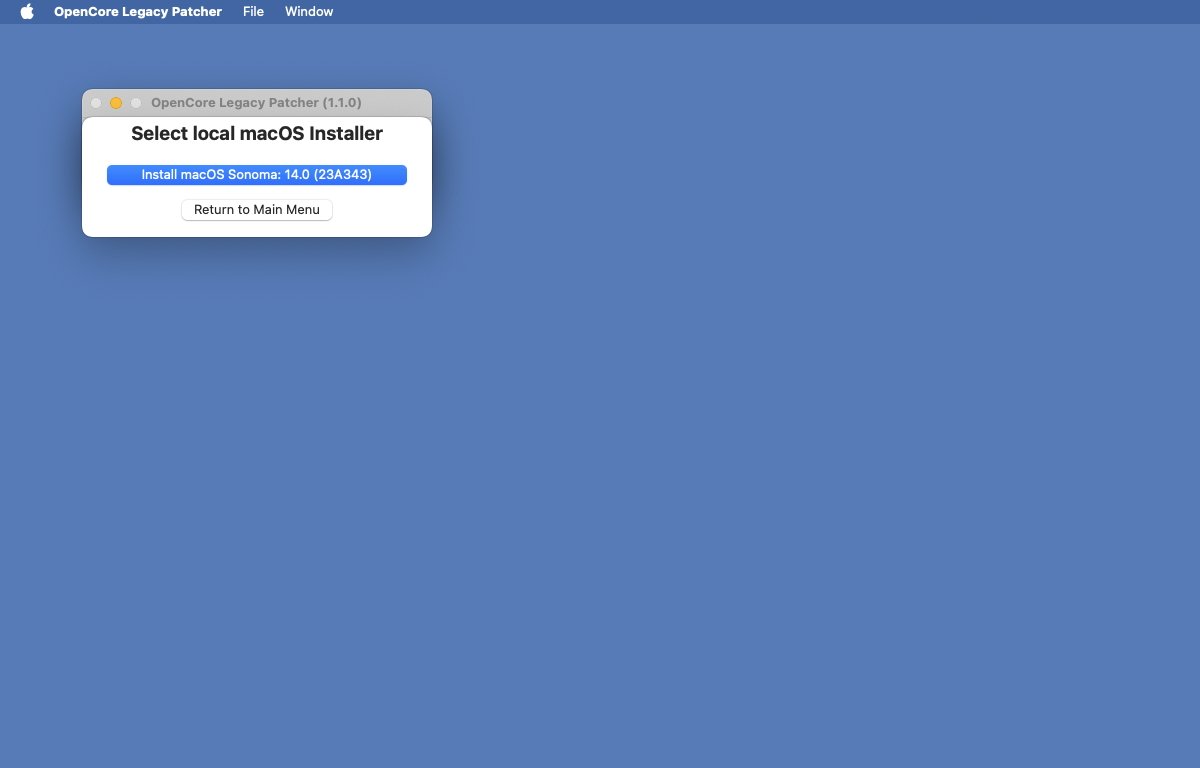 Select a local macOS installer in /Applications to use.
Select which USB drive to flash the installer onto and proceed. As soon as you click which USB drive to use for the installer, flashing will begin.
A progress window will tell you the flashing status, and whether the USB drive was created successfully or not.
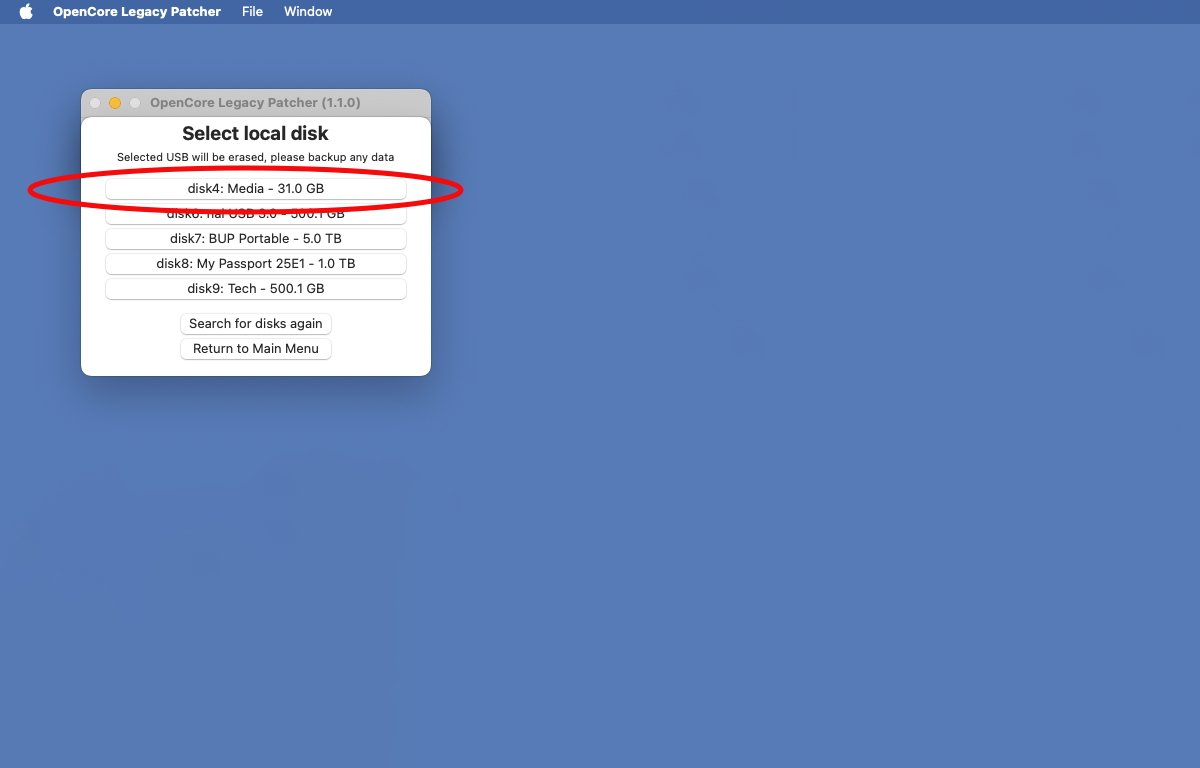 Select a target USB thumb drive to flash the installer onto.
Building
Once your USB drive is flashed, you'll next want to head to the "Building and Installing OpenCore" (i.e. - the "BUILD") page.
On the BUILD page you're immediately warned that OpenCore builds are hardware specific and if you're not building on the Mac you intend to install onto, you have to select the target Mac model in Settings:
Warning: OpenCore configurations are hardware-specific. If you're building OpenCore for a different model than you're currently running, it is absolutely necessary to select the proper model from Settings.
Once that's all set, click the "Build and Install OpenCore" button in OLP to start the build of OpenCore itself. You'll be alerted when the building process is complete.
When OpenCore finishes building, you'll get an alert with a button titled Install to disk. Click it to select a drive and a volume on that drive to install OpenCore onto.
Installing macOS
The next instructions page linked at the bottom of the previous page is titled "Booting OpenCore and macOS". Click it to proceed to the next step.
To reboot make sure the USB thumb drive you built is plugged into your old Mac, Restart, and hold down the Option key on the Mac's keyboard. This starts the Mac up into the EFI boot menu.
From there, select EFI Boot which has the OpenCore icon with a disk icon on it:
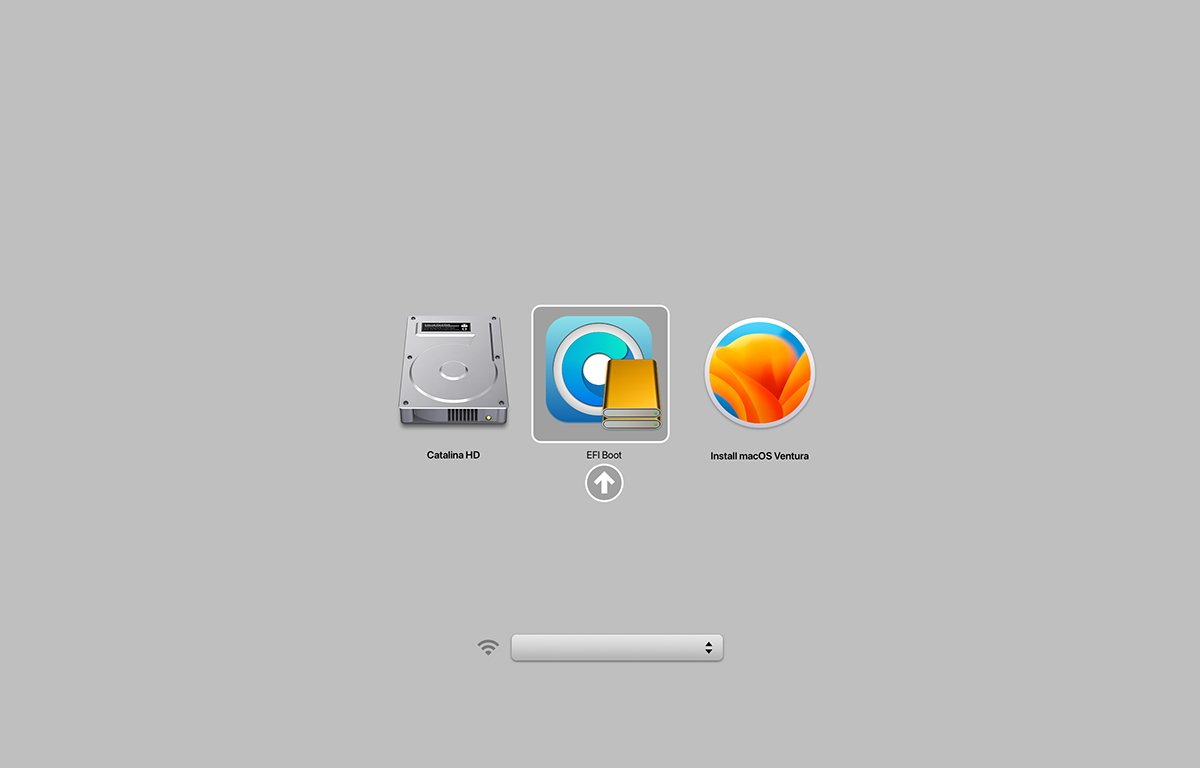 EFI boot menu.
Click the arrow button to boot into the USB thumb drive.
From there, you'll see the similar-looking OpenCore Picker. Select Install macOS Sonoma, or whichever variant of macOS you built to install to start the process.
You can also build the installer to use verbose mode so you can see details of what happens at install time.
Booting macOS
Once macOS is installed, restart your machine to boot into macOS. Run OLP again.
The final instructions page "Post-Installation" informs you that you can now take several actions. You can:
- Boot without USB drive
- Booting seamlessly without Boot Picker
- Applying Post-Install Volume Patches
To achieve the first option, follow the instructions on the Post-Install page. Essentially you have to run OLP from the newly installed drive, change its settings, build OpenCore again, install OpenCore to the internal drive, and reboot a final time using the Option key.
Once you select the newly patched macOS on the internal drive you can boot into it in the future without needing to use the USB drive.
To achieve the second option (Booting seamlessly without Boot Picker), you'll need to run OLP again, go to its settings, and turn off Show OpenCore Bootpicker.
You'll need to rebuild OpenCore yet again, and from then on you can show the OpenCore selector by holding down the Esc key while clicking on the EFI boot volume from the Options screen (i.e. when holding down the Option key while rebooting).
The final option (Applying Post-Install Volume Patches) is only needed if you didn't build the USB thumb drive from within OLP. If you did it runs this step for you automatically.
At this point you have a fully installed and patched version of macOS running on your legacy Mac.
Additional resources
There are numerous guides online for using OLP to install newer macOS onto legacy hardware. Several YouTubers have tutorials with varying levels of detail for install.
Sean at Action Retro has a fifteen-minute video, and Mr. Macintosh has a more detailed, albeit forty-four-minute, video.
Sean uses OLP to install Sonoma onto a 2012 MacBook Pro with only 3GB RAM.
Also, be aware Apple just released macOS Sonoma 14.1, and there are apparently some potential issues with 14.1 and OLP 1.1. So be careful if using that combination until an update to OLP is released.
The OpenCore Install Guide itself has quite a bit of technical info - including issues with various built-in GPUs on various older Macs, and detailed info about how the OpenCore boot process works.
It also has pages on ACPI (Advanced Configuration and Power Interface) as defined by the UEFI Forum. As explained on the OLP ACPI page, ACPI uses tables that define devices present on a computer, and the Mac is very finicky about how these devices and their descriptions are represented.
Intel also publishes a book on ACPI.
Many of the patches OLP applies relate to updating these tables so they match older legacy hardware devices Apple no longer supports.
There are also issues centered around Kernel Address Space Layout Randomization (KASLR) which OLP attempts to mitigate - and which can vary from Mac to Mac.
OLP relies on another project from acidanthera - Lilu, which is an open-source kernel extension (KEXT) patching library.
Be sure to check out the Settings window as there is a huge array of configuration options with OLP.
OLP is an amazing piece of software and can keep modern versions of macOS running on your old Macs for years, should you choose to do so.

 Christine McKee
 Mike Wuerthele and Malcolm Owen
 William Gallagher
 Malcolm Owen

 Oliver Haslam
 Amber Neely