 Malcolm Owen
In situations where a visitor wants to use your Mac for a task, providing them access via your personal account may be an unwise move, especially if it isn't someone you completely trust. AppleInsider explains how to set up a guest account in macOS that provides access without endangering your personal data.
Over time, the need to provide a houseguest or visitor access to a computer has reduced, in part because of the prevalence of smartphones and tablets being carried around, ones which are capable of doing the majority of things guests may want to do. There are, however, some things that are simply better to do on a desktop, like writing out a lengthy document, that would be best done with a physical keyboard instead of an iPad's display or an iPhone's small software keyboard.
The immediate solution is to log into a Mac using an existing account and letting the visitor do what they need to accomplish. While this may be suitable for situations where the account owner is monitoring the guest's usage, it isn't a secure option if the account's user has to leave the Mac unattended, as this effectively gives the visitor free reign to alter and delete data, install unwanted apps, and other potentially harmful tasks to the account.
To save users from having to set up a second dedicated account for visitors to use and abuse, Apple has included the ability to set up a guest account.
What is a Guest Account?
The guest account is a separate account accessible through the Mac's log-in screen, alongside other existing accounts. When selected, the guest account automatically access the account without a password, saving Mac owners from having to remember yet another account credential to pass onto guests.
When accessed, the guest account effectively loads up the Mac as if it is a new user, complete with the default background and apps in the dock. Guest users can access apps installed on the Mac, including browsers for Internet access, but crucially it does not provide access to any files stored on the Mac in other user
The guest account provides access to installed apps and the Internet, but importantly the way it is configured means it cannot be used to affect the files created by other account users registered to the Mac. As well as protecting documents from prying eyes, this protection even applies to apps, like iTunes not showing any music stored on the Mac by other accounts.
Even better, at the time the guest account logs out, all files created using the account that are stored on the Mac are deleted, leaving the account clear for the next guest, as well as preventing any storage from being used up for the other normal accounts.
Setting up the guest account
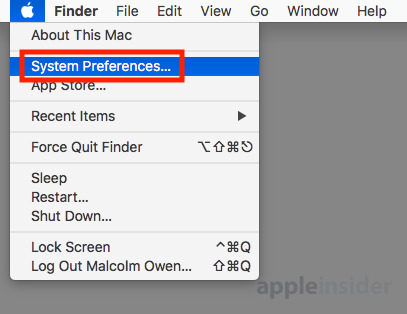
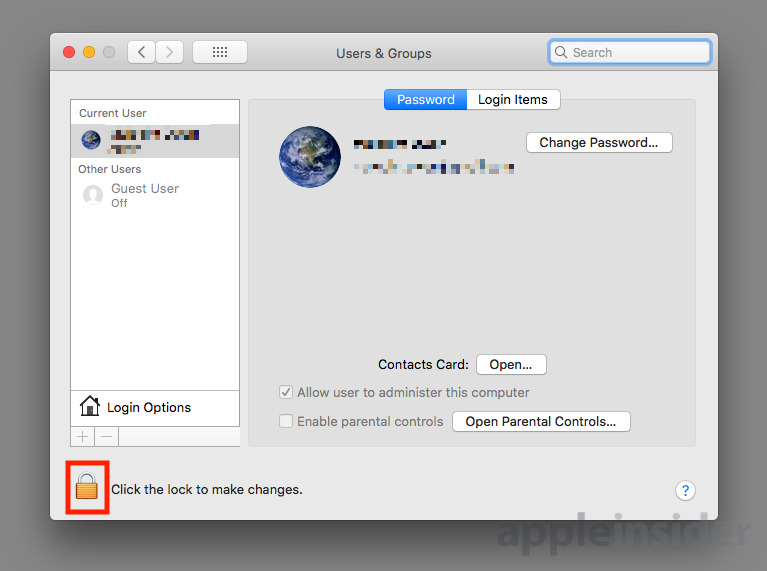
When logged into an administrator account, select the Apple icon in the main menu, and select System Preferences. Select Users & Groups, which will be on the fourth row down, first icon from the left.

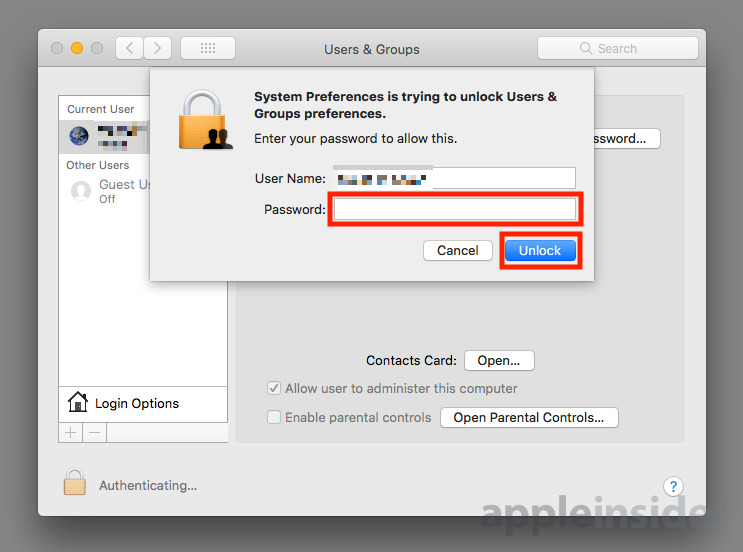
In the Users & Groups window, click the lock in the lower left to make changes, enter the account password, and click Unlock. Select the Guest User account in the left-hand column, and click Allow guests to log into this computer.
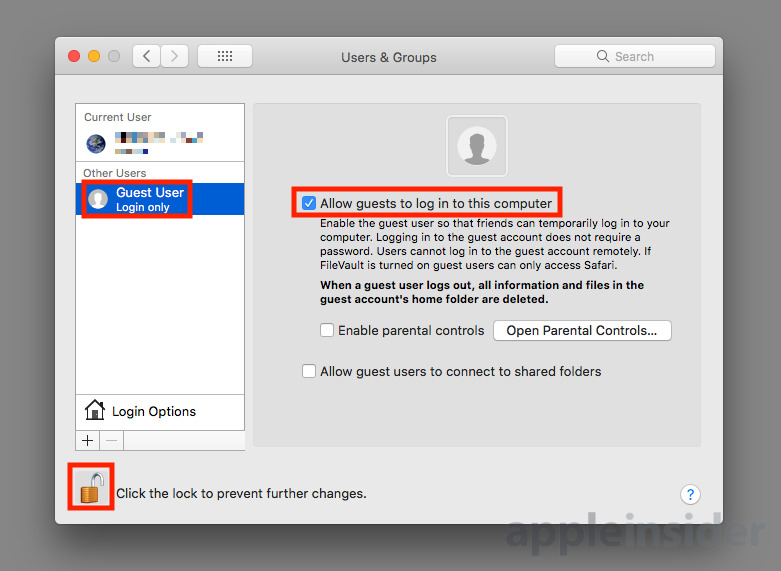
This tickbox can also be unticked to deactivate the guest account in the future.
Click the lock again to prevent further changes.
At this point, you can check the guest account is available by saving any work on the current account and logging out or rebooting the Mac. At the login screen, there should be a new option marked as Guest User.
Using the guest account
At the login screen, click the Guest User listing. This will bring up a familiar default new account view of the macOS desktop, complete with a selection of apps on the Dock.

If you look in Finder, the list of areas accessible to the guest account are relatively blank or not immediately usable, with no access to existing files on the internal storage at all. Installed apps do appear in the Applications folder, though again without allowing access to accounts or sessions used by other registered users.
While it won't provide access to internal storage, it will still allow guest users to access files located on external storage devices. Keep this in mind if there are any items on these drives you do not wish others to access, as you may need to reconsider creating a guest account in the first place, or disconnect the drives in question before the guest logs in.
At the point of logging out, a window will appear advising the user is logged in as a guest, reminding any created files will be deleted and unrecoverable, and giving an opportunity to retain the files. To delete and exit the account, click Delete Files & Log Out.

Restricting abilities
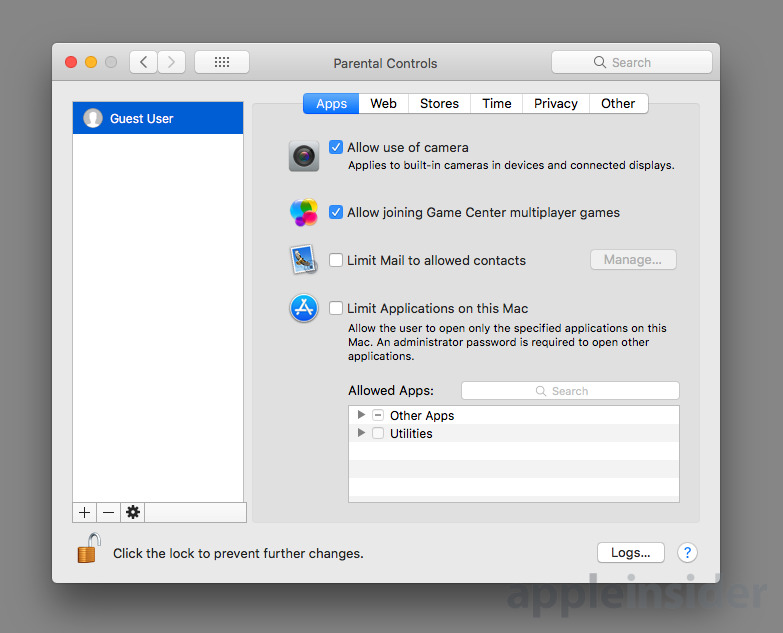
While this guide does cover the basics of setting up a guest account, there are more options available to those wanting to restrict a guest's abilities while using the account. An option in the Users & Groups window for the guest account gives the option to enable parental controls, along with a button to set the changes.
Just as with parental controls for specific accounts, this can be used to allow or deny access to specific applications, connected cameras, Apple's media stores, and adult web content, among other elements. This will be discussed in detail in a future tip.
It is also possible to include the Guest User within specific user groups, allowing for the mass management of permissions for multiple accounts. This could be handy if you have multiple accounts for children that have specific restrictions, as including Guest User in this group would give it the same permissions and restrictions as the other accounts.
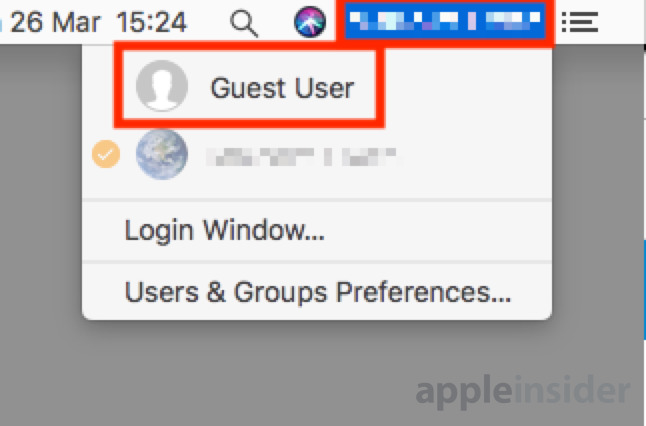
Enable fast user switching
If you are using a normal account but quickly want to change to the guest account, the fastest way to do it is to enable fast user switching. This will allow users to click their account name or icon in the menu to bring up other accounts, then a click of the guest account will lock the existing one while opening up the guest version.
To enable this, go to the Users & Groups window as described above, and click Login Options. Tick the checkbox for Show fast user switching menu.
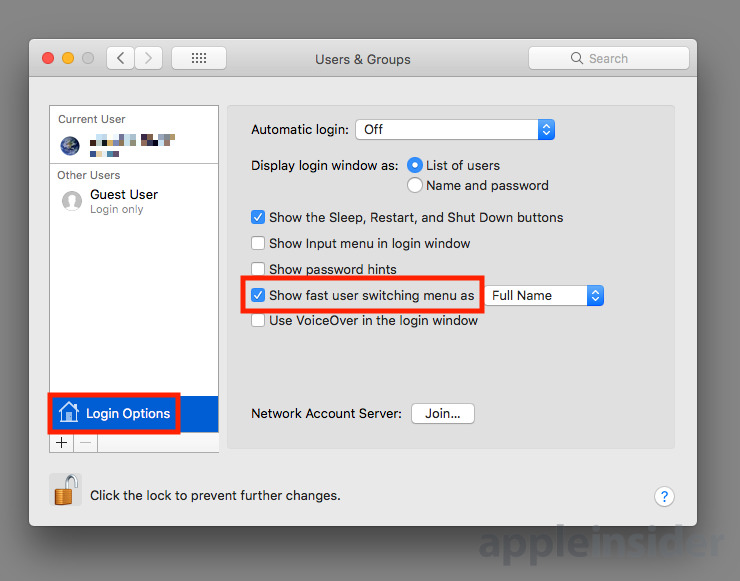
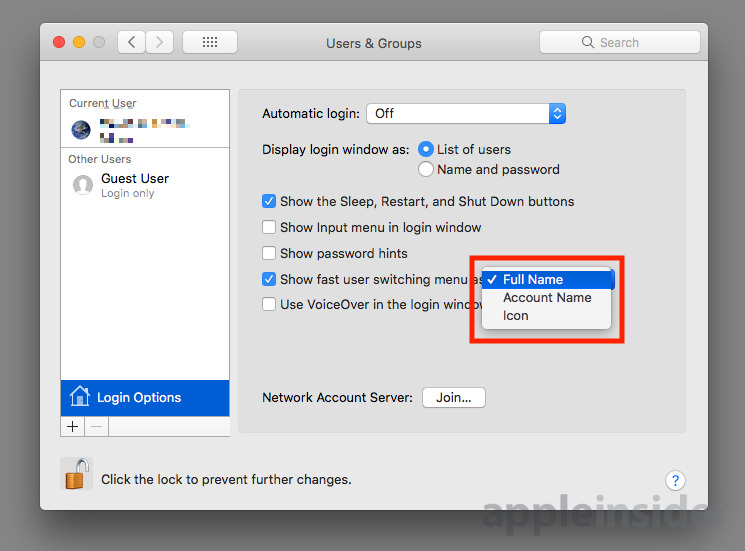
A dropdown box next to the option changes how it appears in the menu, including selections for the full name of the user, the account name, and an icon.


-m.jpg)


 Marko Zivkovic


 Amber Neely

 Wesley Hilliard


7 Comments
I’d say you not only could but should provide a restricted guest account so in the event themsc gets stolen it will be used and thus enabling tracking!
Having a guest WiFi login on your router is also good, if it supports it. It will let visitors join your LAN with their own device, but that device will be prevented from speaking to all the other devices on the network.
For me it’s not just about security. It’s also nice because not everyone is a Mac person or is familiar with magic mouse. I use MagicPrefs which to a n00b on magic mouse can be extremely frustrating. Plus I always have a couple projects going and several Safari windows etc. and having a guest account just limits the amount of damage they can do! But the security aspect is of course also nice.
Guest accounts can present severe security risks and should be disabled. Do not use Guest accounts. The benefits are simply outweighed by the risks and the effort. I absolutely disagree with this article.
"In situations where a visitor wants to use your Mac for a task, providing them access via your personal account may be an unwise move, especially if it isn't someone you completely trust."
What task do they need to do, unsupervised, on your computer, while they are visiting you? If you don't trust them, then don't let them use your computer. Do they not have a smartphone / tablet / laptop?
"The guest account works with the Find My Mac feature of iCloud, which can help you find your Mac if you lose it. You can locate your Mac if someone finds it, logs in as a guest, then uses Safari to access the internet."
And just a recent example of an exploit...
https://9to5mac.com/2017/11/28/how-to-set-root-password/
"Users who haven’t disabled guest user account access or changed their root passwords (likely most) are currently open to this vulnerability."