Sponsored Content
How to create social-worthy video using Wondershare Filmora X
 AppleInsider Staff
Wondershare Filmora X

Do you want to make videos you share on social media better to watch? Here's how you can use Wondershare Filmora X's features to improve clips you want to share with your friends and the rest of the world.
Many people dream of becoming a social media star, with exciting YouTube videos or impressive TikTok clips that are watched by anyone and everyone. However, on trying to accomplish that goal, many people fall into the same traps.
For a start, creating a YouTube video can take quite a long time and require tons of effort, especially when you're trying to get to the same level of quality and professionalism as already established content creators. On TikTok and Instagram Reels, the problem is that everyone is using the same built-in filters and features, and no-one particularly stands out.
Simply filming with your iPhone and uploading without edits isn't really an option either, you could end up sharing a video that's quite boring.
A middle ground is to use a video editing tool like Wondershare Filmora X, which is both quite easy to pick up and use, and quite powerful from the outset. If you have your video already filmed, you can easily build up a shareable clip within a few minutes on your Mac.
What is Wondershare Filmora X?
Filmora is packed with features that will take your video editing to the next level. Editable keyframing presets help you make smooth transitions between clips, while motion tracking lets you track movement in your video and have objects, such as elements, videos, images, and text follow the action.
A blending mode allows you to layer media for special effects, such as adding rain, snow, fire, bokeh, and more. A green screen mode allows you to easily add backgrounds to your videos by keying out an existing, solid-color background.
Filmora also features plenty of drag-and-drop video effects, which lets you easily set the mood for any video. A simplified color matching feature allows you to take color settings from one clip and apply them to a batch of clips quickly and easily.
If you have a Touch Bar on your MacBook Pro, Filmora will allow you to use it for easy, precision scrubbing through your timeline.
If you're posting to Instagram, TikTok, or Twitter, Filmora's Auto Reframe feature will detect a focal point and automatically crop it to fit a wide range of different aspect ratios. One-click audio ducking allows you to quickly fade your audio tracks in and out as needed, perfect for lowering music once the dialogue begins.
Once you've finished your video, Filmora even lets you upload directly to YouTube, too.
How to edit a simple video using Wondershare Filmora X
First, create a new project. On opening Wondershare Filmora X, select Create Project, then the aspect ratio in the dropdown, then New Project.
Next, you will need to bring in files to the project. Click Import then select the files you want to use, or drag and drop them into the workspace.
To speed up editing, Filmora will offer to create proxies, namely lightweight versions of the videos that will be temporarily used. They will be replaced by the final versions at the end of the editing process.
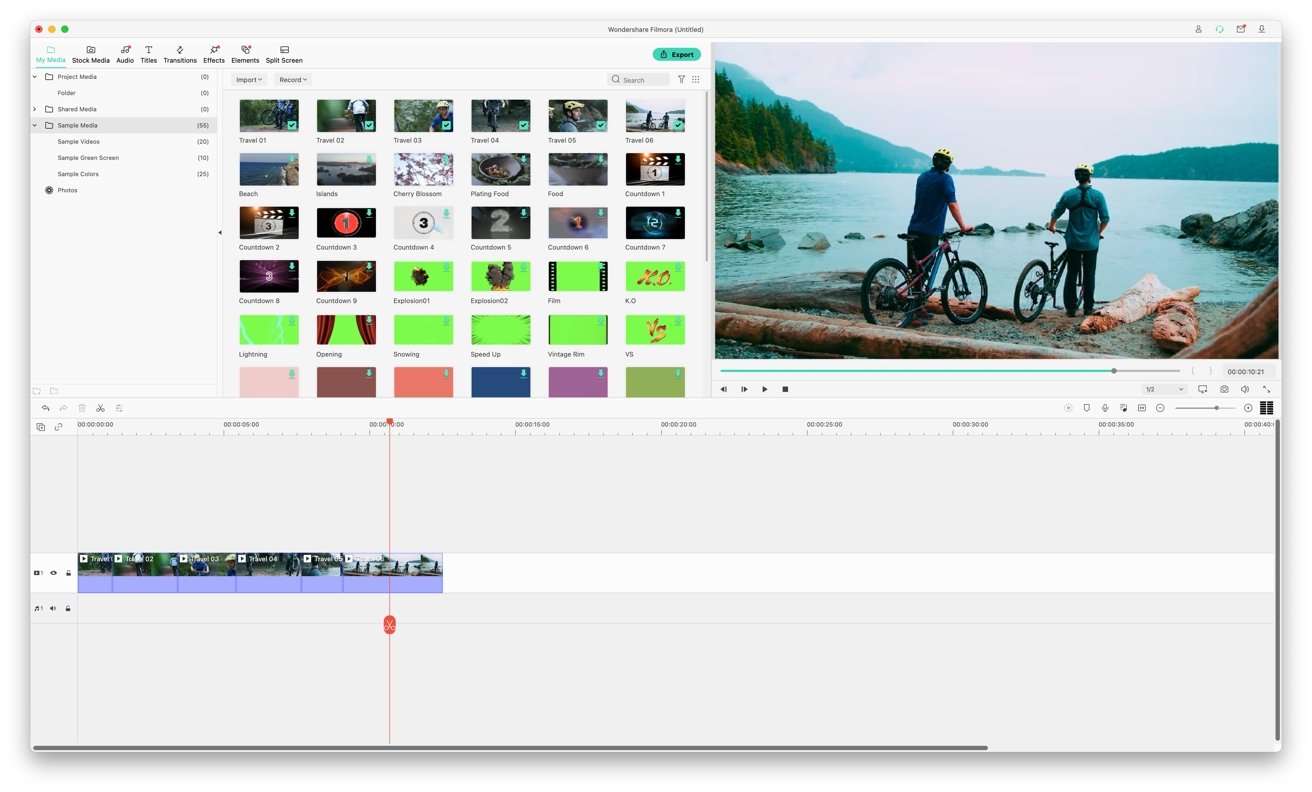
Next, drag the videos down to the timeline, building up a chain of clips in sequence. If a clip is too long, you can shorten it by dragging from the edge of the clip in the timeline and moving it left or right.
You can also cut a clip into smaller clips, by moving the clipping line to the exact moment and clicking the scissors icon. Each part of the now-split clip can be moved to different areas.
To remove a clip or part of a clip, select it and right-click, then Delete. By default, this will automatically shift later clips up the schedule, closing what would normally be a gap in the timeline.
At any time, you can use the media controls in the preview to see how your edit is coming along. You can also press the spacebar to automatically start playing the preview of the video from the currently selected point on the timeline.
Like video, you can also import music and audio to your project. Again, you can drag and drop the audio clips into the timeline, as well as trim them to length if required.
You can add multiple tracks of both video and audio. While in the case of audio it will play multiple sound sources simultaneously, multiple layers of video can be used for special effects.
How to add special effects to a video in Wondershare Filmora X
While you could edit a video and use the original footage, you can make some changes to how the video appears. Filmora X includes quite a few features that you can apply to a clip to make it more interesting.
During editing, select Titles to add graphical overlays to your video. Drag them down to a new layer above the video clips to place them, and double-click the added section to bring up editable options, such as text within the graphic.
Transitions are also useful for making switching between clips interesting. Select Transitions, then drag the transition down to the timeline at a point between two clips to apply it.
Again, you can change the duration of a transition by dragging the edges sideways, and to alter other settings by double-clicking the transition and selecting from the menu.
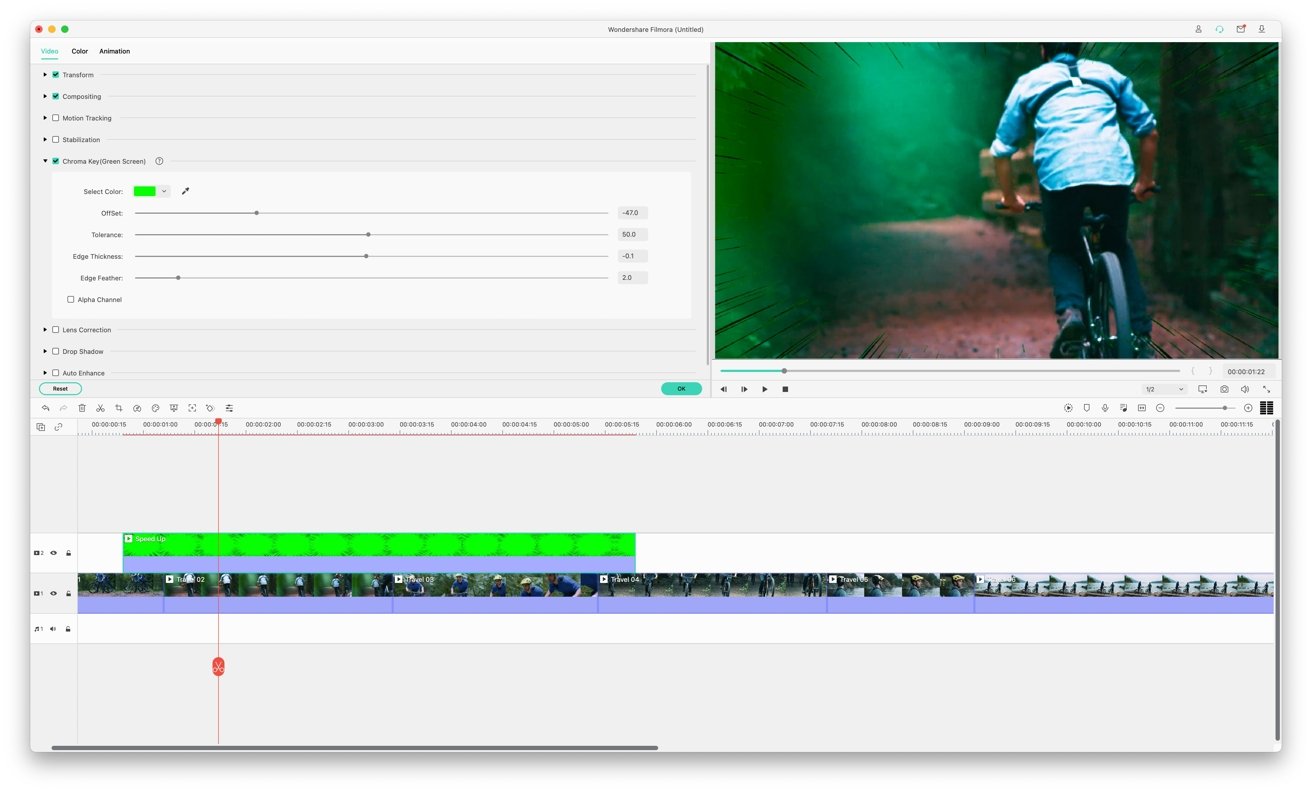
If you happen to have a graphic on a green background that you want to use as an overlay, or want to use a chromakey effect to create your own weather report, you can do so quite easily.
Drag the video with the green background onto a layer above another video or a graphic, then right-click it and select Green Screen. Click the Chroma Key (Green Screen) option, select the color you want to key out, and adjust the sliders to improve the effect.
There are quite a few other editing tricks you can pull off in Wondershare Filmora, including stabilizing a clip, performing motion tracking, and to automatically enhance a clip. Many of these can be accessed and altered by right-clicking the relevant clip on the timeline.
How to use stock media in Wondershare Filmora X
It's not guaranteed that you will be able to get every clip you need for your project by yourself. For example, travel restrictions could prevent you from going to a location.
There's the possibility that the video you've filmed needs an extra scene to make it more interesting, or has been corrupted in some way. Maybe there's a meme that you want to add to spice up the video.
It's also entirely plausible that you don't have any video on hand and want to experiment with some already-filmed items.
The Stock Media tab, a recent integration to the tool, provides access to stock footage from Giphy, Pixabay, and Unsplash, which can be downloaded and introduced to the video.
To add extra elements, click Stock Media in the top bar, then select your footage source. Click the search box and type in a subject to find clips and images that could be of use to you.
Select the media to have it downloaded and placed in the Download folder. Once downloaded, drag and drop it onto your project's timeline.
How to use AI Portrait and AR Stickers in Wondershare Filmora X
While there's many effects you can add to make a video more visually interesting, there are some effects that you can apply that take advantage of machine learning that automatically detects subjects in a frame. Similar in concept to Snapchat filters, AI Portrait and AR Stickers can apply effects to the video clips themselves.
Within the Effects tab, select either AI Portrait or AR Stickers to show what is included in the software. Both include a series of effects that you can apply to subjects within the clip.
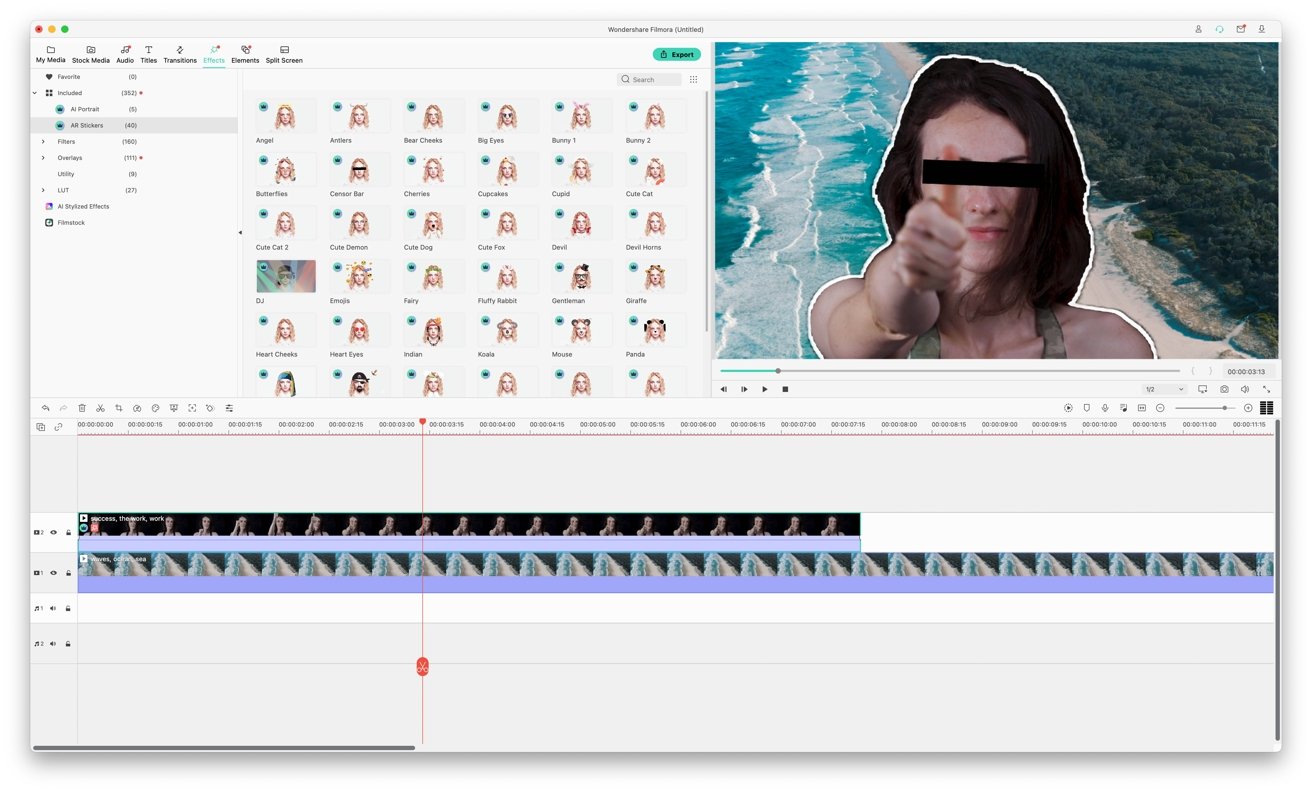
AI Portrait will let you perform effects such as Human Border, which will place a border around subjects of a clip, or Human Segmentation to remove a background behind a person for a chromakey effect.
AR Stickers work in a similar way, applying items to human subjects within a clip. This is more whimsical and closer to the aforementioned Snapchat filters, such as adding a censor bar across someone's eyes, or adding dog ears and nose to a person.
How to export an edited video in Wondershare Filmora X
Once you have finished editing your video, click Export. This will bring up a dialog box where you can customize the name of the final video, where it is saved, the format, and the resolution.
If you move from Format to Device, you will get some default settings for a variety of devices, such as iPhone, iPad, and Apple TV. These are presets that will optimize the video export for that particular device.
Tabs for YouTube and Vimeo allow you to export and automatically upload the video to each service. After signing into the relevant account, you can then change the settings of the video, its description, tags, and whether the video is publicly viewable or not.
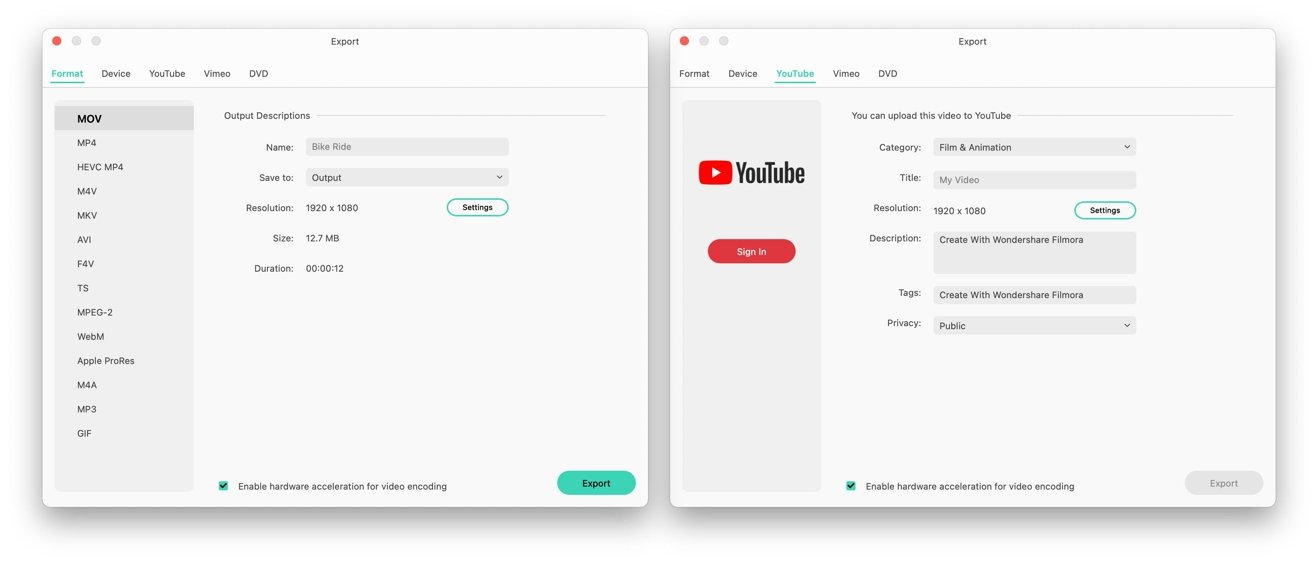
If you have a DVD recorder, you can also create a DVD for the video. You can select the standard, the aspect ratio, if you burn a disc or create an ISO for burning later, and even add a menu for navigation.
How to use Auto Reframe in Wondershare Filmora X
After you have finished editing a video, you may want to repurpose it for multiple different video services. While you can use the normal landscape orientation for YouTube, you have to consider vertical video when it comes to TikTok and some other services.
You could re-edit the video once again for each service, or you could take advantage of the Auto Reframe tool within Wondershare Filmora X.
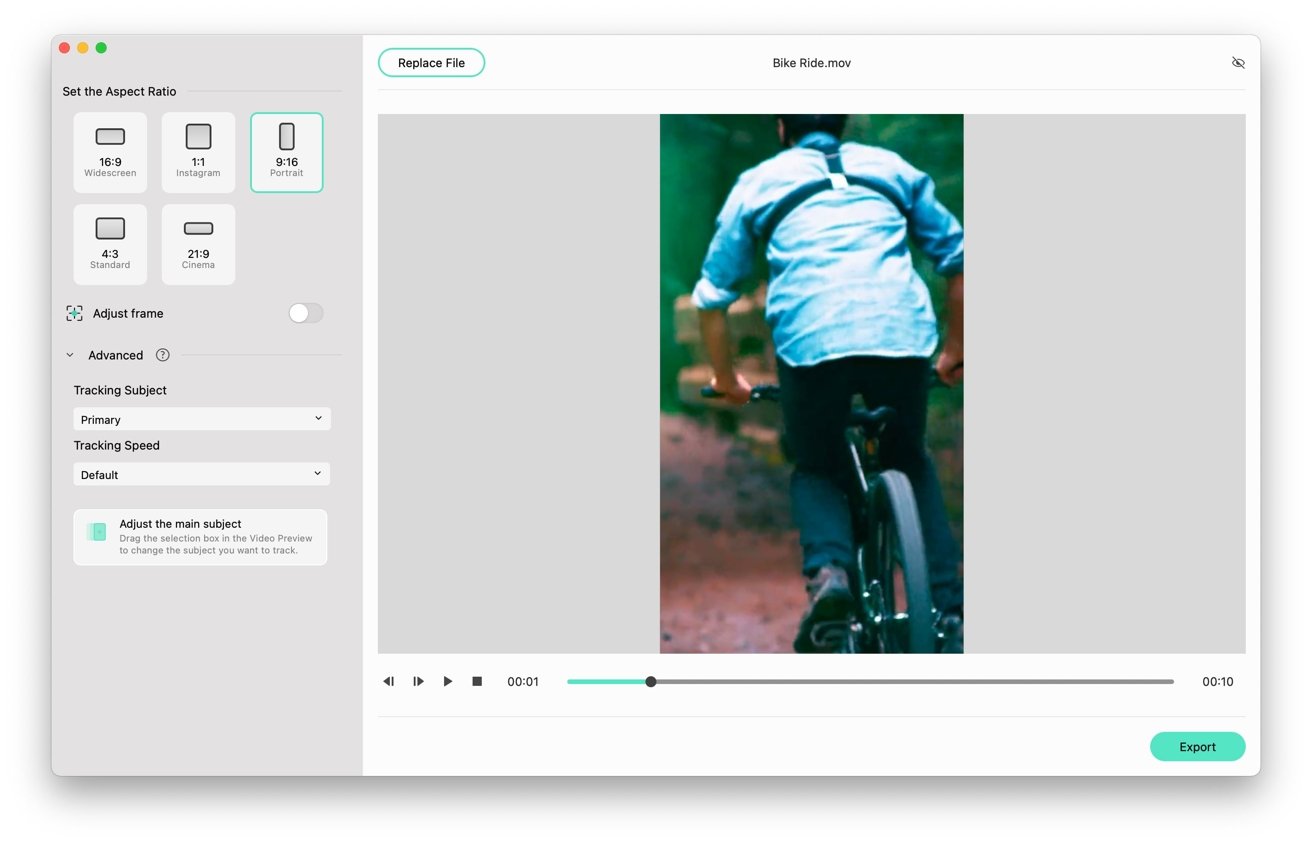
With an edited video on hand, re-open Filmora X and click More Tools on the opening screen, then click Auto Reframe. This will bring up a simple window that asks you to drag and drop your video within it, though you can click Import and navigate to it if you wish.
The tool will open to show your video, along with a selection of aspect ratios. Select one, and the tool will automatically crop the video down to that size. It will also automatically track to subjects, keeping interesting items in frame as much as possible.
The position of the frame can be adjusted by clicking the Adjust Frame toggle and moving it within the preview. Advanced brings up extra options, such as whether it should be tracking the primary subject of the video or a secondary subject, as well as how fast the tracking speed should be.
Once tweaked to your satisfaction, click Export to create a new video file in the new aspect ratio.
Where to buy
Wondershare Filmora X is available to download from the company's website, and in the Mac App Store.
Pricing starts from $19.99 per month, rising to $51.99 for an annual subscription, and $79.99 for a lifetime license. A limited free trial of Filmora X is also available.
Filmora X requires a Mac running macOS 10.12 or later, with the software also being compatible with macOS Big Sur.
It will run on an Intel Core i5 at 2Ghz though newer processors or the Apple M1 chip are recommended. Intel HD Graphics 5000 or later with 2GB of VRAM or an AMD Radeon R5 are needed for the GPU at a minimum.
At least 10 gigabytes of free disk space is required, with SSDs recommended. It also requires 8 gigabytes of memory, though 16 gigabytes are suggested for those creating HD or 4K-resolution video.
You'll need to have a Mac running macOS 10.12 or later — and yes, Filmora is compatible with macOS Big Sur. In addition, Filmora requires at least 10 GB of free disk space.
You'll also want an Intel Core i5 or better, and it's also compatible with all M1 Macs. You'll need at least 8 GB of memory, but Wondershare advises you should have 16 GB for HD or 4K videos.


 William Gallagher
 Chip Loder
 Andrew Orr
 Marko Zivkovic
 David Schloss

 Malcolm Owen