Apple has provided ways to record videos of your Mac, iOS, and Apple TV screens, but it doesn't make it easy to figure out how to do it. Here's how to get it done.
Sometimes an image is not quite enough. If you want to show someone how to do something on their device — or you want to document a whole process — then you need more than a screengrab or screen shot. You need video. Apple has you covered for how to do this, and so do other companies.
Without any third-party tools, you can record a video showing the screen on your Mac, your iOS device or even your Apple TV. Then with certain third-party tools, you can do that same recording but zoom in on areas, edit the video, highlight some areas and blur others.
None of it is quite as fast as taking the odd instant screen shot, but none of it is really time-consuming — unless you want it to be.
If you choose, you can make an entire YouTube-style video presentation and actually, maybe that would be good. Perhaps you've got staff who need to do something a certain way for you, maybe nobody stays with your firm long enough to do it twice. Or maybe it's a job for you that is crucial, yet it's also a once in a year kind of thing.
The basics on iOS
There have been ways to film your iPhone or iPad screens before, but from iOS 11, Apple made it particularly easy — so long as you know where to look.
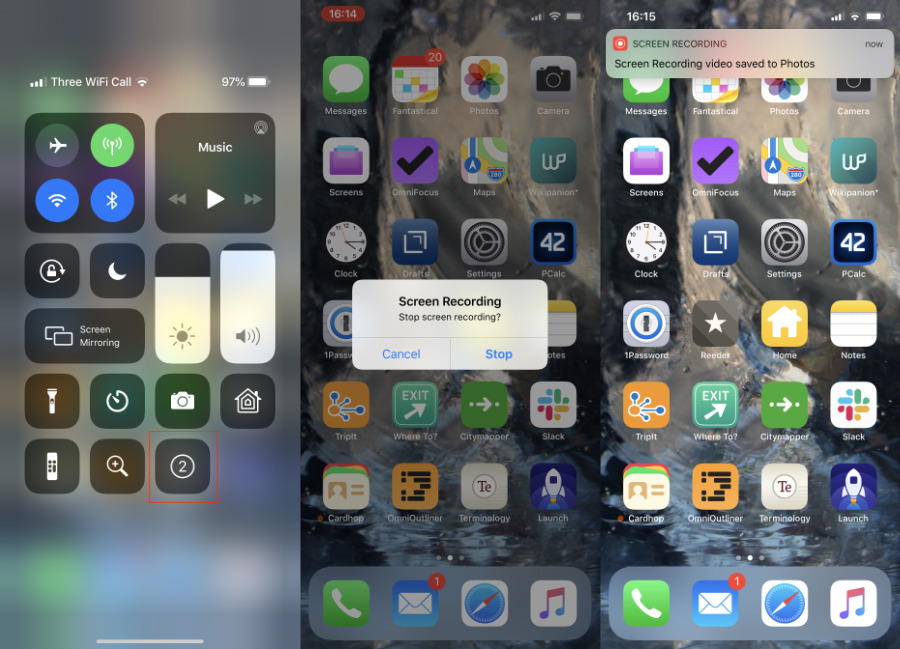
Once you've added it to Control Center, recording is a matter of tapping the Record button
What you need is the Screen Recording feature. It may be named very clearly and obviously, and using it is going to be extremely easy, but finding it is none of these things.
This Screen Recording feature is an optional part of Control Center.
- Go to Settings on your iPhone, iPod touch or iPad
- Tap on Control Center
- Choose Customize Controls
- From the bottom list, More Controls, find Screen Recording
- Tap the green plus sign next to it
This screen recorder will be added to Control Center. So now whenever you swipe down from the very top right of your device to call up this Control Center, you'll see the Screen Recording button there.
To record your iOS device's screen, tap that button, and you'll get a three-second countdown in the button's icon. From then until you tap the button again, anything you do on your device will be recorded.
When you are done, tap the button again. The resulting video is saved to your Camera Roll.
The basics on Mac
Press Command-Shift-5 on your Mac. This brings up the toolbar of options for taking screenshots, but it also includes video settings. The middle section of icons features one button for recording your entire screen and another for recording part of it.
Make your choice, and as soon as you've clicked on either of these buttons, you get a new one at the far right of the toolbar, called Record.
If you've clicked to record only part of the screen, you will also get a highlighted box showing you which portion will be recorded. That box has grab handles and you can resize or move it anywhere you need.
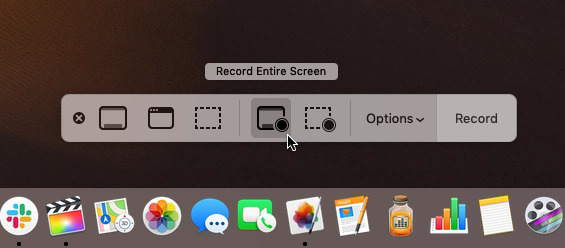
Command-Shift-5 brings up the Mac's screenshot and screen recording options
Then click Record and that portion, or the entire screen, will be recorded. There'll be a Stop icon in your menu bar and that will be recorded along with everything else.
When you click it, the recording stops and you get a brief glimpse of a thumbnail-sized image at the bottom right of your Mac's screen. Click on that and you can do the same markups and sharing of the video that you could with screenshots.
If you don't do this right away, you can later on find the screen recording saved on your desktop.
You can change where it's saved, and select other settings such as a timer countdown before the recording starts, by click on the Options drop down in the screen recording toolbar.
Very nicely, if you later come to record a portion of the screen, macOS will start off assuming it's the same portion.
That's one big advantage over the older way of doing it, which was to record your screen using QuickTime Player. You can still do that — launch the app, choose File and New Screen Recording — and it can record the whole or a portion of screen just as it ever did, but it doesn't remember the portion.
Yet QuickTime Player is still good to keep around, because right now it is the only way in software to record your Apple TV's screen.
The basics on Apple TV
On a Mac that's on the same Wi-Fi network as your Apple TV, launch QuickTime Player. Choose File and then New Movie Recording — that's Movie, not Screen recording.
If you have a camera on your Mac, then you'll see yourself and a control strip with a red Record button. If you don't have a camera, you'll have a small blank image with that button on it.
- Click on the down arrow to the right of the button
- Select your Apple TV in the Camera list that appears
- Click Record
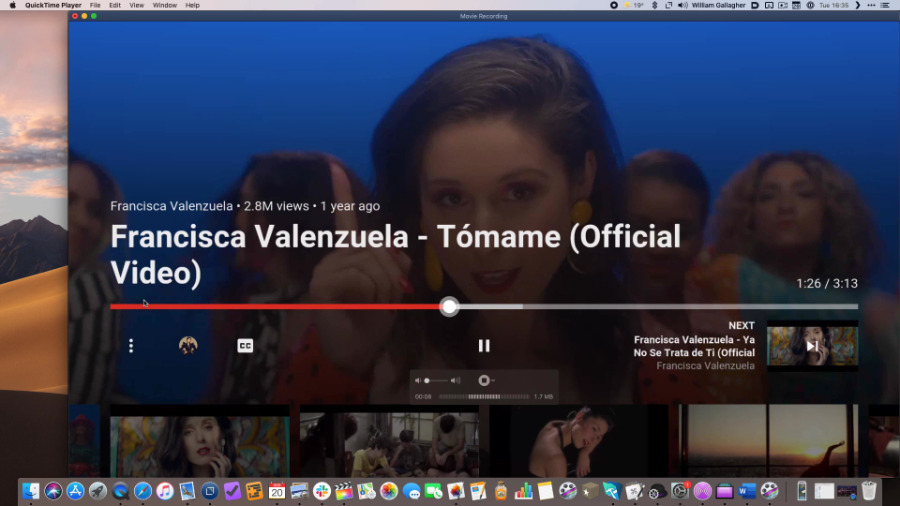
That's Apple TV being streamed to a Mac and recorded by QuickTime Player. Just walk to your living room instead.
This does not actually start the recording, but rather it tells your Apple TV that you want to record. The Apple TV will first show a code number that you need to enter into QuickTime Player to authorize the recording. Then, Apple TV displays a notice explicitly asking the viewer to Allow someone to record it, or not.
Assuming that viewer is you and that you're up for this, once you click on Allow, certain things happen. Anyone watching that Apple TV will now see their regular screen plus a very big, very bright red border around the edge of the whole screen. They'll also find that their audio is switched off. You could find yourself unpopular.
On your Mac, QuickTime Player will be recording the Apple TV screen — without that red border.
It is possible to hear and record audio, too. In that same dropdown where you chose your Apple TV as the camera, there's another section for Microphone. It, too, will list your Apple TV and you can select it as the source to record.
However, you'll have to go back through entering an authorization number and clicking Allow before it will work.
In our experience, it's not worth it. Your mileage may vary, but even in general use such as relaying YouTube videos from Apple TV this way, we regularly find video is great but the audio quality is choppy. Plus the recording is prone to stopping, not always for an obvious reason.
And you get oddities such as sometimes the audio won't play while you're recording, but it will when you then play that back.
Plus certain services such as Netflix are blocked from this working so you just end up recording a silent blank screen.
So while this is in theory a way to watch Apple TV on your Mac, save yourself the bother and wait for the forthcoming Apple TV Mac app instead. At least you'll definitely hear that, and you'll be able to click controls instead of hoping your remote is still in range of your TV.
That said, for explaining how to, say, set up AirPlay speakers or route TV audio to your HomePod, screen-recording Apple TV is always going to be handy.
Third-party apps
Apple has made taking screen-recordings on iOS and Mac much easier, but there have long been third-party apps such as ScreenFlow that will do it too.
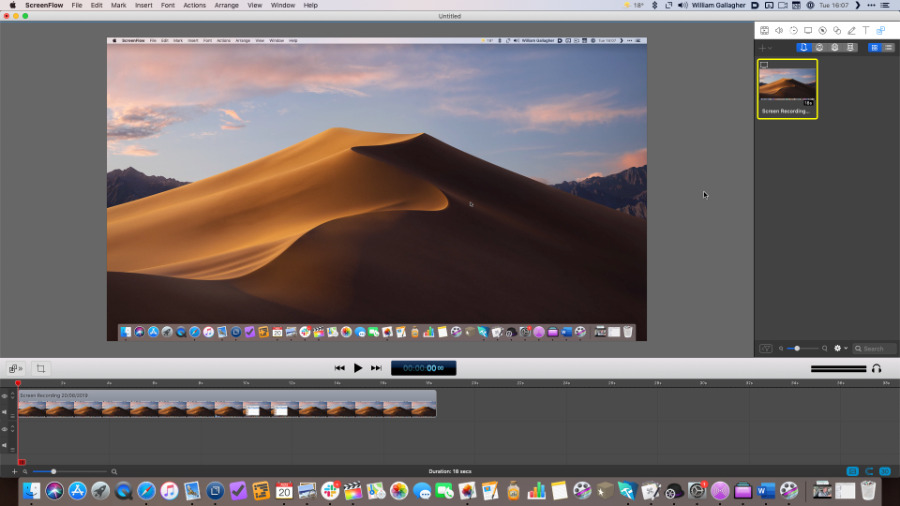
ScreenFlow is a screen recording app and a strong video editor too
ScreenFlow is still the better choice if you're going to be making a lot of screen recordings, or if those recordings are going to be long. It's now a reasonably fully-fledged video editor, which means it's easy to cut together short recordings of long jobs.
You can see how taking screen recordings is useful, and now you can see that it's easy, too.
Let us give you just one word of advice, though. Remember to stop the recording when you're done. It is ridiculously easy on the Mac, especially, to forget. You come in the next morning and your Mac is complaining that it's low on storage space — because you've just recorded 15 hours of video.
Keep up with AppleInsider by downloading the AppleInsider app for iOS, and follow us on YouTube, Twitter @appleinsider and Facebook for live, late-breaking coverage. You can also check out our official Instagram account for exclusive photos.