Apple hasn't exactly revamped Notes for macOS Big Sur, but it has brought some new enhancements that will be a boon to regular users.
In terms of dramatic visual changes for macOS Big Sur, Apple's Notes app barely registers. If you're a regular user, though, you will notice the improvements immediately — and you'll be pleased with them.
That's because the changes are all to do with making commonly-used features just that little bit more convenient. It's about taking controls you use and putting them where you will use them.
And it's about surfacing the note you need to read now. If you've got hundreds or thousands of notes, the newly updated Notes will be a boon, if not even a relief.
New search in Notes
- Click on the magnifying glass icon at top right
- Type what you're looking for into the search box that expands out
- Check the new Top Hits section
Top Hits is a new grouping of search results that appears atop the whole and probably very long list of searches. It's identical to how search has been improved in Mail, and it has the same useful effect.

Search now automatically returns Top Hits, just as Mail does
Not surprisingly, Top Hits is meant to show you what you are most likely to be looking for. So that may include notes where the term you searched for is in the title.
However, in AppleInsider testing, it appears to be far more intelligent than that. Top Hit results for us appear to be based in part on how many references there are to a search term in any one note, but also how recently you opened it.
Apple has only said that Top hits will "surface the most relevant results," but you have to assume that Machine Learning is part of it. If so, that means that Notes is only going to get better at finding these Top Hits the more you use it.
Editing in Notes
One aim of Notes is to be fast — you open the app, click a single button and start jotting down a note. Now the new version intends to make it faster to do just a little more, to use a little more of its formatting options.
As before, the first line of any note is automatically shown in bold as a heading. After that, every line is in your default system font and size.
What you can do now, is select some text and then use the newly updated text styles button. Click on the Aa button and you'll get quick access to bold, italic, underline and strikethrough.
It's possible that this didn't make you gasp, and certainly not spill any coffee. Yet this seemingly small change is a lot better than having to go to the Format menu, choose Font, and then select an option.
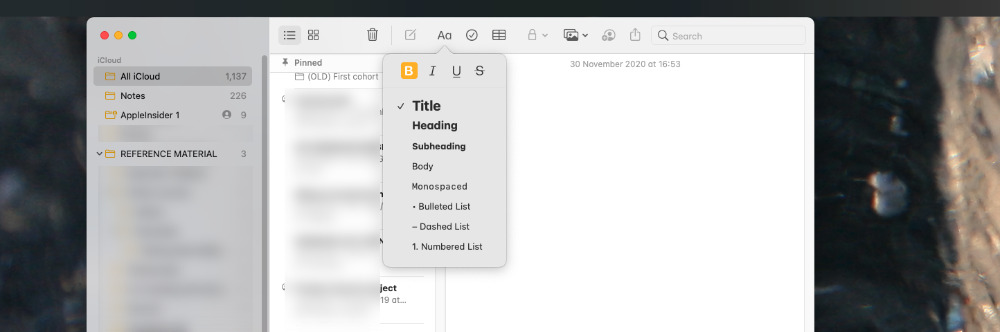
Text styles such as Bold and Italic are now more convenient
Though note that it's still faster to select the text and then press Command-B, Command-I, or Command-U for bold, italic, and underline. There's no keystroke for strikethrough, however.
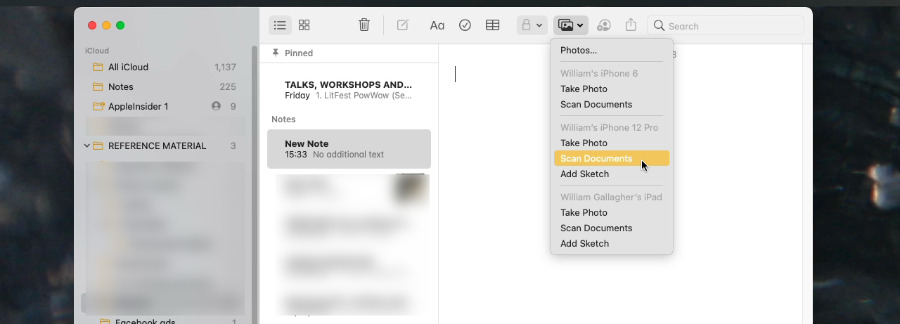
Scanning and Continuity Camera
Within Apple Notes on your Mac, you can create a blank note and then choose the icon of photos from the toolbar. That icon produces a drop down menu that does include the option to add a photo, but will also detect your nearby iOS devices.
So right there within the dropdown menu, it will include a section headed with the name of your device. Under that will be options to Take Photo, Scan Documents, or Add Sketch.
This is what Apple calls Continuity Camera, and what's new is that behind the scenes, macOS Big Sur has improved it all.
"Continuity Camera has never been better," claims Apple. "Use your iPhone or iPad to capture sharper scans that are more precisely autocropped, and have them automatically transferred to your Mac."
If the behind the scenes functionality has been improved, though, the process is still the same — and is still as unreliable.
In theory, you choose an option such as Scan Documents and the Camera app automatically opens on your selected iPhone or iPad. You then take the shot on the iOS device.
There are options for adjusting the edges of a scanned document, but then you need to tap on Keep Scan. Once you've done that, there is usually now a new button marked Save.
Tap on that, and the scanned image immediately appears in the Note on your Mac. Except the reason we say, "usually," is that often the whole process crashes at this point.
If it doesn't crash before it presents the Save button, it can crash afterwards. Your Mac may show an error message, but it will solely say that the iOS device was disconnected.
Repeated use of taking the same scan to save into the same note does appear to work, though.
Continuity Camera is a superb way of getting scans into Notes on your Mac
Small changes that make large differences
Crashes like these will stop you unthinkingly turning to Continuity Camera when you need to scan a document. Yet when it works, it is a remarkably useful feature so Apple's improving of the end result is welcome.
It would just be good if it improved the overall reliability — or explained what makes it go wrong.
Even with improvements, though, it's not a new feature and it is not a radically changed one. Nor is the new search, nor is the new position of text styles such as bold or italic.
Yet that search and those styles, especially, are features that you are likely to use very often. So their new improvements are ones you will feel the benefit of.
Keep up with AppleInsider by downloading the AppleInsider app for iOS, and follow us on YouTube, Twitter @appleinsider and Facebook for live, late-breaking coverage. You can also check out our official Instagram account for exclusive photos.