If you're a keen photographer, you probably have a lot of memory cards that need to be wiped. Here's how to format SD and microSD cards safely within macOS.
One of the problems with having a camera separate from your iPhone or iPad is that you have to deal with memory cards. As time marches on, photographers tend to accumulate collections of SD cards and microSD cards, typically filled with images and videos that they have yet to delete.
After photos have been taken off the cards and stored in other mediums, such as cloud-connected apps like Apple's Photos app, most people don't bother to clean the card. Instead, they tend to wait until they need to use an empty memory card, then format it in the camera before use.
This is a fairly typical cycle, but it is one that should be changed.
Why regularly format memory cards?
Cleaning your memory cards should be a regular occurrence and should happen each time you are sure you don't need any of the photographs on the card anymore.
If you take lots of photographs and use multiple cards between occasions when you offload the images onto your Mac, you'll often fall into the problem of determining which cards you should use next once one is filled up. If you're not regularly formatting and emptying the cards entirely, you have to spend a few minutes with your camera formatting the storage.
 If you've gone on a trip with a camera, you're probably going to burn through multiple memory cards, especially for longer trips.
 This doesn't sound bad until you consider situations when you simply don't have the time to spare to set a new card up. This includes special events like weddings or sport when being ready as quickly as possible is essential.
A second reason relates to this multi-card scenario in that if you're formatting just as you're about to use a previously-used card, there's a chance that you could make an error. You could mistakenly start formatting a card you thought was safe to clear but contained images that had yet to be copied to your Mac or stored in other ways.
In a professional environment, that could be a costly mistake.
There's also the privacy aspect of memory card hygiene.
If the worst happens and someone steals your bag with memory cards, and you didn't format cards regularly, the thief could potentially have hundreds of thousands of your photographs in their hands. They could see all of the images and related metadata if they were so inclined, which could be damaging depending on the type of photography.
If you share memory cards with others, it also eliminates the chance of them seeing something embarrassing or similar on the cards.
In short, wipe your memory cards once you've ingested the data into whatever storage or editing platform you use and have backed it up.
Why format on a Mac?
While you can undoubtedly format cards in your camera, it's probably a lot easier to do it at the Mac for a few reasons.
First, if you're doing it right after ingesting the data, the card's already in the reader and ready to be formatted. Secondly, there's the hassle of putting the card into the camera and navigating its menus to format the card, which may be a bit more difficult to do than via a Mac.
If you have a stack of memory cards to wipe in one go, simply sliding it into the memory card slot and changing a few settings on the Mac could be easier. Certainly more than the process of turning off the camera, opening a flap, ejecting the previous card, inserting the new one, closing the flap, turning on the camera, waiting for it to boot, and then to navigate the menu.
It's a much cleaner process to go through, especially with large numbers of cards.
Formatting memory cards
The process of formatting a memory card on macOS is straightforward and is similar in nature to formatting a hard drive. It's the same process but with small tweaks.
How to format a memory card in macOS
- Insert your SD card, or microSD in an adapter, into the card reader.
- Wait for it to mount on your Mac, and make a note of the card's name.
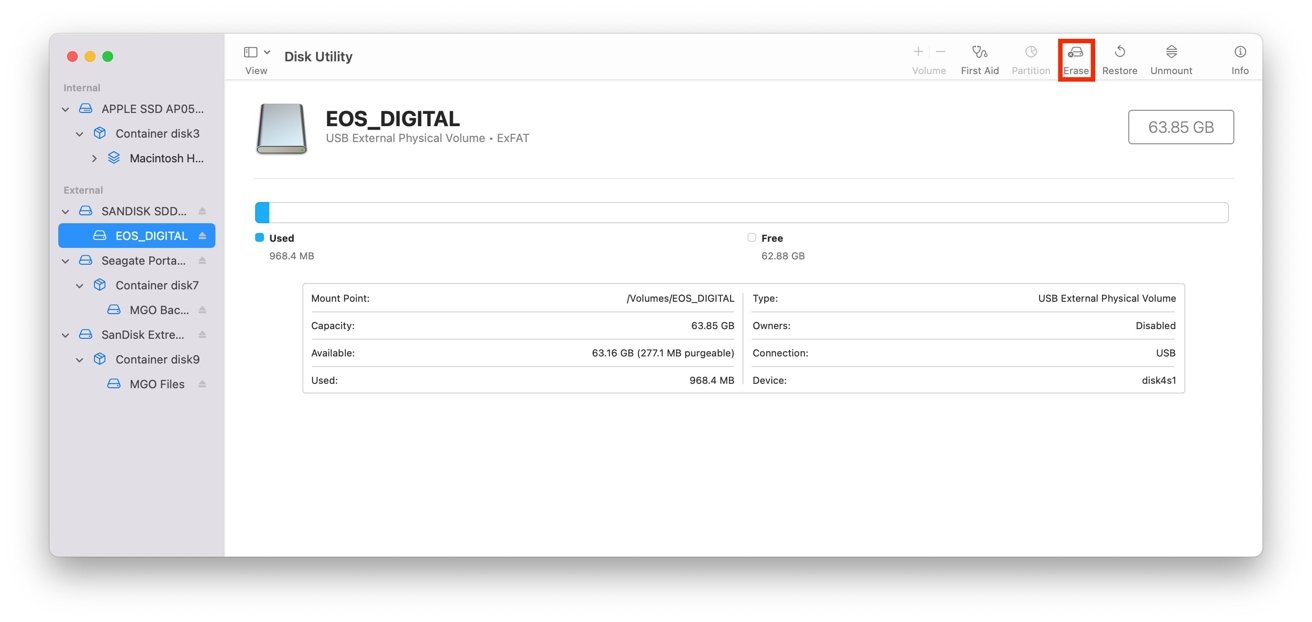
- Open Disk Utility. It is available through the Applications Folder in a Utilities sub-folder, or you could use Spotlight search to open it by name.
- In the sidebar of Disk Utility, search for your memory card and select the volume. Typically you'll find it under the name of the manufacturer of the memory card, and it will have a volume title that matches the name of the drive when it mounts, as well as matching capacity.
- Once you have established you have selected the correct volume, click Erase.
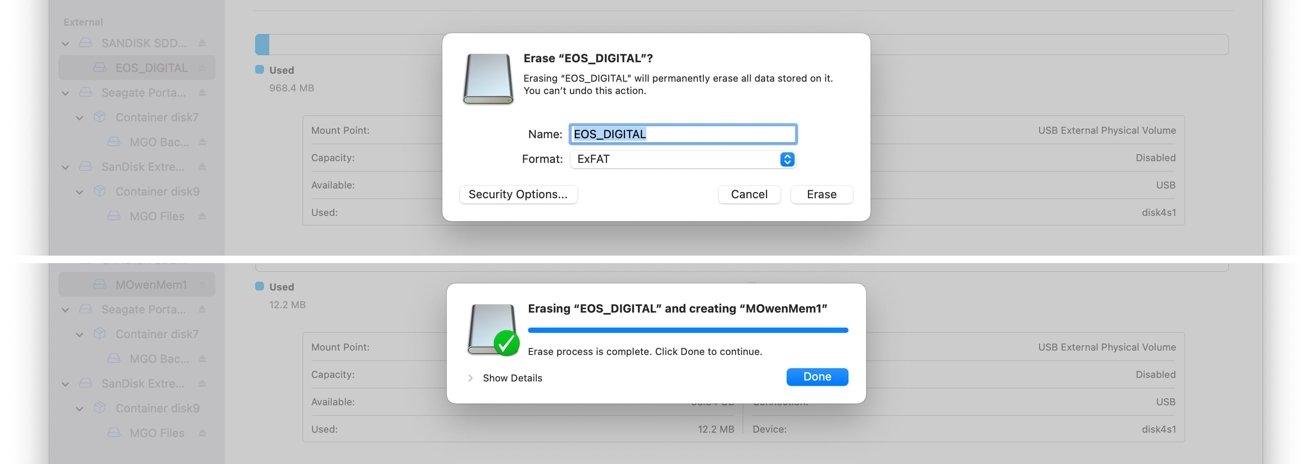
- Enter a name for the memory card.
- Select the format for the memory card. Typically, this will be MS-DOS (FAT) for memory cards at 32GB or lower capacities, and ExFAT for 64GB or more.
- Click Erase
- Once it has completed, click Done.
Security Options
Going through the erasure process, you will most likely have spotted a button marked "Security Options." Selecting it brings up a slider and offers a way to securely format the memory card.
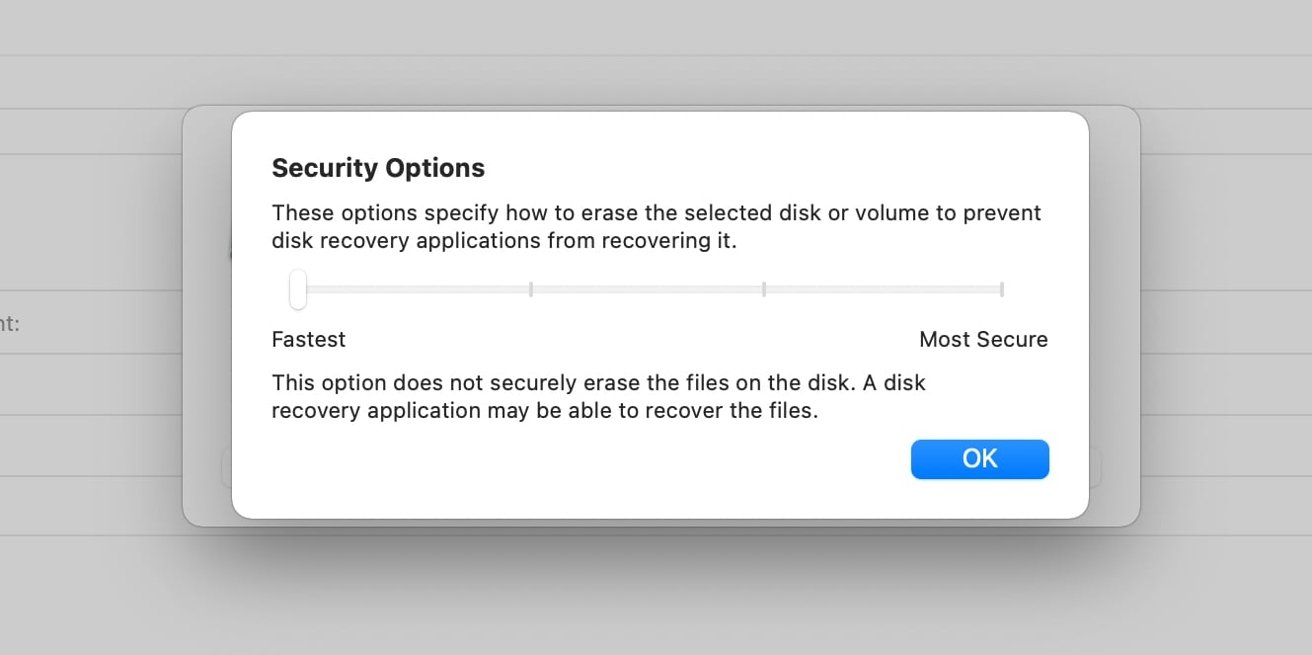 You don't necessarily need to use Security Options, as it's more suited to hard drives, not memory cards.
 You could adjust the slider under Security Options to the right-hand side if you want to more securely erase data by overwriting it with passes of random data. This is useful if the data that was previously on the card consists of images or photographs you really don't want other people to see.
However, remember that memory cards and SSDs have a limited lifespan of writes to them. Being overly cautious could shorten the usable lifespan of the card, but it may be worth it depending on your situation.
After all, an SD card is relatively cheap to replace. Your privacy isn't.
An Alternative Option: SD Memory Card Formatter
Using Disk Utility is not the only way to format a memory card, as there are a few other options online. Arguably the best third-party app you can use is SD Memory Card Formatter.
Published by the SD Association, the group of companies that creates the standards used by SD card producers, the SD Memory Card Formatter is a tool that complies as close to the association's standards as possible.
For users intimidated by Disk Utility, the SD Memory Card Formatter could be a good option for a few reasons. Firstly, it can work out what storage you have connected up that is an SD card, minimizing the chance of formatting another volume.
It will also determine the correct filesystem for the capacity you're about to format, removing another decision from the process. It's a simple app, too, consisting of a single screen and relatively minimal controls.
Lastly, it's free to download for both Mac and PC users, so it's worth trying out to see if it's for you.
 Malcolm Owen





 Brian Patterson
 Charles Martin


 William Gallagher
 Christine McKee
 Marko Zivkovic