The Control Center on your Apple Watch is a powerful tool for customizing and taking full advantage of its core features. However, it was revamped in
The Control Center has been around for as long as the Apple Watch has, but in watchOS 10, Apple changed the way you access it on the Watch itself. Previously, you just swiped up from the bottom — now you press the flat button on the right side to access it.
Swiping up from the bottom now shows widgets. It's a bit of re-learning for veteran Apple Watch users, but with practice the side button becomes a natural move.
Another much smaller change in watchOS 10 was to move the "connected" icon — a small iPhone symbol in green — from the top left to the top center. This allows other icons to join it to quickly show you Control Center items that are currently active.
Accessing options in Control Center
One thing you should probably not do is keep holding the side button for too long when accessing Control Center. If you do, it will bring up the Medical ID, Compass Backtrack, and Emergency SOS options.
If you should do this by accident, just press the Cancel option at the top left of the screen. You can also press the side button again to get back to Control Center.
Pressing the side button twice still bring ups Apple Pay and Apple Wallet, as before. To dismiss those options if you have accidentally invoked them, just press the side button again.
Apart from these changes, the icons themselves in the Control Center are largely the same. If you're not sure what a given icon does, pressing and holding on a given Control Center icon will bring up other options, if available.
For example, holding the ringer icon — which looks like a bell — offers to turn it on (or off), turn it on or off for one hour, or on or off until evening or morning. Holding the Wi-Fi icon will show any available networks, as well as which one you're connected to.
Customizing Control Center
Typically, most of the available Control Center icons are shown by default. However, you can remove icons you are sure you won't use, rearrange the layout of the icons, and add new ones.
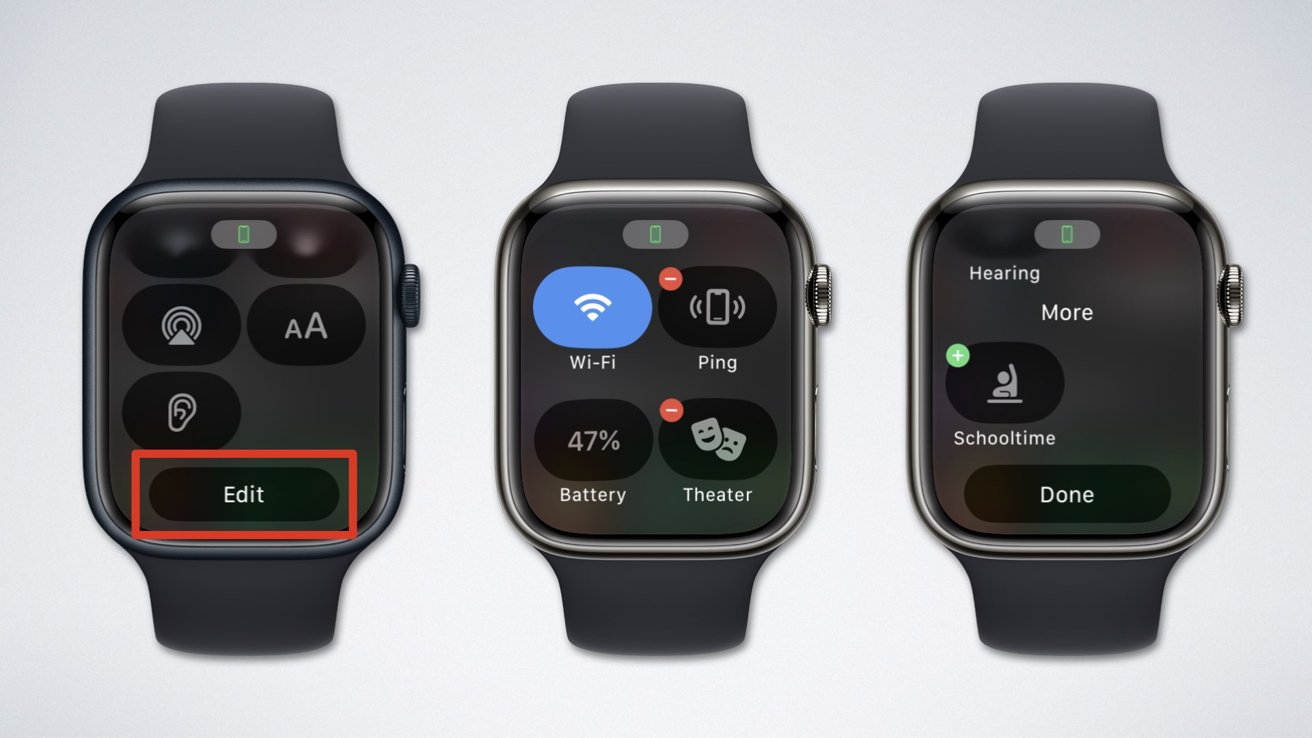
To do this, open Control Center and scroll to the very bottom of the list. At the bottom, press the Edit button.
Scroll up to see the icons "wiggling," and you'll see that some have a minus icon in the corner. This mimics the behavior of iPhone apps when in edit mode, and you can press the red minus button to remove an icon from Control Center.
Likewise, you can press and hold on a Control Center icon while in edit mode to move it. Once it is where you want it, let go, and then press the side button again to exit.
At the bottom of the list in edit mode, you will also see any Control Center icons not currently installed. You can press and drag these if you want to add them.
Two of the most useful Control Center features
Only the first six icons will be visible immediately upon entering the Control Center, so move the ones you tend to use most often to one of those six spots for easy access. To see the rest, use the digital crown to scroll down.
One of the most useful icons in Control Center looks like a vibrating iPhone, which activates a "pinging" noise on the paired iPhone to help you find it. On the latest Apple Watch Series 9, a screen will appear on the Watch guiding you to its location.
.
Another icon you may want in your "top six" is the Theatre Mode icon, which looks like two masks. Activating this ahead of any event is an easy way to prevent unwanted lighting up, or audible sounds and alerts, on the Watch.
In this mode, it prevents the screen from activating even if you happen to raise your wrist. An emergency notification will still alert you with a nearly-silent haptic buzz.
If you need to check the time or a notification, just tap the Watch screen to display it. When the event is over, don't forget to turn off Theatre Mode.
You should open Control Center if you haven't before — or not in a while — and check out all the icons and what they do. Chances are high that you'll find a few that add features you want, or didn't even know you had.
 Charles Martin



 Christine McKee

 Amber Neely
 Andrew Orr

 Sponsored Content

 William Gallagher





1 Comment