Apple provides security features in macOS to give apps access to files on your local storage and removable drives. Here's how to configure them.
Years ago, Apple added the ability for macOS to restrict which apps can access your files and folders stored on local volumes attached to your Mac.
Some apps, such as Finder, require this access. But in the case of third-party apps, you may or may not want them to have access to your files.
macOS has preferences in System Settings for allowing or denying apps access to your files.
Some apps can also access removable volumes such as USB thumb drives, or CD/DVD volumes when inserted into a Mac's DVD drive.
You can also set which apps have access to removables in System Settings. Not all apps provide this capability, and if they do, the apps and their settings will show up in the System Settings->Privacy & Security pane.
Apps must be built with access
When Mac apps are built using Apple's Xcode developer environment, specific security settings are included in each app's bundle. These are based on how a developer has configured those settings in Xcode.
One of these settings is whether or not to allow access to files and folders.
If the app developer has included this setting when an app is built, then it will show up in the System Settings->Privacy & Security->Files and Folders pane. If not, the app won't be listed there.
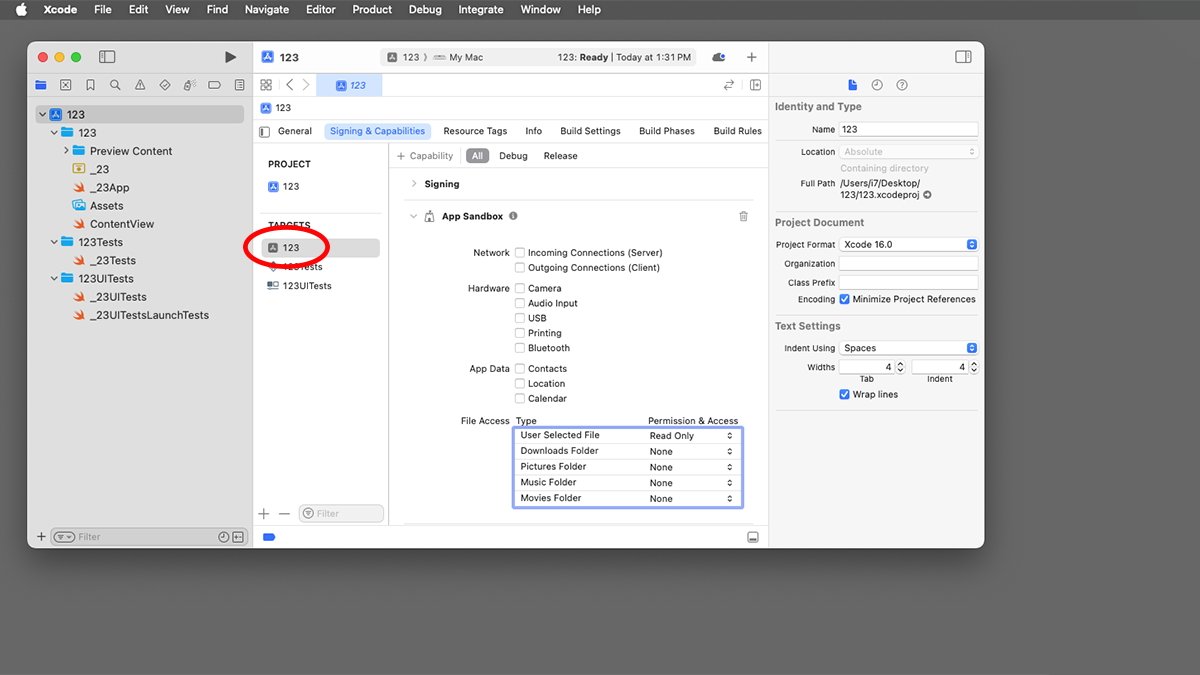
Specifically, these settings are configured in each build target's Signing & Capabilities->App Sandbox->File Access settings in Xcode:
The App Sandbox
The App Sandbox is a security system built into macOS which by default walls apps' access off from sensitive parts of the system such as the filesystem and network. Apps are only allowed to access parts of the system that they have been given permission to access.
These settings in Xcode include specific user folders such as Downloads, Pictures, Music, etc, but there's also a setting for User Selected File.
It's this setting that allows a third-party app to let users to select files to access using a standard macOS system Open file selector sheet. Developers can also specify whether to allow read-only access or read-write access.
The Hardware->USB checkbox in Xcode determines whether or not to allow apps to access USB devices, including thumb drives.
How these settings are configured at app build time determines whether they show up in System Settings for file and removable access.
Developers can also turn off all file access entirely, denying access to files at a system security level regardless of what APIs the app may call. There are also Sandbox settings for camera, audio, printing, and Bluetooth.
This is why you may see a macOS alert, for example, the first time you run a VOIP app such as Skype or some gaming apps that want access to your computer's microphone.
Taken together, the App Sandbox settings restrict or allow what kind of access an app has to your Mac. Apple added these settings to macOS to prevent malware from being able to perform actions such as sending your entire Startup Disk's contents to a malicious actor.
See our previous article How macOS protects your data from malware for a full discussion of how malicious software can steal your data.
With the App Sandbox and other security features, you don't have to worry as much about downloading a Mac app and having it grab all your local data the instant you run it.
All macOS apps distributed in the Mac App Store must have the Sandbox enabled in Xcode at build time, even if all the settings are turned off.
Changing access settings
For file and folder access, you can toggle these settings in two places in the System Settings app:
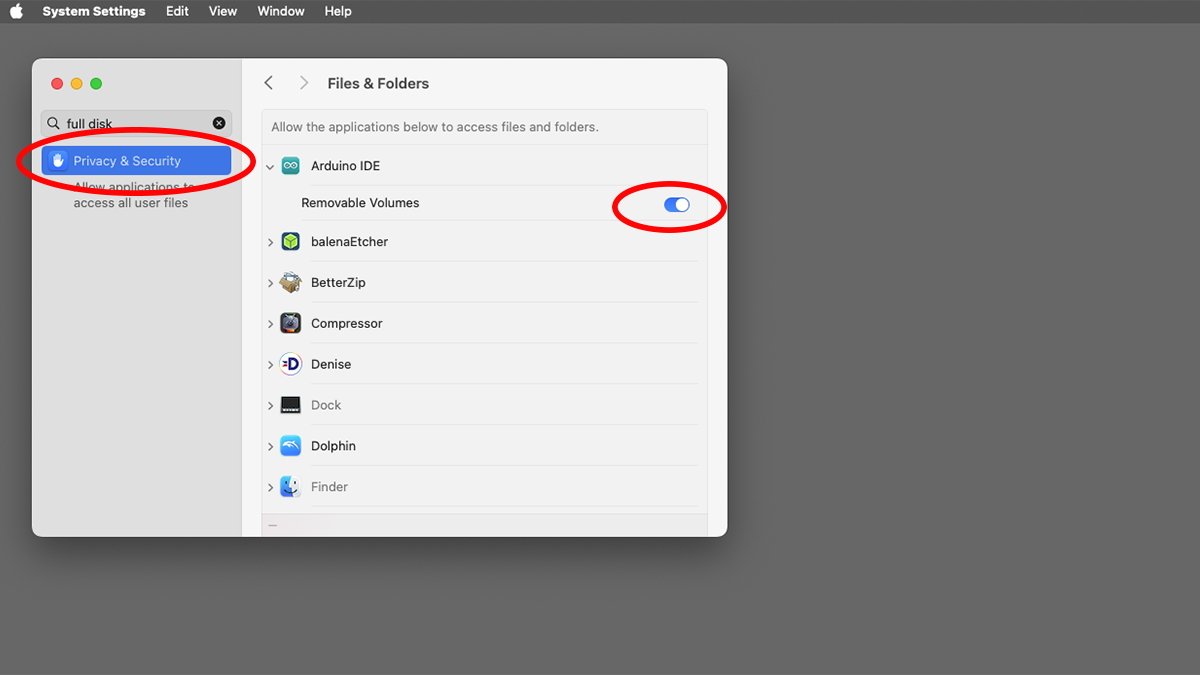
- System Settings->Privacy & Security->Files and Folders
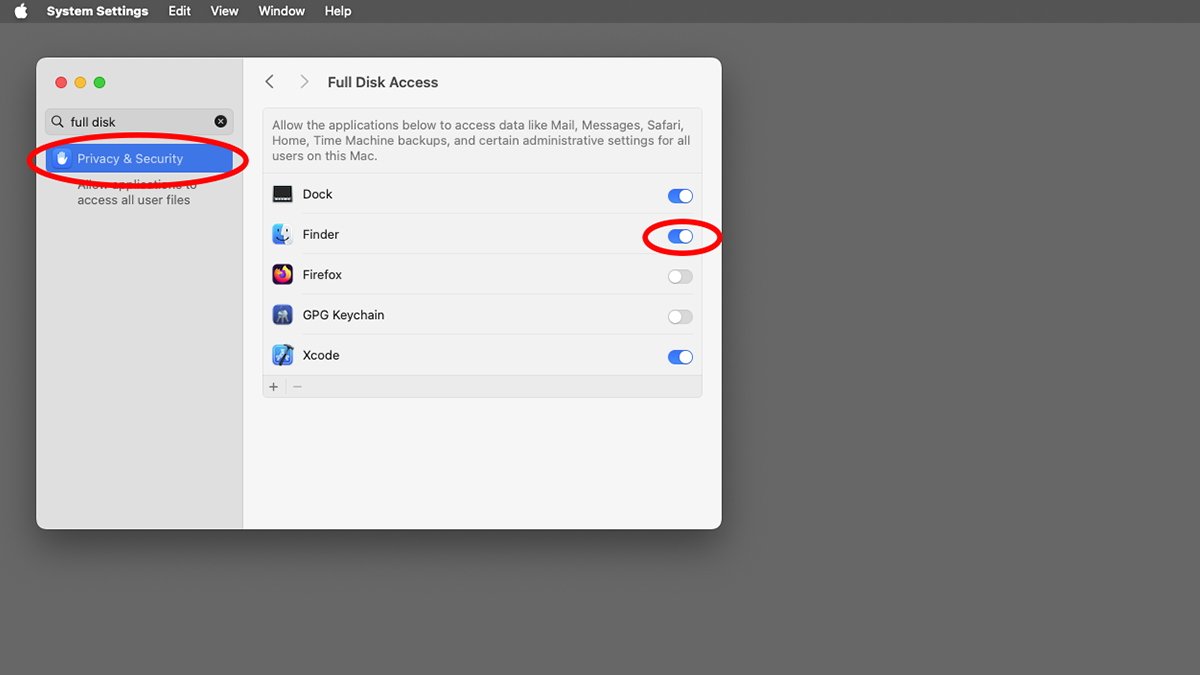
- System Settings->Privacy & Security->Full Disk Access
In the case of Full Disk Access, there's no setting in Xcode in the App Sandbox. When you enable Full Disk Access, you're giving an app access to all your Startup Disk's files at the OS level, not just for specific folders or user-selected files.
Full Disk Access is a more general and serious level of security - so you should change Full Disk Access carefully, since doing so gives the app in question free reign over your Mac's Startup Disk.
In the case of removable drives, if an app is configured to allow access to removable volumes, an additional switch will appear for that app in the Files and Folders pane. Not all apps may support removables.
You may also see additional switches for each of the user folders mentioned above, and in some cases, the Desktop too. If the app requires or has Full Disk Access turned on that title will appear alongside the app in the Files & Folders pane, but it will be greyed out.
Obviously, if you grant an app Full Disk Access, it doesn't need the individual permission switches in the Files and Folders pane.
System Settings->Privacy & Security->Full Disk Access allows you to set which apps should be allowed to have full disk access.
It is possible to turn off full disk access for the Finder and the Dock apps. However, it's probably best not to since they are both an integral part of the Finder - and they both come from Apple.
The only reason you might want to turn access for these apps off is if you want your Mac to operate like a kiosk, or for example, if you want to restrict file access by children.
Network-based apps in particular shouldn't be granted full-disk access since doing so creates a heightened security risk. One example is a malicious Java applet or extension downloaded via a web browser.
macOS also uses Gatekeeper and runtime protection to shield the core parts of the operating system and its files from third-party apps. This ensures the system can't be tampered with.
Gatekeeper also provides a level of confidence that an app came from its actual registered developer and isn't fake.
Gatekeeper apps have to be digitally signed by Xcode before they can be distributed in the Mac App Store. If they are tampered with the Finder will let you know when you try to launch them.
The Mac App Store also employs Notarization and encrypted digital receipt verification to ensure downloaded Mac apps haven't been compromised.
Overall these security settings help enhance the security of your Mac and they mean malware will have a much harder time penetrating your Mac's defenses. They also help protect your private files.
You might want to take a look at these settings to ensure all your apps are configured for maximum security. Also, be sure to check out the Apple Platform Security guide.
 Chip Loder



 Malcolm Owen
 Charles Martin

 William Gallagher
 Stephen Silver

 Christine McKee



1 Comment
Thanks for the informative article, all good information!