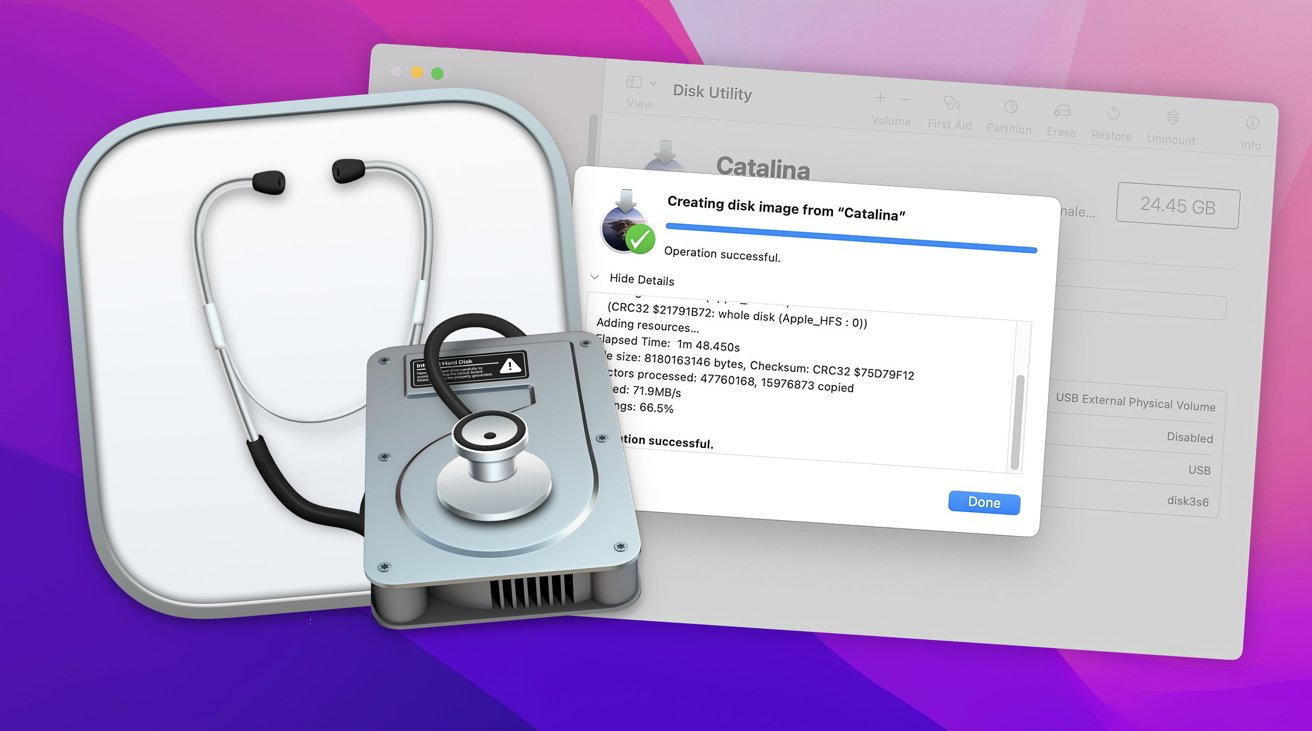
Disk Utility provides features for creating disk images, RAID, and repairing disks. In the second part of our deep dive, we'll look at those options.
In part 1 of this series, we looked at the basics of Apple's Disk Utility: what are devices and volumes, how to create and use volumes, and how files and folders are stored on volumes.
This time, we'll look at using disk images, RAID, and repairing disks with Disk First Aid.
Getting started with disk images
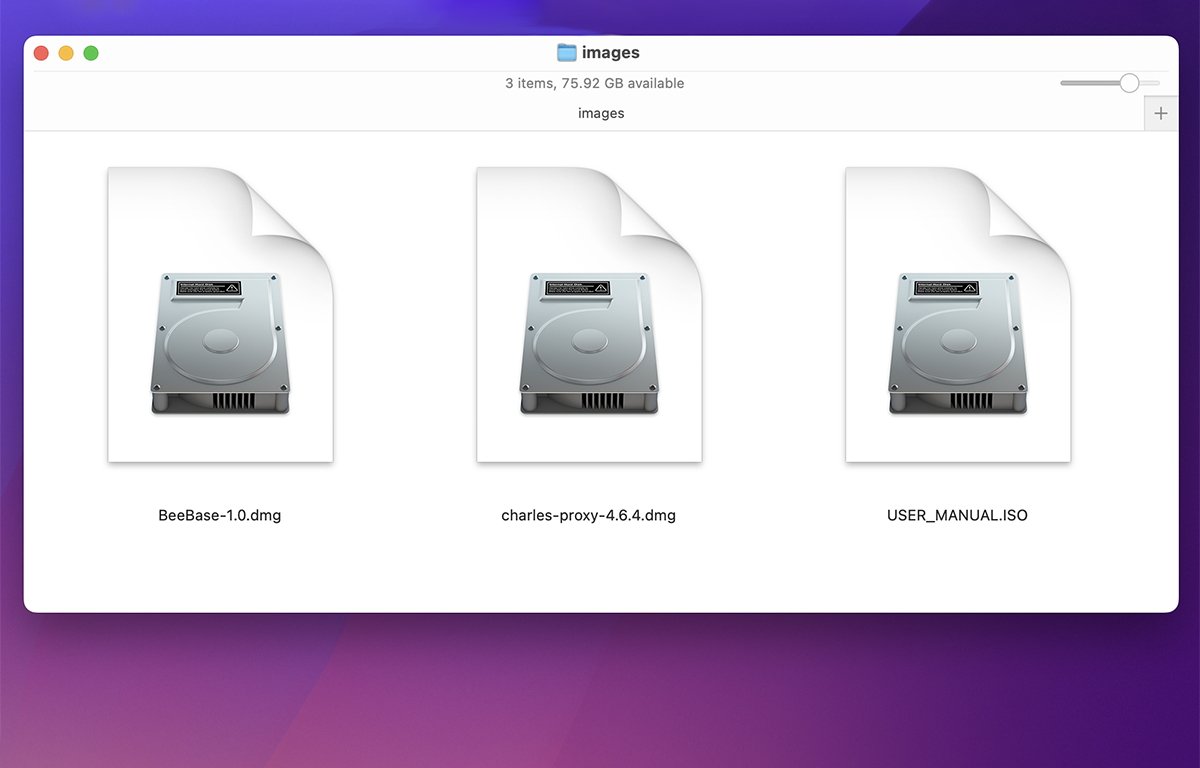
Disk Utility allows you to make exact copies of storage volumes and entire devices and store them as disk images. For Mac disks, these are usually stored as .dmg files using Apple's APFS or HFS+ filesystems.
Disk Utility and the Mac Finder also know how to mount, copy, and format other disk image formats such as .iso, FAT16 and FAT32, and exFAT formats.
.iso images can only be mounted on the Finder's Desktop if they were formatted with a filesystem the Mac Finder knows how to read. Additional image formats can be supported by installing third-party foreign file system plugins, which add additional filesystem support to macOS.
For optical formats such as CD-ROM (Yellow Book) and Compact Disc (Red Book), Disk Utility makes .cdr images, but .cdr is really just .iso with an optical standard format applied. The macOS Finder also knows how to natively read some extended CD-ROM formats such as CD-ROM\XA, better known as Photo CD.
In many cases you can convert a .cdr Disk Utility image to an .iso image merely by changing its file extension to .iso - and sometimes vice versa.
You can read and save any optical format to an image file using Disk Utility, provided it doesn't contain a copy-protection scheme such as those used on commercial DVDs or Blu-Rays.
Beware, however, that in order to legally make disk image copies of copyrighted materials such as audio CDs, you must physically own the discs. You also must not share the copies with anyone without the written permission of the copyright holders.
Once you've made disk images of a volume or device, you can later restore the volume or device using Disk Utility's Restore feature.
Creating disk images
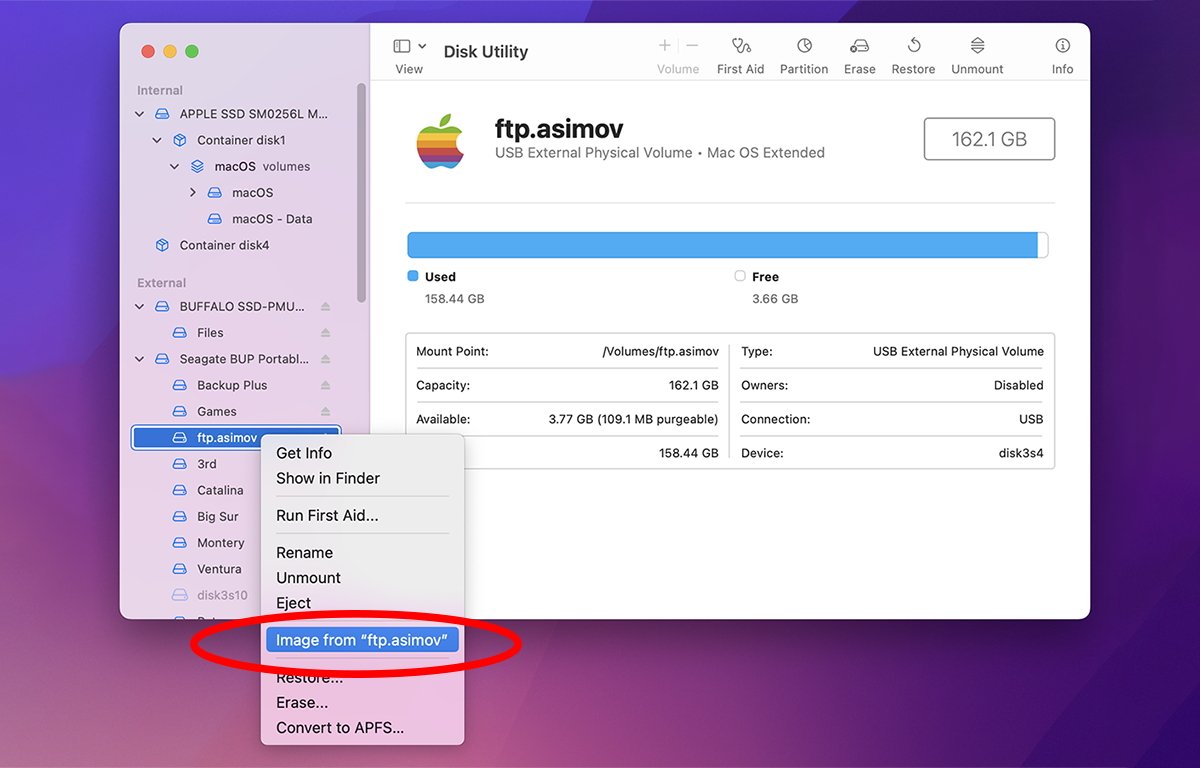
To make a disk image of a volume in Disk Utility, open the app in the Utilities folder on your Startup Disk, and select a volume from the volumes list in Disk Utility's main window on the left side, then Control-click or right-click.
In the pop-up menu, "Select "Image from Volume Name", where "Volume Name" is the name of the volume you clicked on:
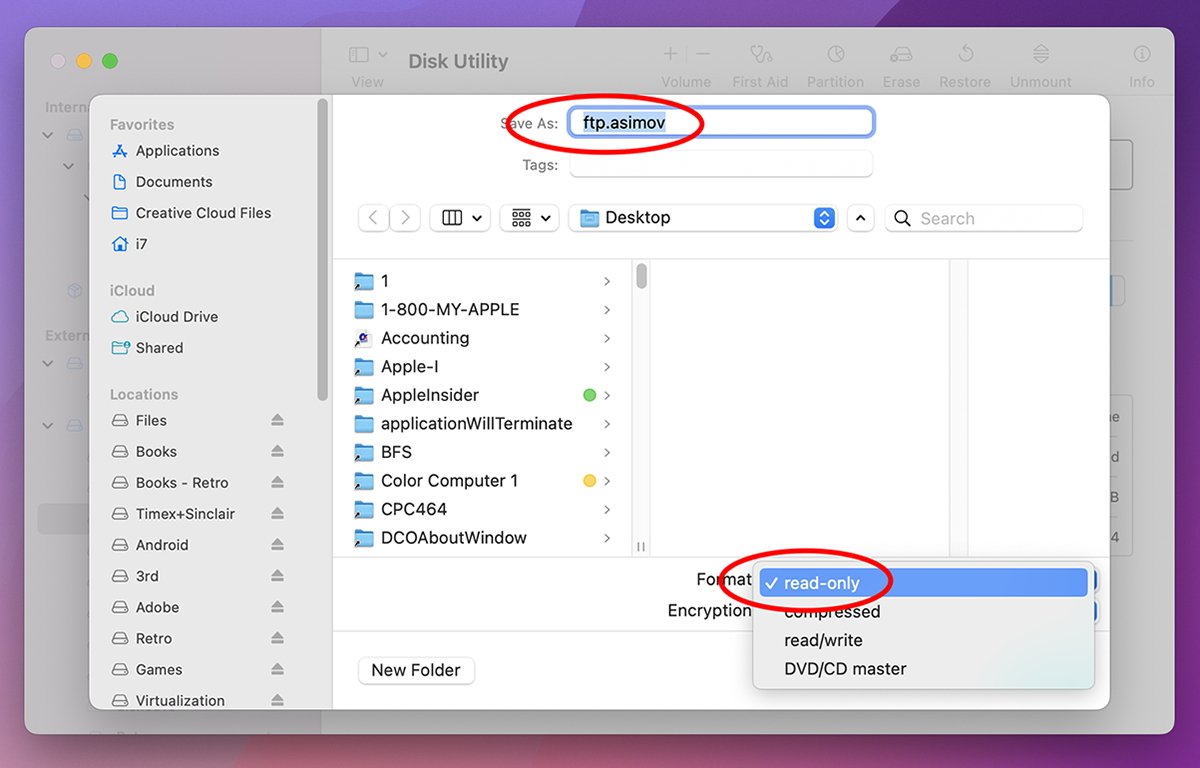
A standard file pane will appear, through which you can give the file a name. In the lower right corner is a Format menu, from which you can choose which kind of disk image to create:
- read-only
- compressed
- read-write
- DVD/CD master
Select a location in the dialog where you want to save the disk imag. Any storage location with enough space to hold the image will work.
Read-only images will mount on the Finder Desktop like real volumes, but you won't be able to write any files to them or modify existing files on them.
Compressed images are like read-write images, but their data is compressed to make the disk image smaller.
Read-write images are the same as read-only except they are fully writable when mounted on the Desktop. You can write additional files to them, and modify existing files on them.
When you unmount the read-write volume, any changes get saved into the disk image.
DVD/CD master makes an exact bit-level copy of a CD-ROM, Compact Disc, or DVD disk. Again, be aware copying a DVD in this manner will likely result in an unreadable copy as the copy protection scheme won't work on the copied data.
Unlike the Compact Disc audio standard, DVDs have built-in copy protection to prevent piracy.
The same legal restrictions apply to copyrighted DVDs as apply to copyrighted CDs.
In the Encryption popup menu below the Format menu, you can optionally choose 128-bit or 256-bit AES encryption. If you choose an encryption option, all data on the volume will be encrypted when the image is created.
Click the "Save" button to begin creating the disk image. You'll be prompted by the Disk Utility helper tool for a system admin password to begin creation.
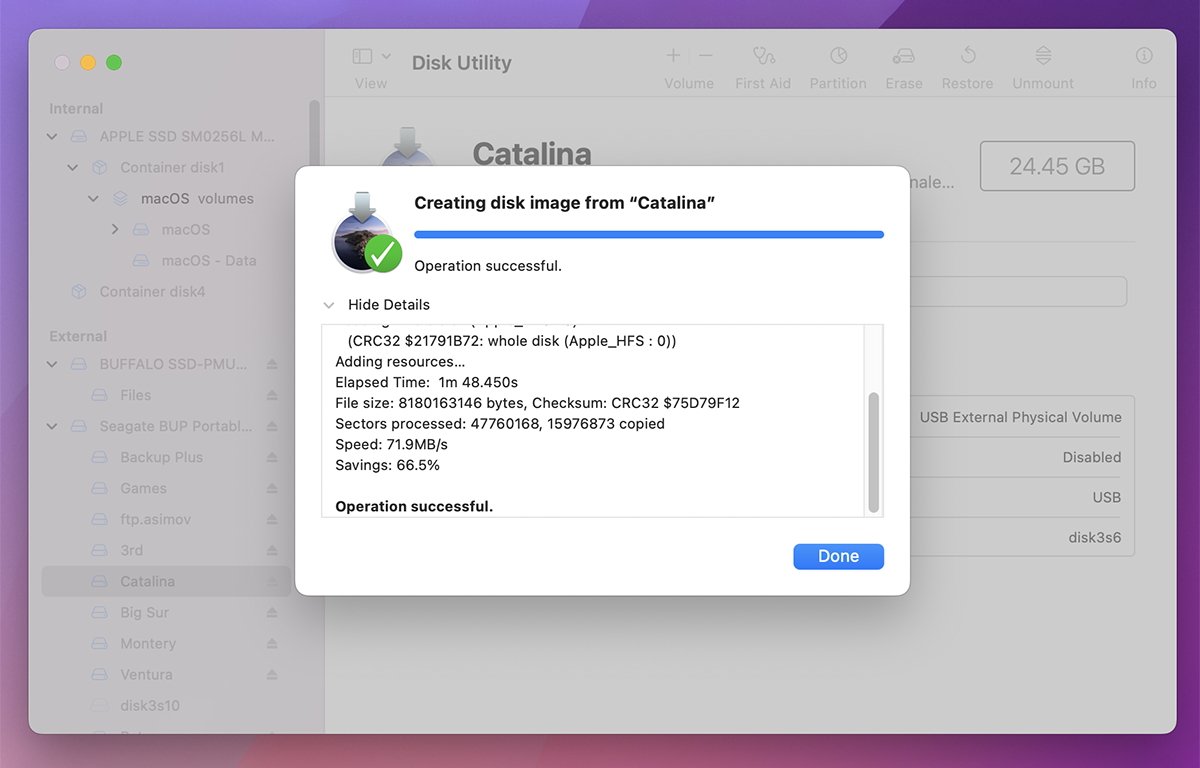
As Disk Utility creates the disk image, a progress sheet will appear and, when completed, a success or error message will be displayed.
Note that in order for the copy to begin, Disk Utility has to unmount the volume - or in the case of a device, all volumes on the device. If there are any open files on a volume that need to be unmounted, the copy will probably fail and you'll see an error message in the Disk Utility progress sheet.
Note that you can also make disk images of entire storage devices by following the same procedure, but by first selecting "Show All Devices" in the View menu. You then Control-click on a device in the main list in the Disk Utility window and select "Image From".
Show All Devices causes Disk Utility to display not only volumes but all the physical devices containing those volumes. When you make a disk image of a device, you make a block-level image of that device - including all the volumes it contains.
After completion, you'll have a new Disk Utility disk image which is fully transportable, copyable, and can be mounted and unmounted at will on any Mac by double-clicking the image file in the Finder.
To unmount a mounted disk image in Finder, drag its volume icon to the Trash in the Dock, or Control-click it in the Finder and select "Unmount" or "Eject" from the popup menu.
Volumes containing open files or apps can't be unmounted until all open files on them are first closed.
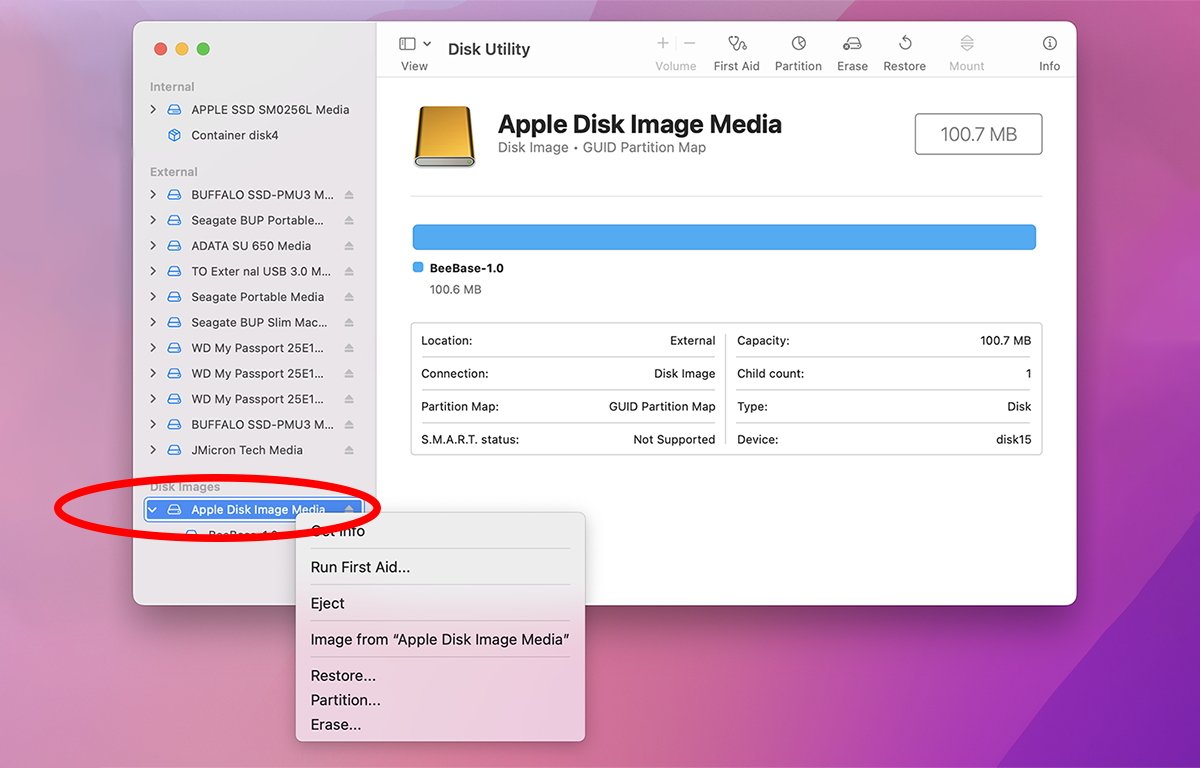
When the Finder mounts a volume from a disk image, Disk Utility also makes note of it using file notification services built into macOS. Disk Utility will list all mounted disk image volumes at the bottom of the volumes list on the left-hand side of the window.
You can Control-click any disk image volume shown here and use the context popup menu just as you would on any volume on a real device.
In fact, Disk Utility also creates a virtual storage device above each mounted volume named "Apple Disk Image Media" so that you can use the context menu on it as if it were a real device:
You can also unmount volumes from the volumes list by Control-clicking them and selecting "Unmount". To remove the virtual device containing the volume, Control-click it and select Eject.
Restoring from disk images
Once you have a disk image, you can restore it to a physical device fairly easily.
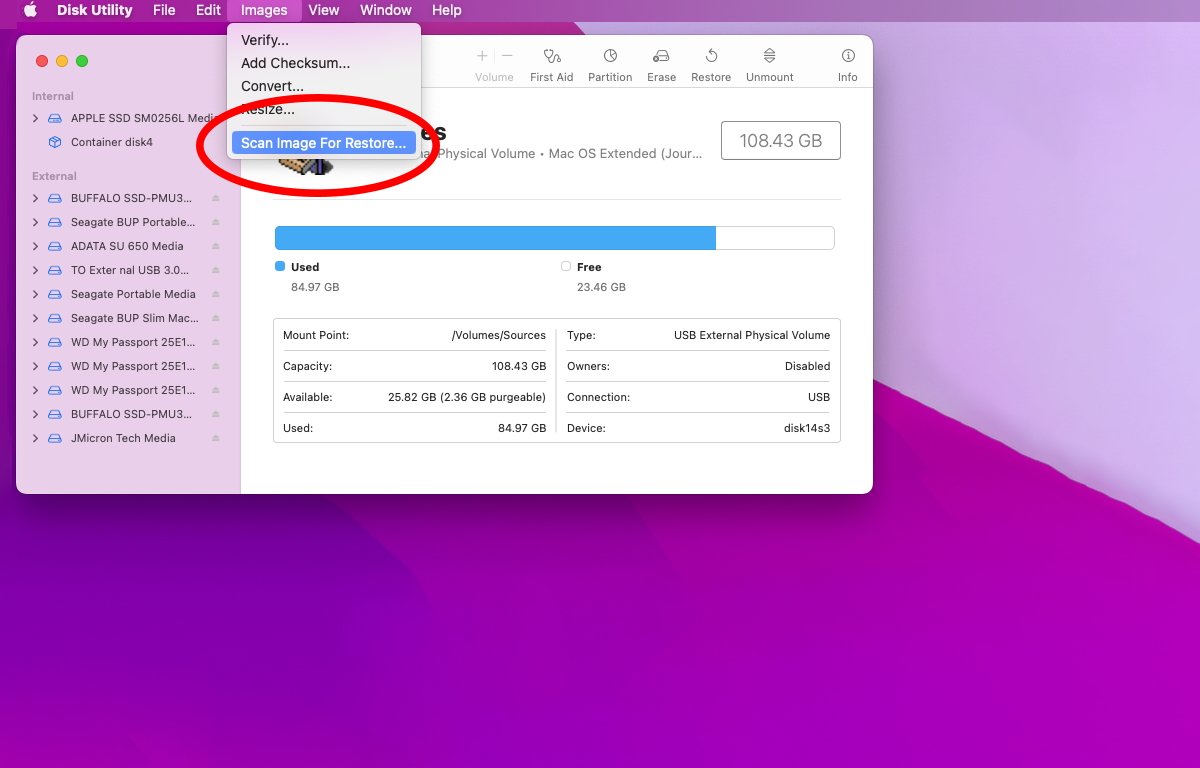
To do so, however, you must first scan the image to restore from via the "Images" menu in the main menubar. To do so select "Images->Scan Image for Restore", and when the standard file pane appears, select the disk image and click "Scan":
This allows Disk Utility to check the image and verify it can be restored to a device or volume.
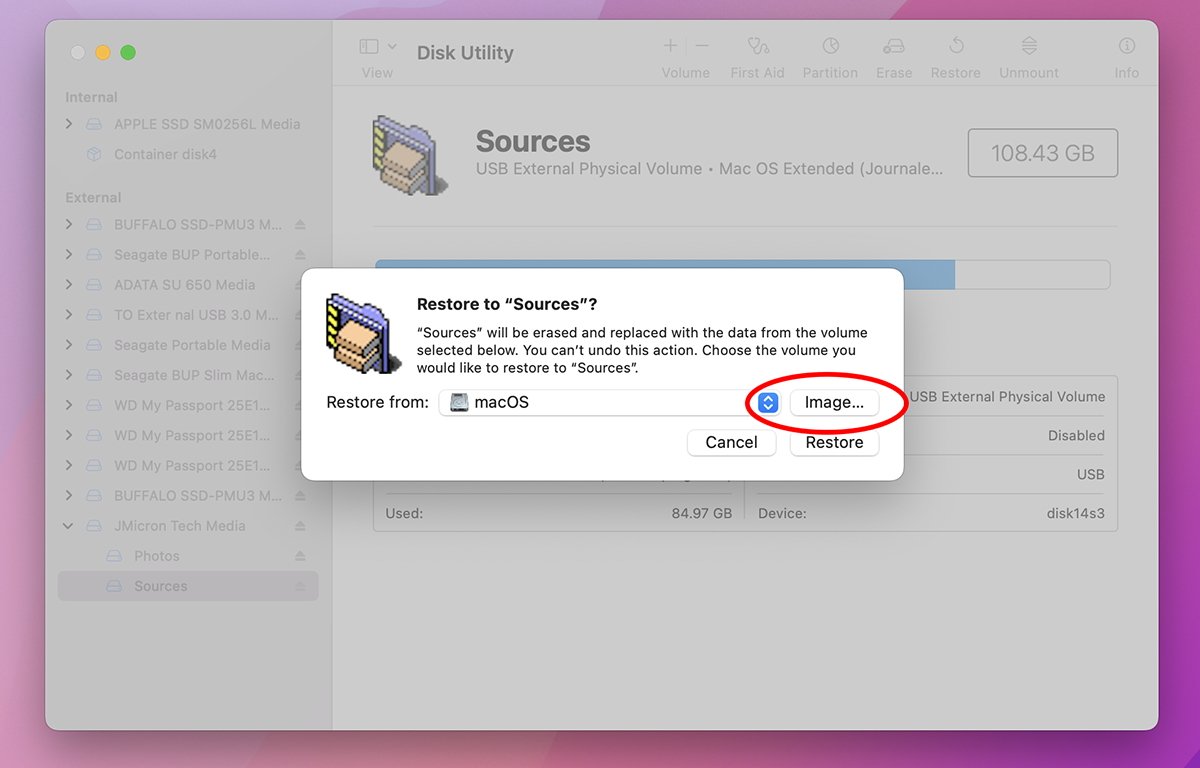
Once the image has been successfully scanned, select a volume or device from the main list in the Disk Utility window and click the "Restore" button in the toolbar. This displays the Restore sheet:
Note that this is a little counter-intuitive: instead of selecting the image you want to restore first, you select the device or volume you want to restore to first. Once the sheet appears, you can then restore from the scanned image by clicking the "Image..." button.
You can also restore to any device or volume on your Mac by clicking the volume popup button on the left of the "Image..." button and selecting any existing volume. This allows you to make an exact block-level copy of any volume to any other volume.
Use the Restore feature with care, since as soon as you click the Restore button in the lower-right corner of the sheet, all existing data on the target volume or device will be irrevocably destroyed.
Once the restore begins, Disk Utility will display a progress sheet, and when completed, whether the restore succeeded or failed. If it succeeded, Disk Utility will attempt to mount the restored volume on the desktop.
You can also restore by Control-clicking in the main list in the Disk Utility main window.
There are a few other options in the "Images" menu in the main menubar:
- Verify
- Add Checksum
- Convert
- Resize
"Verify" allows you to verify existing disk images, and "Convert" allows you to change an existing disk image into any one of the other four formats originally mentioned at the top of this article.
Disk First Aid
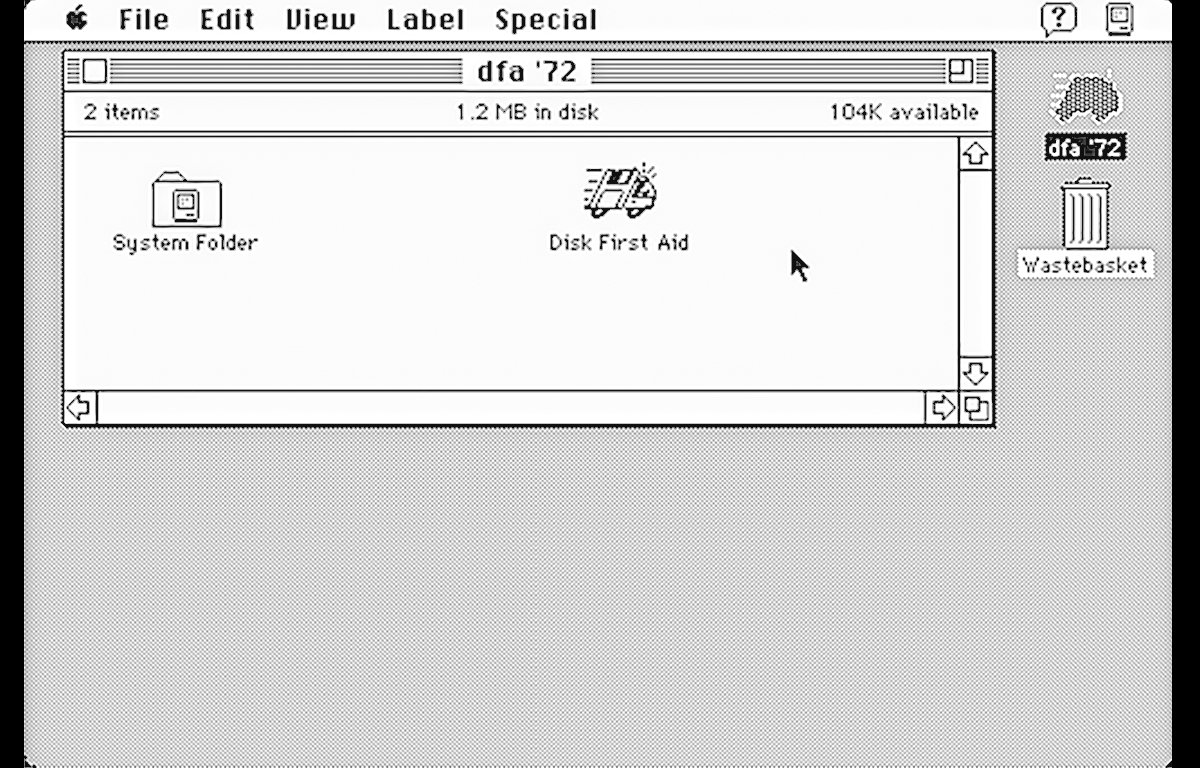
Disk First Aid, or DFA as it is better known, has been around on the Mac since System 6 in the late 1980's. With Disk First Aid, you can scan a device or volume for problems and try to fix those problems if the tool can.
On modern Macs, this includes scanning a device's partition map and comparing it against any found partitions on the device to make sure they match. There's also the scanning of each volume's volume header, catalog, and extents files to make sure there are no file or folder discrepancies.
On top of that, there's the checking of UNIX permissions, owners, and groups to make sure the filesystem settings on system files are what they are expected to be.
If Disk First Aid finds any problems with a volume or any damaged volumes on a device, it tries to repair them in order to make them usable again.
Except in the case of repairing damaged volume structures that prevent a volume from mounting, Disk First Aid doesn't usually recover any files on volumes directly. Apple also has a technote on how to attempt to repair a Mac disk using Disk Utility.
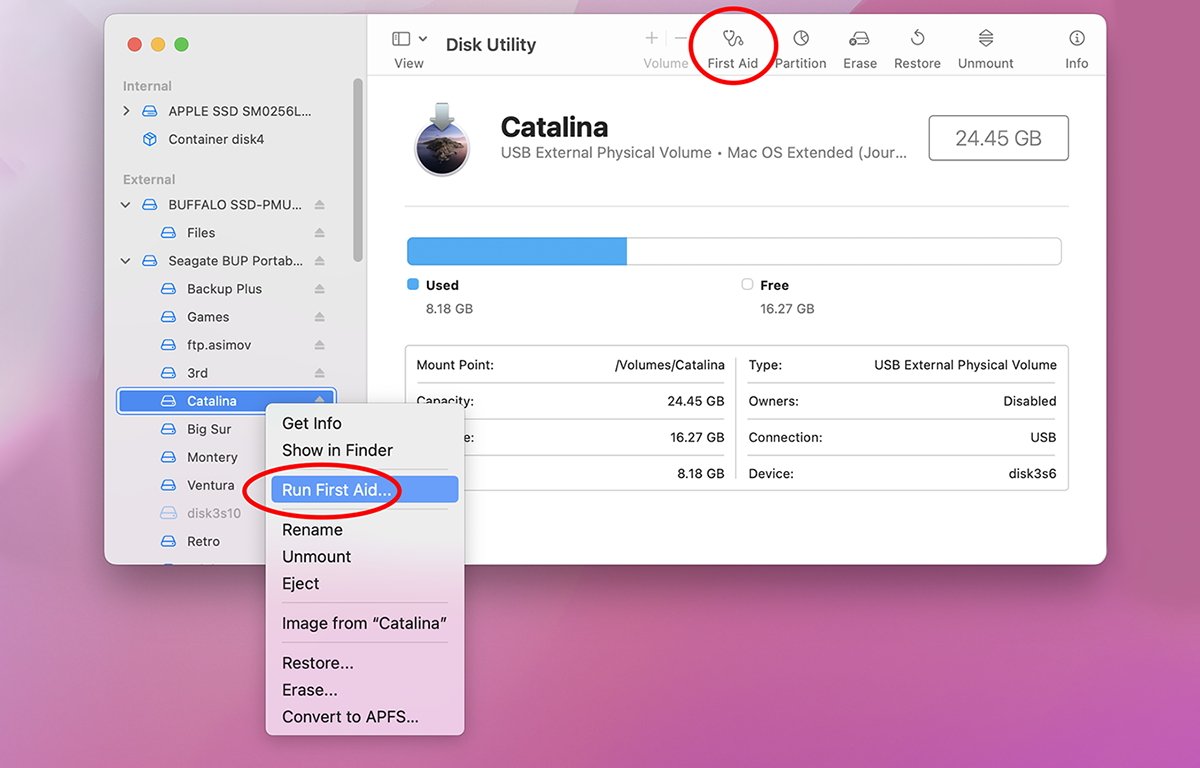
To repair a volume in Disk First Aid, select it from the main window's sidebar, and click the "First Aid" toolbar button, or Control-click the volume in the main window, and choose "Run First Aid" from the popup menu.
Click the confirmation button in the alert, and Disk First Aid will begin checking the volume for errors. If it finds any, it will attempt to repair them.
When the repair is finished, Disk First Aid displays a sheet with a text summary of what it found and what it repaired, if anything.
You can also run First Aid on physical devices in addition to volumes.
If you're repairing an APFS disk that contains multiple volumes, you want to run First Aid on them in reverse order: repair volumes first, then container volumes, then disks. For more information, see Apple's technote on the topic.
Command line
Disk First Aid relies on several command line tools built into macOS: namely hdutil, diskutil, and dd. To get more info on any of these tools, run their corresponding man pages in Terminal. For example:
man diskutil and press Return.
RAID
A striped Redundant Array of Independent Disks (RAID) can allow huge performance improvements by marshaling drive data to and from multiple drive mechanisms simultaneously. The increased throughput spread across disks speeds up I/O and makes overall access faster while presenting the entire array to the computer as if it was one drive.
With drive prices fairly low today, it's easy and inexpensive to set up your own RAID using several drives.
In general, you want to use the fastest external connection possible for RAID, such as Thunderbolt. USB will work too - you just won't see as big a performance improvement over USB and you will with a Thunderbolt RAID.
Several third-party vendors sell RAID-enabled drive enclosures which are simple to set up and use.
We covered how to create your own inexpensive RAID array in a previous article.
Checking S.M.A.R.T status
Self-Monitoring, Analysis, and Reporting Technology (S.M.A.R.T.)is a storage standard for monitoring drive health on drives that support it. Most modern SSDs and hard drives have S.M.A.R.T. built into their firmware inside the drive.
Standard SATA commands are used to query the S.M.A.R.T. status of a drive. Disk Utility knows how to do this automatically so there's nothing you need to do to check S.M.A.R.T. status.
Some external USB drives don't report their S.M.A.R.T. status because the controller boards found in these drives don't support translating S.M.A.R.T. commands from the SATA drive mechanism to USB.
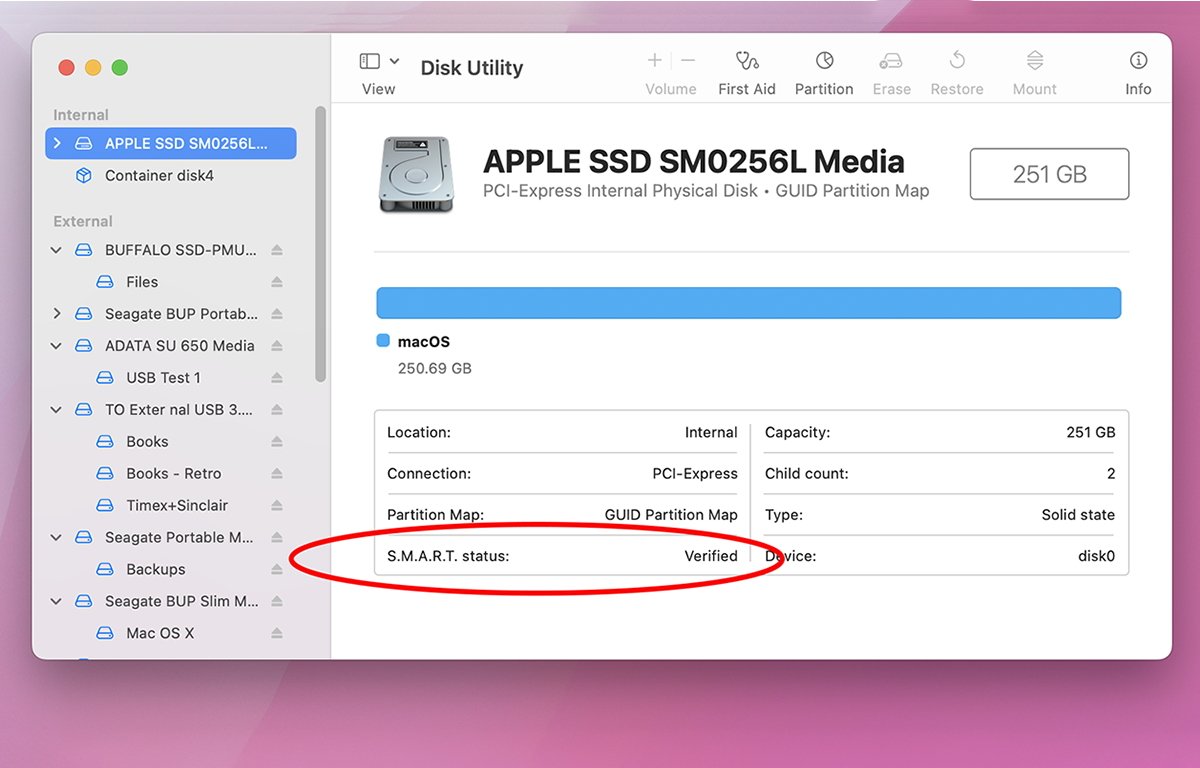
To read a supported drive's current S.M.A.R.T. status, start by looking at drives and volumes in Disk Utility's main list, then select any device in the list. Make sure to select a physical device and not just a volume.
If the drive supports S.M.A.R.T., Disk Utility will display its status in the text grid in the main window to the right of the device list, under the device's name:
There are a few other options we didn't cover in this article such as converting, adding, and removing existing APFS volumes, turning journaling on and off, and adding checksums. We'll address these in part 3.
 Chip Loder



 Wesley Hilliard
 Amber Neely

 Malcolm Owen
 William Gallagher

 Christine McKee
-m.jpg)
