Although it's very rarely needed, flushing the DNS cache might help clear up mysterious internet connection issues. Here's why, when, and how you do it.
This is one of those tips that you may never need to employ. That said, it is a useful tip to have as part of a Mac user's troubleshooting arsenal when a Mac is having problems connecting to websites, and the usual raft of easy fixes — also known as "restart all the things" — aren't resolving it.
This particular tip isn't that easy if you are unfamiliar with the Terminal app, but don't worry — we'll guide you through it.
Your Mac, your router, and your Internet Service Provider all have DNS caches in service to getting you connected to your most-visited websites ever more quickly, so let's start there.
What a DNS cache does
You may already be aware that every website or other location on the internet actually has a numerical address rather than the name you think of: for example, you would enter "apple.com" into a browser, but the actual IPv4 address is 17.253.144.10. Humans aren't especially good at memorizing strings of numbers versus words, so the Domain Name System (DNS) was created, turning these addresses into easily memorable names.
Every ISP uses a cache of frequently-visited site addresses to create a faster connection to the right place on their own DNS servers, and uses this to do a quicker lookup of the real address for any website, once it receives the request from your computer. For the exact same reasons, most routers also keep a small cache of frequently-visited site addresses, and so does your computer.
If your Mac can fetch the IP address of any site more quickly than waiting for the ISP's DNS server, it will take you directly there — bypassing any possible lookup delays from other DNS servers along your "route" from request to the serving of the site.
This entire process takes mere tenths of seconds on a fast connection, but you may still be able to detect that if you return to a website you recently visited, the page always seems to load more quickly than if you visit a website you've never been to before.
That's because if the "lookup" — the conversion from name to IP numbers — for the never-visited isn't already cached on your computer, the browser falls back to the ISP's DNS server to find the real address, which takes a moment longer — perhaps a few seconds more if you're one of the very few to visit that website.
Internet connection issues
Connection problems can happen when the ISP's DNS server is having its own problems — which would affect all the Wi-Fi-connected devices in your household — or when your router's DNS cache has become corrupted, or if your own computer's DNS cache has issues. This can be caused by simple errors writing to the cache, or in very rare cases through malware.
If you're having trouble getting to websites on any of your devices using your Wi-Fi connection, the first thing to try is the easy stuff — restart the router, restart the affected devices, and see if the connection problem clears up. Alternatively, you can:
- Turn off Private Relay,if it is turned on
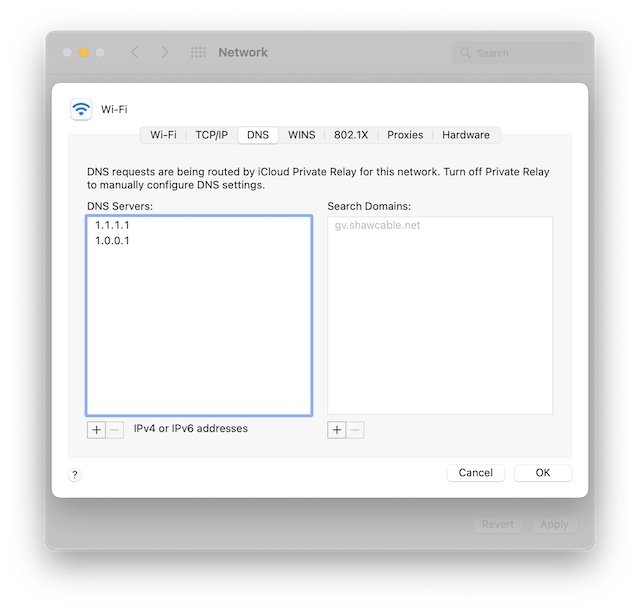
- Go to System Preferences -> Network -> Advanced
- Click the DNS item in the tabs. Make note of what the numbers are first, just in case something goes wrong.
- Add Cloudflare's 1.1.1.1 and 1.0.0.1 DNS server instead
- Click OK
If going to websites suddenly works after that, the problem was with your ISP's DNS server, and will likely be resolved in a few hours. You can restore the ISP's servers later by simply deleting the 1.1.1.1 address later, and restarting.
If that didn't do the trick — and especially if you find that you can't reach your frequently-visited sites but random never-visited sites actually do go through — clearing the DNS cache on your machine might be the answer.
Terminal time
Apple does not provide a graphical or simple way to "flush" a DNS cache because of the rarity of you ever needing to do it, and the risk of doing some accidental damage to things if the steps below are not followed carefully — as with anything involving Terminal. The procedure is not complicated, and using copy/paste for the command will help ensure no mistakes are made, but if after reading ahead you don't feel it is something you want to do — or if you are running an old, unsupported version of macOS prior to El Captain it would be best to contact a local expert to assist.
- Quit, don't just minimize, your open applications.
- You should then see a "Go" menu in the menubar at the top of the screen. The last option in the Go menu will be the Utilities folder. Select that.
- A window will open with the contents of that folder. One of them is named "Terminal."
- Double-click that to open it
- You should now see a window with some plain text in it, ending with your short username and a cursor.
- Because commands in the Terminal must be typed using an exact syntax, it is best to copy and paste the following command rather than attempt to type it in yourself:
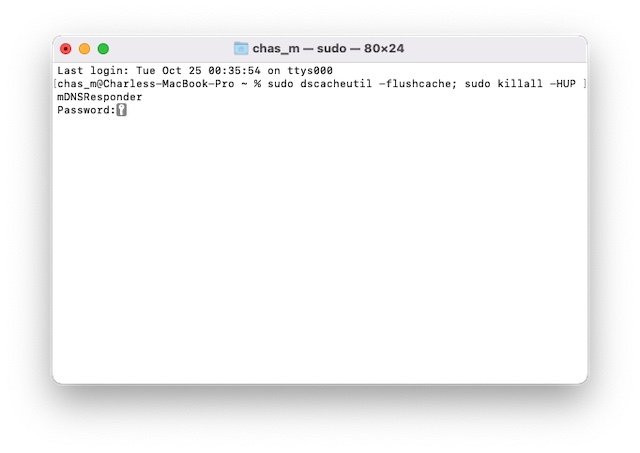
sudo dscacheutil -flushcache; sudo killall -HUP mDNSResponder
- Once that is pasted in, press Enter/Return
- You will be asked for your Mac's login password. Although you will be typing it in, the Terminal does not display it at all — so go slowly, and be sure you are spelling the password correctly.
- Then press Return or Enter again.
If you do not get another password request again or an error message, you will have successfully executed the command. Close the terminal window, and try using your preferred browser to visit a website.
It may load a bit slower than it did before, but if it loads successfully, flushing the DNS cache solved the issue, and your Mac's DNS cache will rebuild itself over time. Pat yourself on the back.
 Charles Martin




 Brian Patterson



 Malcolm Owen
 William Gallagher
 Christine McKee
 Marko Zivkovic