 Chip Loder
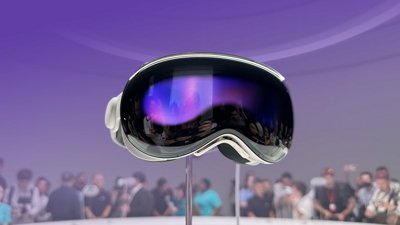
Apple Vision Pro's release is imminent, and there are lot of things for developers to consider when building apps for the headset. Here's what you should think about when making visionOS apps.
The Apple Vision Pro is an interactivity departure for Apple. Unlike apps for Mac or iOS, which rely on user interacting largely with a flat plane and a well-established user interface language, visionOS throws that all away, forcing developers to embrace new ways for users to interact with their apps.
Apple has provided extensive documentation and tutorials for designing for spatial computing. The following are some key points to keep in mind as you design your apps for visionOS.
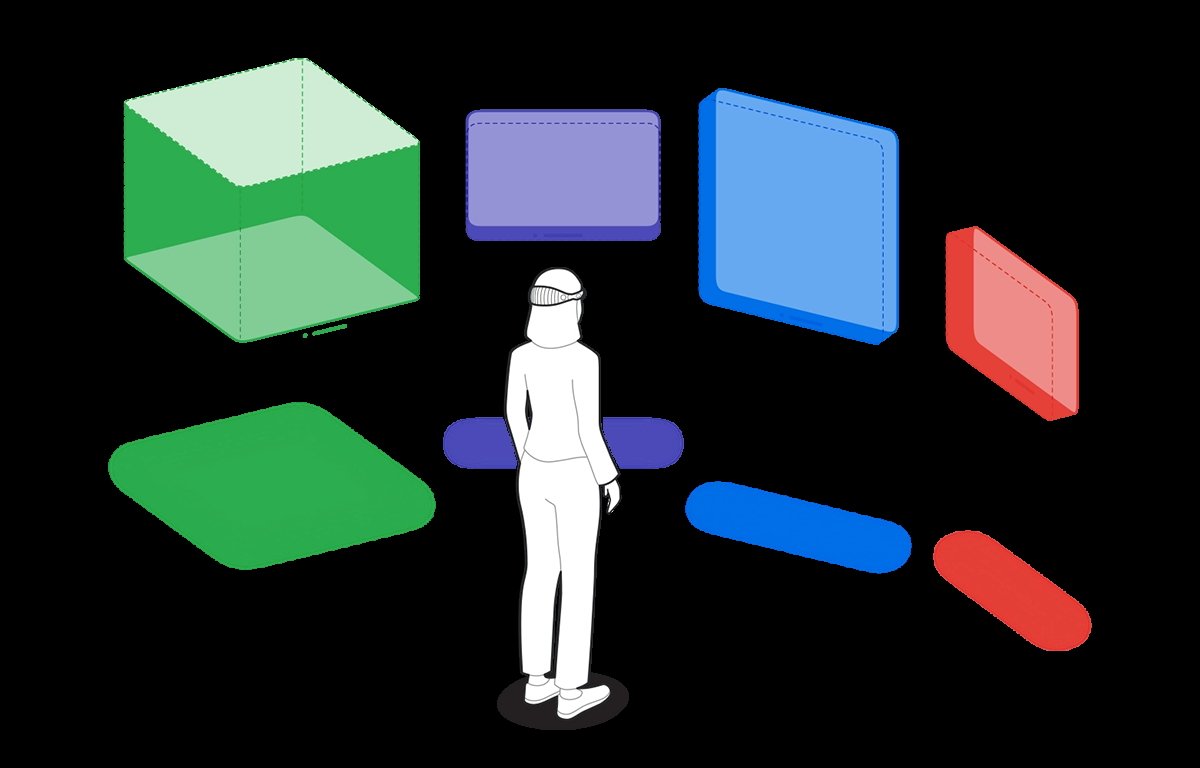
Passthrough versus immersive mode
visionOS lets you create apps in either passthrough or immersive mode.
In passthrough mode, the user sees their surroundings through the Apple Vision Pro headset using its built-in external cameras, but apps and windows are displayed floating in space.
Users can use gestures and eye movement to interact with the user interface in this mode
In immersive mode, the user enters a complete 3D world in which they are surrounded by a 3D-generated scene containing 3D objects. Immersive mode apps can also be games in which the user enters the game environment space itself.
For most visionOS apps, Apple recommends starting users in passthrough mode, establishing a ground plane, or orientation, and later transitioning to fully immersive mode if needed.
This is because some users may find immediate immersion in a 3D space on an app's launch jarring.
 Passthrough mode.
Gestures
Apple Vision Pro (AVP) relies heavily on gestures - more so than iOS or iPadOS.
AVP is the first mainstream computer that allows you to control and manipulate the interface using only your hands and eyes without an input device. Using gestures you move your hands in space to control the user interface.
An object that can receive input in visionOS is called an entity. Entities are actually part of the RealityKit framework.
To implement gestures in a visionOS app, three things are required:
- An entity must have an InputTargetComponent
- An entity must have a CollisionComponent with shapes
- The gesture must be targeted to the entity you want to interact with
Objects in visionOS are defined by components and there are different types: input, world, view, view attachment, hover effect, collision detection, and text components.
Each component controls a different aspect of visionOS's interface and control. Apple has defined a Swift struct for each.
An InputTargetComponent is a struct that tells visionOS which object can receive input in the form of gestures.
If you don't add an InputTargetComponent, an object in visionOS can't receive input at all.
You can also set whether an object can receive direct or indirect input.
In Swift:
myEntity.components.set(InputTargetComponent()
To define which part of an entity can receive input, you add a CollisionComponent. Collision components have shapes that define hit-test areas on an entity.
By changing CollisionComponent shapes you can change what parts of an entity will accept or ignore gesture input.
To disable any physics-based processing on an entity, you can disable collision detection on the CollisionComponent using a CollisionFilter.
InputTargetComponents work in a hierarchy so if you add them to an entity that has descendant entities that also have InputTargetComponents the child entities will process input unless you disable it.
You can set what type of input an InputTargetComponent can receive by setting the .allowedInputTypes property.
A descendant InputTargetComponent's .allowedInputTypes property overrides the .allowedInputTypes properties of ancestors.
You can also set the .allowedInputTypes when you first initialize the structure with the init() method.
You can toggle whether the InputTargetComponent can accept input by setting the .isEnabled property.
Gestures can be set to be targeted at a specific entity, or any entity.
You can find out which entity received input in the gesture's .onEnded method like this:
let tappedEntity = gestureValue.entity
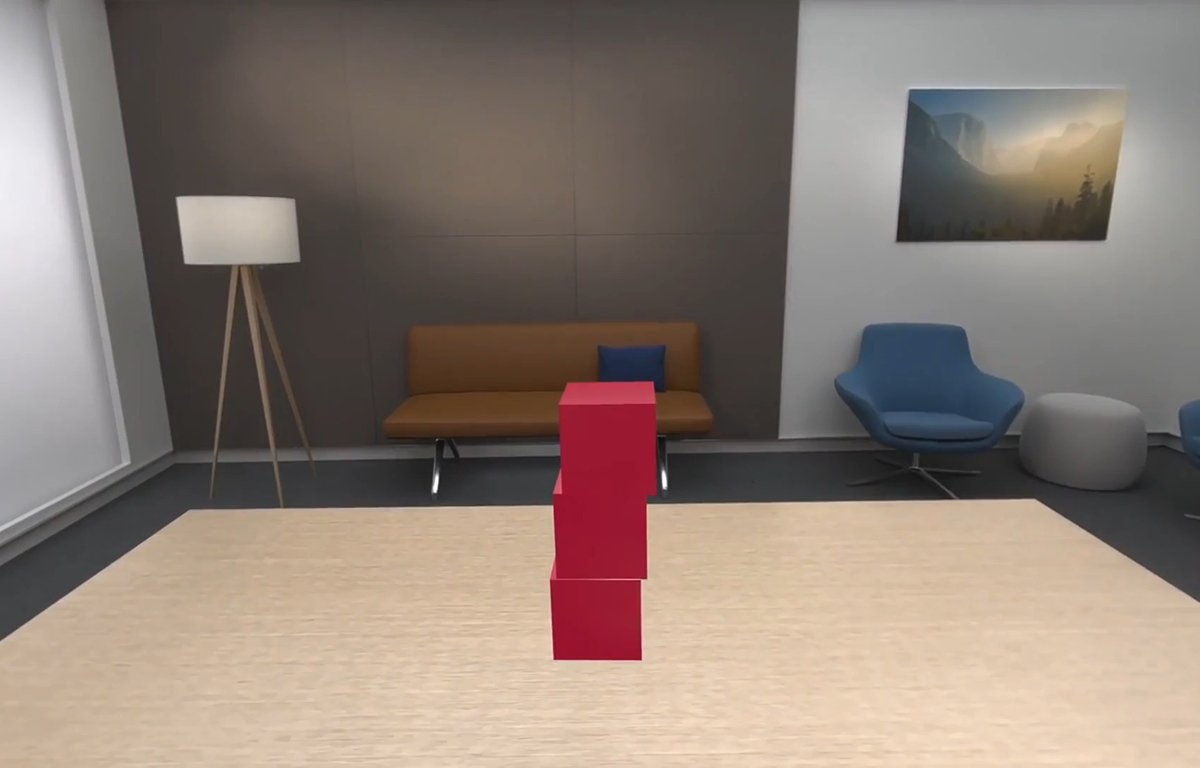
In most cases, you'll use entities in passthrough mode where you may have a mixture of windows, icons, 3D objects, RealityKit scenes, and ARKit objects.
 Passthrough mode with windows and 3D objects.
HoverEffectComponents
If an entity is an interactive entity (I.e. it's enabled for input), you can add a HoverEffectComponent to it to astound and delight your users.
The HoverEffectComponent is possibly the coolest thing ever in the entire history of user interfaces:
If you add a HoverEffectComponent to an interactive entity, visionOS will add a visible highlight to the entity every time the user looks at it.
When the user looks away from the entity the highlight is removed.
This is one step away from the full mind control of computers.
Like the single-click on the macOS desktop, or highlighting text in iOS, the visual highlight tells the user the entity is selectable - but it does so without any physical interaction other than eye movement.
As the user moves their eyes around the field of view in visionOS, it will highlight whatever entity they look at - as long as it has a HoverEffectComponent.
This is pure magic - even for Apple. Incredible.
The eyes will be new input devices in spatial computing.
This is indeed a very exciting prospect: the ability to control a computer with your eyes will be vastly faster and more accurate than manual input with your hands.
It will also open up a whole new world of computer control for those with disabilities.
 visionOS can include spaces that include several kinds of objects, or entirely rendered 3D scenes.
Virtual Hands
One new aspect of spatial computing is the idea of virtual hands: in visionOS apps you'll be able to raise your hands and control objects in your field of view in AVP.
We covered this previously in our article on visionOS sample code. Apple already has some demo programs with this working.
Using virtual hands, you will be able to touch and control objects in your view inside of AVP. This gives you the classic UI concept of direct manipulation but without a physical input device.
Virtual hands are similar to on-screen hands used in many modern video games. In fact, this idea was already in use decades ago in some games such as the groundbreaking Red Faction for PlayStation 2 - but it still required a physical input device.
With AVP the experience is more direct and visceral since it appears as if you are touching objects directly with no hardware in between.
Using virtual hands and gestures you will be able to tap on and move objects around inside visionOS's space.
You can also use them in immersive games.
Additional considerations for gesture control
There are a few other things you'll want to think about for gestures, control, and spatial interaction.
You'll need to think about nearby controls for distant objects. Since some objects in AVR's 3D space can appear farther away than others, you'll also have to consider how to allow your user to interact with both.
Apple advises to consider 3D space and depth. Developing for AVP will be more complex than for traditional screen-bound devices.
Comfort and 360-degree views
Apple stresses several times to keep in mind that comfort is important. Remember that when using the AVP the entire body is used - especially the head.
Users will be able to swivel and rotate their heads in any direction to change the view. They will also be able to stand and rotate, bend, and squat or sit.
You'll need to keep this in mind when designing your app because you don't want to force the user into too much movement, or movements they might find uncomfortable.
There's also the issue of too many repetitive movements which might fatigue the user. Some users may have limited range of motion.
Some users may be able to make some movements but not others. Keep these considerations in mind when designing your app.
Also, be aware that there will be some additional weight on the user's head due to the weight of AVP itself. You don't want to force the user to hold their head in a position too long which might cause neck fatigue.
No doubt over time as later iterations of AVP become lighter this will become less of an issue.
Apple also discourages the use of 360-degree or wrap-around views.
While users will be able to pan across the view by looking in different directions, Apple doesn't want developers to make apps that span a full circle.
A few other tidbits
Apple lists a few other things to help in your visionOS development:
Apple recommends not placing the user in an immersive scene when your app launches. You can do so, of course, but unless your app is an immersive game Apple doesn't recommend it.
Even for immersive games, you may want to start the user in a window so they can change their mind or access other apps before they start the game.
Apple defines a key moment as a feature or interaction that takes advantage of the unique capabilities of visionOS.
ARKit only delivers data to your app if it has an open immersive space.
Use Collision Shapes debug visualization in the Debug Visualizations menu to see where the hit-detection areas are on your entities.
You can add SwiftUI views to visionOS apps by using RealityView attachments to create a SwiftUI view as a ViewAttachmentEntity. These entities work just like any other in visionOS.
Also, be sure to see the section of the Xcode documentation entitled Understand the relationships between objects in an immersive space.
You can currently can resize or move a window in visionOS after it is created using onscreen controls, but you can't do so programmatically.
Therefore you should think carefully about a window's initial size when you create it. When visionOS creates a new window it places it onscreen wherever the user is looking at the moment.
If your app includes stereo views that display video you'll want to convert the videos to MV-HEVC format using the AVAsset class in AVFoundation.
To provide lighting in a RealityKit scene in visionOS you can either let the system provide the lighting or you can use an ImageBasedLightComponent to light the scene.
The CustomMaterial class isn't available in visionOS. If you need to make a custom material for a scene, use the Reality Composer Pro tool which can make the material available as a ShaderGraphMaterial struct instead.
Apple has a WWDC 23 video session on using materials in RCP. See the video Explore Rendering for Spatial Computing from WWDC.
Also be sure to watch the WWDC 23 video Principles of Spatial Design as well as Design Considerations for Vision and Motion.
You can get the current orientation of the AVP by using the queryDeviceAnchor(atTimestamp:) method.
Spatial audio and sound design 101
Another spatial part of the AVP experience is immersive audio.
Full-environment audio has been around for decades in software, especially in games, and with headphones or surround-sound home theater systems, users have been able to enjoy immersive sound experiences for years.
But AVP takes the experience to a new level.
For one thing, having immersive audio connected to an immersive or mixed reality visual environment creates an entirely new dimension of realism than previously possible in computing.
Having both sound and the visual experience work in tandem creates a new standard of what's possible.
Your brain works by using complex interpretations of what both your eyes see and your ears hear. Many spatial cues in human perception are based on hearing.
For example, the slight delay of a sound arriving at one ear a split second before the other combined with your head obscuring parts of sounds is what allows your brain to tell you what direction a sound originates from. These are called interaural time differences and interaural level differences.
Pitch, timbre, texture, loudness, and duration also play roles in how humans perceive sound. Reflected sounds also have an effect on perception.
Humans can typically hear sound frequencies ranging from 20Hz at the low end to 20Khz at the high end, although this range declines with age, and some people can hear sounds beyond these ranges.
The classic Compact Disc audio format samples sound at 44.1KHz - twice the maximum frequency of human hearing. This is based on the Nyquist Limit - which states that to accurately capture a sound by recorded sampling, the sample frequency must be twice the maximum sound frequency.
One oddity of human hearing is that people have difficulty localizing any sounds that originate from or reflect off of cone-shaped surfaces - which isn't surprising since these shapes rarely occur in nature.
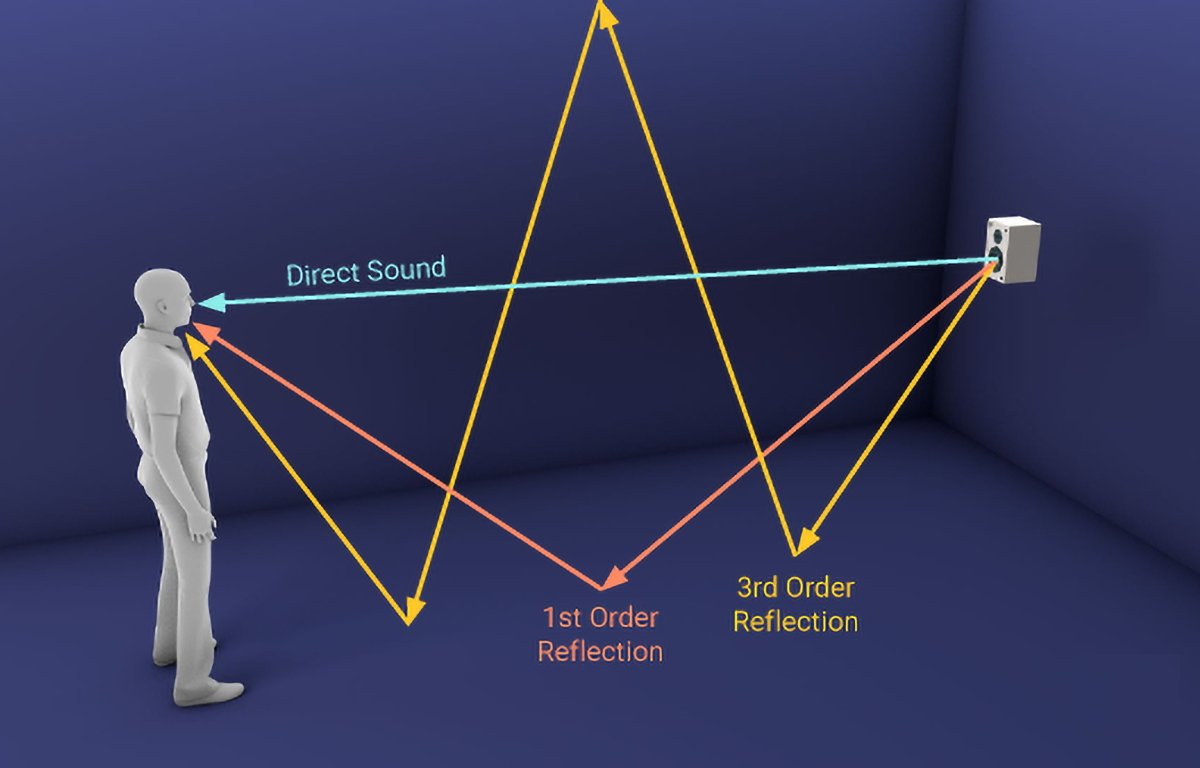 Direct and reflected sounds. Courtesy Resonance Audio.
When vision and sound inputs are properly combined and synchronized, your brain makes connections and judgments automatically without you having to think about it.
Most of your ordinary perception is based on these complex interpretations and sensory input. So is your brain's perception of your orientation in space (combined with inputs from your inner ears which affect balance).
AVP provides a new level of experience because it allows synchronized input of both vision and immersive sound. Keep this in mind too when designing your apps.
You want your users to have the most realistic experience possible, and this is best achieved by careful use of both sound and vision.
For non-immersive apps use audio cues to make interactions more lifelike.
For example, you can use subtle audio responses when a user taps a button or have audio play and seem to come directly from an object the user is looking at.
If you are making an immersive app you will need to carefully tune any audio so it properly matches what the user sees. For games, it's important to use 3D audio cues so they precisely match gameplay events and environments.
ADSR
Every sound has what is known as an ADSR - attack, delay, sustain, release.
Attack is the rate or slope at which a sound's volume goes from zero to maximum. A perfectly vertical attack means a sound goes from silence to max instantly.
Delay is the time the sound lasts from its maximum, or peak, until it drops or settles into its standard volume, which lasts until the sound's final stage - its release.
Sustain is how long a sound is held at standard volume after the delay period. This is the level most people perceive a sound.
Release is the duration of time from the start of the sound fading out until it goes to zero volume or silence. The release phase begins at the end of the sustain period until silence.
A perfectly vertical release curve means a sound goes from standard volume to silence instantly. An extremely long and shallow release curve means a sound fades out very slowly over time.
If you've used the crossfade effect in the Apple Music app you've heard shallow attack and release curves.
Sounds with a perfectly vertical attack or release are called gated sounds.
Taken together, a sound's four ADSR values are known as its envelope.
Most professional sound editing software lets you adjust all four points on a sound's ADSR graph. Altering the ADSR affects how users perceive sound.
Using ADSR you can create some pretty interesting and subtle effects for sounds.
ADSR was originally used only for synthesized music but today's pro sound software lets you apply ADSRs to sampled (recorded) sound as well.
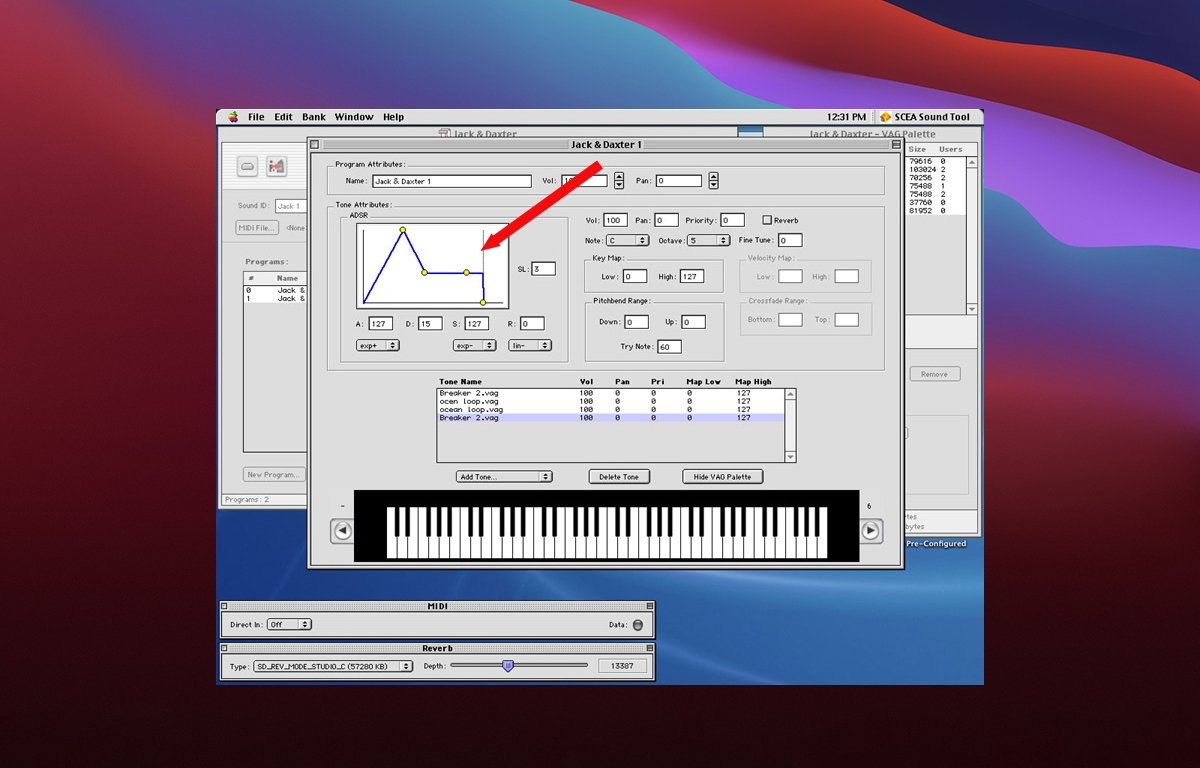 ADSR adjustment in the PlayStation 2 sound editor.
Sound effects
If you're making an immersive game for visionOS, you'll need to think about sound effects carefully.
For example, suppose your game contains a distant explosion or gunfire. You will need to both time and mix your sound so that the relative loudness of each sound matches the distance and intensity of the effect.
Sound realism in immersive games is also dependent on the materials in an environment.
Is there a huge rock canyon in your game where an explosion or gunfire goes off? If so you'll need to include multiple realistic echo effects as the sound bounces off the canyon walls.
You will also need to position each sound in 3D space relative to the user - in front of, behind, to the sides of the user, or even from above or below. Certain sounds in real life may seem to come from all directions at once.
Other types of sounds in real life may temporarily leave the participant deaf, or leave them with only ringing in their ears for a while (grenade concussions come to mind).
Consider that for a distant explosion many miles away in a game setting, in real life, the viewer wouldn't actually hear the explosion until several seconds after they see it.
Little touches like these will add extra realism to your apps.
On top of all this, keep in mind your user may be moving their head and thus alter their perspective and field of view while sounds are playing. You may have to adjust some sounds' spatial cues in 3D space in real time as the user's perspective changes.
There are audio libraries to help with this such as Ressonance Audio, OpenAL, and others, but we'll have to wait and see how spatial audio evolves on AVP.
Sound design for games is an entire discipline unto itself.
For an excellent deep dive on how sound works in the real world check out the exceptional book The Physics of Sound by Richard Berg and David Stork, although some math is required.
Apple's visionOS Q&A
At WWDC 23 and in recent developer labs Apple has held several sessions with visionOS experts, and as a result, Apple has compiled a visionOS Q&A which covers many more topics.
You'll want to check it out to make sure your visionOS apps can be as great as possible.


-m.jpg)


 Marko Zivkovic
 Malcolm Owen

 William Gallagher
 Amber Neely
 Sponsored Content

-m.jpg)


7 Comments
I think that I would prefer immersion over Passthrough. For me, I think Passthrough might be more distractive. Of course, I also don’t have a family. Passthrough might be more practical if you’re surrounded by family.
The hand-gesture UI sounds a bit like that in Minority Report but with a headset rather than a wrap-around screen.
https://www.youtube.com/watch?v=33Raqx9sFbo
I haven’t seen it demonstrated, I think. Can 2D display views overlap?
Great read, thank you!