Ten step guide to sharing your iPhone's connection with NetShare
For those who don't fully grasp the power of wireless tethering provided by applications like NetShare, think of it as instantly having 3G or EDGE Internet access on your MacBook anywhere you have 3G or EDGE access on your iPhone. If you were on a road trip, for instance, and suddenly received a call from your boss requesting a file residing on the MacBook sitting on the seat next to you, you could pull over, wirelessly connect your MacBook to your iPhone's Internet connection using NetShare, email the file from the side of the road, and then continue on with your trip. There's no need to search for a hotspot.
Alternatively, you could surf the web at a beach that has no WiFi hotspots, or provide live textual coverage of Steve Jobs' next keynote straight from the Moscone Center in San Francisco once the available wireless networks become over saturated and melt down. Of course, these are just some examples. For those considering NetShare (available from this App Store link), see the following configuration guide:
Configuring NetShare after downloading it to your iPhone
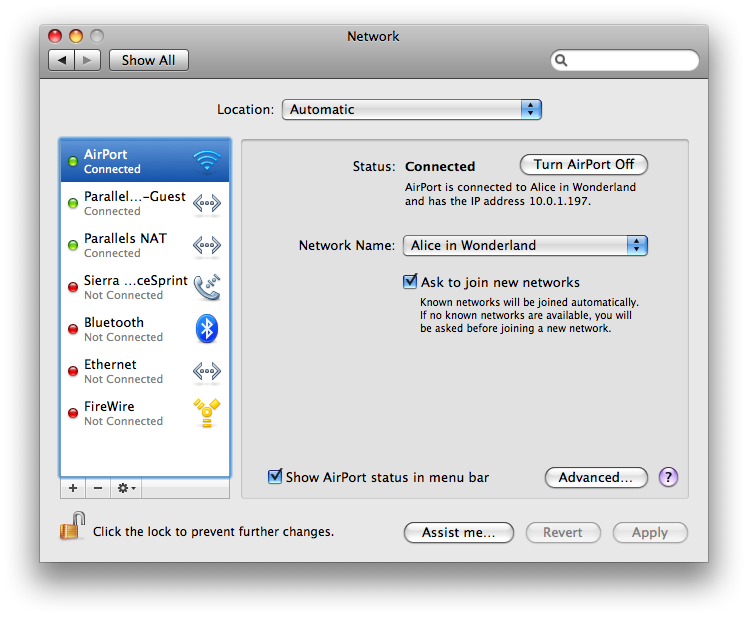
Step 1: Open "System Preferences" on your Mac and go to the "Network" section.
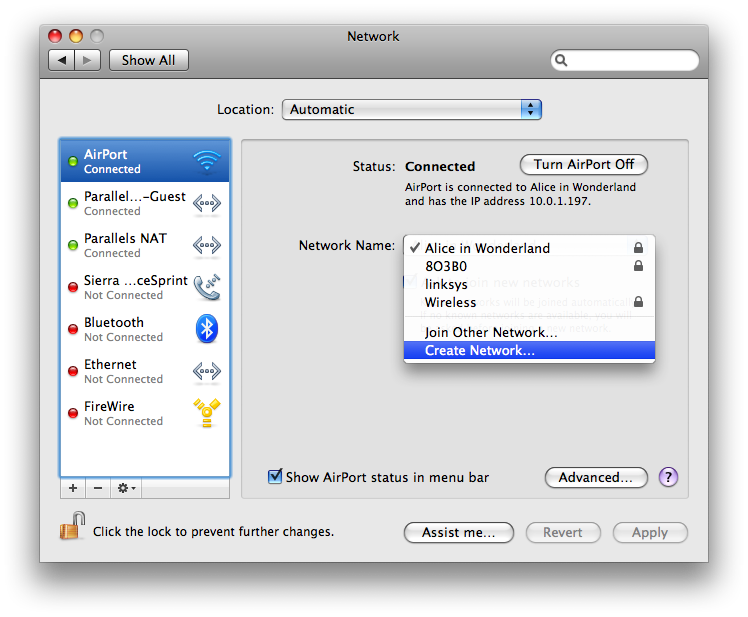
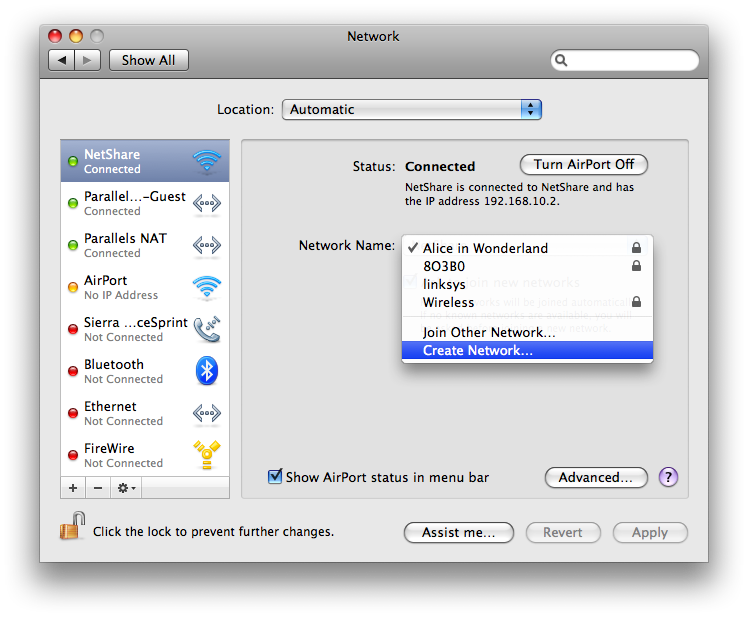
Step 2: Locate your Wi-Fi (AirPort) interface and choose "Create Network..." from the Network Name drop down.
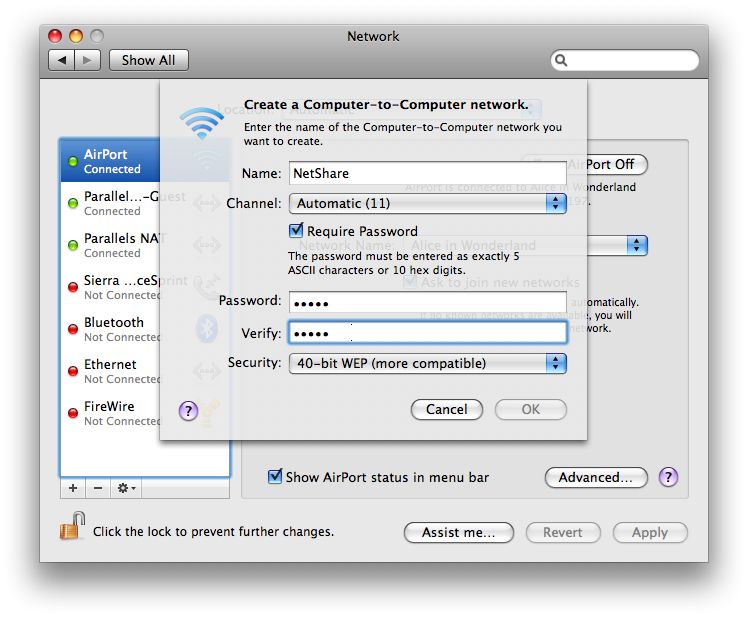
Step 3: Pick a network name, such as "NetShare" and optionally provide a password.
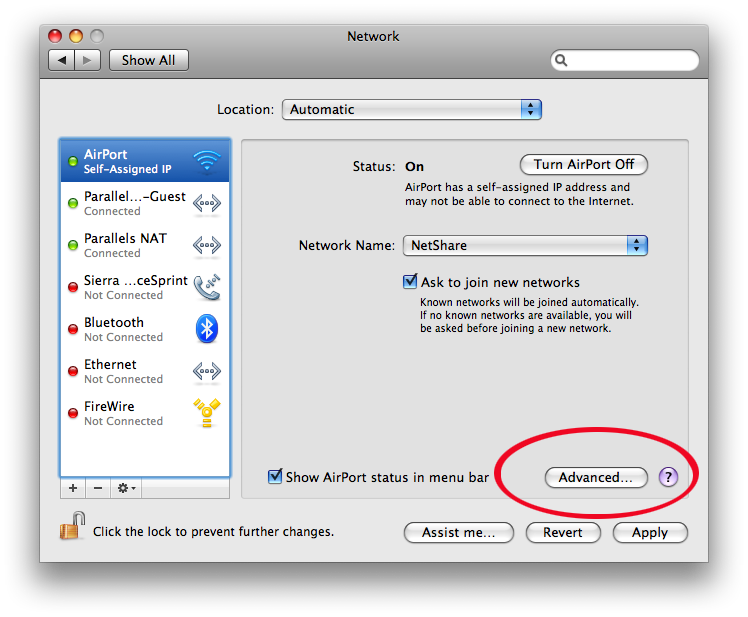
Step 4: Now click "Advanced" for the Wi-Fi interface.
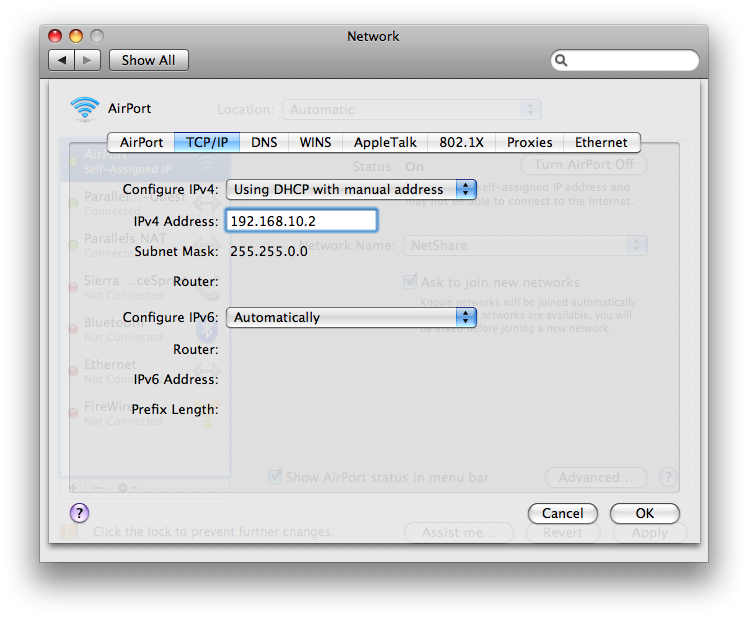
Step 5: Select the TCP/IP tab and enter a TCP/IP address (Using HDHCP with manual address) for your computer, such as 192.168.10.2
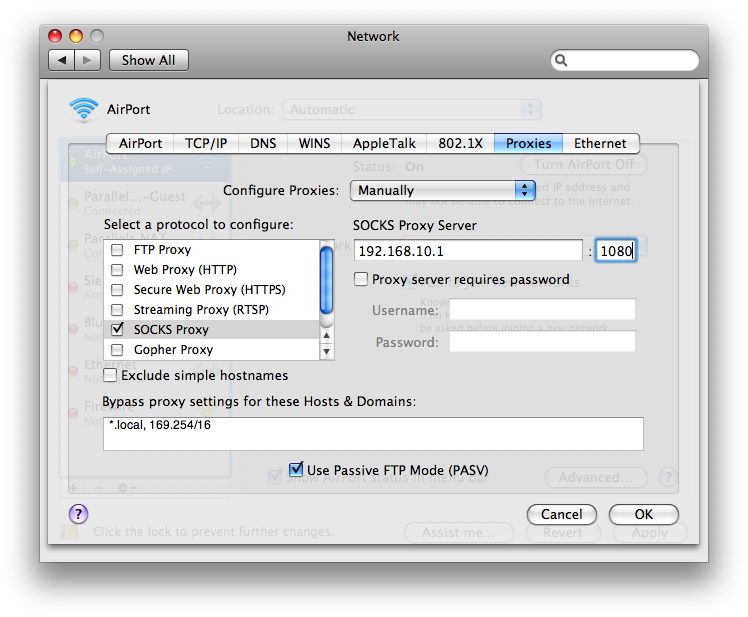
Step 6: Now click the "Proxies" tab and select and enable the SOCKS Proxy option, specify your iPhone's IP (which you will configure on your iPhone later) for the Proxy Server and enter 1080 for the port field. If you used 192.168.10.2 for your Mac, you would want to use 192.168.10.1 for your iPhone (and the "SOCKS Proxy Server").
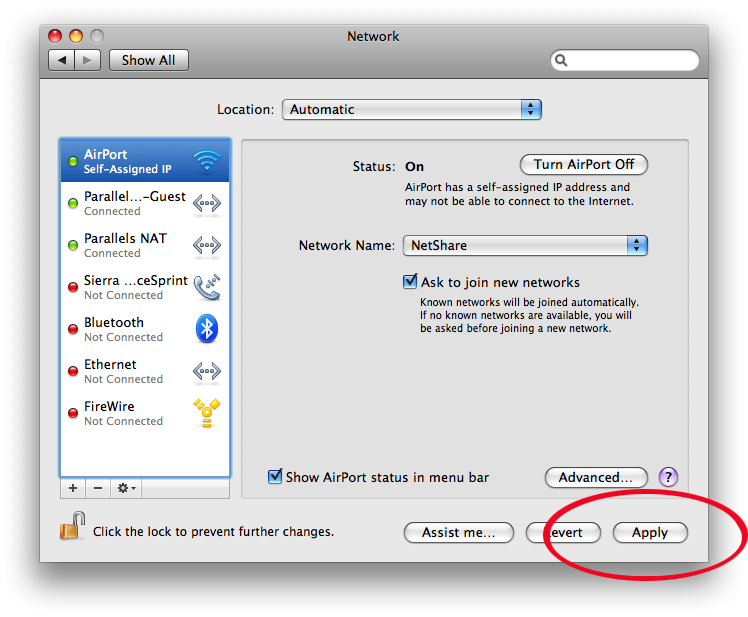
Step 7: Now click "OK" and then click "Apply." Your Mac is now configured. Time to configure your iPhone.
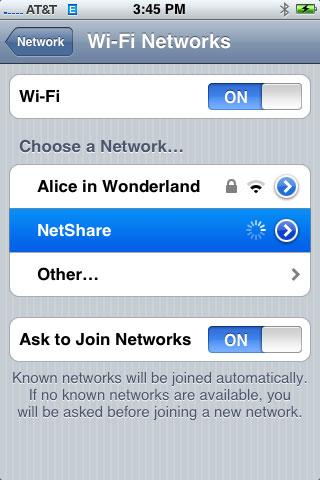
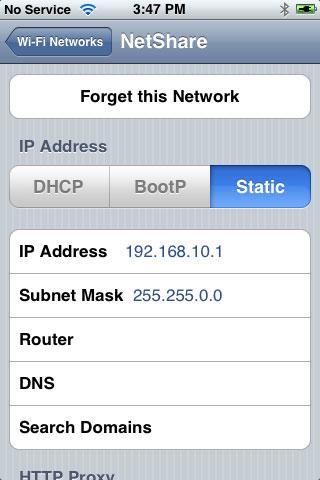
Step 8: Now, go to "Settings" on your iPhone and select the "Wi-Fi" option. Click the blue Arrow next to the Wi-Fi network you selected and choose "Static" for the "IP Address" option.
Step 9: In the "IP Address" field enter the iPhone IP address you entered into your Mac earlier (192.168.10.1).
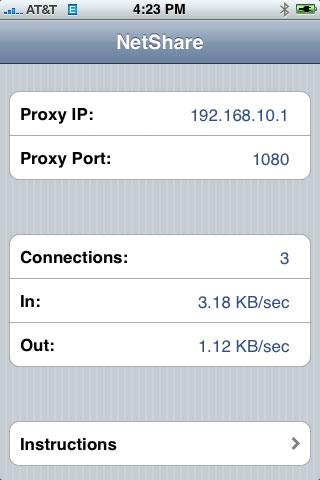
Step 10: Now hit the home button on your iPhone, launch the NetShare app and try and access a page on your Mac in Safari. You should be all set.
Tips for easier switching between Wi-Fi and a NetShare connection
If you purchase NetShare, chances are that you'll be using it only in the event that Wi-Fi or a faster Internet connection is not available. Therefore, you'll find it easier to switch back and forth between a standard Wi-Fi connection in your home and a NetShare connection if you create a separate network connection for NetShare in your Mac's Network system preferences before completing the steps above.
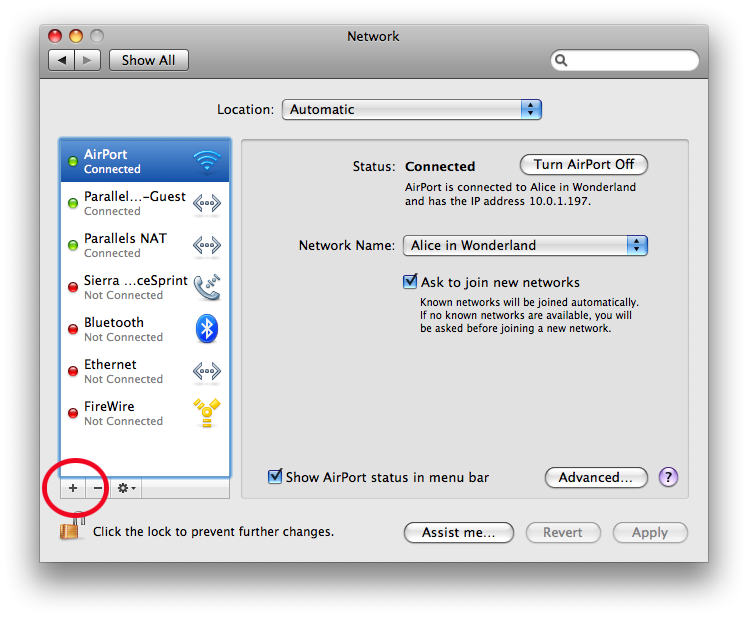
To to do, click the + button below the existing network connections in your Mac's Networks preference pane.
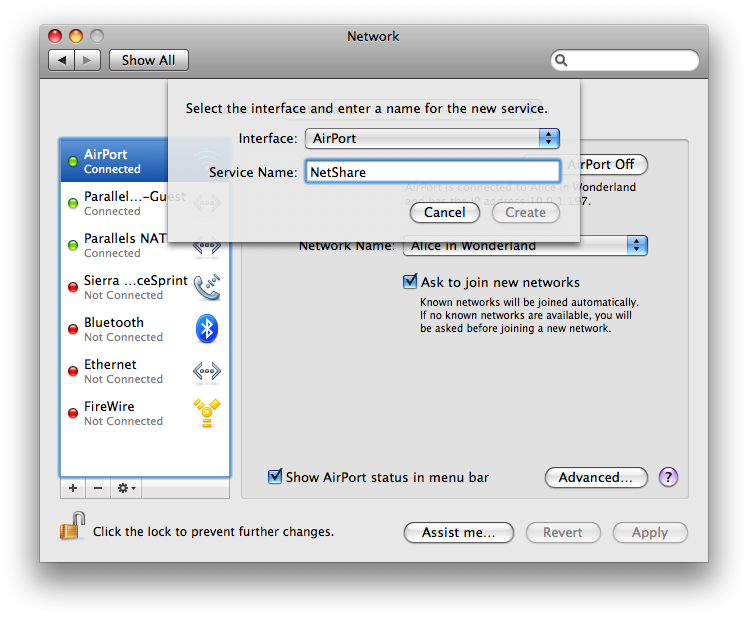
Leave AirPort selected as the network interface and put "NetShare" for the service name.
You should now see a "NetShare" network connection option in your Network preference pane. Select it. Choose "Create Network..." and then skip to Step 3 from above.
Switching between Wi-Fi and NetShare connections
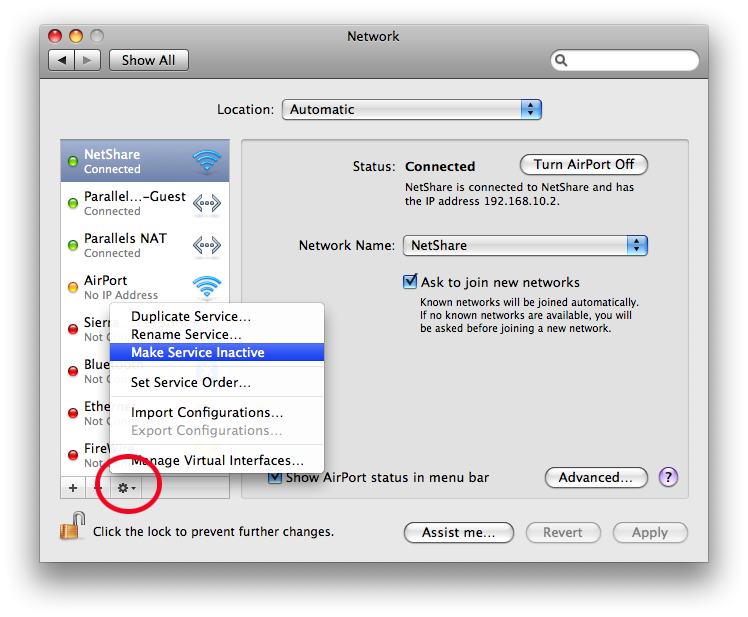
Once you have network configurations for both your Wi-Fi (AirPort) and NetShare, you can switch between them more easily by deactivating one and activating the other via sprocket-like button.
Troubleshooting
We've found that NetShare won't function properly on a slow EDGE connection, even if configured correctly, if you don't establish a quick EDGE connection just prior to launching the NetShare app in the middle of Step 10. So just before launching NetShare, launch Safari on your iPhone and load any webpage. Once the iPhone has established an EDGE connection and is downloading the webpage, hit the Home button, launch NetShare, and then try and access the web via your Mac again. It should work this time.
iChat
When using iChat with NetShare, be sure to enable the "Use Proxy" option in iChat's preferences.
 AppleInsider Staff




 Amber Neely
 Thomas Sibilly
 William Gallagher
 Malcolm Owen
 Christine McKee






55 Comments
Apple needs to make this type of thing easy for all. Creating networks should be piss-easy, even for computer illiterate. This is 'slightly' different, but you get the point.
I need intructions on how to do it with my PC... I tried a few random things I thought were similar to the MAC but I cannot get it to work. Anybody have it working on a PC? lol I know everyone in this forum hates Microsoft I personally have no problem with them. So any help would be fantastic! I am not very computer savey and I need help! Thank you
It just works…
What a lot of faffing about for something many other phones achieve with a but more ease.
C'mon Apple, make this easier!
It just works…
What a lot of faffing about for something many other phones achieve with a but more ease.
C'mon Apple, make this easier!
Except that the App has been pulled from the App Store because, if what others say is correct, AT&T does not allow tethering of the iPhone.
Edit: Doh!
One must read everything there is to read on a minute-by-minute basis in order to have half a clue what is going on in this business.
The app apparently made a re-appearance on the App Store, which AppleInsider no doubt took into account before posting this in-depth review of the process required to get the app working.
I'm sure this will be easier with successive iterations of the software.
I am actually quite surprised how lax apple is about the apps on the App Store. I think Apple is pushing the legal limits of ATTs tethering rules. I wonder if this is not actually considered tethering since it is essentially moving data (backwards) over a virtual tunnel that the iPhone connects to. This is different then the computer actually connecting to the iPhone as a host. Sneaky stuff....I like it.
Oh and by the way people, chill out about it being hard to use. How hard is a one time spoon fed step by step process. Given the circumstances you should be impressed this software even exists. Good job Apple and NetShare.