Whether it's to fix problems with your Mac, or get it ready to sell on to someone else, macOS Recovery, also known as Mac Recovery Mode, is a powerful tool to help you.
It would be great if Macs just worked, and kept on working, but sooner or later you do hit problems and they can be severe ones. There can be any number of issues with your drive, or maybe there's a bug means you want to revert to an older version of macOS. Equally, you can have bought a secondhand Mac — or be about to sell yours that way.
If you have a Mac with a T2 Security Chip, then you have to use macOS Recovery Mode if you want to have the Mac boot from an external drive. For security, macOS Catalina simply will not boot from an external drive, unless you go through this process.
For that and each of these cases, there is macOS Recovery.
Apple introduced macOS Recovery, sometimes called Mac Recovery Mode, with Mac OX X Lion back in 2011. During installation, when you're setting up a drive, macOS effectively sets up second one. It partitions your drive so that as well as the main volumes you work from, it can also be booted from this separate recovery volume.
This won't help you if the physical drive is damaged somehow, but it's much more likely that the Recovery HD partition will be there untouched and working. In theory, you could go through your entire Mac-using life without even noticing that this partition is there, but you won't.
What you can use macOS Recovery for
- Erase the Mac's boot drive
- Run Disk Utility to repair that boot drive
- Make a problematic Mac startup
- Install an older version of macOS
- Setup a modern Mac to boot from an external drive
How to start up Mac Recovery Mode
The key to using macOS Recovery is to restart your Mac in a particular way. You boot up the Mac into this recovery mode, and you will probably do it at least a couple of times as you sort out problems. So there's a restart procedure to get used to, and you may need to get a USB keyboard for a Mac, or use the built-in one on a MacBook Pro, or MacBook Air.
Wireless keyboards can work, but not reliably. In our testing, Apple's own wireless keyboards tend to work better than third-party ones.
- Restart your Mac
- Immediately hold down Command-R
- Release them as soon as you see the Apple logo
You may find it difficult to time this just right. There's a definite art to holding and releasing Command-R at precisely the right moments. However, if it's not working for you, try a Shut Down rather than a restart. Wait a moment, then press the power button and get ready to hold these keys.
If it's that your Mac is frozen, or for any reason you can't choose Restart from the Apple menu, press and hold the power button so that it switches off. Don't do this casually: it's a last resort. Then wait a moment, press the power button back on, and press Command-R.
It's Disk Utility that you're most often going to use.
All modern Macs will show you an Apple logo during the startup, and this is when you need to release the Command and R keys. If you instead see an icon of a folder with a question mark in it, power off for around 10 seconds, then try again — but be quicker at holding Command-R, or slower at releasing that.
Depending on how your Mac is set up, you are likely to be asked for a password. This is the password that you use to log in to your Mac, if you are the only or an admin user. Note that it's not your Apple ID, it is specifically the password for this computer.
What happens next
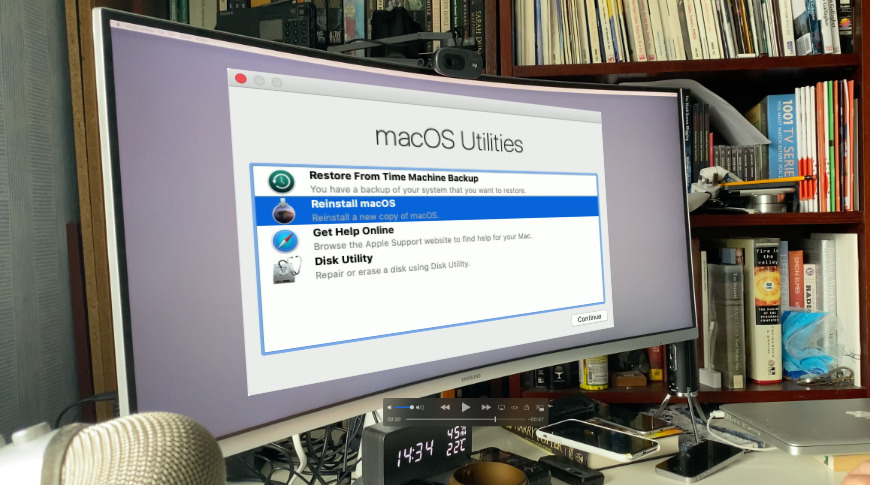
Your Mac will continuing starting up until it has completed booting from the Recovery HD. The way you'll know that has happened is that instead of your regular wallpaper, Dock and mess of files on the Desktop, you get a single panel.
It's the macOS Utilities panel and it contains the three most commonly used options for when someone has started up in Recovery Mode — plus a help guide. That help is a link to Apple's support documentation online, and it may well be what you need, but you can read those pages off your iPhone.
So the three useful features are Restore from Time Machine Backup, Reinstall macOS, and Disk Utility.
They're just probably listed in reverse order of usefulness. You've gone into Mac Recovery Mode because there's a problem, and that typically means a drive problem. In which case, the first thing you need to do is run Disk Utility.
This examines the drive you tell it to, and it will repair many potential problems. It typically can't repair the disk your Mac has currently booted from, but that's why you've booted into this Recovery HD.
Once the drive appears okay, you should restart your Mac and check it out. If the problems have been fixed, you're fine. And if they haven't, go back into Mac Recovery Mode — but possibly in a slightly different way.
If you know that you want to wipe the Mac's main drive, which you can do with Disk Utility, you can also then restore from a previous Time Machine backup. However, if you instead know that you want to reinstall macOS, you can do it without going through this panel.
Instead, restart your Mac using one of two possible key combinations. Choose Option-Command-R as soon as the restart begins, and hold it down until you see the Apple logo. This will then automatically upgrade your Mac to the latest version of macOS that it can support.
Alternatively, you can choose to press Shift-Option-Command-R. That automatically installs the version of macOS that came with your Mac. It's possible that Apple may have chosen to stop allowing that particular version to be installed, but if so, this key combination will see you getting the closest version to it.
That's typically a way to revert from a recent macOS update, back to one that you know works.
Recovery mode's extra options
While you may well find that these three main options provide all you need, there are more — and they're surprisingly easy to miss. Since this macOS Utilities panel opens up as the sole thing on your screen, and especially as it sits squarely in the center, you tend to concentrate on it, and can readily fail to even spot that there is a menu bar.
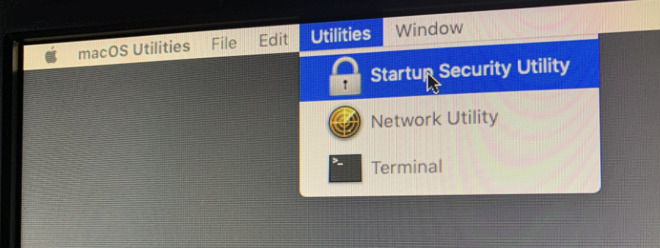
Seriously, you can miss that these are here, but there are powerful extra tools in Mac Recovery Mode
This macOS Utilities panel is a Mac app and so it has a Mac app's menus with the familiar Restart or Shut Down under the Apple menu. If your Mac is a recent one, those menus will also contain extra options that are necessary to solve certain problems.
- Startup Security Utility
- Network Utility
- Terminal
Previously, Terminal would be the most popular because it allows experienced Mac users to run scripts examining the hard drive. Network Utility reports details on your internet or other network connection.
Now, though, it's likely that the Startup Security Utility is going to be the most often used. This is tied to the T2 security processor in an increasing number of new Macs, and that processor has one impact that experienced users will not like. By default, a Mac with a T2 chip, and running macOS Catalina, cannot boot from an external drive.
You have to explicitly tell it that you want to do this, and you do that in this utility. Here's everything you need to know, to do, and to be concerned about when using it to let Catalina boot from an external drive.
What to do when Mac Recovery Mode doesn't work
If your Mac's drive is physically damaged, or there is anything corrupted with the copy of macOS on your recovery partition, the regular Mac Recovery Mode will not boot. However, instead of using the Recovery HD that's meant to be on your drive, your Mac can try to use one held on Apple's servers instead.
This may happen automatically. During the restart, if the familiar Apple logo is instead replaced by a spinning globe, your Mac is attempting to enter Recovery Mode over the internet.
You can force it to do this anyway, though. After you've tried entering Mac Recovery Mode and it's failed, restart you Mac yet again. This time, use the key combinations that install different versions of macOS. So that's Option-Command-R to get the latest version, or Shift-Option-Command-R to get the one your Mac originally shipped with.
It isn't quick. While it's working, though, you will see a progress bar underneath the globe. If it fails on you, that bar disappears, and an exclamation mark appears over the globe.
You could be lucky. It's worth leaving the Mac for now and trying again later, because it could just be an internet connection problem.
If it isn't, then you've exhausted what Mac Recovery Mode can do, and you'll need to look at booting from an external drive. Or taking the Mac to an Apple Store to have it fixed.
Keep up with AppleInsider by downloading the AppleInsider app for iOS, and follow us on YouTube, Twitter @appleinsider and Facebook for live, late-breaking coverage. You can also check out our official Instagram account for exclusive photos.