Get your Mac to rearrange all of those overlapping document windows you've got, and instead make it possible to see what you need, when you need it.
Long, long ago, when Windows was taking its first faltering steps out into the world, it had a problem. It wasn't allowed to have overlapping windows, they had to all slot together like tiles. As an attempt to keep Windows from taking over the world at the expense of the much better Mac, it failed.
As a dreadful idea, though, it persisted. To this day, there are people who not only like tiling windows, they lament that you can't do it on the Mac. Now that we're no longer on tiny 9-inch Mac screens or low resolution ones, though, these people do also have a point.
Today you're far more likely to have multiple windows open at the same time than you were back then. And computers are supposed to make work easier, not harder, so there is a very solid point to be made that your Mac ought to be able to help you. Your Mac should be able to sort out the mess of overlapping windows and show you what you need, when you need it.
It can. Not only can a Mac do this, but there are four different ways to manage your windows like this — and they each have strengths and weaknesses.
Apple's own solution
Macs have always been great at remembering where you left a window on your screen, whether it was filling it or over to the left. They've always been great at remembering what size you had a given window from any app.
So if you are disciplined enough, if you have a big enough monitor, and if you tend to always do the same sorts of work each day, you could just drag windows to where you want and leave them there.
However, most of us have different responsibilities and are using different apps. And then many of us are using Microsoft Word.
One of Word's more erratic features is that will sometimes abruptly stop respecting where you dragged a window, or what size you decided to make it.
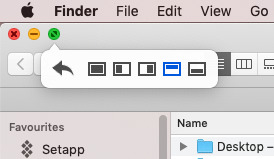
Apple's Split View on the Mac is useful but confusing, especially as you get in and out of it.
So if you do, say, financial work in the morning and graphic design in the afternoon, or if you just use Word, it's worth using the semi-automatic window management Apple provides.
The feature is called Split View and ultimately it means you can have two documents, or two of any window, filling half the screen each. It's great for comparing documents, it's excellent for helping you concentrate on just two windows to the exclusion of everything else.
Unfortunately, it's clunky to get into, and a royal pain to get back out of. It's especially tedious when all you want is to change one of the two documents you're looking at.
That's because macOS's Split View is really leveraging the separate Spaces feature. Spaces is superb for helping you organize different sets of work, but it's confusing when it's imposed on you by Split View.
Nonetheless, Split View does work as a temporary way to work on two windows. And Spaces is good for setting up several different workspaces. Even if you move on to the other methods of managing your windows, Spaces is useful.
Third party window managers
Usually it's on Windows where you find that the operating system doesn't do something and you need to buy a third-party app. This time, that's the case with the Mac, and the dedicated third-party window management app you should look at is Moom.
There are alternatives such as Magnet, which is currently on sale for 99c in the Mac App Store, but the $9.99 Moom is particularly good and for years has been the one to get.
Hover your mouse over the green dot in the top left corner of any window, and Moom offers you a pallet of options. With one click, you can have that window occupy the whole left half of your screen or the whole right side.
Hover over the green button and Moom pops up a menu offering to move the window to the sides.
You can have it take up the bottom half of the display, or the top half. And you can instead choose have the app fill the entire screen.
Perhaps the most useful option, though, is a sixth one that appears whenever you've used Moom to move the window. It's a backward-facing arrow and when you click on that, the window jumps back to wherever it was before you used Moom.
So you can very quickly rummage through windows looking for what you need and then arranging them where they're most use on your screen.
It's definitely well done, and if you'll benefit from this window management a lot, it's certainly worth buying Moom. However, Moom's sole job is to manage your windows like this.
Other utilities
There are other third-party utilities that have been doing this as just one part of their many other features. Up to now, it's been tempting to buy one of these because you're getting more functionality, and because it's a single app to learn instead of two.
They can also be a single app for a developer to concentrate on. For instance, there is still a dedicated window management app called BetterSnapTool which costs $2.99 in the Mac App Store. It has a sister app called BetterTouchTool, which contained some useful but rudimentary window management tools.
Now, however, BetterTouchTool has become the window manager to get because it has gained all of BetterSnapTool's abilities and added them to its own powerful features.
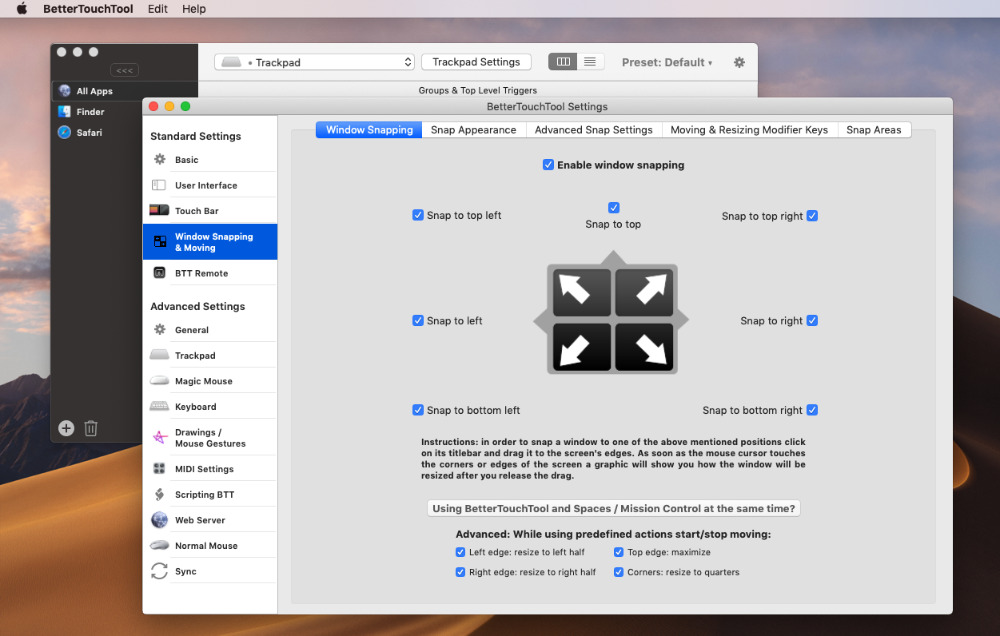
BetterTouchTool has radically increased its window management features
BetterTouchTool is an app for getting more out of gestures on your Mac's mouse or, especially, trackpad. It long ago added some basic window management so that you could drag a window to right or left, top or bottom, and have it snap to fill that space.
What's been brought in from BetterSnapTool, though, is that you don't have to just drag to the edges of your screen. Instead, you can create specific areas where you want app windows to go.
If you sometimes write in Word, sometimes in Final Draft, sometimes in OmniOutliner, but you always want your writing area to be a particular spot on your screen, tell BetterTouchTool.
You do that by moving and resizing any app window — other than the BetterTouchTool preferences — to where you want on your screen. Then use the BetterTouchTool icon in your Mac's menu bar, choose Snap Areas (Advanced Feature). Click on Create New Snap Area (Use Active Window as Template).
This defines the destination position. Next it prompts you through creating a trigger area, a spot on the screen that will make BetterTouchTool snap your window into this destination. It defaults to being in the center of your display, but you can re-position this target wherever you like.
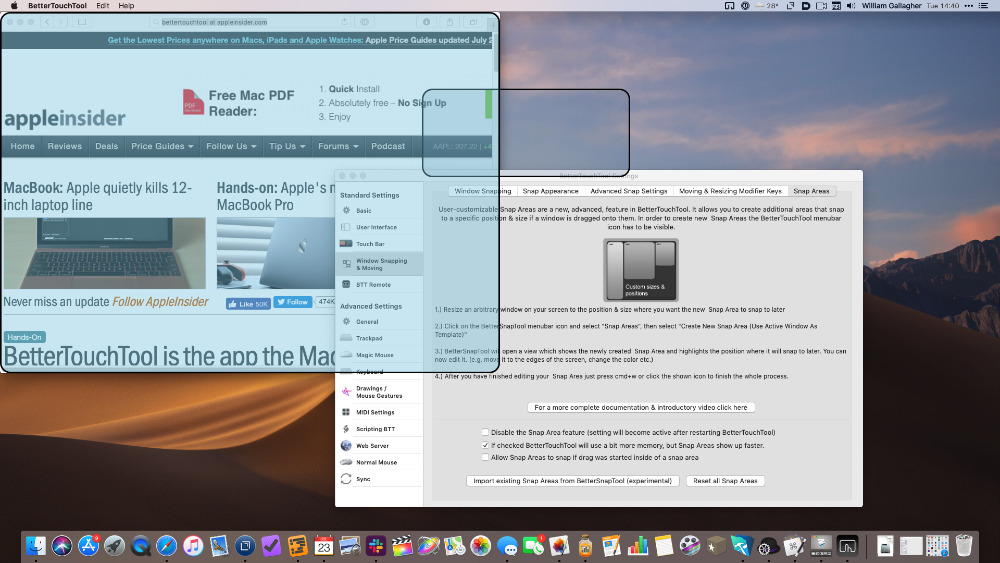
BetterTouchTool. The small blue rounded rectangle is a target that appears whenever you move a window. Drag the window onto that target and it snaps to your predefined size and position (the larger blue area).
It's ridiculously powerful, especially given that none of this is what BetterTouchTool is sold for. The window management is just a sideshow to its main features, and yet it's worth buying the whole app just for these.
Similarly, it's unquestionably worth buying Keyboard Maestro for all the things it can do, and that does include window management. Keyboard Maestro is more complicated to get into, though, and of the myriad things it can do for your Mac, moving windows around is maybe the least obvious thing to set up.
One more way
You get Apple's macOS window features for free with your Mac. Moom costs ten bucks. BetterTouchTool is available via Setapp, or for a preposterously low $7.50 direct from the maker. And Keyboard Maestro costs $36.
You can get some of these same benefits, though, for a mere 1,000 to 2,000 bucks.
Certain large monitors, particularly the so-called Ultrawide ones, now come with a form of window management built in.

While the way they do it varies, broadly speaking they all divide your monitor into separate zones. Each of these zones acts like a complete display on its own, and you can choose to limit an app's windows to one of them.
It works, but one of the benefits of spending a lot of money on an ultrawide monitor is that you can spread your work out in any way you want.
So even if you have need for an Ultrawide, and it makes economic sense to spend that amount, spend an entire $7.50 extra and get BetterTouchTool to go with it.
Keep up with AppleInsider by downloading the AppleInsider app for iOS, and follow us on YouTube, Twitter @appleinsider and Facebook for live, late-breaking coverage. You can also check out our official Instagram account for exclusive photos.


