Apple has finally launched iCloud Drive Folder Sharing, so it's time to see if it's the Dropbox alternative it promised to be. Here's what you can do with it, and how to do it.
Apple has finally given iCloud Drive not only the single most significant feature it was missing, but the feature that has been promised since iOS 13, iPadOS 13, and macOS Catalina were first announced back in June 2019. You can now share an entire iCloud Drive folder with someone else. That means iCloud Drive is now functionally on a par with Dropbox, on paper, at least.
You have always been able to share a single file that you've stored in iCloud Drive. While it took a couple of steps, you could nominate a person you wanted to collaborate with on that file, and then invite them to share it with you. It worked, it worked fine, it just wasn't a lot of use.
For you had to do this with every single file on its own, sharing over and over again. And it was also unsatisfactory because all users had to organize their files in their own way. What we wanted, and what has made Dropbox so successful, is the ability to nominate a folder and let everyone use it.
That's what we've got now. One person creates a folder, then shares it with anyone else they need to. Thereafter, anybody in that group can read any file that's in the folder, and they can add files to it, they can remove it, too.
It does still take a few rather cumbersome steps to get going, though.
What you need first
You and everyone you want to share a folder with must be running iOS 13.4, iPadOS 13.4, macOS Catalina 10.15.4, or later. Even though you are the one originating the sharing and so must have the operating system that includes iCloud Drive Folder Sharing, each of your colleagues needs it too.
In theory, all they really require is an Apple ID — and if they don't have one, they are prompted to create it when you send them an invitation. In theory, this does mean that they could share your folder without even being on a Mac, or an iOS device, but in practice they're never going to do it.
Where Dropbox just works on all machines, to share an iCloud Drive folder with someone who isn't on Apple gear, they would have to keep going to iCloud.com on their PC. And they just won't. Compare logging on to a website against the way Dropbox integrates with all the other folders on your computer.
For all practical purposes, iCloud Drive Folder Sharing is solely for Apple users.
How to use iCloud Drive Folder Sharing on an iPhone, iPad, or iPod touch
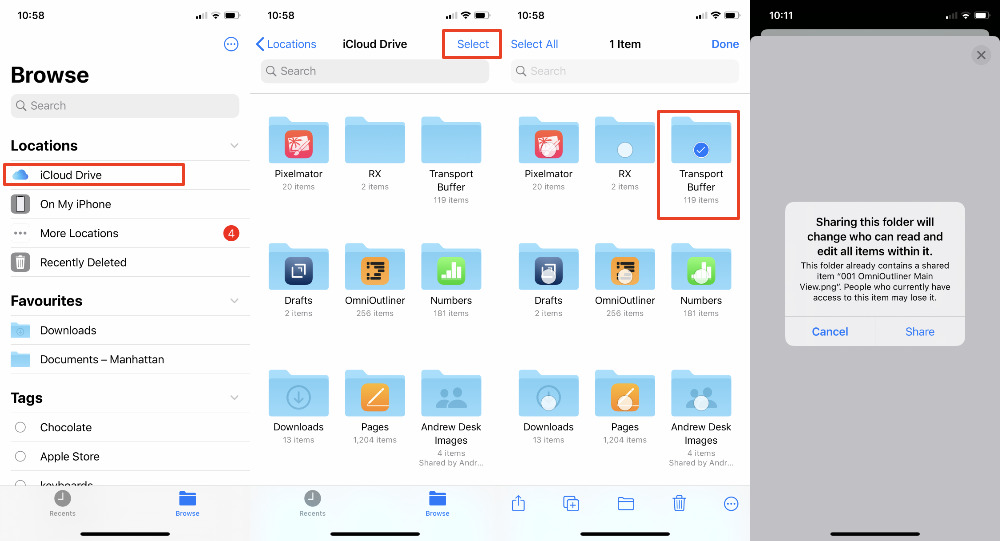
Start in the Files app on your iPhone or iPad.
- Tap on Browse
- Choose iCloud Drive in Locations
- Find the folder you want to share
- Tap Select in the top right corner
- Tap on the folder
- Tap the Share icon at bottom left
- Tap the Add People
The Add People part is easy to miss because it's in the list below the icons for people you can share with, and below the list of apps you can share via. But it's important, because it's through this option that you specify what people can or can't do with the folder.
Selecting which folder to share
You're reminded that if you share a folder, then it changes what may have already been set up for that folder. If it includes a file that you have previous shared by itself, for instance, you will be warned that sharing the whole folder could mean previous collaborators will lose their access.
It's not clear why that would be the case, why a previous single-file sharing wouldn't just adopt the new sharing settings. Or why you can't be asked whether you want to inform the previous collaborator. However, at least you are warned, and iOS will tell you one of the files that's affected.
Choosing who gets what
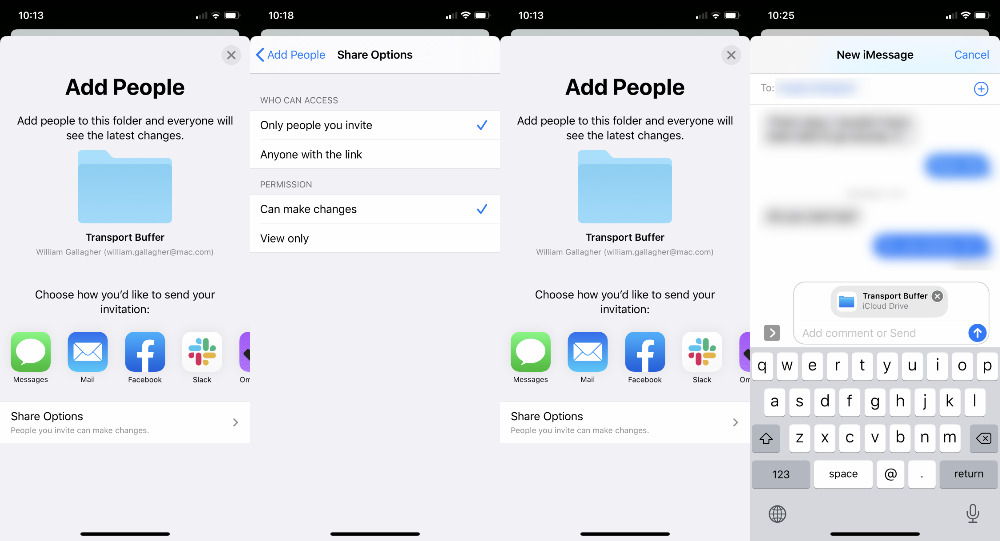
Tapping Share, now opens the full Add People dialog. Except that you're still not actually at the stage of adding people just yet. Instead, you get options for how you will tell them, and what they will be able to do once you're sharing a folder with them.
It is oddly cumbersome, though. You would think that if you choose to let anyone with a link read your shared folder, that iCloud would just give you the link to send them.
Equally, you might well think that before you pick who you want to share a folder with, you'd have to decide whether it's read-only or people can make changes. The business of how you invite someone, whether it's by Messages or email, for instance, seems the last step, and yet it's the first thing on your screen.
Even so, ignore the order Apple proposes and instead of choosing how you'd like to send the invitation, first go to Share Options below that.
You tap this to set permissions. You can let someone be limited to just seeing the folder, not adding, removing or changing files in it. Or you can give them full access, by choosing Can make changes.
There's also the ability to either allow the sharing to happen exclusively with people who you have directly invited — or anyone who has a link to the folder. You'll probably most often use the former, and it is the default, as that means you have control over who has access.
You might, though, need to create a shared folder for your whole team, and if that team changes a lot, you can just include the link in a new member's induction email.
Then tap on Add People at top left to go back one screen, and now choose how to invite someone. The options for how you invite them are the regular set of Messages, Mail, and so on, though it also has choices to do with third-party apps you have. Some of that seems odd, though, as alongside clear messaging services such as WhatsApp and Slack, you may be offered the option to send via the Kindle app.
Even though that surely won't do anything, and it's more a function of this being built on iOS's regular Share sheet, once you get used to the sequence, it makes a kind of sense. Add People, skip to what access you want to give them, then go back to how you want to invite them.
Except this works only if you are actually inviting someone. If you want to create a link, it's harder. You need to go through this process of directly inviting someone, and then cancelling it before you actually send the invitation.
Seriously. In the Share Options screen, tap Anyone with the link, and then go back to the Add People page. Tap on Messages, or anything really, and let iOS create a message that contains the shared folder. Don't even bother picking someone to send the Message to, just come right back out of the Messages app.
And now when you go to Add People, there's an option for Send Link. Tap on that and you go back around to the choosing of how to invite someone, and it's confusing enough that you will loop around this more than once before you're used to it.
Inviting someone
Whether you've got to it via the initial Add People screen, or you've gone through these hoops to get a Send Link option, you next need to choose how you send someone an invitation. Tap on Messages, Mail, or any other option.
Add the person or people you want, and tap the send button. Note that if you have done this before setting any of the Share Options, your recipient will get full access.
Ending sharing
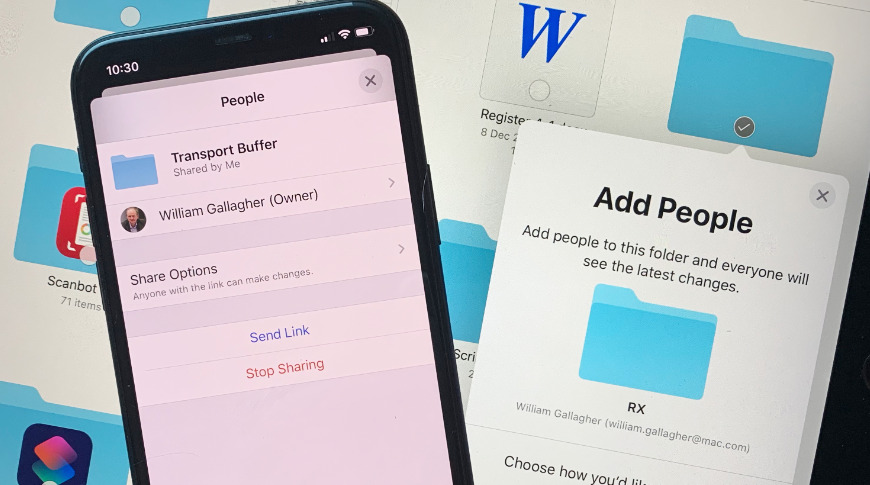
If you regret giving them access, or your shared project is over, you can go back into Files and stop the sharing.
Now rather than going into the Add People section, tapping that Add People option instead shows you details of the existing sharing. So you'll have a list of people you're sharing with and can make chances to what they can do with the folder.
Choosing who to share your folder with, and what they can do with it
That includes changing them from read-only to full access, or removing their use of the folder completely. Similarly, you can also select Stop Sharing here, and that switches it off for everyone.
How to use iCloud Drive Folder Sharing on the Mac or iCloud.com
You can also set up iCloud Drive Folder Sharing on the Mac, or via iCloud.com in a browser. In both cases, the principle is the same. You set the permissions, choose the method of inviting people, and then select who gets the invitation.
On the Mac, you need to first choose iCloud Drive from the Finder window's navigation bar, and then find the specific folder you want. On iCloud.com, you start by logging in and then opening iCloud Drive.
The fine print
Even if you give everyone full access to a folder, you are still the owner, and this means a couple of things. First, and perhaps most significant, the folder only takes up space in your iCloud Drive. If you have a 1GB file in a folder that you share, it only takes up 1GB of your iCloud space, not for anyone else in your shared group.
Similarly, you are the only person who can actually delete the whole folder. If a shared user tries to do that, if they delete it on their Mac or iOS device, they really just remove their access to it.
Lastly, where you previously had to specifically nominate every single Pages, Numbers, or Keynote file that you wanted to collaborate on, now it's almost the other way around. Any such document that is in a folder you've shared, is now a collaborative one, and your fellow users can work with you on them.
Keep up with AppleInsider by downloading the AppleInsider app for iOS, and follow us on YouTube, Twitter @appleinsider and Facebook for live, late-breaking coverage. You can also check out our official Instagram account for exclusive photos.