In those times where you have your hands full, you'd probably want some way to control your Mac verbally. Here's how to get started with Voice Control.
One of the problems of everyday life is that sometimes you are encumbered with a task that prevents you from properly using your computer with both hands. While this could be as serious as a medical condition or a disability, it can also be from a more mundane and temporary issue that hampers your computing capabilities.
For some users, it could be something as simple as needing both hands for feeding a baby or to prevent a kitten from interfering with someone else's practical task. Even eating in front of the screen can get in the way of doing work.
To solve this problem, Mac users should turn to a feature known as Voice Control.
What is Voice Control?
An accessibility feature introduced in macOS Catalina, Voice Control simply provides users with ways to control their Mac using their voice. By speaking commands, the Mac can then act on those instructions.
By that description alone, it sounds quite similar to making Siri queries, in that you're speaking to the Mac with an expectation of something being done for you. This isn't a great comparison, as while Siri can be useful for general queries or tasks it is programmed to perform, Voice Control is much more direct in how it works with macOS.
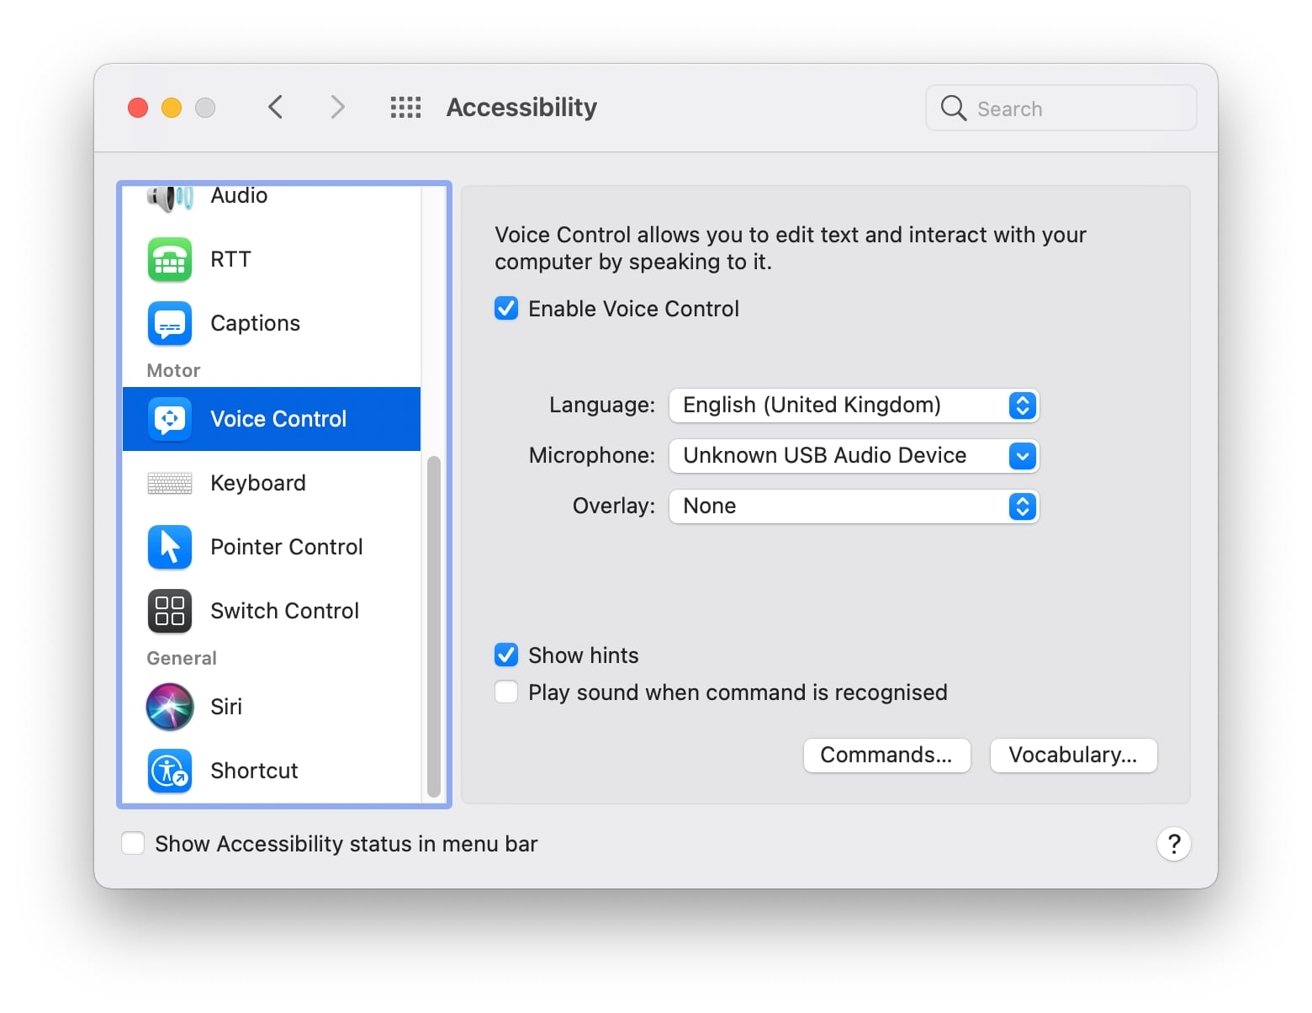
You can find Voice Control in the Accessibility menu.
When using Voice Control, you're effectively instructing the Mac to do a particular thing. For example, you can tell macOS to open a menu in an application, click an option from a list, or drag items from one designated part of the screen to another, all with voice.
It can also apply to practically any application you can run on macOS, without requiring Siri-friendly hooks or other items. Ultimately, it turns your voice into a simulated mouse.
Getting started with Voice Control
To use Voice Control, you first have to enable it. Naturally, it is within the Accessibility section of System Preferences.
How to turn on Voice Control in macOS
- Click the Apple logo in the menu.
- Select System Preferences.
- Select Accessibility.
- Scroll down to Voice Control in the left-hand sidebar.
- Click Enable Voice.
- If required, authenticate with the Mac to confirm you want it activated.
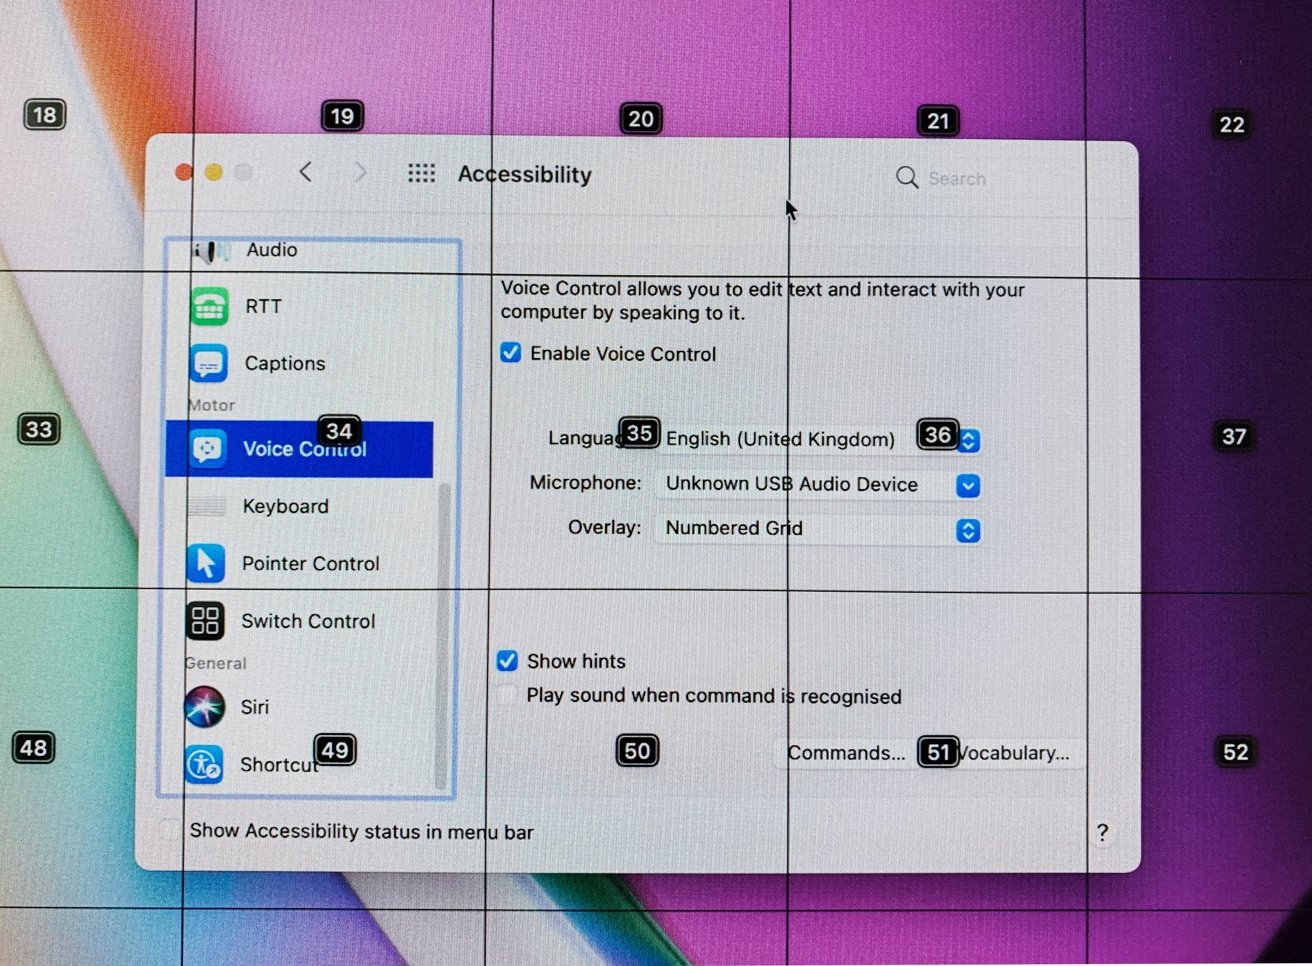
Once enabled, a microphone icon will appear on the desktop, showing the detected volume of the selected microphone. You can change the microphone by using the Microphone dropdown within the Accessibility screen, while another dropdown will let you switch between different installed languages that will work with Voice Control.
You can quickly start and stop Voice Control detection by saying "Wake up" or "Go to sleep." Alternately, click the Wake Up or Sleep option on the aforementioned microphone icon.
Overlays
Another dropdown box called "Overlay" will give you the option to permanently show two different types of overlay, which will be crucial to the Voice Over experience.
Item Numbers
The first option, Item Numbers, will add a series of numbers next to selectable items on the screen. This can include icons, options within a menu, and individual files in a folder.
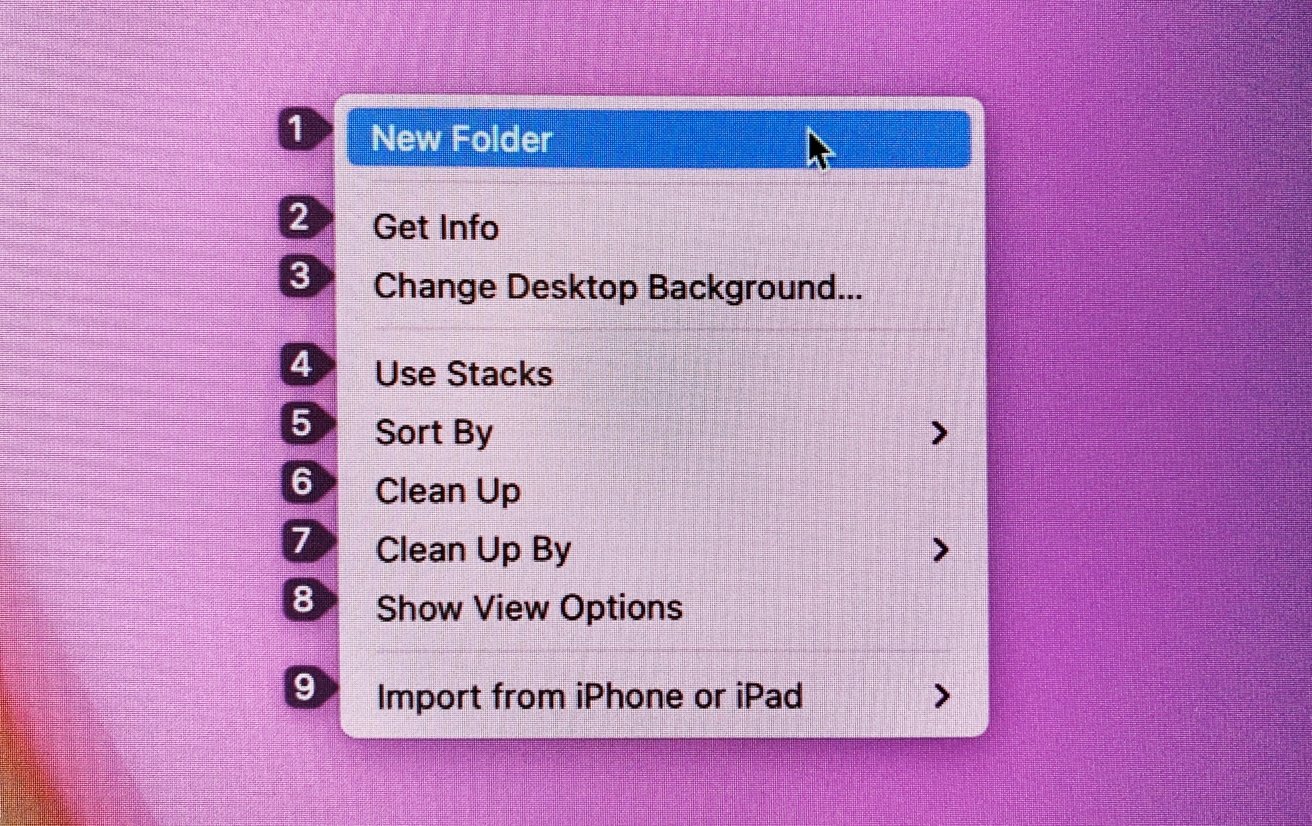
It's easier to say "Click 8" than "Click Show View Options"
This is useful as you can instruct macOS using numbers rather than the name of options. For example, it may be easier to say "Click 25" than to say "Click familyholidaytripbarcelona2019-1.jpg" and hope to be understood.
Rather than permanently on, you can leave this off and summon the numbers whenever you want by saying "Show numbers." They will also automatically appear in menu lists, even if the option isn't selected.
Numbered Grid
The other main overlay option, Numbered Grid, creates a grid that covers the entire macOS desktop, including applications. Each grid space is numbered, with the idea being that it can be used to select specific points in the desktop like you would a mouse.
Instead of being on permanently, you can ask macOS to Show grid" to bring it up temporarily, or alternately "Show window grid" to limit it to the currently active window.
You can use grid numbers to say where on the screen you want to click.
If you say a grid number, macOS will then subdivide the cell down into a smaller grid, which you can then again say a number within to narrow down further until the required area is selected. To help see the smaller grid, you could say "zoom" then the cell number to zoom into that area.
To select an item in a cell, narrow down to it and then say "Click." If you want to drag an item, you can use the "Drag" command, such as "Drag 38 to 2."
If you want to see the grid without numbers, state "Hide numbers." To hide the entire grid overlay, say "Hide grid."
Dictation
If you are using a word processor or another application where text is involved, you can naturally use Dictation within Voice Control to say sentences. Like Siri dictation for messages, you can make a statement, and it is interpreted and inserted into a document or a text box.
Before dictating, make sure you have selected the application or text box in a place where text can be edited.
You can add punctuation to a sentence by saying "period" or "question mark." Emoji can also be added, by saying the emoji's name, along with formatting such as "Bold that" or "Capitalize That."
There are many commands you can use with Voice Control, and many variations of things to say too.
You can select text verbally by saying something like "Select previous word," though this can also apply to paragraphs and sentences. "Move up a sentence" or "move up a paragraph" can quickly move the cursor around within a document.
Deletion is also available, such as "Delete all" to wipe a document or "Delete that" to remove the last thing you uttered.
If you want to replace text, you say Replace" followed by the words you want to change, followed by "With," then the words you want to use instead. For example, "Replace tenth birthday with eleventh birthday."
Commands
As well as treating Voice Control as a mouse, you can also ask it to perform from a very long list of commands. You can bring up a list of commands you can use straight away by stating "Show commands."
The list is extensive, including opening and closing applications by name, creating and saving documents, selecting different fields in a form, and various forms of clicking, selection, and deletion.
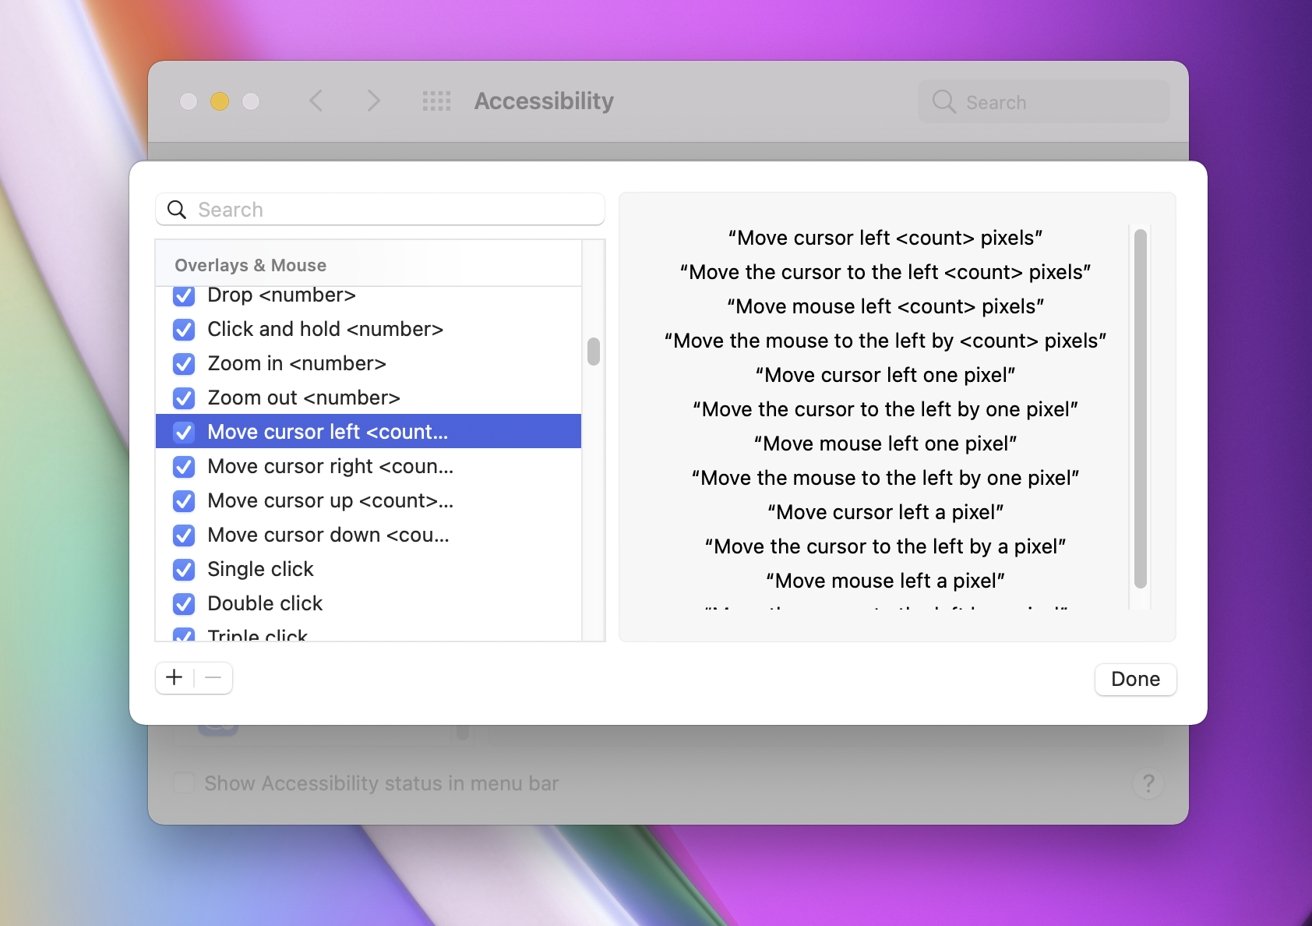
The list also includes lots of fine-control options, such as moving the cursor in a direction and by a specific number of pixels.
You can bring up a quick list of commands any time, and you can even create your own custom versions.
If you want to see alternate versions, you can click the Commands button within the Accessibility menu. Select an item from the list, and it will show all of the different ways you can say a command for macOS to interpret it correctly.
If you are getting repeated misinterpretations of a command, you can disable the command in the same menu by unchecking the box next to it.
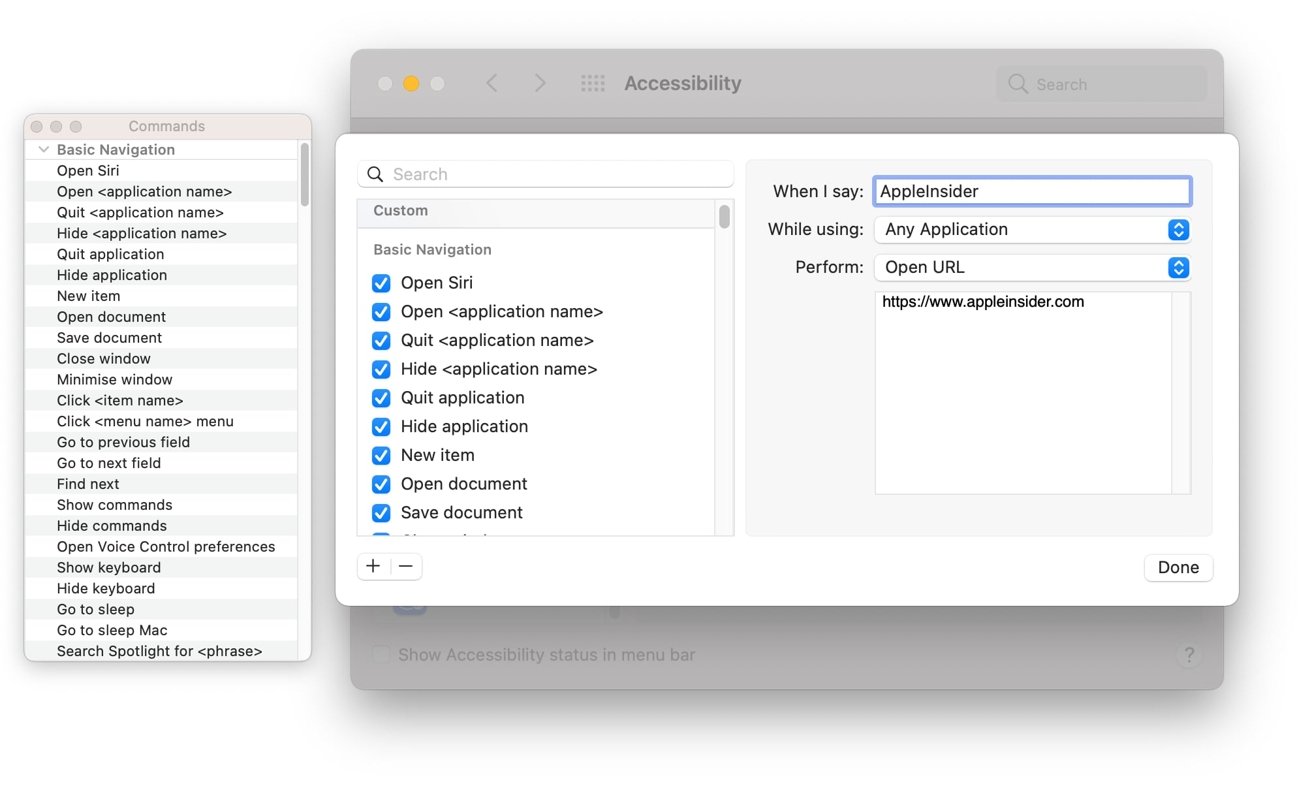
The same menu also enables you to set up custom commands. For example, you could set the command "Visit AppleInsider" to open up a browser window.
How to add custom Voice Control commands in macOS
- Open the Voice Control preferences.
- Click Commands.
- Click the Add button, the plus symbol in the bottom-left corner.
- Enter the command you want to use in the When I say box.
- If required, select the designated application in the "While using" dropdown. This will limit the command to work only in a specific application if selected.
- In the dropdown box for Perform, select the kind of action you want to do. If asked, add any extra requested information for the command.
- Click Done.