Hide My Email is a great way to subscribe to things or use online, but an iCloud mail alias can give you up to three alternate email addresses for business or pleasure.
Apple introduced Hide My Email in iOS 15, a fairly simple way for iCloud+ subscribers to create and give out "throwaway" email addresses to entities from which you want communications, but also the ability to disable the address when no longer needed. Best of all, when a Hide My Email address is disabled, the entity never had your genuine email address at all — and so cannot forward or redirect its messages, nor sell your Hide My email address to spammers.
The Hide My Email service requires a subscription to iCloud+, which starts at $0.99 per month for the 50GB storage level and higher. Users who have custom email domains as part of their iCloud+ subscription can still take advantage of Hide My Email.
Long before Hide My Email came along, though, Apple offered email aliases — a way to use your genuine iCloud email address to create up to three fully-functional alternate email addresses you can use for specific purposes where you don't want a nonsensical, "throwaway" address. Email aliases do not require a paid subscription to iCloud+; you only need a free, active iCloud email address.
Email aliases are best used for genuine ongoing relationships with businesses or people that you'd simply prefer didn't have your "real" email address. A couple of good examples of this would be if you were running your own small business, or perhaps just planning a reunion of cousins.
Due to the limitations of mass outgoing emails from Apple and most other providers, an email alias works best for small groups rather than large ones. We'll come back to this shortly.
An alias acts like an actual second, third, or fourth email address, and keeps your normal personal email separate if you choose to set a filter and/or a mailbox for incoming emails addressed to one of your aliases. By creating an alias such as "[email protected]" or "[email protected]," you can instantly filter and store any incoming emails as you wish, whether you are using Apple's Mail app or some other email service.
How to create a Mail Alias
To begin, you will need an Apple device and have an active iCloud email address. Creating and managing an email alias is most easily done by visiting iCloud.com via your default web browser.
Once you've signed in with your Apple ID, choose Mail, then click on the "gear wheel" icon in the upper left to select Preferences, then click on Accounts. This is where you can create a new @icloud.com alias by clicking the "+" button.
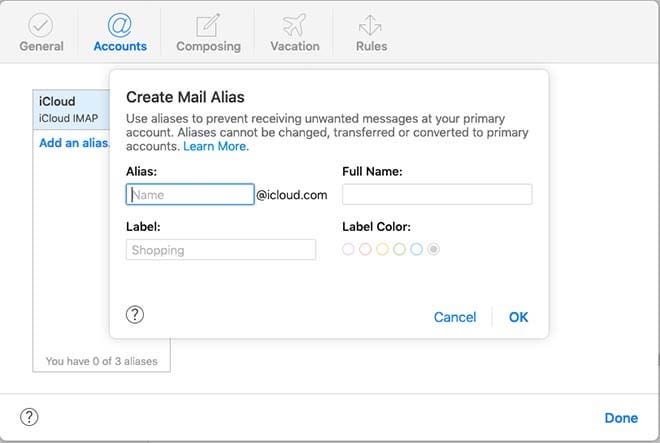
Creating a Mail Alias on iCloud.com.
If the address you want is unavailable, the alias will simply not be created. Once you are successful, the new alias will be added to your list of available email addresses.
You can have up to three active email aliases. If you delete one, you can create it again (if the name is still available) or choose a different one.
It is worth noting that some veteran iCloud email users from back in the MobileMe days were able to create up to five email aliases at the time. If those users now delete one of the aliases, they will be unable to create a new fourth or fifth alias anymore.
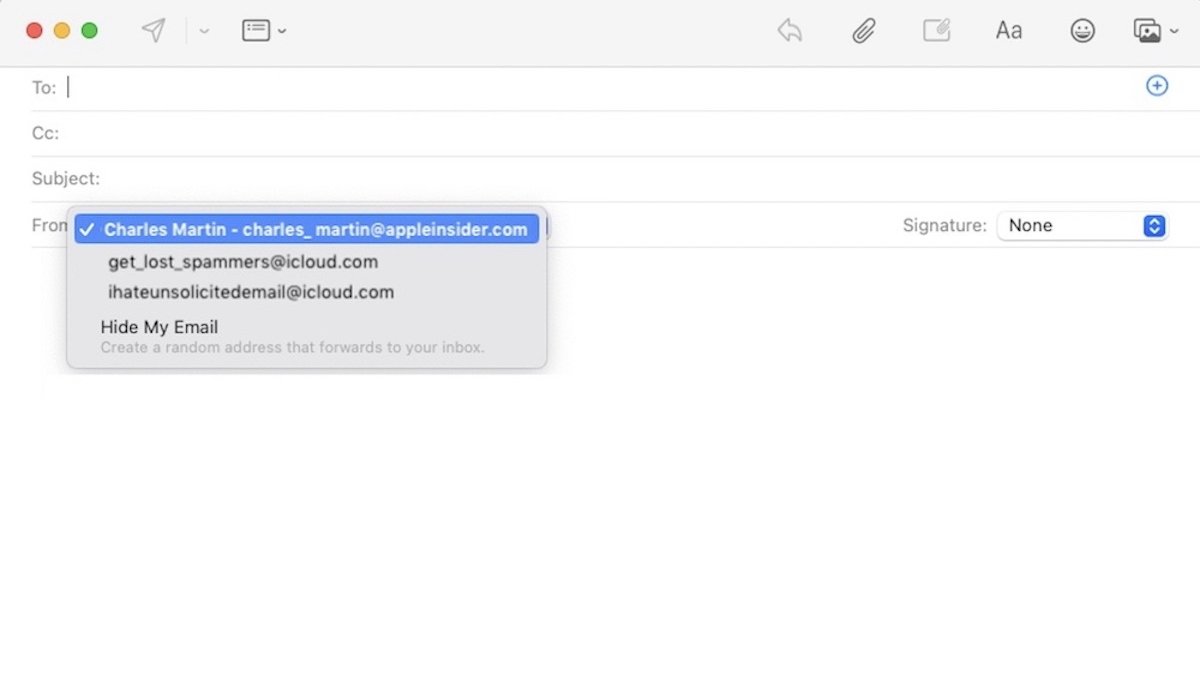
After you've created the alias, when creating a new email you just click on your own email address in the "From" field to select which real address, email alias, or Hide My Email address you want to use with that correspondent. Note that an email alias can't be converted to a primary iCloud Mail address, nor can you use an alias to create a separate Apple ID.
Hide My Email vs. Email Aliases
Apple's more recent Hide My Email feature is ideally used for communicating with businesses that need an email address to send you information, like an airline ticket purchase receipt. The service generates a choice of random but "disposable" email addresses that can be associated with one or more entities, and then turned off when email from them is no longer desired.
A typical Hide My Email address might be something like [email protected], and you have little option but to either choose from a few generated alternates (if you're on the iCloud.com website or in Mac Mail) or delete the email and start again to get a different generated Hide My address. You can have as many Hide My Email addresses as you desire, and make notes on which Hide My address you're using with which establishments and/or persons.
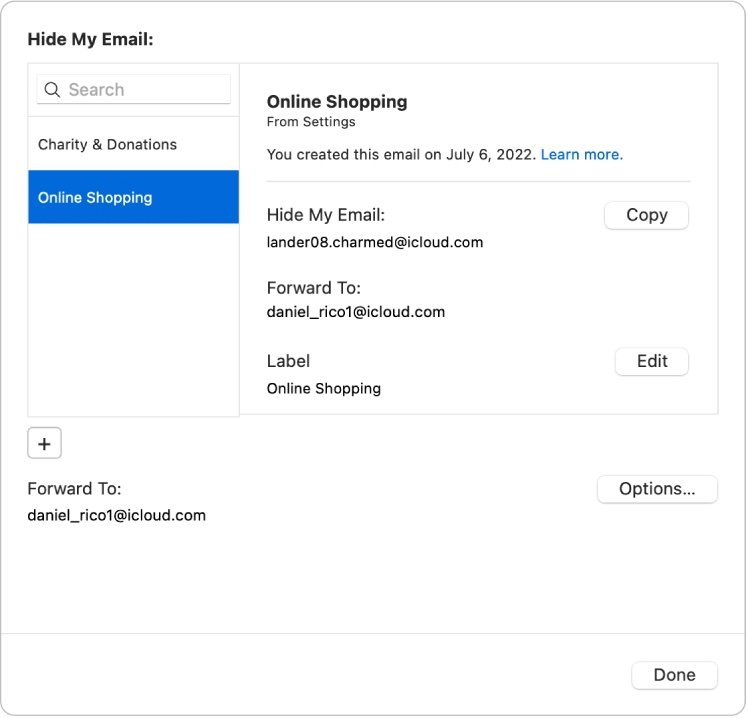
Managing a Hide My Email generated address.
By comparison, in creating an email alias you can use any name that hasn't already been chosen by some other iCloud email user. This can still prove challenging, but your odds of getting something close to what you wanted remains high.
The resulting alias can be yours forever if you wish, or deleted later and replaced with an updated or entirely different address later, if the new preferred name is available. Variations, such as putting characters like hyphens and underscores between words — or adding meaningful numbers or special characters — can help you get the address you want.
With either aliases or Hide My addresses, the way to use them in an outgoing email is the same: click on the default "from" address and choose from the pop-up list of chosen aliases or previously-used Hide My Email address (or select "Hide My Email" to generate a new one). Responses to either get forwarded to your "real" iCloud email address.
A word about sending mass emails
If you need to communicate in a group with more than a couple of dozen members, you may run into "spamming" limitations from your local internet service provider. Some recipients may not receive the email because of limitations on mass emails from their local internet service provider, even if your provider allows a more generous number of recipients.
When sending out emails to a group, it is a "best practice" to put your own outgoing email address as the only "To" recipient, with all other addresses being put in the "BCC" field. This prevents recipients from seeing the email addresses of the other members of the group.
If you find that your provider does not allow a sufficient number of recipients in your mass email, you may wish to send your message from the iCloud.com website's Mail feature directly — rather than Apple's Mail app or your own email program, where the message may run afoul of the ISP's limit on recipients. Apple says that its limitation on recipients is 500 per message, with a total of 1,000 recipients per day.
If you need to address a even larger number of recipients on a regular basis, consider using a third-party service such as MailChimp or TinyLetter. Both have free options for greater than 1,000 recipients, and options for those with even larger recipient needs.
Depending on your reasons for wanting to use a different email address than your own, Hide My Email or an iCloud email alias might be the right way to go for you. A personal email address should mainly be given out only to people or other entities you actually know and trust.