Text has long been customizable in Xcode when creating software for Apple's platforms. Now, String catalogs make it even easier to localize your app to multiple languages.
Ever since macOS shipped in 2000 as Mac OS X, Apple's development environments have allowed developers to easily localize text (strings) in their apps using two Apple technologies: language-specific bundles, and .strings files.
Localization is the process of translating app string files into multiple languages for use in many countries. Developers can decide which languages to localize Strings files into so that when an app runs, it automatically loads the correct .strings file for the current system language.
Apple inherited these technologies when it bought NeXT Computer, Inc. in 1997. The people at NeXT had thought carefully about how to make it easy to localize apps, and to even allow additional languages to be added to apps later without the need to recompile projects.
This was accomplished by using bundled resources located inside each app.
In Apple technology terminology, a bundle is simply a folder with some special filesystem bits set that tell the operating system that the folder is to be treated as a code package - an app, a framework, a driver or system extension, or an installer. There are other types of bundles as well.
In Apple programming, bundles are defined by the Objective-C class NSBundle, which we'll use in a moment.
This is accomplished in macOS and iOS via bundles and .strings files stored in each bundle on disk.
Bundles can contain other bundles, and from a localization standpoint it's common to store bundles inside an app by language with a language extension - for example ".en", for English, ".jp" for Japanese, or ".de" (Deutch) for Germany.
Each language bundle can contain parallel resources but in different languages.
.strings files are really XML files
Apple also defines a special kind of file called a .plist (Property List) file which is essentially just an XML file containing key-value pairs. Xcode has a built-in editor for .plist files so it knows how to edit the key-value pairs in a graphical editor.
.plist files can also contain strings, which can be localized, or they can contain entries that point to other string files elsewhere in the bundle.
A special file named Info.plist contains Apple-defined keys which the Finder reads when you open an app. The Info.plist file contains special keys and values that tell the operating system what settings to use when starting an app.
A strings file contains sets of keys and corresponding strings using "
"
"
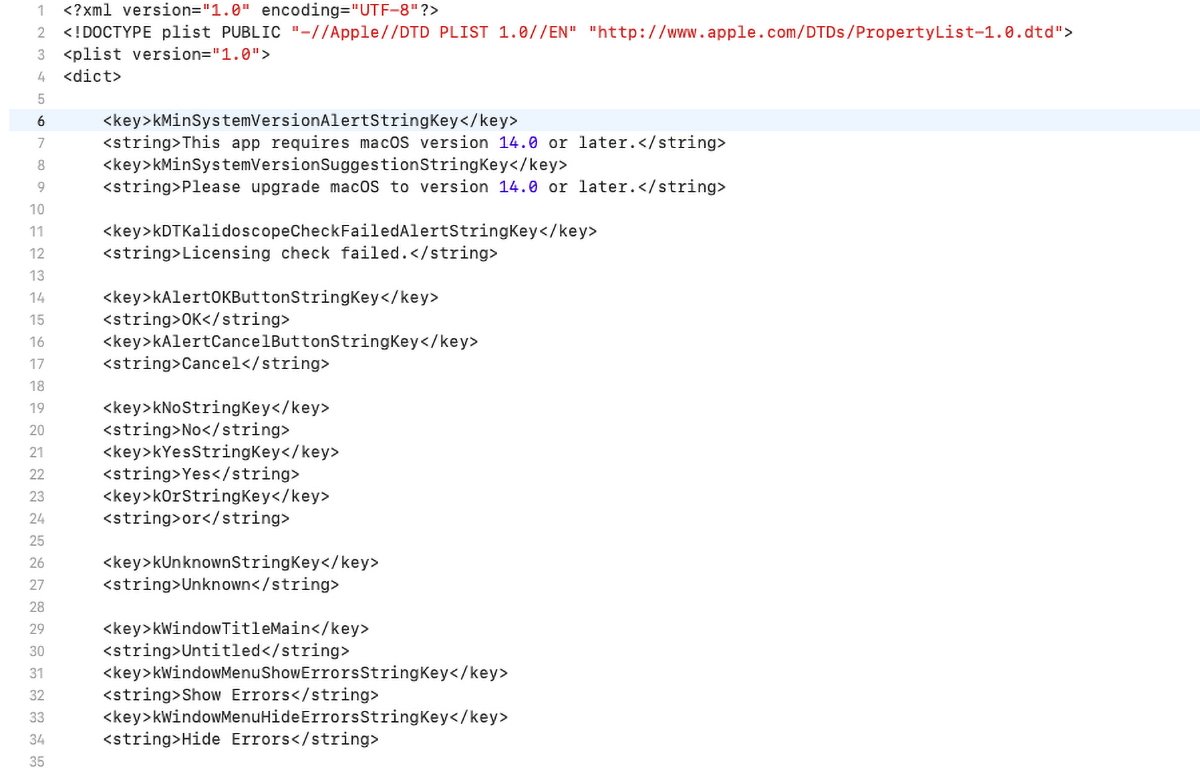
A .strings file in Xcode.
The
The
Once a .strings file has been created, the file itself can be handed off to a translator to copy into several different languages. This design makes localizing an entire app or bundle easy.
Traditionally, the default .strings file in an app on Apple platforms is named "Localizable.strings".
NeXT's programming language was called Objective-C and is still in use by Apple today.
Objective-C dates all the way back to the late 1980s when it was developed at NeXT for that computer platform. Objective-C derives from an even earlier language called C which was used to develop UNIX at Bell Labs in 1970.
In fact, C was created in order to write UNIX.
In Objective-C-based apps, developers will usually include a .h (header) file for each strings file, which contains constant defines that match the keys defined in the .strings file. This makes it easy to change keys in Objective-C apps.
Most modern TCI/IP networking stacks are still written in C. .h files were created for the C language. This was all before object-oriented programming (OOP) was invented.
Before Objective-C and NeXT's development environment, localizing and re-localizing software required each app to be fully recompiled every time a string was changed.
Apple's more recent programming language Swift does away with C header files, but strings are still localized and loaded the same way as before.
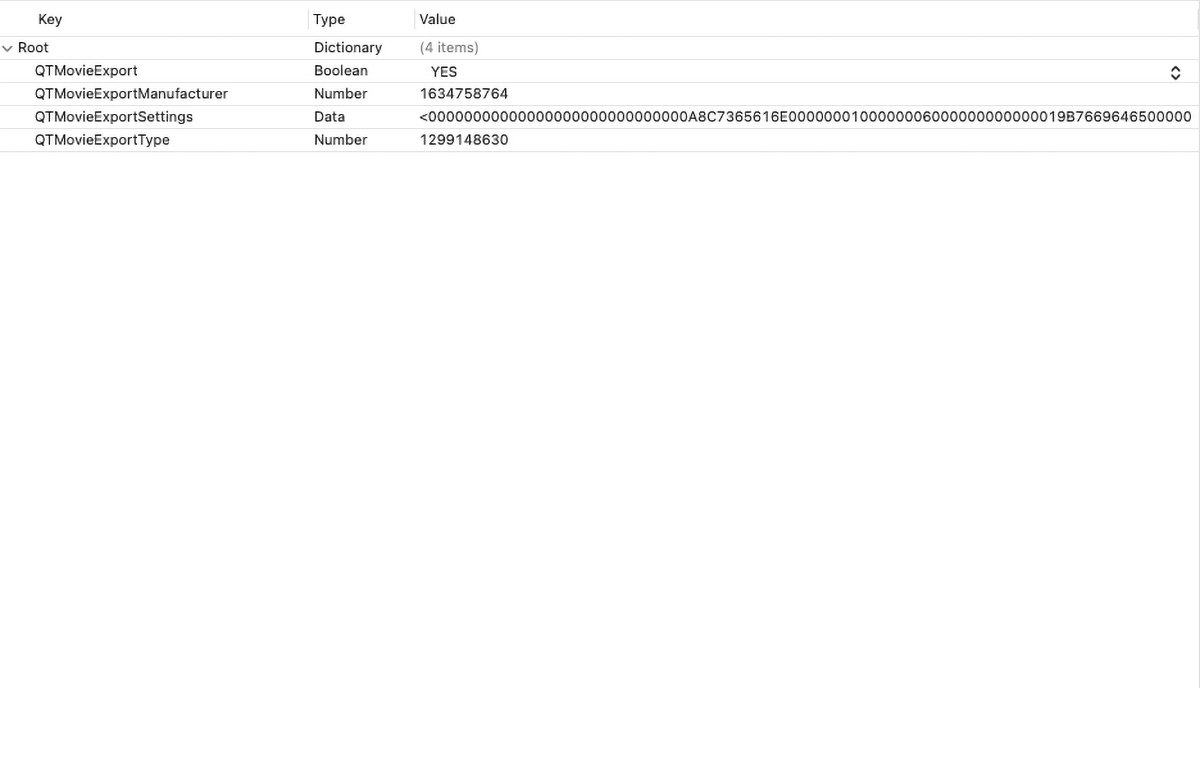
The .plist editor in Xcode.
Special string classes from Apple
Once an app is built for Apple platforms, the resulting app bundle contains all code, resources, and strings needed for program execution.
In OOP, the code definition of an uncompiled object is called a class. Classes are code bundles that bind both code and data together for ease of re-use. Classes can be subclassed - allowing descendant classes to inherit both the properties and methods of their ancestor classes.
The central string class in Apple programming is NSString (Objective-C) or simply String (Swift).
Both classes work similarly and have the same functions (called methods( in OOP). Swift also has its own Standard Library containing many strings functions, although they depart drastically from the traditional C Standard Library.
Apple string classes have several methods for creating strings. You can load them from a .strings file, you can create them from a C string, or from a Unicode string, and you can initialize an NSString or String using dozens of "init" methods provided.
You can also convert other Apple data types such as dates, raw data, bytes, or from URLs, or other file types such as .txt and .rtf files.
To see how to create Apple string classes, visit the NSString class reference page on Apple's Developer website. From there you can toggle between Swift and Objective-C syntax.
NSString used to have dozens of methods for converting NSStrings back into C strings, but those methods are now deprecated because Apple doesn't recommend using C strings unless you have to for compatibility reasons.
You can also define an NSString constant in Objective C using the @"" syntax like this:
@"NSVisualEffectView"
This tells the compiler to store the literal string itself in code at compile time. Constants are usually used only as flags to method parameters, but you can also pass them anywhere an NSString or String is required.
You can also use a string constant to get the class of any compiled Objective-C or Swift object at runtime by using the Class keyword like this:
Class vibrantClass = NSClassFromString( @"NSVisualEffectView" );
Class is a special type of reserved variable in Objective-C and Swift that stores the class of any object in memory. The plain C function NSClassFromString() returns the actual class of the object and stores it in the Class variable you define.
In the above example NSClassFromString( ) is passed the constant @"NSVisualEffectView" and the function returns the class and stores it in the Class variable named 'vibrantClass'.
The string constant you pass to NSClassFromString() is the name of the class as defined in Apple's documentation. There is also a version of NSClassFromString() for Swift:
NSClassFromString(_:)
Apple also provides an unimplemented class called NSClassDescription which you can implement to provide more advanced details about objects.
There is a sister string class from Apple called NSMutableString which allows you to manipulate and edit the string contents itself. Strings also have encodings which tell the software how the data in the string is to be treated.
There are string encodings for Roman, Cyrillic, Asian, Arabic, and other languages.
The base class from which most other NSObjects inherit is called NSObject.
NSString is a vast class and you'll want to check out the documentation thoroughly.
Loading strings programmatically in Apple apps
There are several ways to load strings in Apple apps.
The usual way when working with .strings files is to use the NSLocalizedString() function. This C function (it's a C macro actually) takes two parameters:
// Load localized message string
NSString *suggestionString = NSLocalizedString( messageStringKey, kEmptyStringKey );
This loads the string indicated by the key passed in the first parameter from the Localizable.strings file in the app's bundle. If the key passed in doesn't exist in the .strings file, nil is returned.
The first parameter is the string key in the .strings file you want to load. You can pass this in as a string constant, a C or Swift compiler define constant, or an NSString variable itself which contains the key for the string.
Either way, NSLocalizedString() returns the string you requested from the strings file and stores it in the NSString variable on the left side of the expression.
Note that the NSString variable returned by NSLocalizedString() must be declared as a pointer variable using the "*" syntax.
A pointer in C, Objective-C, or Swift is just a variable in memory that contains the address of another variable or memory location. The compiler needs a pointer variable in this case because it has to know where in memory to store the NSString object when it creates it.
On return from the function call to NSLocalizedString() the pointer you define points to that location in memory.
The second parameter to NSLocalizedString() is a "suggestion" or comment string, and can be the empty string (@""), something you choose, or nil. In Objective-C and Swift nil means "nothing" - an empty pointer.
In the example above, kEmptyStringKey is a precompiler macro defined in a header file like this:
#define kEmptyStringKey @""
This tells the compiler: Anywhere you encounter 'kEmptyStringKey' during compilation, replace it with @"". #define in C is called a "pound-define" (for the '#' symbol).
You could have written the same line just as easily like this:
NSString *suggestionString = NSLocalizedString( messageStringKey, @"" );
#defines are used so that when a constant value needs to be changed, it only has to be changed in one place in the header and the change happens everywhere the #define is used in code the next time the app is recompiled.
In Swift, the call to NSLocalizedString() would look like this:
let suggestionString = NSLocalizedString( messageStringKey, nil )
In both languages NSLocalizedString() appears to be a C function, but it's really a cleverly defined macro in the NSBundle class:
#define NSLocalizedString(key, comment) \
[NSBundle.mainBundle localizedStringForKey:(key) value:@"" table:nil]
It turns out NSBundle has its own method for loading strings from the app's main bundle by key, with the optional second parameter, and a table parameter. The table parameter can be used to load strings from a .strings file other than the Localizable.strings file by passing in the name of another .strings file in the third parameter.
This allows you to use several string files in your app or bundle instead of just the default one.
At precompile time the compiler crunches this entire macro down to just the syntax to shorten the code and make it look like a plain C function.
Loading strings programmatically using NSBundle
Another way you could load strings from file is to use NSBundle directly, using its pathForResource:ofType: method to load a string from a text file:
NSString *fileName = [ [ NSBundle mainBundle ] pathForResource:@"readme" ofType:@"txt"];
if (fileName)
{
NSString *contentsString = [ NSString stringWithContentsOfFile:fileName ];
}
Using this method, you pass in the name or path of a text file, and the file extension as an NSString in the second parameter. If a readable text file exists at the location and name specified, NSBundle will load it and return the path to it as an NSString.
You would then pass the returned file path string from pathForResource:ofType: to NSString's stringWithContentsOfFile: method.
If all goes as planned, when stringWithContentsOfFile: returns, the *contentsString variable declared above will point at the entire text contents of the text file - as a string.
NSBundle takes a little getting used to, but once you master it there's a lot of power.
There are actually several similar macros on NSBundle which are variants of loading strings from bundles. You can even load them from .strings files in other bundles:
- NSLocalizedStringFromTable
- NSLocalizedStringFromTableInBundle
- NSLocalizedStringWithDefaultValue
- NSLocalizedAttributedString
- NSLocalizedAttributedStringFromTable
- NSLocalizedAttributedStringFromTableInBundle
- NSLocalizedAttributedStringWithDefaultValue
An NSAttributedString is a string class similar to NSString except that the string can have attributes set, such as font, face, hyperlink, and other typographic details. You can also load an NSAttributedString from an HTML file online or locally.
Loading strings programmatically using NSDictionary
Another Objective-C Class called NSDictionary can be used to load string files from disk or from a URL. An NSDictionary is essentially a set of key/value pairs much like an XML or .plist file.
In fact, you can load a .plist file directly into an NSDictionary object and have it populated into the dictionary's key/value pairs. The NSDictionary class knows how to read a .plist file from disk and populate an object with the data from the file.
Since the values stored in a .plist or XML file are strings, you can load one string, or entire sets of strings with little code from a file and search it using the file's XML keys: just use the valueForKey: or allValues: methods to retrieve all entries in the dictionary once it has been loaded.
You can also retrieve all the keys in the dictionary by using the allKeys: method.
Xcode 15's string catalogs
Traditionally, in Apple app development, you'd create your .string file(s), add them to your Xcode project, set which build targets you want them included in, then load the strings from your code when you needed them at runtime.
This design worked fairly well for decades, but it had some limitations.
First, loading strings from .strings files didn't work well with string literals (i.e. - strings enclosed in quotes in code). Unfortunately, SwiftUI relies heavily on string literals, and hence there's no easy way to localize them other than to edit the strings in your source files.
Secondly, it previously was more difficult to go the other direction: to create strings and write them back out to .strings files programmatically. It can be done, but it's not an elegant solution and you'll likely find yourself writing a lot of excess code to write strings out in multiple languages.
String catalogs solve these problems and modernize the string infrastructure in Xcode for today's needs. String catalogs are also designed specifically to work with SwiftUI-based projects.
When you first create a strings catalog in Xcode, it will be empty. Unless you explicitly add strings, Xcode won't populate the strings catalog until you actually build your project.
String catalogs are designed to be assembled at build time. This is not only so strings can be included in SwiftUI code, but also so that they can be written out at build time, updating any strings modified during compilation so that you don't have to change them manually after a bundle is built.
String catalogs also allow default and multiple additional languages to be specified in Xcode itself. Xcode knows how to locate and assemble all the strings for all required languages for you when your bundle is built.
Catalogs also eliminate the need to keep adding additional .strings files to your project every time you add a new language to your bundle.
String catalog files in Xcode have an extension of
As you might guess, the default strings catalog file in an Xcode project has the name
At least Apple kept things consistent.
When you select a .xcstrings file in the Xcode navigator on the left side of an Xcode project window, Xcode's strings catalog editor appears on the right.
Let's take a look at an example.
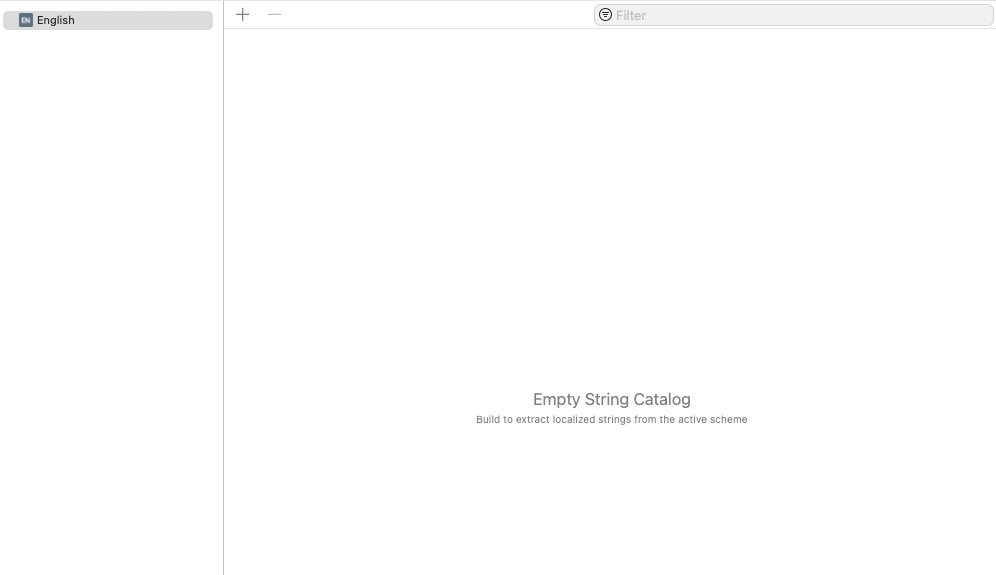
The Xcode strings catalog editor.
A sample Xcode project for strings catalogs
To begin, open Xcode and select File->New Project from Xcode's menu bar at the top of the display.
Choose an iOS or macOS App project from the Xcode project template chooser. Click Next, give the project a product name, an organization identifier, and choose a language.
Click Next, and save the project to disk.
When the Xcode project appears, you'll notice there is no .xcstrings file in the project navigator on the left. That's because none has been created yet.
Next, click the
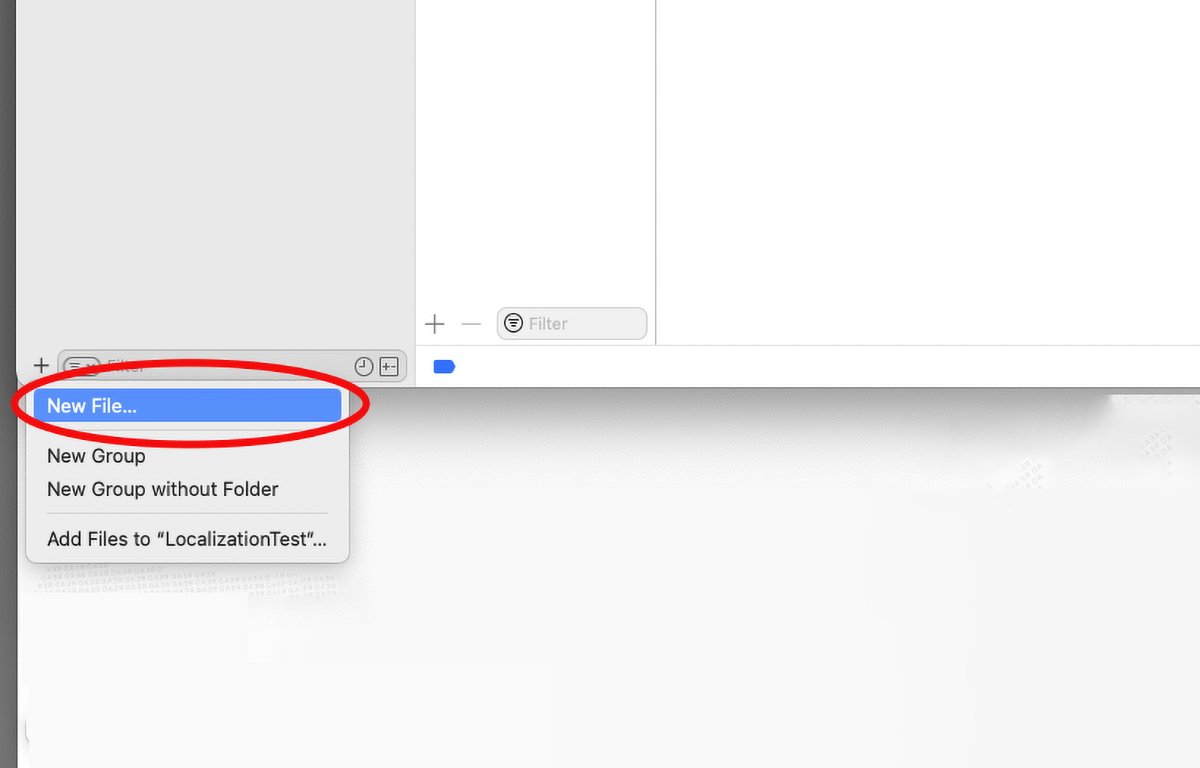
Select "New File..." from the popup menu.
Scroll down to the "Resource" section, and click
The default file name is preset to "Localizable" for you.
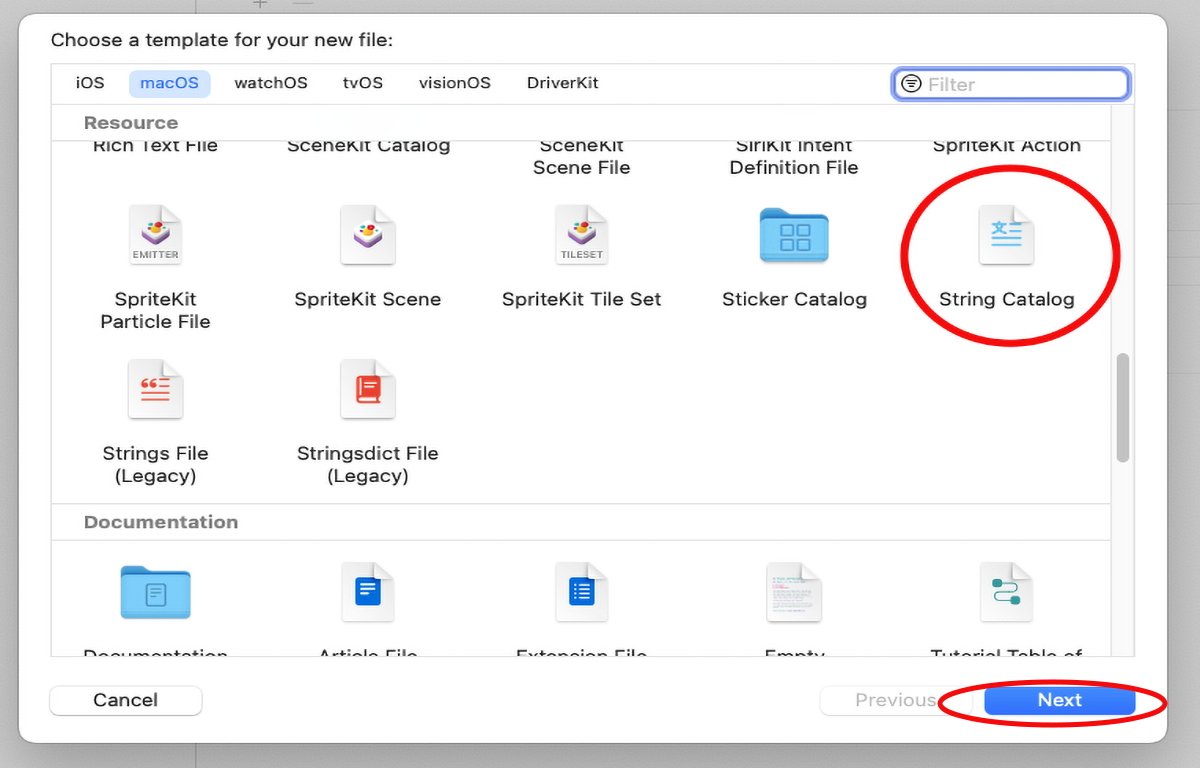
Select "String Catalog".
After you save the file, you'll see it added to the Xcode project automatically, and Xcode will select it in the project Navigator. When it does, you'll see the strings catalog editor appear on the right.
Note the "Empty strings catalog" message in the editor.
In the catalog editor, you can either click the + button at the top of the editor to add a new key to the catalog, or you can click the + button at the bottom left of the catalog editor to add a new language to the catalog.
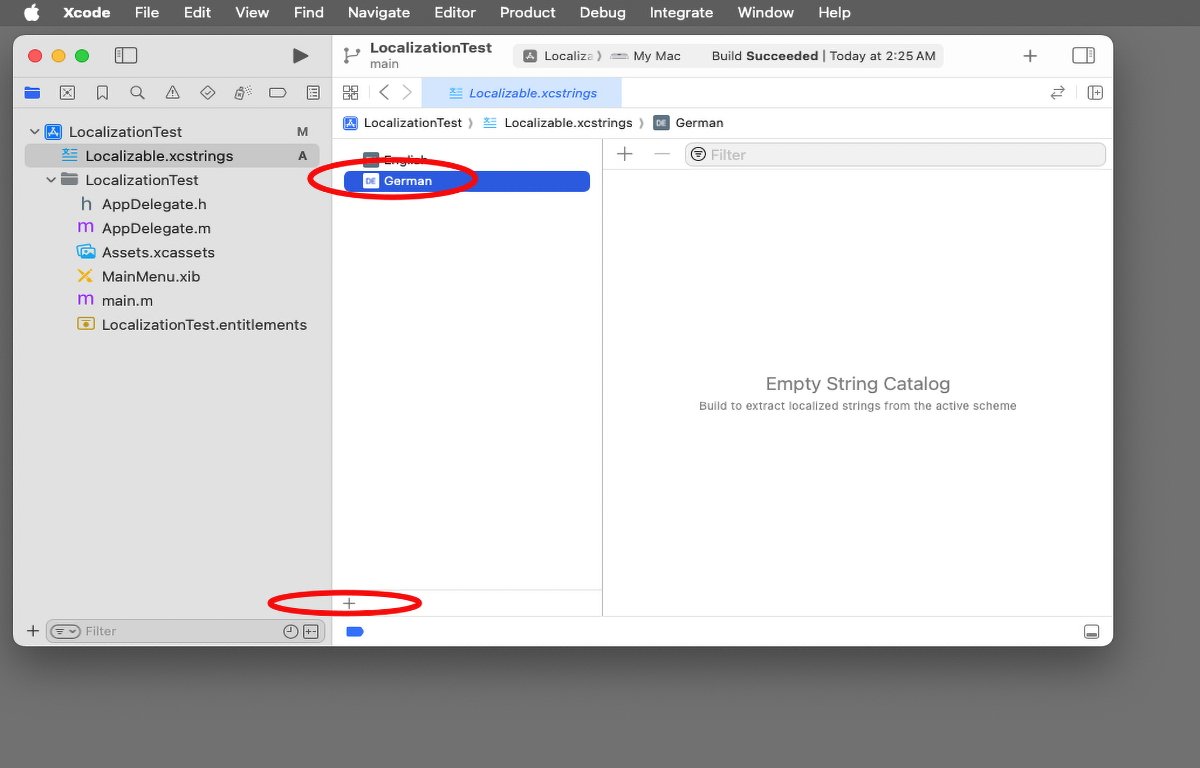
Add a language in the catalog editor.
If you click the + at the lower left corner of the editor, you'll get a popup menu with a list of all possible languages. Select any language from the menu to add it to the catalog. When you do it appears under the default language at the top of the catalog list.
Once your catalog is set up, when you click the Build button in Xcode, the compiler will automatically scan your source code files and add any strings it finds to the strings catalog. The string text is added to the catalog as both the key and the value for each string.
When you click on one of the other languages you've added in the catalog editor, that language is displayed in each row next to the default language. You can then click the text under each language name and type in new text for that language.
There is also a comment and a state field in each string. Once you add a translation for each key, the state column displays a green checkmark indicating that string has a localization.
Keys without localized strings display a red "New" label in the state column.
To view each localized string in your app when it is running, you can either go to the Apple Settings app and change the system language, or you can go to the app schema in your Xcode project and change the language for runtime. The next time you run your app you'll see any localized strings in their correct languages.
If you are using custom Xcode Previews in an iOS or iPadOS app by using the #Preview macro in your code, you can also set the .locale identifier string in the .environment property of the ContentView() struct to specify the language to be used at runtime.
You can set one #Preview macro for each language and locale to display localized strings properly at runtime. Language names for previews are usually the full language names, and locales are usually specified by 2-character ISO country codes such as "DE" (Germany), or "JP" (Japan).
You'll need to look up the specific language name and locale code for each language you want to use.
Converting old .strings files to string catalogs
If you have existing .strings files in your Xcode project you can convert them to strings catalogs simply by Control-clicking on them in the Xcode project navigator and selecting Migrate to String Catalog from the popup menu.
One cool feature of migrating localized .strings files to catalogs is if your .strings file already has localized copies, Xcode will migrate all of them at once into the strings catalog - moving all the strings into their correct localizations for you.
Xcode also displays a percentage-complete indicator next to each language's name in the catalog editor - showing you how many strings are left to be completed before the entire language is complete.
Using the "verbatim" key in SwiftUI
If you are building a SwiftUI project, you can place the keyword verbatim: before any string in a Text element, and when you build your project, Xcode will not localize and include those strings in the string catalog.
This is a handy way to exclude text you don't want localized, or you only want to use for test purposes during development.
Using LocalizedStringResource
Starting in iOS 16, Apple introduced LocalizedStringResource - a new Swift struct that allows you to localize string resources lazily. That means you can tell the compiler what you want to load, but have it load a localized version at a later time - for example only when it is needed, or when some other process such as an XPC program needs it.
This might occur in a distributed network environment where one process is running on a machine using a different locale than the machine that is running the calling process. LocalizedStringResource is also used by Apple's Intents Framework for SiriUI.
Also, be sure to check out the discussion of LocalizedStringKey in the Text Input and Output section of the SwiftUI documentation.
String catalogs for Info.plist files
You can also create new string catalogs for your app's Info.plist files. To do so, select them in the project navigator and Control-click just like you did for your localized .strings files, and then select Migrate to String Catalog again just as before.
Xcode knows how to convert and import your Info.plist files to a new .xcstrings file. Make sure the new file is named Info.xcstrings just like your Info.plist file.
Once converted, you can localize and update your Info.xcstrings file just like you did for your .strings files.
"Stale" messages in string catalogs
Another cool feature with string catalogs is that Xcode now not only imports and sets up string catalogs for you, but if you introduce an error in the catalog file that doesn't match what is in your source code, the catalog editor marks the row with a yellow "stale" badge in the state column to let you know something got out of sync.
Having this available makes it trivial to scan the entire catalog in multiple languages for errors just by scrolling and glancing at the catalog.
Previously with strings files, it was easy to make a typo in a .strings file and get a string key out of sync with a matching constant in a header file or a literal in code. Before, you'd have to spend time searching to find what didn't match and correct it.
Now you can find errors just by looking at the state column in the catalog.
Strings catalogs are a welcome new feature in Xcode and they save a lot of time during development. String storage, assembly, and localization are now all in one place in Xcode - and in one strings file.
You no longer need to create and manage multiple .strings files.
This vast simplification plus the new catalog editor means localization is no longer a burdensome chore. What used to take hours now takes minutes.
The built-in editor safety checks help you spot errors instantly so you no longer have to search multiple files to fix problems.
Be sure to check out three major sections in Xcode's documentation to learn more about strings catalogs:
- Localizing and varying text with a string catalog
- Localizing strings that contain plurals
- Importing localizations
It's also a good idea to read up on Swift's String class and its methods as well as the Swift Standard Library which has string functions.
Finally, check out the WWDC '23 session video Discover String Catalogs for a quick thirty-minute overview of how string catalogs work.