The often overlooked Xcode FileMerge app lets you spot what's changed between two files. Here's how to spot the differences using the tool.
Most developers of Apple software are familiar with Apple's integrated development environment (IDE) Xcode.
But there are several utility applications bundled inside Xcode which are often overlooked.
These are:
- Accessibility Inspector
- Create ML
- FileMerge
- Instruments
- Reality Composer Pro
Several of these apps such as Reality Composer Pro and Create ML are new, but one utility, FileMerge has been around for decades and was part of OpenStep - the original developer tools created by Steve Jobs' other company NeXT in the early 1990s.
Apple bought NeXT in 1997 and its software and operating system (NeXTStep) became what is today macOS, iOS, and Xcode.
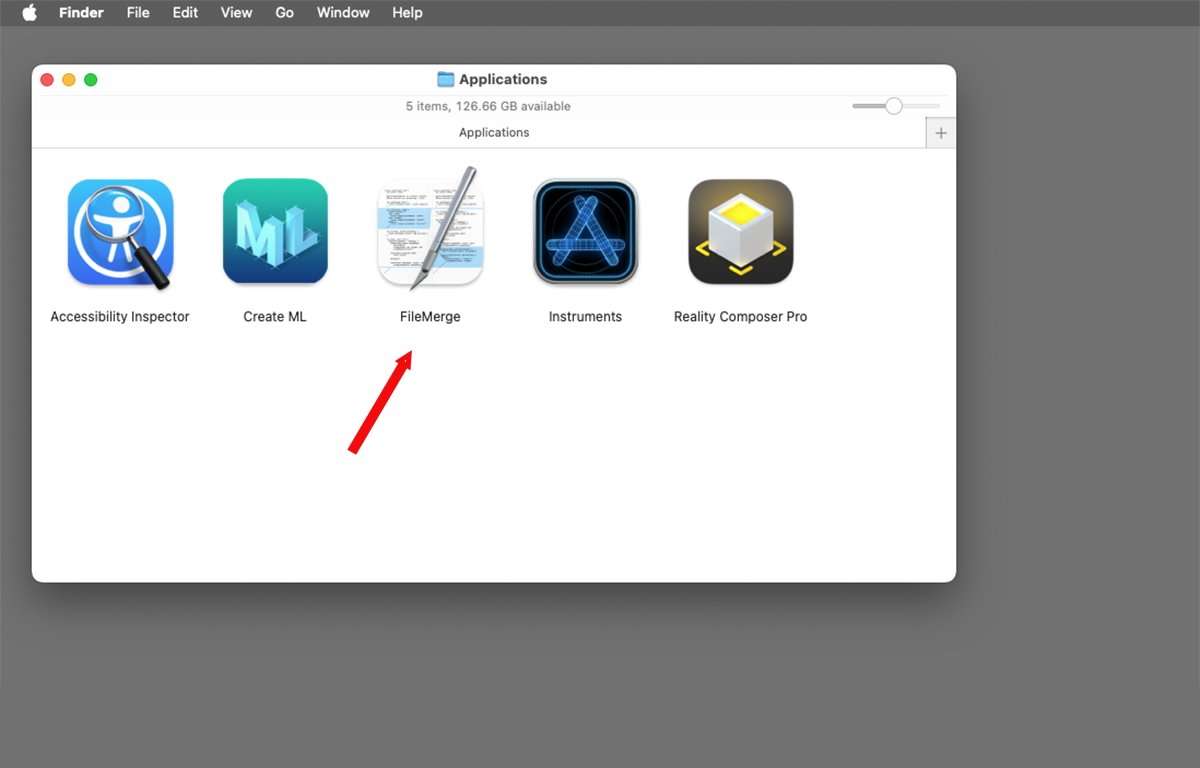
Apps inside Xcode's Applications folder.
In fact, Xcode's FileMerge is one of the few apps surviving today from the original NeXTStep which is virtually unchanged.
FileMerge was originally created as a tool for developers to compare and merge source files, but it will work just fine on most plain text (.txt) files as well.
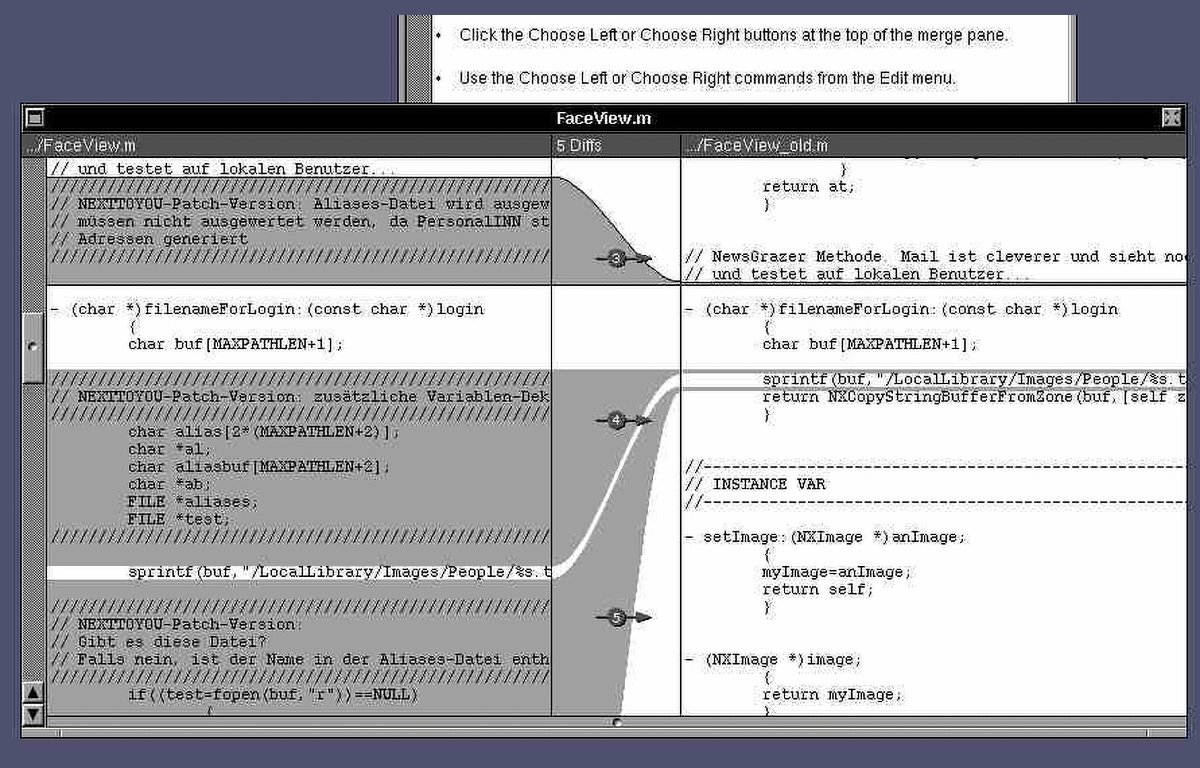
The original FileMerge app in NeXTStep.
Accessing FileMerge
FileMerge lives inside the Xcode application bundle in a subfolder called "Applications" in a folder named "Contents". So the path to FileMerge in the Xcode bundle is:
Xcode.app/Contents/Applications/FileMerge.app
There are two ways to access FileMerge: you can either run it from inside Xcode by selecting from the Xcode->Open Developer Tool->FileMerge menu in Xcode, or you can open the Xcode app bundle itself in the Finder, open the /Contents/Applications subfolder, then drag FileMerge to the Dock to create a shortcut to it.
To open Xcode's bundle, Command-click on the Xcode icon in Finder while holding down the Command key on your Mac's keyboard and selecting Show Package Contents from the resulting popup menu:
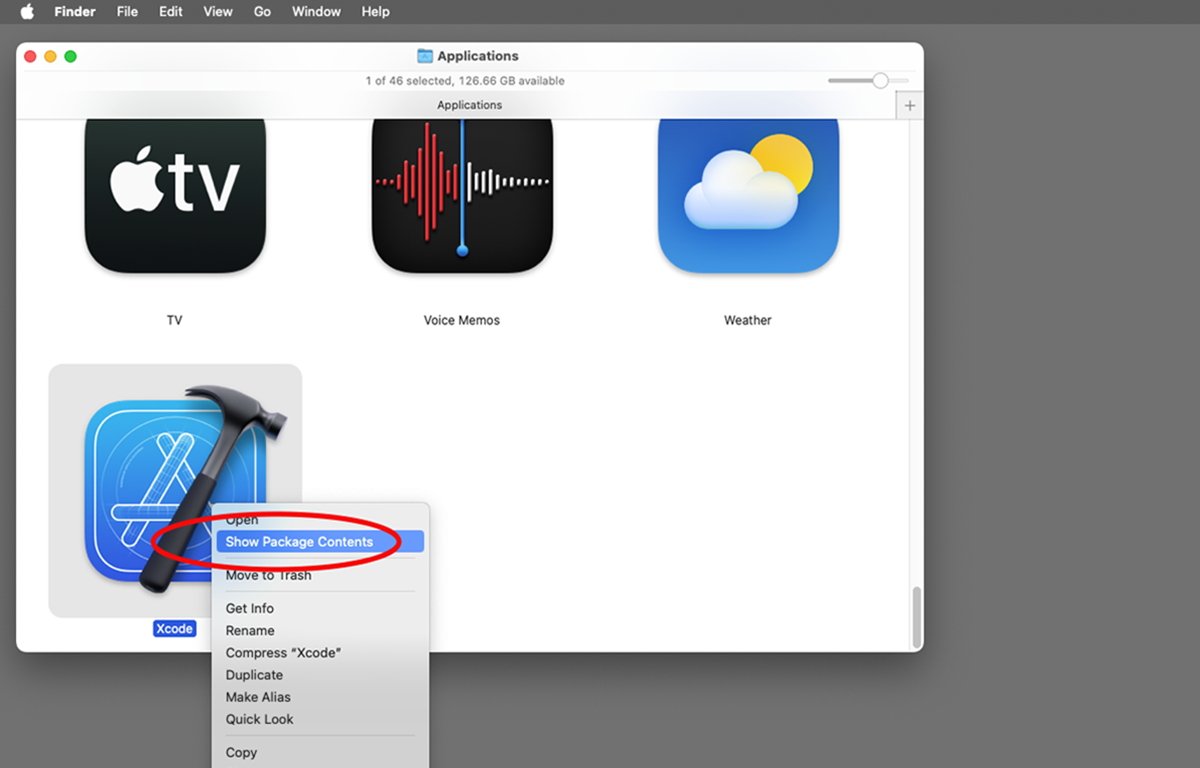
Opening the Xcode app bundle in Finder.
The terms "package" and "bundle" are somewhat synonymous in macOS. Bundles are just folders with special bits set on them to tell the Finder they contain executable code.
You can also Command-Option drag the FileMerge app from Xcode's Applications folder to the Finder's desktop by holding down those keys on your Mac's keyboard, clicking the app icon in Xcode's application folder, and dragging to the desktop. This creates an alias shortcut on the desktop to FileMerge.
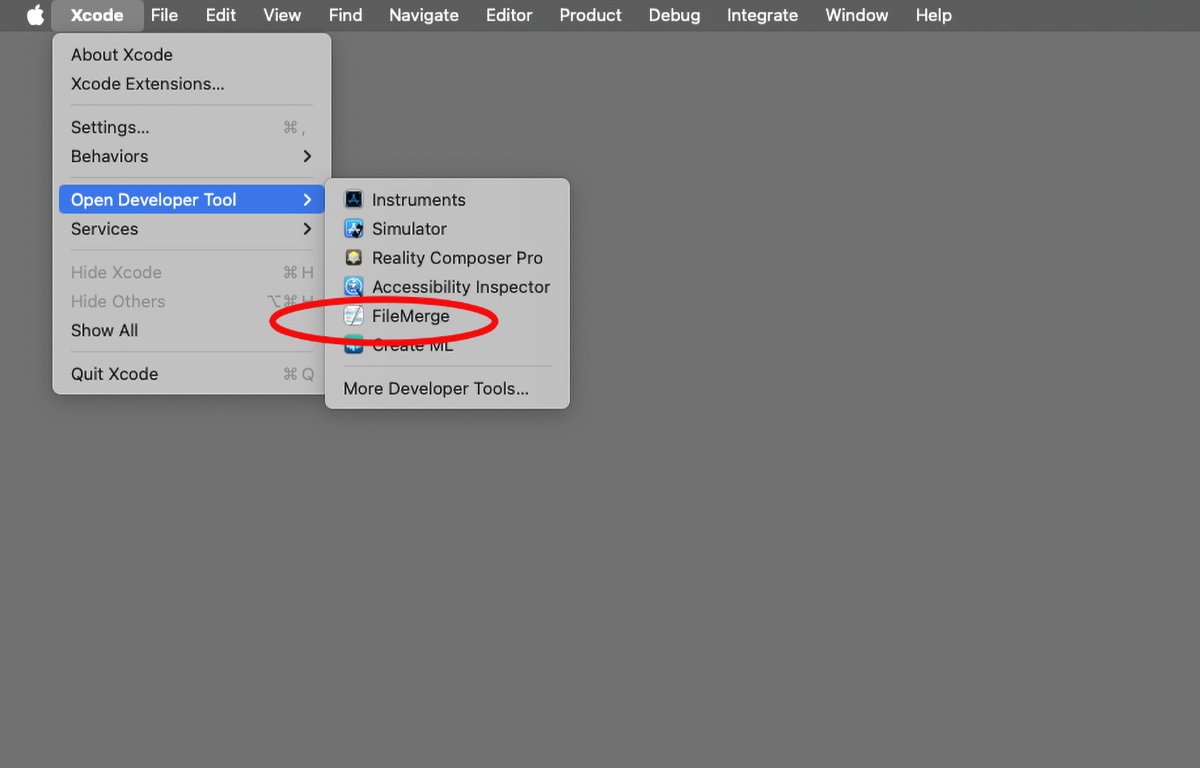
Open FileMerge from the "Open Developer Tool" menu in Xcode.
You can Command-click the Xcode icon itself if it's in the Dock in the Finder and select the Open Developer Tool->FileMerge menu item from the popup menu to open FileMerge. This has the same effect as opening it directly from within Xcode.
Any of these methods will work to open FileMerge - just don't remove the app itself from inside the Xcode bundle or it may damage the integrity of the Xcode app.
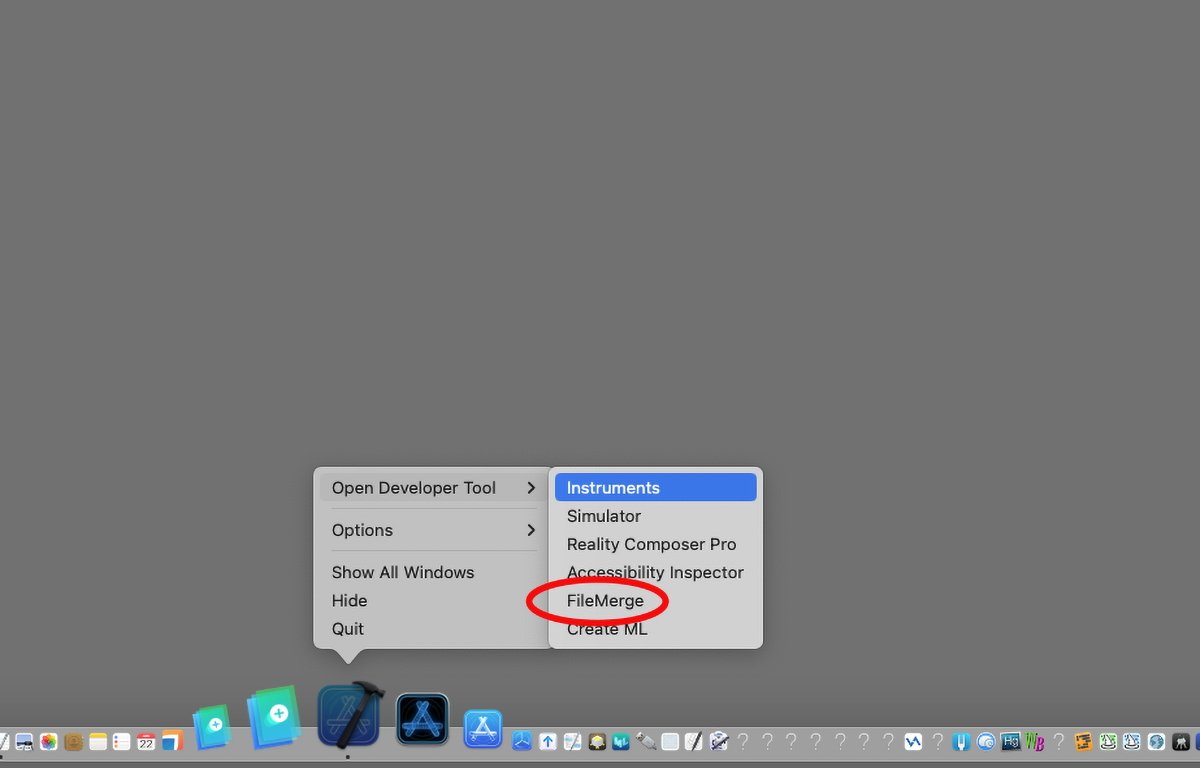
Open FileMerge from the Dock.
Using FileMerge
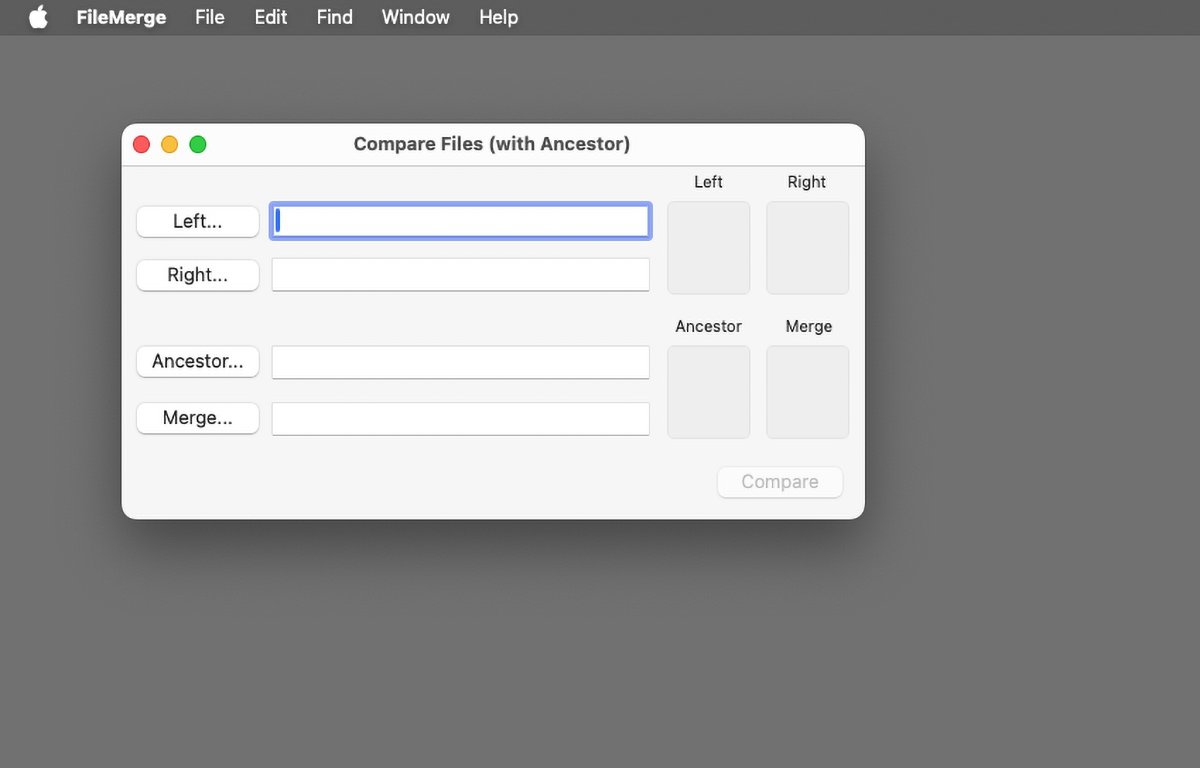
Once FileMerge is open, its interface is a breeze: you're presented with a single small window with two levels, one for the original file you want to compare ("Left"), and one for a newer file ("Right"), which should be the same but contain some changes compared to the original. Both files should be plain text files to compare differences, but you may find FileMerge works on some other limited types of text files as well.
FileMerge can't handle most encoded text files, so it's best to use it on plain text. If you do try to compare encoded files with FileMerge, you'll likely get an alert warning you "Files are not ASCII" and asking you if you want to proceed anyway.
If you choose to proceed it will compare the files, but you'll only see the encoded comparisons which are usually meaningless: FileMerge doesn't know how to decode most files.
ASCII is an acronym for American Standard Code for Information Interchange - an ancient 8-bit encoding for Roman-based language text. ASCII has since been replaced with Unicode which is a 16-bit text encoding because it supports multi-byte characters in other languages such as Asian and Arabic languages which have larger character sets and special characters.
Although Unicode is now the worldwide standard for text encoding on computers today, you may still encounter some older 8-bit ACSII files in daily use.
Here's the FileMerge UI:
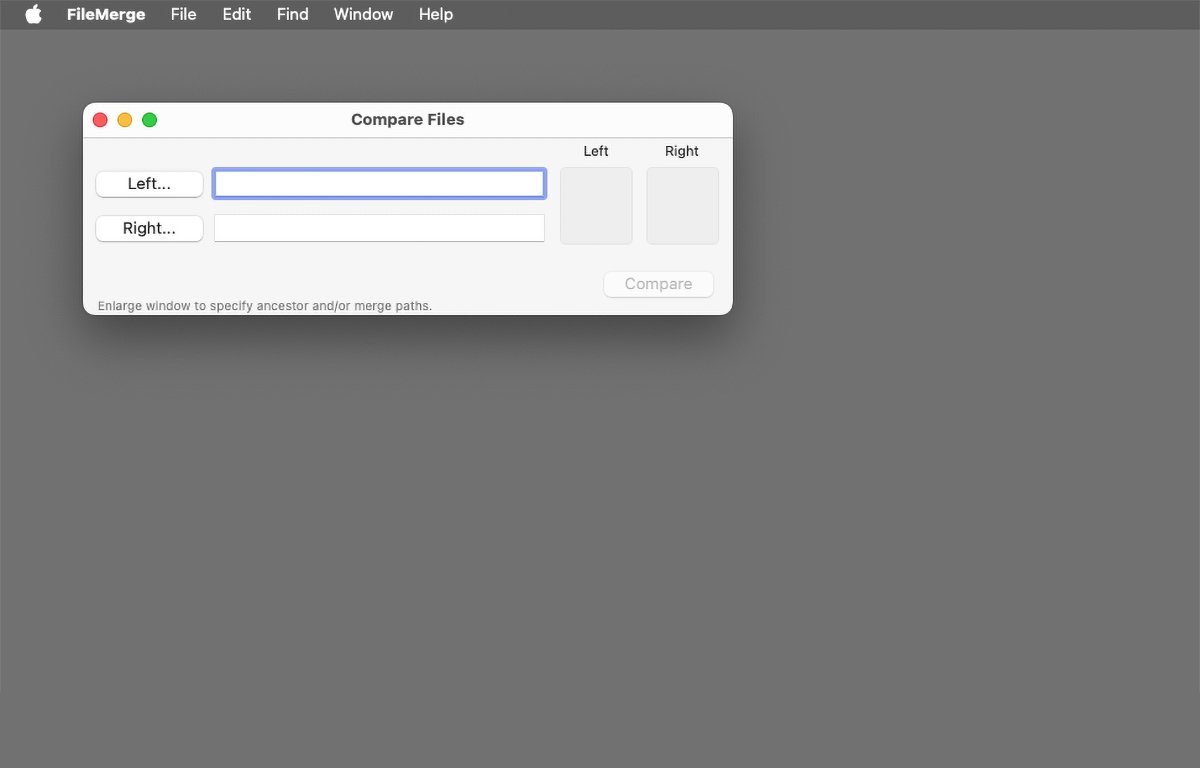
FileMerge's main window.
You can either click the Left and Right buttons using macOS's standard Open sheet, or you can drag the two files from the Finder into the left and right image wells on the right side of FileMerge's window. Doing either has the same effect.
Once both files have been set in FileMerge, you'll see their file paths on disk appear in the two edit fields next to the Left and Right buttons.
Now you're ready to compare files. We'll use a trivial example to demonstrate.
Comparing files
After your files are set in the FileMerge interface, click the Compare button in the lower right corner of the main window. This will run FileMerge's compare and open a new differences (diff) window with both files, highlighting changes in each.
In the diff window the original file appears on the left, and the changed (new) file on the right. Changes are indicated by colored bands which vary with the sections of text changes in the changed file.
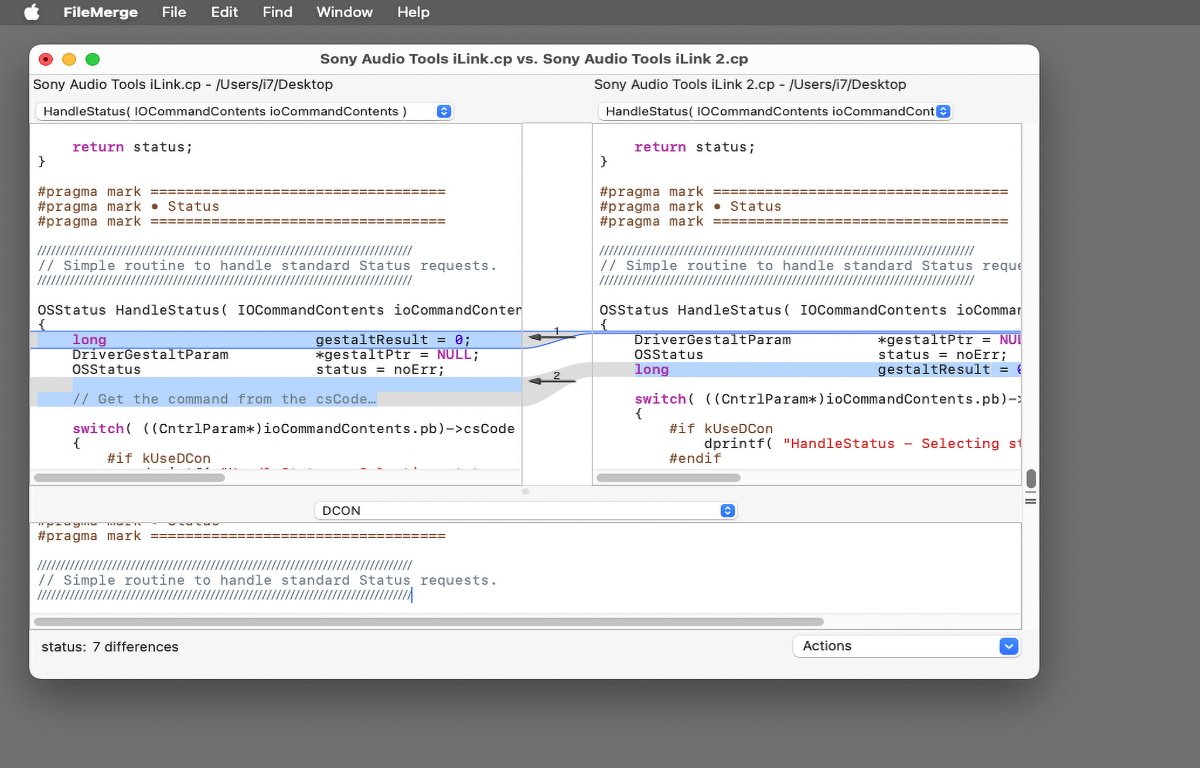
FileMerge's diff window.
As you scroll through the file's text, FileMerge displays these remarkably ingenious bands to animate which sections of the text have changed. Larger sections scroll more slowly, so the opposite file can catch up.
If the newer file has a block of text inserted, the entire block is highlighted, but its insertion point is shown in the other file in the same color with a thin band stretching from the side that contains the inserted text. As you scroll the diff window, the bands shift smoothly so you can see what has changed.
For single-line changes or changes of only a few lines, the diff window highlights the changed lines with similar bands but which are only a few lines tall.
In the center of the diff window is a single column that contains arrows indicating which of the two files contains changes. Arrows can run in both directions: left and right. You can select any single text change by clicking in the change band in the center column where each change arrow is.
To select a change you have to click in the center column - clicking on a change band in either the left or right pane in the diff window does nothing. Each change arrow has a number above it indicating the change number from the top of the file.
If the files you are comparing are source code files in any standard programming language, the diff window also shows a popup menu at the top of the left and right diff panes. Each menu contains all the function or method names in the files - and selecting a method name from either menu jumps to that method in the file.
Using Ancestor and Merge
At the bottom of the FileMerge window, you'll notice a small note: "Enlarge window to specify ancestor and/or merge paths".
If you click and drag on the bottom of the FileMerge window downward, you'll see an additional interface appear:
Using the Ancestor/Merge pane.
What this UI allows you to do is to add an additional third file for a three-way merge. To hide the Ancestor/Merge UI, just click and drag back up on the bottom of the FileMerge window.
Merging changes
Once the diff window is open, and FileMerge shows the differences between the two with change bands, you can choose how you want to handle each change: you can either ignore each change, or you can copy newer text to the opposite file (a merge), or you can delete a specific change.
You perform these actions using the Actions popup menu in the lower right corner of the diff window.
The possible options on the menu are:
- Choose left
- Choose right
- Choose both (left first)
- Choose both (right first)
- Choose neither
If you select either of the first two options, the changes will be made to the file on the left or right. Selecting either of these options decides which file will receive the change.
If you select either of the Choose both options, the change will be added to both files, based on what has changed in either the left or right file.
If you select Choose neither, the arrow for that change is removed from the center column indicating the change will be ignored.
Regardless of which Action you select from the popup menu, the change is made - and the arrow in the center column in the diff window is updated to reflect the new reality.
Also, note there is no "Change" button in the UI - when you select an Action from the popup menu, the change is made instantly without any further warning or user interaction.
Saving changes to disk
Once you've made all your changes in the diff window using the Actions menu, you still have to save your changes to disk for them to be saved.
Unlike normal text editors, FileMerge doesn't automatically save your changes to the original files when you select File->Save Merge from the File menu. This is so your original files can be preserved intact in case you want to use them later as-is.
Instead, when you select File->Save Merge you will always be prompted with the standard Save panel so you can decide what to do - if you click the Save button in the same location as the original left file, you'll be promoted if you want to replace the original. If you click Replace the original file will be overwritten.
Or, if you want to save the original file with the same name in another location, you can by navigating to it and then clicking the Save button, or you can rename the file to something else, and save it in the same location as the original - which creates a new file with the name you choose.
File->Save Merge As is effectively the same as Save but you're required to give the file a new name so a new file is created.
Once you make a change using the Actions menu in the diff window, you'll be prompted to save the Merge if you try to close the window or quit FileMerge. If you try to close the diff window without saving, you'll be prompted with an alert asking if you want to save.
You can Cancel from the alert, or you can click Don't Save which discards your changes.
If you click the Save button in the alert, it's the same as if you had selected File->Save Merge from the File menu.
At any rate, once the Merge is saved, the resulting file now contains all the changes you made in the diff window. If you didn't explicitly overwrite your original file, it remains untouched.
Directory compares
You can also compare two folders (directories) containing files using FileMerge. To do so, use the above techniques, but select two folders in the Left/Right interface instead of two files.
The basic folder compare possibilities in FileMerge are to check sets of files to see if they are identical, if files in either folder have changed, or if files were added to or removed from either folder.
When you hit the Compare button on two folders of files, FileMerge rifles through both sets - comparing all the files contained in both folders.
The resulting folder compare window shows what the differences between the file sets in each folder are:
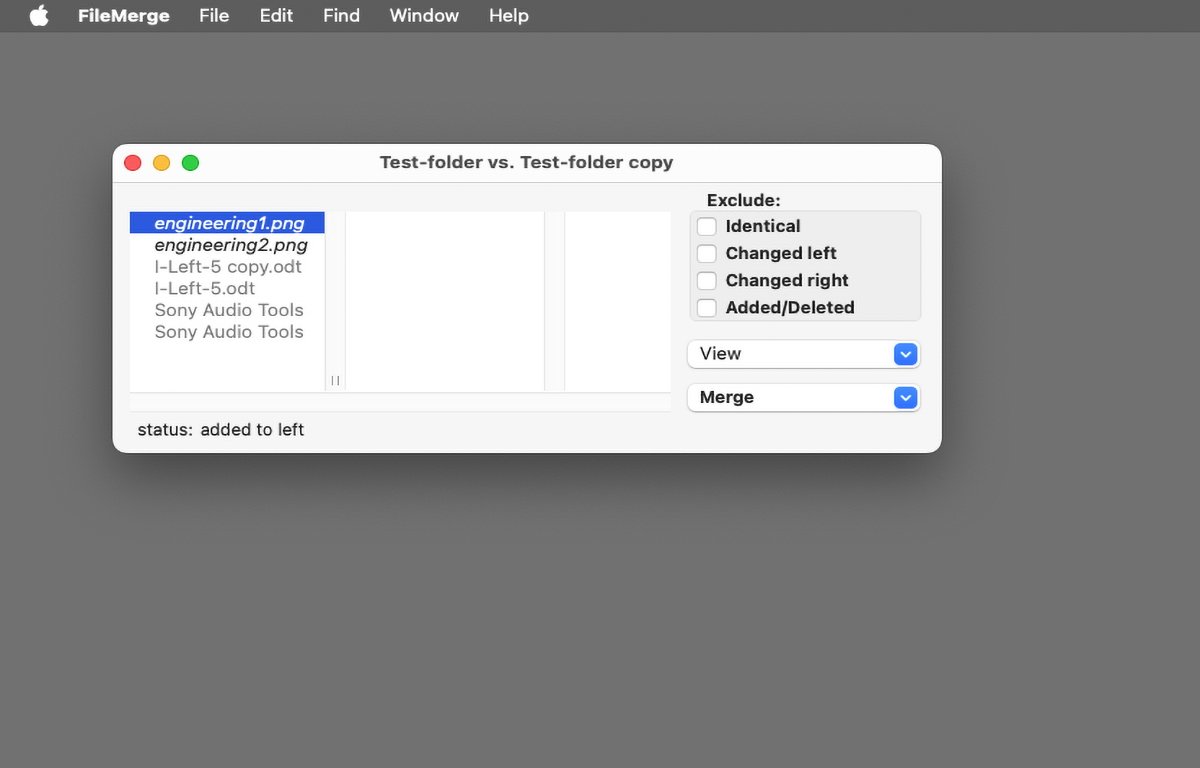
The directory compare result window.
If both folders contain two files with the same name, those file names will be shown on the left as greyed out. If a file appears in one folder, but not the other, its name appears in italics.
Single-clicking on any filename in the left pane shows the status of that file in the bottom left corner of the pane.
You can set which folder change options you want to exclude under the right pane named "Exclude".
Below that are two popup menus: the first contains items for viewing and comparing files. Selecting an item from this menu performs actions similar to the Actions menu in the diff window.
The other popup menu named Merge contains options for moving or combining files between the two compared folders. You can combine files, choose to use only the left or right file, remove files entirely, and remove any files from the list that couldn't be compared.
The View and Merge items can be confusing, and they violate Apple's Human Interface Guidelines because when not clicked they display what should be menu labels: when you click either one, the titles "View" or "Merge" disappear from either menu, then reappear when you release the mouse.
Use the Merge menu with caution.
After you use the Merge menu, the small status message in the lower left corner of the window is updated to reflect what was changed. Keep in mind that this window is mainly for merging or moving files between the two compared folders.
Searching, re-comparing, and resetting in FileMerge
Once you've run a file Compare in FileMerge, you can view any diffs in the diff window as mentioned above by scrolling, or you can use the Find menu in FileMerge's menu bar at the top of the screen.
The Find possibilities in FileMerge are:
- Go to next
- Go to previous
- Go to line/difference
- Find
- Find next
- Find previous
- Use selection for find
- Jump to selection
The next/previous options let you jump to the next or previous difference, changes on the left or right sides of the diff window, or to the next conflict. Conflicts are two nearly identical blocks of text that both contain changes - making an exact comparison impossible.
You'll need to resolve conflicts yourself manually.
If you select some text in the diff window and then select Find->Use Selection for Find, FileMerge opens the Find window, but it automatically inserts the selected text into the Find search field for you.
Once your comparison is finished, you can reset FileMerge to its original state by closing the diff window and then selecting File->Compare Files This reopens the main FileMerge window, but with your last selected file paths still intact.
You can also select File->Recompare Files to run the previous compare again. This is useful if you make external edits to the files, save them, and then want to recompare them after your changes.
FileMerge settings
If you select FileMerge->Settings from the FileMerge menu bar at the top of the Mac's screen, you'll see a FileMerge Preferences window which allows you to set a variety of behaviors for how FileMerge works:
- Wrap text
- Show change numbers
- Show merge direction
- Show changes in scrollbar
- Highlight differences
- Font
- Directory compare options
- Filters for comparison
- Files to ignore
To save your changes in FileMerge Preferences, simply make your changes and close the window.
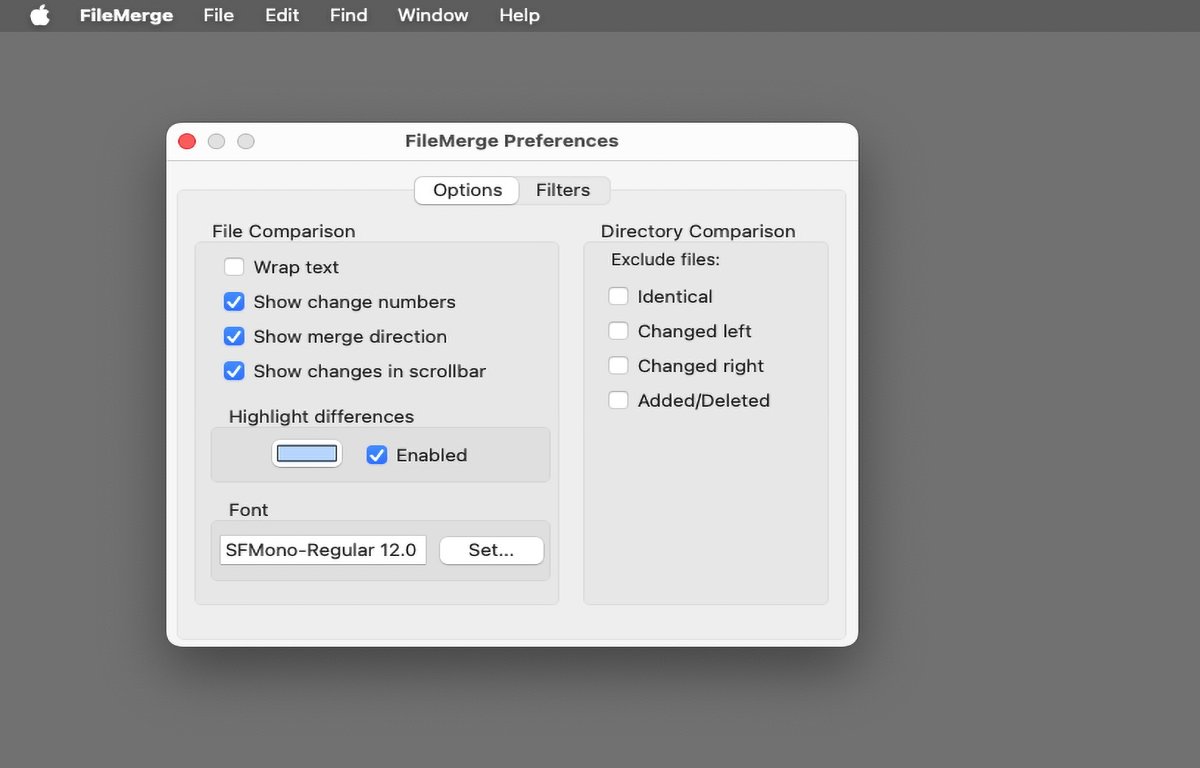
The FileMerge Settings window.
FileMerge has been a mainstay of macOS developer tools for decades, but it's so useful you'll probably find yourself using it daily once you understand how it works. Its interface harkens back to an era when software was small, simple, quick, and easy to use.
It's a hidden gem that has been lurking in macOS for a long time - and once you discover its simple power to compare files, you'll wonder how you got along without it.


