MetalKit is a high-level framework which makes getting to grips with Metal easier. Here's how to get started using Apple's 3D framework.
Getting started
Metal is Apple's 3D graphics and game pipeline to render 3D objects on Apple devices. Designed to replace OpenGL and other 3D frameworks Metal has the advantage of being optimized for Apple hardware to achieve maximum performance.
Metal provides buttery-smooth 3D rendering on Apple devices at performance levels not possible with other 3D frameworks.
You have probably seen an example of Metal rendering on an iOS or macOS device if you've subscribed to and run Apple's Arcade game app. The brief introduction animation in Arcade is rendered with Metal:
Apple Arcade app intro rendered using Metal.
In 2015 at WWDC, Apple introduced another, higher-level framework for Metal called MetalKit. This framework makes it easier to use Metal by providing some higher-level functions which make 3D app development simpler.
Specifically, MetalKit provides additional Metal APIs in the following areas:
- Texture loading
- Model I/O
- View management
Texture loading
Using MetalKit, asset and texture loading is easier by using the MTKTextureLoader class. This class provides an easy way to load assets and textures as well as set texture options.
These options include mipmap usage and loading, cache and storage modes, texture coordinate transformation, cube texture usage, and RGB color options.
A mipmap (or MIP map) is just a multi-layered image with each layer being a progressively lower resolution than the preceding layer. Mipmaps are used to speed image rendering and remove aliasing artifacts such as Moire patterns.
A Moire pattern is a distracting banding or color artifact pattern that sometimes appears in computer graphics consisting of lines or regular pixel patterns such as alternating pixel grids:
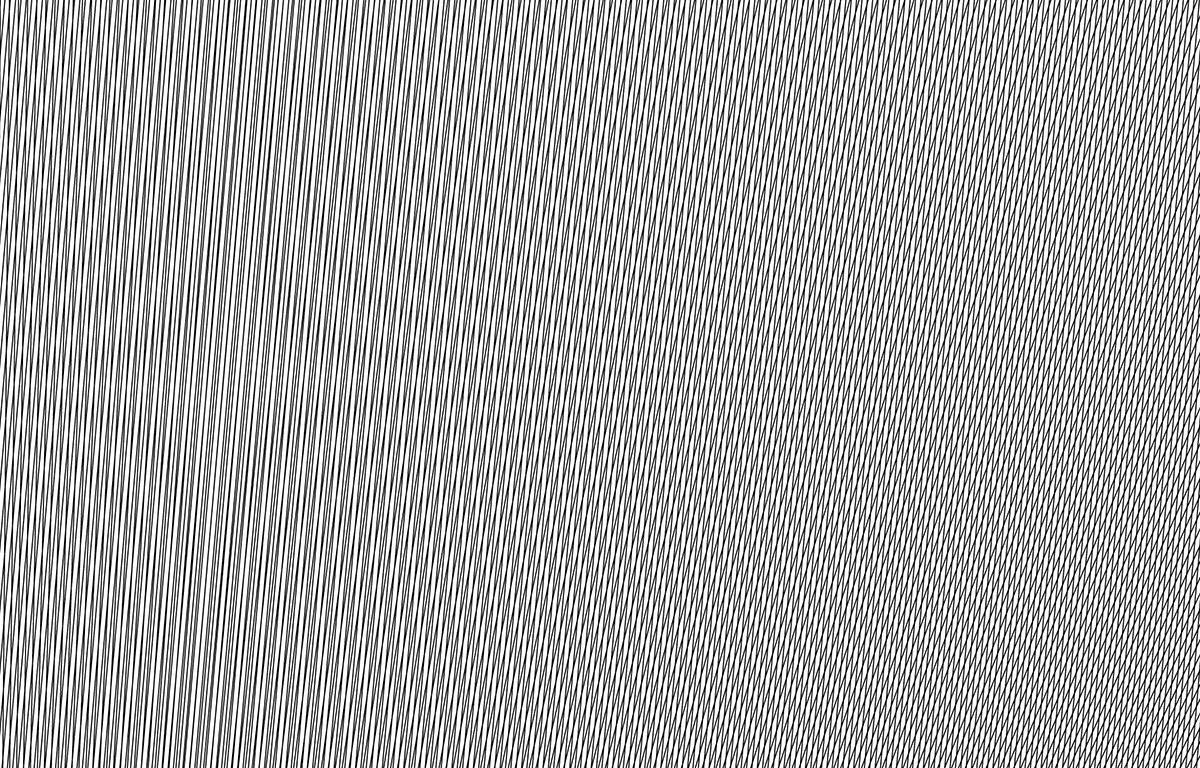
A Moire pattern.
Full documentation for MTKTextureLoader is available on Apple's developer website in the Metal framework documentation at Documentation/MetalKit/MTKTextureLoader.
Model I/O
Model I/O is Apple's developer framework for managing 3D and 2D assets. MetalKit's Model I/O integration includes APIs for quickly loading textures into Metal buffers and use mesh data using containers.
There are currently about a half-dozen Model I/O-related classes in MetalKit, mostly dealing with meshes. (We'll get to classes and object-oriented programming in a minute).
View management
Most iOS and macOS apps use views - standard classes that present visual information and UI elements on-screen. Different view subclasses provide different types of views.
For example, in iOS a UIView is the view base class, but UIButton is a button view class derived from UIView. By using object-oriented view classes in iOS or macOS, you can build additional functionality which relies on standard functionality already defined by Apple classes.
This is known as object inheritance. Think of an object in an app as a bundle of code that encapsulates both code and data that code operates on. By bundling both together into objects, code can be easily reused and repurposed by additional objects.
In particular in MetalKit, a new class - MTKView - is provided which allows developers to create fully-fledged Metal views in apps. By having a dedicated Metal view class, the view can be drawn and managed optimally by Metal without any additional code.
Apple's documentation for MTKView is on the developer website at Documentation/MetalKit/MTKView. MTKView also requires you to first set an MTLDevice in one of its properties to tell it which device and screen to render Metal objects into.
MTKView also provides an MTLRenderPassDescriptor when asked which you can render your textures into. Check out the Documentation/Metal/Render Passes section of Apple's developer site.
A little OOP
In Object-Oriented Programming (OOP), objects are defined by classes. A class is a definition in a source code file that defines what an object contains, and in Swift, the actual implementation of an object.
A class defines methods (functions) that can receive messages sent to them by other objects to perform some function. Each method contains code to perform some work.
A class also defines properties or variables that can contain data. Typically a class's methods perform some work on the class's properties. Most, but not all methods can read most (but not all) properties contained in the class or in one of its superclasses (parent classes).
All of the above is known as object encapsulation. Objects encapsulate both data and methods to keep everything tidy and organized. It's easier to transport, reference, copy, and use objects with their associated data in one place than it is to have to keep track of the data separately.
Inheritance is an OOP feature by which new classes can be defined from another class. The derived object is called a subclass and the parent class is called the superclass.
Long chains of objects can be defined by subclassing. Inheritance is powerful because it allows you to reuse existing code with almost no work.
Subclasses inherit all the behavior and properties of their parent classes with almost no additional work. Subclasses can add additional methods only they (or their subclasses) know about.
Even better, when you instantiate (create) an instance (one copy) of an object in a program it also instantiates a copy of all its superclass objects automatically.
With one line of code, you can gain vast levels of program functionality just by creating one instance of a class.
Instantiation is simply creating an object, allocating memory for it in RAM, and making it available to a program.
All of this is usually defined in one or, in the case of Objective-C, two source code files - usually one or two files per class.
So in our discussion above, an MTKView is defined as a class (by Apple) and is instantiated when created in code (by you). The result is an MTKView object in memory, ready for use. When the MTKView object is no longer needed, it is de-allocated which removes it from memory, destroying it.
Most apps are programs that create, use, manage, and destroy hundreds of such objects.
The OOP programming paradigm is powerful because it vastly reduces the amount of code needed via subclassing and reuse, and keeps programs more modular and reusable by encapsulating code and data.
Once you've written a class to do some specific work, you can simply reuse the class or subclass it in another program to create another app quickly.
Core Animation in MetalKit
Like many iOS or macOS standard views, MTKView also has a Core Animation Layer. Core Animation is Apple's high-performance 2D animation framework.
Most views have a CALayer - a Core Animation layer object which can draw and animate 2D graphics. CALayers can be grouped and combined to create complex animations.
MTKView has its own CALayer subclass called CAMetalLayer which Metal can render into. You can combine CAMetalLayer with other CA layers to create combined 2D and 3D animations.
In most cases for both 2D and 3D CALayers, drawing is much faster and more efficient than the drawing that occurs in UIViews. You can also set the opacity, or alpha of CA layers to make parts of them transparent.
MTKView modes
MTKView supports three modes of drawing:
- Timed
- Notifications
- Explicit
In Timed drawing the view updates at regular intervals set internally in the object. Most games use this mode when a game scene is rendered or drawn at a specific rate described in frames per second (fps).
With Timed mode, you can also set or clear the isPaused property to start and stop the view animation.
In Notification mode, redraw happens when some part of all of the view becomes invalidated. This allows you to redraw just a portion of the view or layer - which takes less time and improves game performance.
To force a redraw using Notification mode simply send the view object a setNeedsDisplay() message to force it to redraw. This forces the view to redraw all its subviews by sending them each a setNeedsDisplay() message also.
In Explicit drawing, you redraw view content by sending the view object a draw() message directly. This is generally discouraged unless you have some custom drawing workflow you use that does something outside the standard view/subview hierarchy.
You can also redraw only parts of a view by sending their subviews setNeedsDisplay() message also, thereby bypassing the top-level view redraw. In general, the fewer objects that get redrawn, the better the performance.
In the case of an MTKView or a subclass thereof, in your drawing method, you obtain an MTLRenderPassDescriptor from the view, render into it, then present the resulting drawable for display.
A drawable is any Metal object which has been encoded and is ready to be displayed.
MTKViewDelegate
In Apple's Swift and Objective-C programming languages, a delegate is an object that performs some work on behalf of another object.
Usually, one object will declare a delegate object as one of its properties, and the delegate declares which methods (functions) it provides.
Delegates are powerful because you can change the behavior of an object simply by changing its delegate property. Delegates are also used to provide additional functionality to objects without having to subclass an object to create another object.
MTKView has its own delegate object called MTKViewDelegate class also described in Apple's documentation. MTKViewDelegate mostly responds to view redraw and resize events.
MTKViewDelegate also inherits from a standard Objective-C protocol common to all Apple objects called NSObjectProtocol.
Think of delegates and protocols as additional objects and methods which can be attached to or "glued" onto other objects.
In Objective-C and Swift, a protocol is simply a list of additional methods a class must implement. The contents of each method in a protocol are up to each class to define.
The MTKViewDelegate is mostly concerned with changing a view's layout (on device rotation, for example), and drawing.
For example, you could define several MTKViewDelegate objects, each with a different behavior, then change your MTKView's drawing or rotation behavior simply by resetting its delegate property to any one of the delegate objects at will and redrawing.
Rendering
When using MTKView, implement the methods of the MTKViewDelegate in your renderer. This allows your renderer to interact with the MTKView and provide drawing and layout changes.
You can obtain info when it is time to render each frame by using the MTKView's currentRenderPassDescriptor property. This allows you to interact with each frame to be rendered.
For example in Swift:
if let onscreenDescriptor = view.currentRenderPassDescriptor
This gets the MTKView's current render pass descriptor and stores it in a variable called onscreenDescriptor.
After rendering, you must use the drawable to update the view's contents. To do so call the present(_:) method on the MTLCommandBuffer object, then send the commit() message and the command buffer to the GPU for display.
There's a more detailed discussion of this process in the MTKView's documentation.
SIMD
Apple also has a math-related framework called SIMD which comes in handy when manipulating 3D and 2D objects and performing calculations on them and matrices. Most of these functions are used to perform fast, efficient floating point math prevalent in 3D calculations.
SIMD can come in handy when you need to transform 3D objects and vertices on objects. The most common and useful data structure in SIMD is simd_float4x4, which is a four-by-four matrix of single-precision floating values.
Tying it all together in Xcode
Armed with all this background knowledge, you're now ready to create a MetalKit app in Xcode. In the following example, we'll assume you'll be creating a simple 3D app containing a single scene that contains a single Metal 3D object.
To write an Xcode MetalKit app you'll need to be familiar with Apple's Swift and Objective-C programming languages, and a little bit of ANSI-C - an earlier C-only language invented at Bell Labs in 1972 when UNIX was created.
To get started open Xcode, and select File->New Project from the File menu. From the project template chooser, choose iOS or macOS at the top, then choose Game from the icons below and click Next:
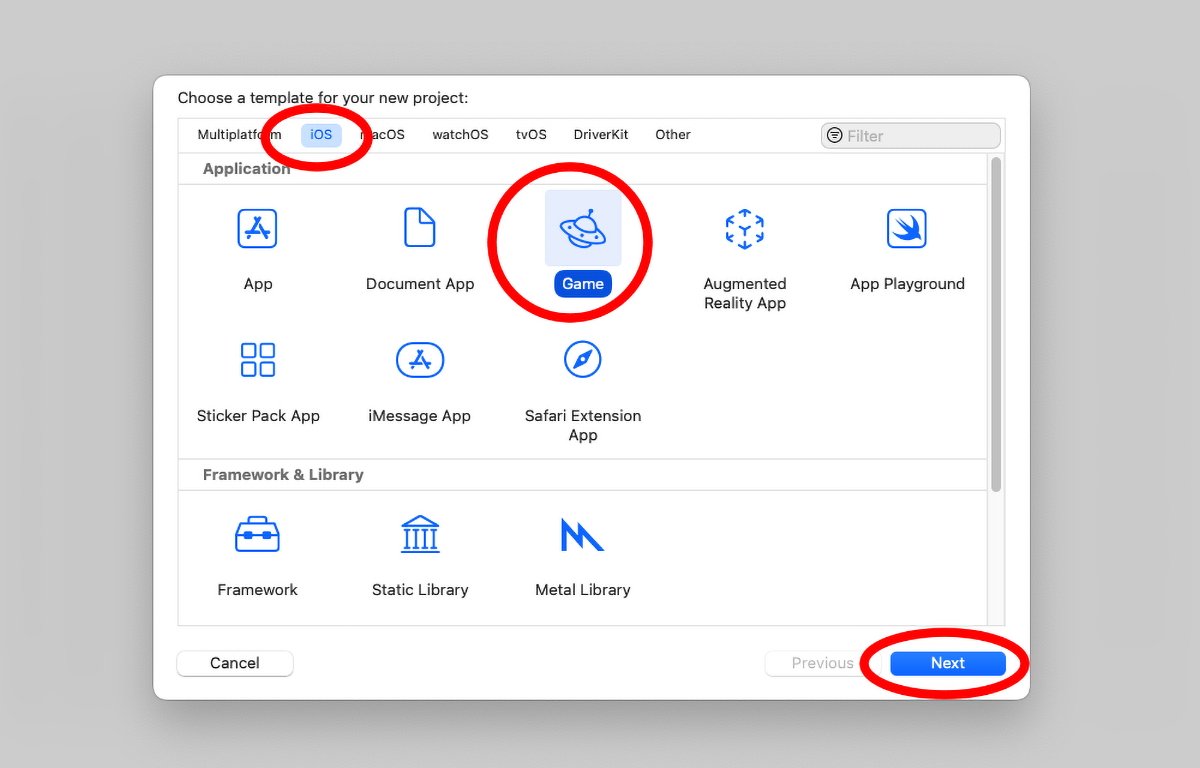
Chose the "Game" template.
On the next pane enter an app name, bundle ID, and organization info and select Swift and Metal from the two lower popup menus:

Enter project details.
Click Next and save your new Xcode project to disk.
You'll also need to define a texture image for your 3D object as a .png file and add it to your Xcode project. This texture file gets "wrapped" onto your 3D object at render time.
Xcode's Metal game template app provides the minimal default template source files you'll need for your app, but first, you'll need to add the Metal frameworks to tell Xcode to link those frameworks to your app at runtime.
To do so, in the Xcode project editor select the name of your project by selecting the project icon in the upper left corner of the project window, then select the target name to the right of that under the Targets section:
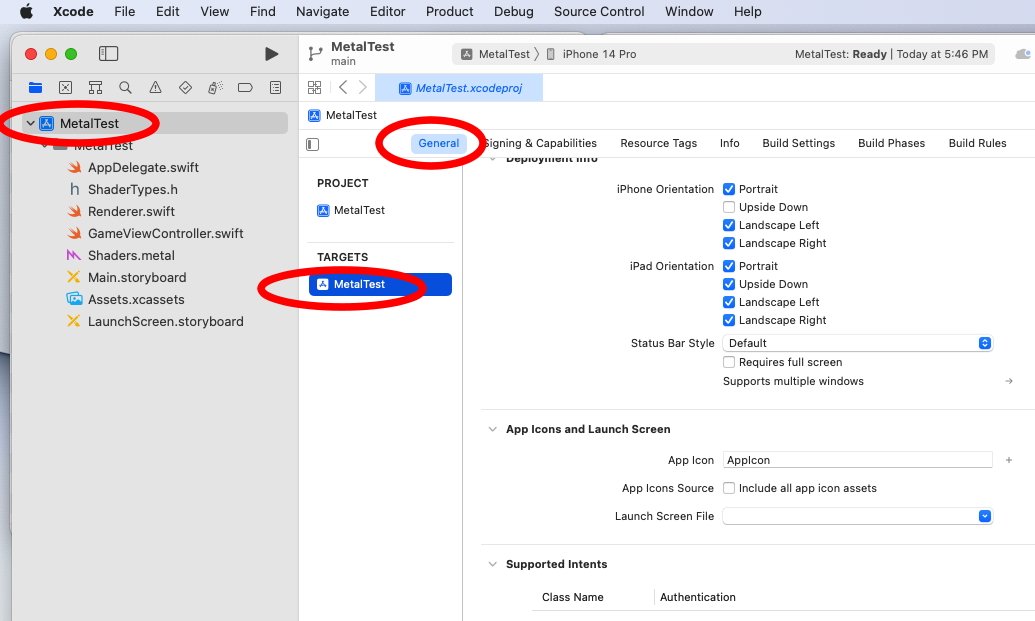
Select the target.
Scroll to the bottom of the window and under the "Frameworks, Libraries, and Embedded Content" section, click the "+" button. The framework selection pane will appear.
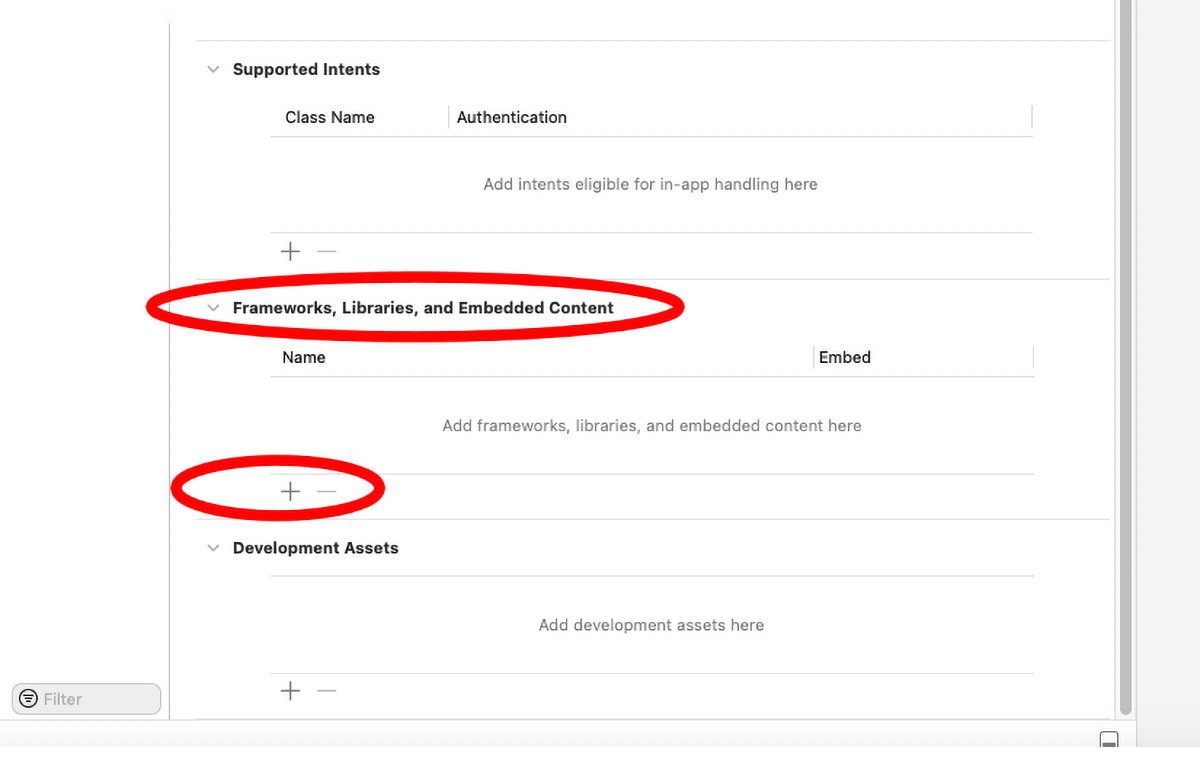
Click the "+" button.
Type "metal" in the search box at the top, and Command-click on six of the seven frameworks listed, excluding the "MetalFX.framework". There are hundreds of Xcode frameworks available.
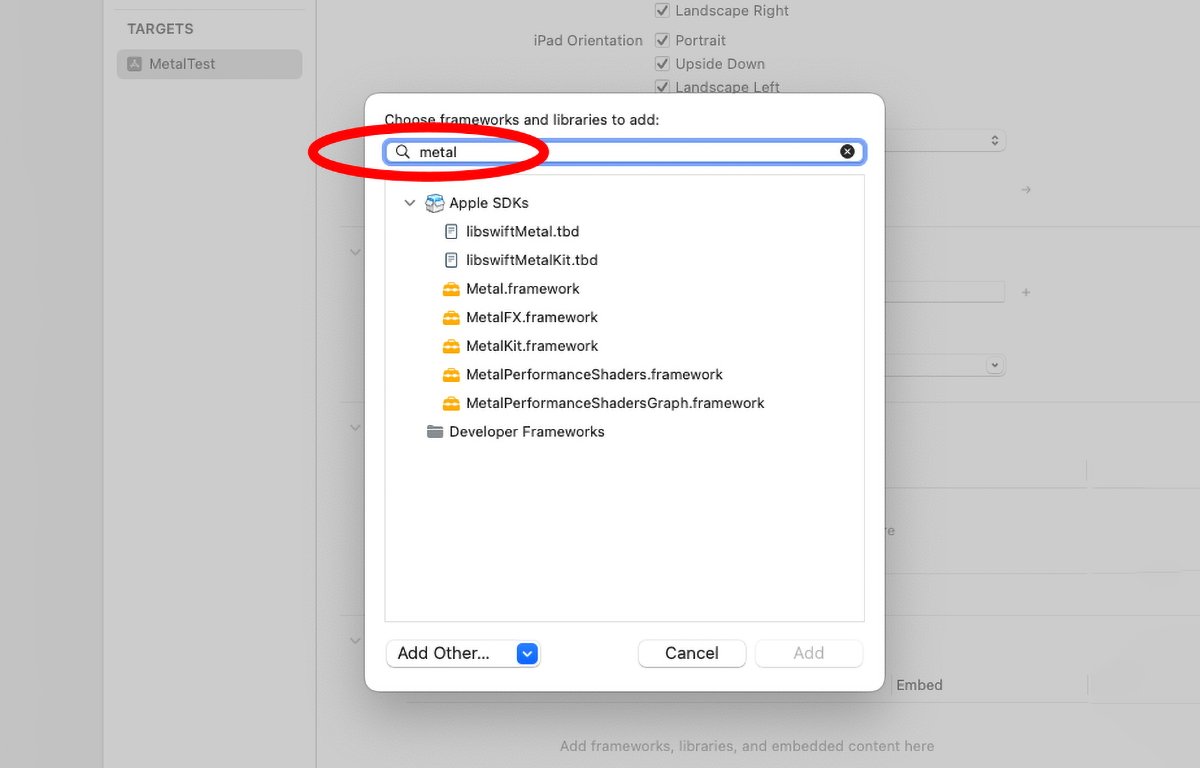
Add framework sheet.
You'll also want to add the libswiftsimd.tbd library, Core Services frameworks, and optionally the Accelerate framework.
"tbd" is a placeholder for "To be determined" as the version numbers of the actual code libraries can change. Including a .tbd library in Xcode tells Xcode to use the most recent version of that library.
If you want to use Model I/O to manage assets, also add "libswiftModelIO.tbd" and "ModelIO.framework".
If you created an iOS app in the template chooser, also add UIKit.framework. If you created a macOS app in the template chooser, also add Cocoa.framework.
Finally, include the Foundation.framework and CoreFoundation.framework. Foundation is a core C-language framework that most iOS and macOS apps use. All Foundation API calls are in plain C.
Shaders
Complete code for a Metal game app is beyond the scope of this article so we'll briefly cover just the basics here for our one-object example. Apple's sample project template creates a single 3D cube that rotates in space.
Xcode creates an app delegate file that controls the general event loop of the app itself, and a ShaderTypes.h file which is a header file defining the shader's mesh and vertex info along with a C struct defining the projection matrix and model view matrix.
These are used by the shader when drawing.
The "Shaders.metal" file imports the "ShaderTypes.h" header file defined above which is shared between the renderer and the GameViewController.swift file which we'll get it in a moment. You import header files into other Swift or Objective-C source code files using the import preprocessor directive:
#import "ShaderTypes.h"
Preprocessor directives are compiler instructions that run prior to actual compilation and usually begin with a "#" sign.
"Shaders.metal" also imports two other files, metal_stdlib and simd.h using the earlier ANSI-C import directive #include. Both #import and #include are similar and we won't get into the detailed differences between the two here.
Below that you'll see this line:
using namespace metal;
Namespaces are a C++ idiom that allows similar or identical sections of code to be defined and isolated by defining them under a namespace. Each namespace has its own name, in this case metal.
In Shaders.metal you define a Vertex and ColorInOut structure, and several functions which define the shaders - in this case only a vertex shader and fragment shader. The fragment shader also contains a sampler variable which allows you to define and use mipmaps if you wish.
The fragmentShader function takes as its arguments color information, a Uniforms structure defined in SharderTypes.h, and a texture2d as defined in the Metal library header "metal_texture".
The Uniforms parameter contains, as previously discussed, the projection matrix and the model view matrix.
Renderer
The next file, Renderer.swift defines the object's Renderer class which inherits from the base Objective-C class, NSObject and conforms to the MTKViewDelegate protocol.
As a bit of a historical note, NSObject harkens all the way back to the NeXT Computer days - Steve Jobs' second company after he was fired from Apple in 1985. NeXT invented Objective-C and had an OS and framework called NeXTStep. The "NS" in NSObject stands for "NeXTStep".
Most early NeXTStep objects had the prefix "NS" to differentiate them from third-party objects. When Apple bought NeXT Computer Inc. in 1997 it acquired all of NeXT's technology, including NeXTStep.
To this day macOS and iOS are based on NeXTStep.
Properties of the Renderer class include a MTLDevice, MTLCommandQueue, MTLBuffer, MTLRenderPipelineState, MTLDepthStencilState, and MTLTexture as well as properties for the matrices, rotation, mesh, and a semaphore.
A semaphore is a thread (path of execution) that relies on a flag to tell it when it can run and when it can't.
When you instantiate a Render object, you pass it an MTKView in its init method, which we'll get to in a moment.
As soon as the object is created, its init method runs, and all the code in that method runs.
The init method sets up and assigns all its properties at the top of the method, then creates a render buffer via the self.device.makeBuffer() line.
Then it sets a few properties on the metalKitView passed in to the init method, creates a vertex descriptor via Renderer.buildMetalVertexDescriptor(), and then builds the render pipeline via Renderer.buildRenderPipelineWithDevice().
Next, the code creates depth and stencil info, and then creates a mesh via Renderer.buildMesh.
Finally, it builds a color map and texture via Renderer.loadTexture().
You'll need to use the Renderer's texture loader method, loadTexture:device:textureName: to load your texture from the .png file you created above - passing the method your texture's filename - in this example "ColorMap".
The do/catch Swift construct is for error handling. The code contained in do is attempted and if it fails, the catch block is run, else program execution continues normally.
The superclass's init() method
Finally at the end of the Renderer's init method the superclass's init method is run:
super.init()
Sending the super.init() message to the superclass at the end of a Swift class's init method ensures the entire chain of objects in the class hierarchy gets created. This is a standard pattern in Swift and Objective-C.
If you fail to call a superclass's init method, it's highly likely the object will crash, or at best not function properly - or your app itself will crash.
Since subclasses rely on superclass methods while running, if the superclass object doesn't exist, a subclass's method call may be sent off into random memory space where the code it is expecting doesn't exist.
When that happens and the processor tries to execute the code at that memory location, a crash is certain - there's no code there to run.
super.init() is usually called last in Swift and Objective-C in order to give your object time to do any setup it needs before the superclass object is set up.
Finally, the Renderer's init method ends with the closing "}" brace.
Renderer methods
Immediately after the init() method in Renderer.swift are the actual implementations of the other methods in the Renderer class. Each Swift function is prefixed with class func followed by the function name, and any function parameters in parenthesis.
If a Swift method returns a value upon completion, that return value type is defined by the -> construct. For example:
class func buildMetalVertexDescriptor() -> MTLVertexDescriptor defines a method (function) named buildMetalVertexDescriptor which returns a MTLVertexDescriptor on successful completion. This is called the return value or return type.
As we saw previously the buildMetalVertexDescriptor method is called internally on object instantiation from the init()method. Many objects work this way.
But most methods can also be called from external objects unless a class definition explicitly prohibits it.
Game loop
The Renderer game loop drives most Metal games, along with the Renderer and MTKView's draw methods. This combined with the main event loop monitored in the application delegate object drives the app as it is running on a device.
In the Render.swift file you'll notice a method named private func updateGameState() this method can be run periodically to update any state stored in the game such as object positions, mouse, keyboard, or game controller inputs, position, timing, scores, etc.
The Swift keyword private means this method is private to and can only be called from this object and any extensions defined in this source file only - external objects can't send that message to the Renderer object.
This additional access control ensures correct program execution only from within and by certain objects - in this case since the Renderer is responsible for the general execution and control of the game, you wouldn't want any external object interfering with it.
Apple has an entire object Access Control section in the Swift developer documentation on the Swift Documentation website.
Frame rendering
Next in Renderer.swift, we see the draw() method:
func draw(in view: MTKView)
You pass in the MTKView you want the drawing done into. Note this function has no return value. Such functions in Swift and Objective-C are called void functions.
In the draw() method, which gets called once per frame, the semaphore is told to wait for a certain amount of time:
inFlightSemaphore.wait()
Then the command buffer is created and sent to the semaphore for rendering, adding a completion handler.
A completion handler is a function that gets run automatically when some other tasks or thread finishes. Completion handlers are a way of executing code in a sequential manner but only when some other section of code finishes.
Completion handlers provide guaranteed execution of code, but without having to write code to manage complex timer algorithms and wait conditions.
Next, the 3D object buffers and game state are updated in that order:
self.updateDynamicBufferState()
self.updateGameState()
Next, a render pass descriptor is obtained from the MTKView and the render pass encoder properties are updated:
let renderPassDescriptor = view.currentRenderPassDescriptor
Then a short loop runs to get the mesh vertex descriptor layouts and buffers and store them in the render encoder. Then the render encoder's fragment texture info is set:
renderEncoder.setFragmentTexture(colorMap, index: TextureIndex.color.rawValue)
Next, for each mesh (object) in the .submeshes array, renderEncoder.drawIndexedPrimitives() is called. This is where each object in the scene is encoded.
To end the encoding phase renderEncoder.endEncoding() is called. The objects are now all ready to be drawn.
The view's drawable is then obtained via:
if let drawable = view.currentDrawable
and if successful, the entire command buffer is then drawn with:
commandBuffer.commit()
The call to commit actually sends the scene's frame to the GPU for display onscreen.
All of the above happens at thirty, sixty, or one-hundred twenty fps.
The Renderer.swift file ends with a few general 3D math transformations and rotation functions.
Displaying the scene in a view onscreen
You will notice two additional files in the Xcode project: GameViewController.swift and Main.storyboard. These are typical files found in most iOS apps.
A typical iOS app contains a central top-level UIViewController class defined in the UIKIt framework. A UIViewController is a class that manages and controls another UIKIt class - UIView.
A UIView class is a class that contains other UIView subclasses such as buttons, images, text, and other UIKIt objects. UIView is how an iOS app's user interface is represented onscreen.
Every UIViewController class has a property named view which is an instance of UIView. The view controller manages the UIView.
If you look at Apple's documentation for UIViewController, you'll notice a half dozen methods for managing the view - namely methods for loading the view, being notified when the view loads, and unloading views.
In most iOS apps, you don't load the top-level view directly - you load it by instantiating a UIViewController subclass you define (in this example a GameViewController). The user interface part of the view is created in Xcode's Interface Builder editor, or via a text-only SwiftUI view.
Typically when creating an iOS app, you lay out each view in Interface Builder by dragging visual components from the Xcode library and dropping them into a view controller object onscreen.
Once your UI objects are all laid out onscreen you connect them to a view controller's properties via a Control-click and drag from each UI element to the view controller's first responder. A first responder is the first object in a view controller object hierarchy that is capable of responding to that object's messages.
When you release the mouse button from your Control-click and drag above, Xcode displays a list of available object properties to connect the object to.
That's it - you typically don't have to do any coding for each UI element - when the view controller gets instantiated and loaded into memory, the Swift or Objective-C runtime makes all the UI connections for you automatically.
This vastly simplifies application development.
Storyboards and Segues
Storyboard files were later added to Xcode to simplify UI layout even further: with Storyboards you define Segues between view transitions - when users navigate between each view on the device, the Segue function you indicate gets called where you can then do any initial view setup or cleanup.
Segues eliminate most view-loading code.
viewDidLoad()
In any case when a view controller finishes loading a view, the controller's viewDidLoad() method gets called. It's in viewDidLoad() that you do any additional view setup you need. Once viewDidLoad() exits, the view is ready to use and is displayed onscreen to the user.
You can subclass both UIViewController and UIView to make your views highly customizable. The one thing to remember is that most UI elements in iOS are stored as properties in a UIViewController subclass.
It is possible to create views and view controllers entirely in code without a Storyboard or Interface Builder, but doing so is much more complex and time-consuming.
GameViewController.swift
Let's take a look at GameViewController.swift
The class is defined at the top of the file:
class GameViewController: UIViewController
This means GameViewController is a subclass of UIViewController.
The class definition is contained in matching open and closed brackets ("{", and "}").
Note that the GameViewController class is very short - just over a page. Most of the game processing work happens in the shaders and renderers.
Next, we see two Swift properties as defined by the var keyword:
var renderer: Renderer!
var mtkView: MTKView!
Next we see that GameViewController overrides the UIViewController method viewDidLoad() using the Swift override keyword:
override func viewDidLoad()
This means that when the view controller loads the view and sends the viewDidLoad() message, the GameViewController version of the method will be run instead of the UIViewController version. This is a perfect example of inheritance in action: you can choose to let a superclass's method run, or override it in a subclass and use that method instead.
Note that in order for this to work, the declarations of both methods in both classes must be identical.
The first thing the override func viewDidLoad() does is send the superclass (UIViewController) a viewDidLoad() message. This allows the UIViewController to do any UI view layout initialization it needs to do.
Without this "super" call the view won't work correctly because some of its internal parts won't ever get initialized.
Next, the GameViewController object loads the MTKView and stores it in its internal property mtkView:
guard let mtkView = view as? MTKView else
guard is simply a Swift conditional test to see if something succeeded - similar to if.
GameViewController then also stores a reference to the device's Metal device in its internal defaultDevice property.
guard let defaultDevice = MTLCreateSystemDefaultDevice() else
The important thing to understand here is that the two internal properties or variables:
var renderer: Renderer!
var mtkView: MTKView!
store references to other objects in memory - in this case the renderer and the Metal view. Once stored, the GameViewController object can access those objects at will. This pattern is how most objects work in Swift and Objective-C.
In Objective-C these two properties would have been declared as:
Renderer *renderer = nil;
MTKView *mtkView = nil;
nil is an Objective-C placeholder which means "nothing" or more specifically no address in memory. nil is used to indicate an Objective-C property or variable doesn't contain anything.
The '*' is a standard indicator for a C or Objective-C pointer - a variable that holds a memory address to an object instead of a value. Pointers are a complex subject so we won't get into them here.
Also note that Objective-C and C code lines must end with a ';' (semicolon). This isn't optional - without the semicolon, the code won't compile and you'll get an error.
Swift dropped semicolons (but you can actually still use them if you want).
Next the GameViewController stores more references to other objects but this time inside the mtkView property object:
mtkView.device = defaultDevice
mtkView.backgroundColor = UIColor.black
This means store the default rendering device in the mtkView.device property, and store a black UIColor in the tkView.backgroundColor.
UIColor is a standard UIKit object to indicate color - in this case set to black, which will be used as the scene's background color. Every UIColor object has a .backgroundColor property.
Note what you're actually doing here is storing references to objects in properties which are themselves properties of this class's properties. This is confusing at first but once you get the hang of it it's easy to understand.
By chaining properties across objects, you're really just Dasiy-chaining objects together.
You can have properties pointing to properties, pointing to other objects. There's theoretically no limit on how deep property references can go.
Before you release (destroy) an object you should set all its properties to nil in the class's deinit() method to ensure all references to other objects get released. Failure to do so can result in memory leaks and unwanted retain cycles.
In Objective-C deinit() is called dealloc.
Continuing, the Renderer object is created, passing in the MTKView object and a reference (pointer) to the Renderer is stored in the view controller's renderer property:
guard let newRenderer = Renderer(metalKitView: mtkView) else
renderer = newRenderer
First, you create the object, then you store a reference to it in a property.
Then the renderer's pointer to the MTKView is sent the drawableSizeWillChange message:
renderer.mtkView(mtkView, drawableSizeWillChange: mtkView.drawableSize)
This lets the renderer know what the view's current drawable size is so it knows how and where to scale the scene when it gets sent to the GPU. Note that the drawable size is stored in the MTKView already in its .drawableSize property.
This demonstrates that you can pass an object's properties to methods as parameters.
Finally, the view's delegate is set to the renderer itself:
mtkView.delegate = renderer
Recall that in the Renderer.swft file the Renderer class is declared as conforming to the MTKViewDelegate protocol:
class Renderer: NSObject, MTKViewDelegate
This is what allows the mtkView.delegate property to be set to a Renderer object. Without the MTKViewDelegate protocol conformance in the Renderer class definition, the mtkView.delegate = renderer line would likely throw a warning or error when compiled saying that the renderer property doesn't conform to the MTKViewDelegate protocol.
Also note that one critical gotcha for newcomers to Xcode is that before you destroy a view controller object you must first set its .delegate property to nil. Failure to do so will guarantee your app will crash.
This in fact applies to any Swift or Objective-C object which contains delegates - not just to view controllers.
Why? Because if you don't release the reference stored in the delegate property first, between the time the containing object actually disappears from memory and the time the system realizes the object has been destroyed, some other object may have sent the delegate object another message.
Not realizing the object which contained the delegate property no longer exists, the message sent to the delegate may still be waiting to be processed - and when it does get processed the delegate is now invalid because its containing object no longer exists.
The delegate gets left dangling in memory but its containing object is long gone - and the system thus has no way to locate the delegate object the message is bound for.
Boom - a crash.
Sending a message to nil in Swift and Objective-C won't have any harmful effects, and is valid, but sending a message to an address in memory where an object is supposed to be but isn't will definitely cause a crash.
Run the app
Now you're finally ready to run the Metal sample app.
Click the Play button at the top of the Xcode window and the code will compile. If there are no errors and everything works, Xcode will launch the iOS Simulator and run the app in it:
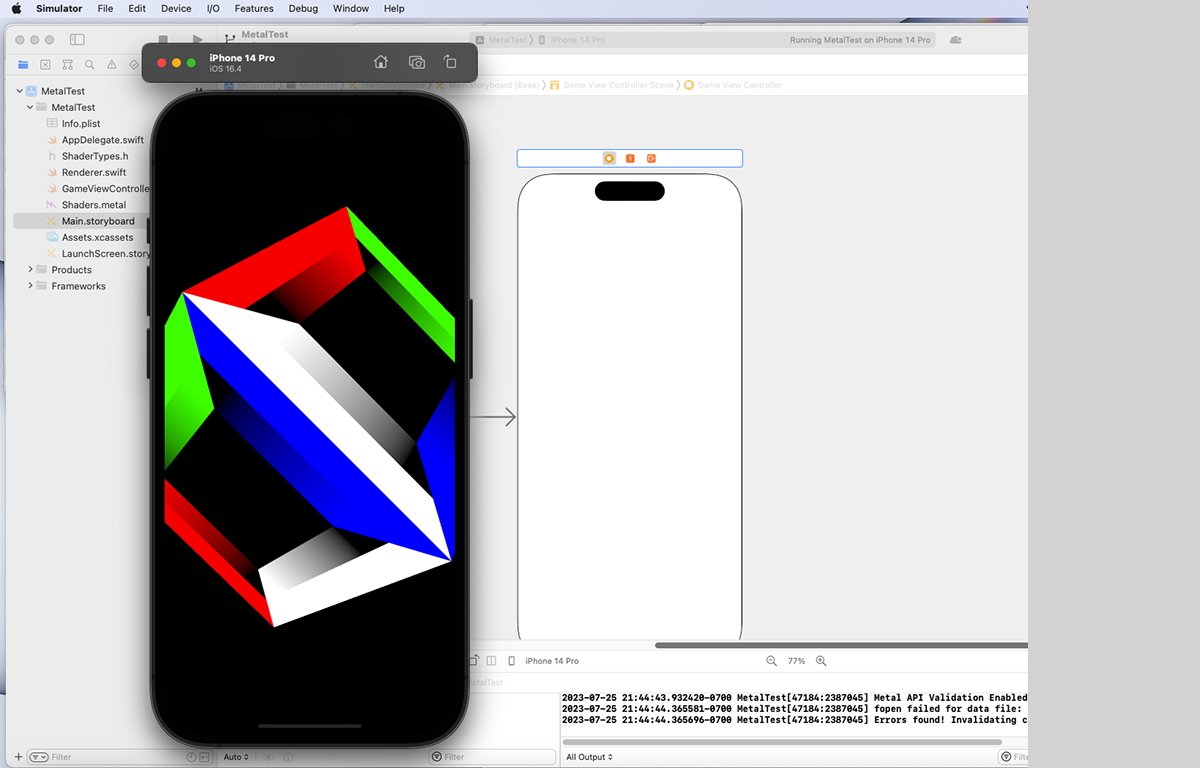
Sample app running in iOS Simulator.
Note some, but not all, Metal code won't run in the simulator. You'll have to run those Metal programs on a real iOS device instead.
Final Interface Builder tips
As one last look at the sample project, we need to go over a few items in Interface Builder.
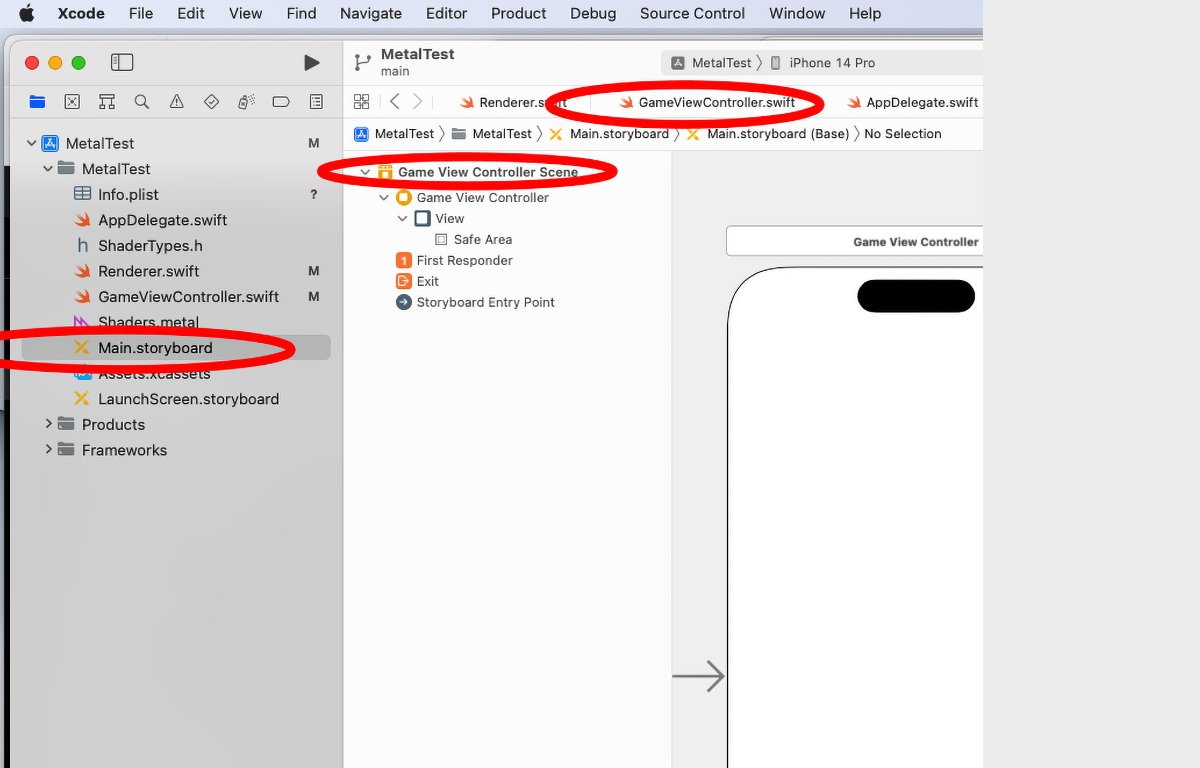
Select the Main.storyboard file in Xcode.
If you are new to Xcode and Interface Builder, note that one critical aspect of iOS development most newcomers overlook is that of class names. The class names each item has in Xcode must match exactly each class name as defined in the source code files.
If they don't, your app won't work.
For example, the view controller must have its class name set in the Custom Class field in Xcode's object info panel on the right side. To do so you have to click the Storyboard or .nib (Interface Builder) file, then click the class name in the Scene or view hierarchy, then verify or set the class name in the inspector on the right:
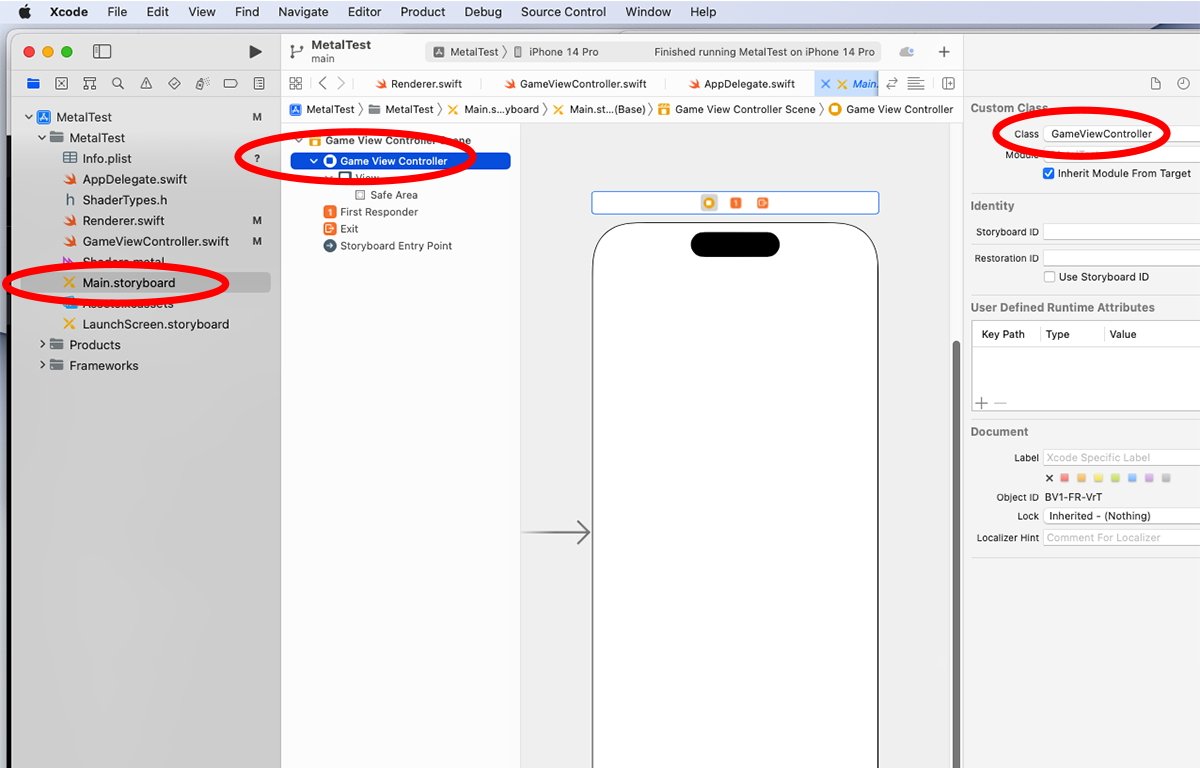
Make sure class names are set in the Storyboard file.
The same holds true for Views and their class names, and other objects such as delegate properties. Failure to set even one class name or property can cause an app to not work.
Most of these usually get set in template files created by Xcode, but it doesn't hurt to check.
One thing that oddly doesn't get set in Xcode template files are the connections between view controllers and their View properties. You have to make these connections manually or else your app won't work.
For example in our sample project, if you Control-click on the Game View Controller object in the view hierarchy you'll notice that the View property is set to nil. You'll need to connect the View to the Game View Controller by Control-clicking and then dragging from the Game View Controller to the View in the hierarchy.
When you do, the "Outlets" panel will appear and you need to connect to the "view" property to the Game View Controller object manually:
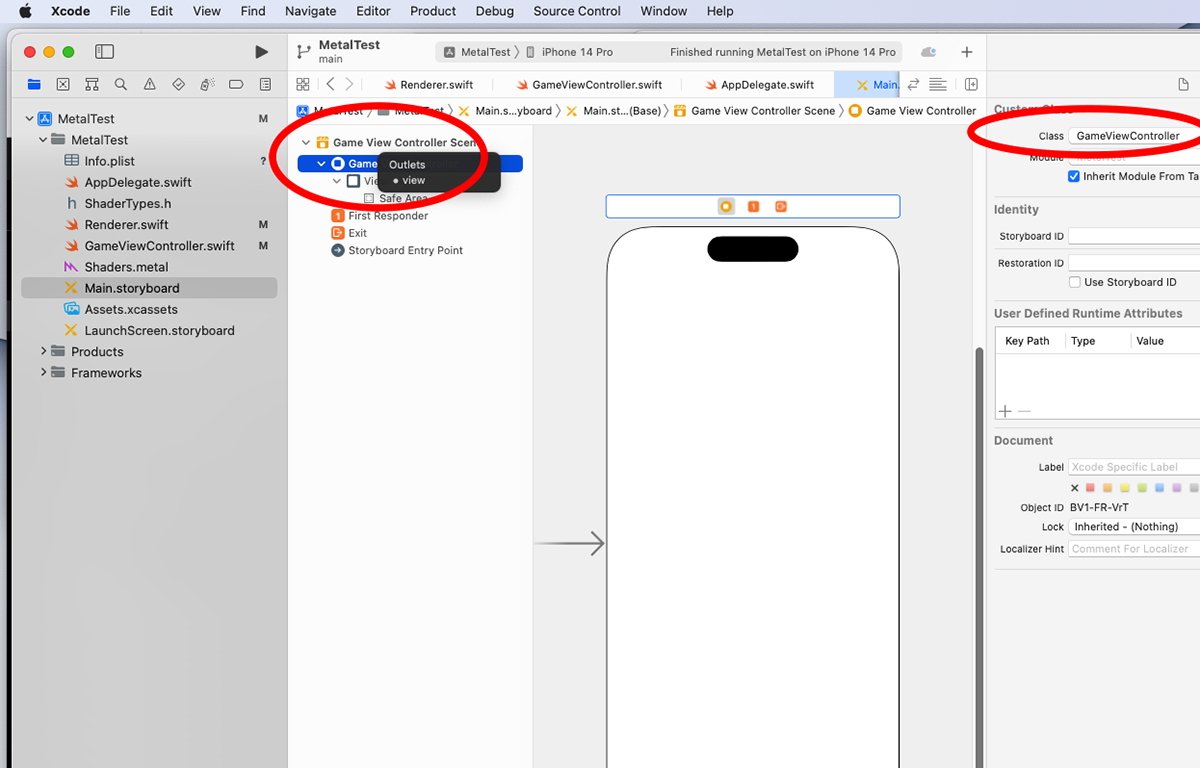
Connect the view controller and view via the Outlets pane.
Without this connection, the app won't work. And the sample template files created by Xcode don't make this connection for you by default.
Note that the small dot next to outlet names in the Outlet panel indicates whether any given outlet is connected or not.
You may have also noticed that the AppDelegate.swift file contains a subclass of AppDelegate which contains empty boilerplate code but there are no references to the GameViewController anywhere in the app delegate file.
So how does the GameViewController get loaded when the app runs?
The answer is the Storyboard file defines the initial view controller and loads it automatically for you when the app first runs. If you were using older .nib-style (Interface Builder) files and code to load the initial view controller, your app instead would have manually created and loaded a GameViewController object instance in the AppDelegate's application:didFinishLaunchingWithOptions method.
Once the view controller then loaded the view, you would get the viewDidLoad() message on the app delegate if you set the AppDelegate as the view controller's delegate.
Additional resources
In addition to Apple's online MetalKit and Metal documentation, there are a number of other good Metal resources you may want to check out.
Be sure to check out metalkit.org and metalbyexample.com which have lots of great tutorials on MetalKit and Metal itself.
Also, be sure to get the definitive third-party book on Metal, the Metal Programming Guide: Tutorial and Reference via Swift by Janie Clayton which teaches you just about everything there is to know about Metal programming.
This has been a long tutorial, but now you should have a much greater understanding of how Metal apps work and how to use MetalKit in your apps to easily load textures and render Metal objects in views in iOS apps.