Widgets have been around on macOS and iOS for years. Here's how to use Apple's WidgetKit to create your own versions.
What are Widgets?
Apple introduced Widgets years ago first in macOS Tiger and later in iOS 14 in 2020. Simply put, Widgets are small applets that display info to users temporarily without having to launch a full-blown app.
Originally macOS Widgets were part of the macOS Dashboard.
In macOS, originally you dragged Widgets onto the desktop, where they floated. Later Apple moved them all to the macOS sidebar where you access them by clicking on the clock in the upper-right corner of the macOS menubar.
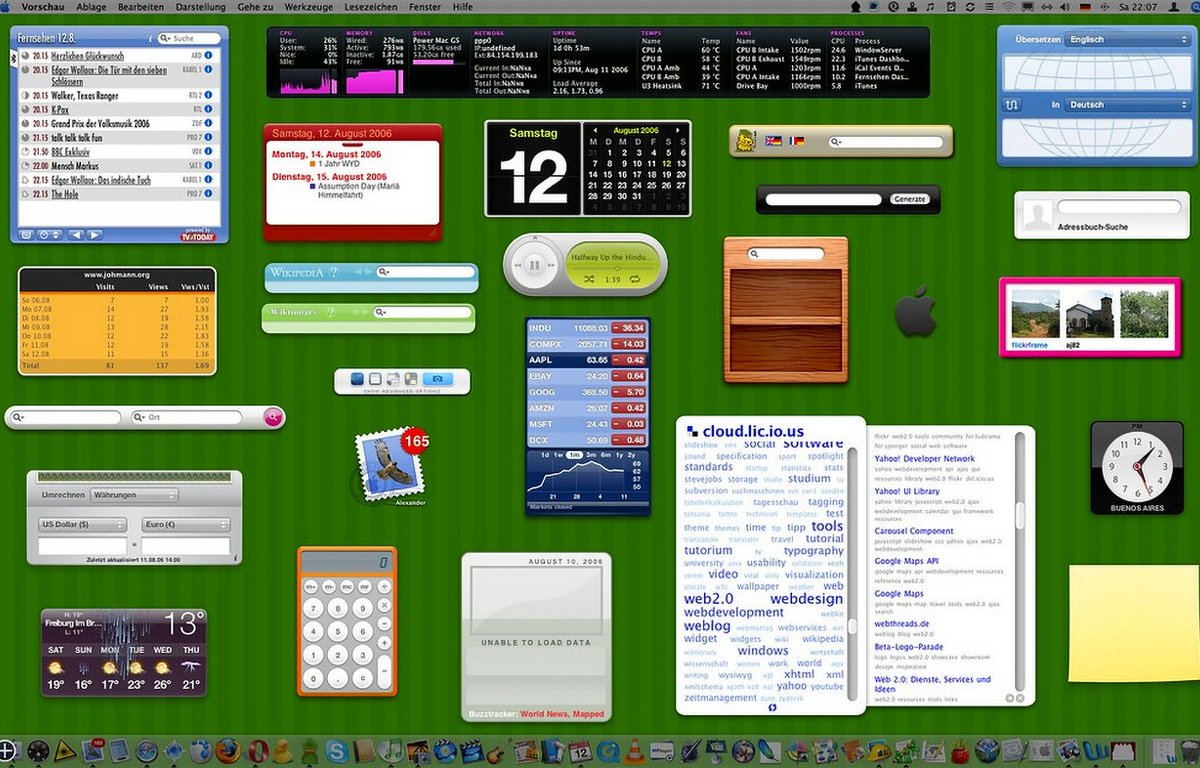
The original macOS Widget Dashboard.
In this fall's macOS Sonoma, Apple is once again allowing you to display widgets on the desktop.
Currently in macOS Ventura, to edit the Widgets in the sidebar, open the sidebar by clicking the menu bar clock, then Control-click on any one Widget in the sidebar:
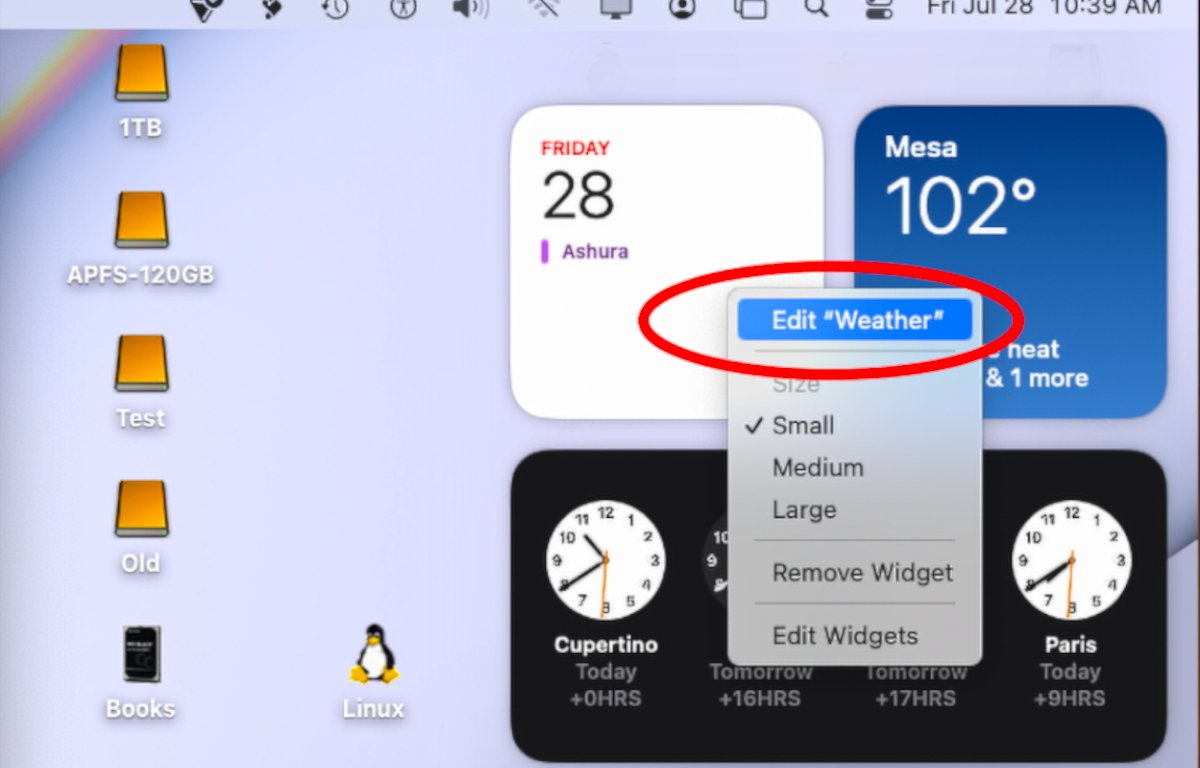
Control-click a Widget to edit it.
To edit the list of Widgets displayed in the sidebar, Control-click any one widget and select Edit Widgets from the same popup menu.
This opens the Widget Editor which shows the Widget sidebar on the right, but also displays all available Widgets in a pane on the left. To add a Widget to the sidebar, drag it from the lefthand pane into the Widget sidebar on the right:
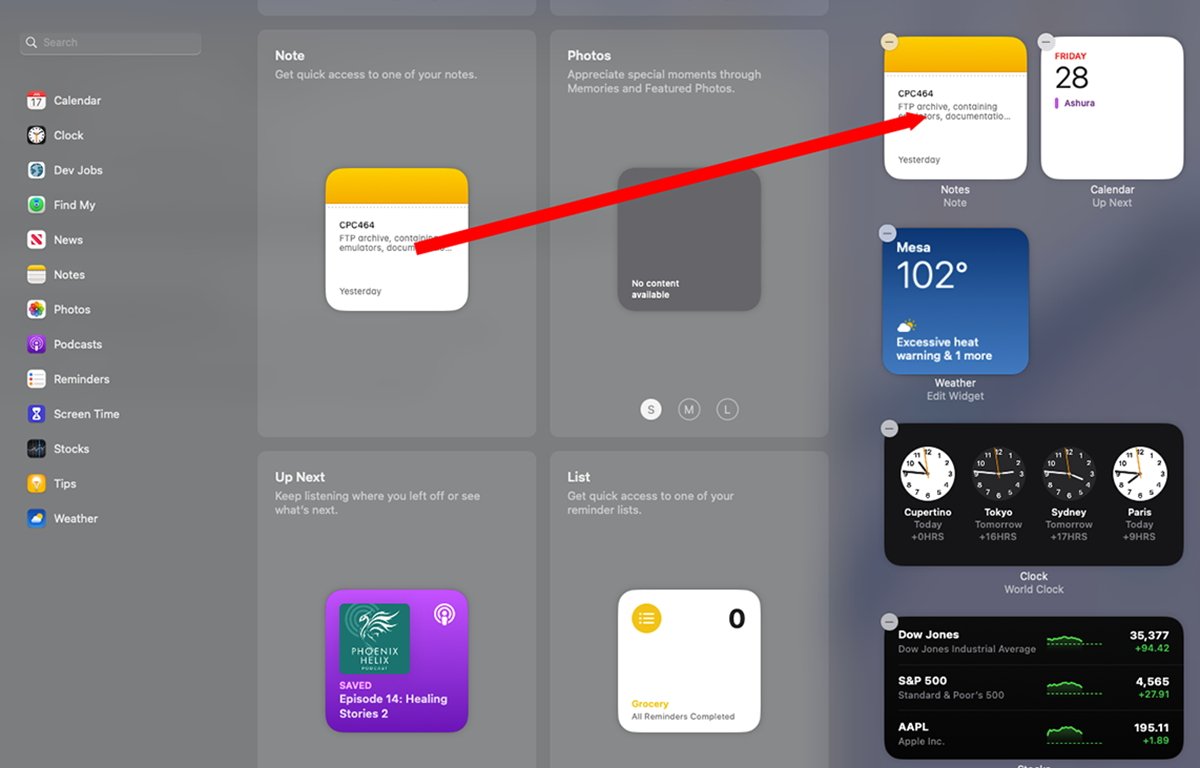
Drag a Widget from the left to the right.
Creating your own Widgets
Originally, Wigets were bundles written in HTML, CSS, and JavaScript and which used the WebKit framework. Apple has removed most of the documentation for these older-style Widgets.
If you still need to create Widgets for earlier systems, check out Beginning Mac OS X Tiger Dashboard Widget Development by Fred Terry from WROX Publishing (ISBN 978-0-471-77825-7).
At WWDC 2020, Apple introduced a brand new framework for developing Widgets called WidgetKit. Apple has full WidgetKit developer documentation on its developer website at Documentation/WidgetKit.
Modern Widgets are written using WidgetKit in SwiftUI, which we'll get to in a second. You'll also need Apple's developer IDE, Xcode - which you can download from the Mac App Store for free.
To write a Widget you'll need to know the Swift language, SwiftUI, and Xcode. Keep in mind that in most cases, Widgets are really additions to existing applications.
Full SwiftUI documentation is on Apple's developer site at /Documentation/SwiftUI. Apple also has a SwiftUI Tutorials page at https://developer.apple.com/tutorials/swiftui/
Getting started
Creating complex Widgets is beyond the scope of this article so we'll use a simple example here. In future articles, we'll delve more in-depth into developing complex and full-featured Widgets.
Widgets live inside an app in the /Contents/Plugins folder inside the app Bundle. Bundles in macOS and iOS are just special folders that package all app code and assets together in one place.
To use your Widget you'll need to create a macOS app first using Xcode, build it, then build your Widget and install it inside your app's /Contents/Plugins folder.
To do so manually, Control-click your app on the macOS desktop and select Show Package Contents from the popup menu:
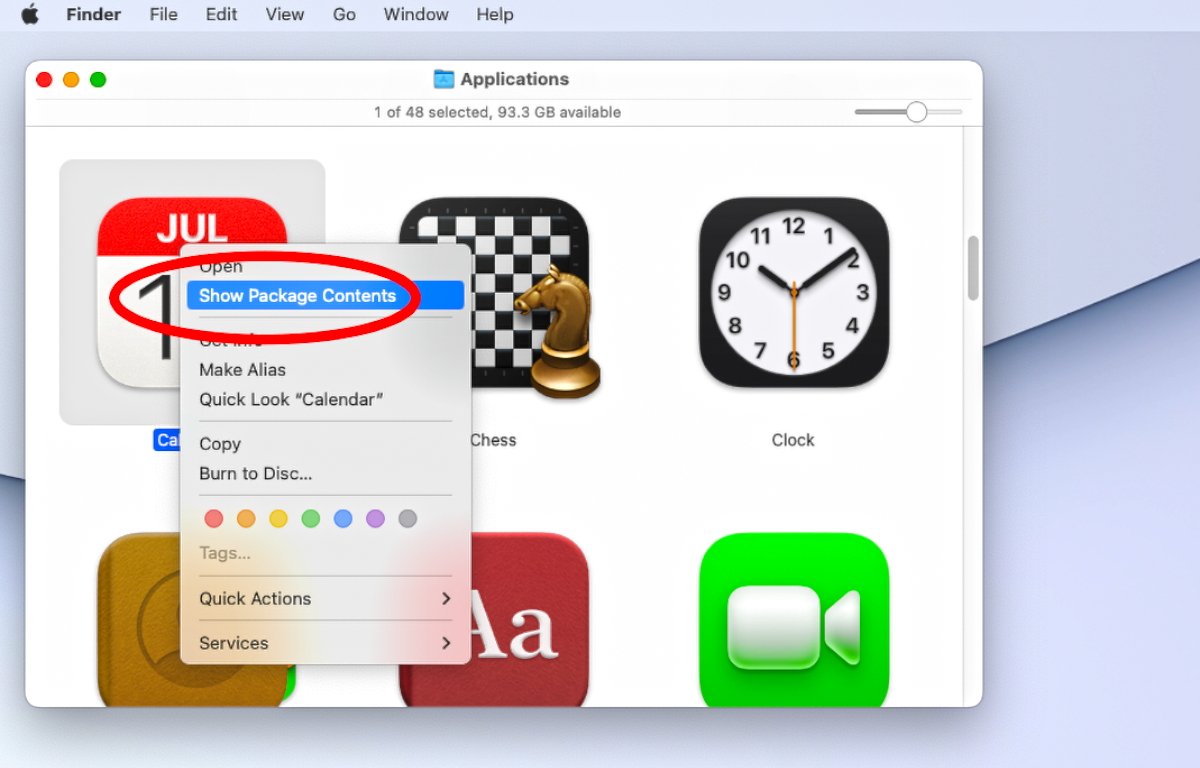
Control-click your app on the desktop.
Navigate to the /Contents/Plugins folder. Widgets have an app extension of .appex.
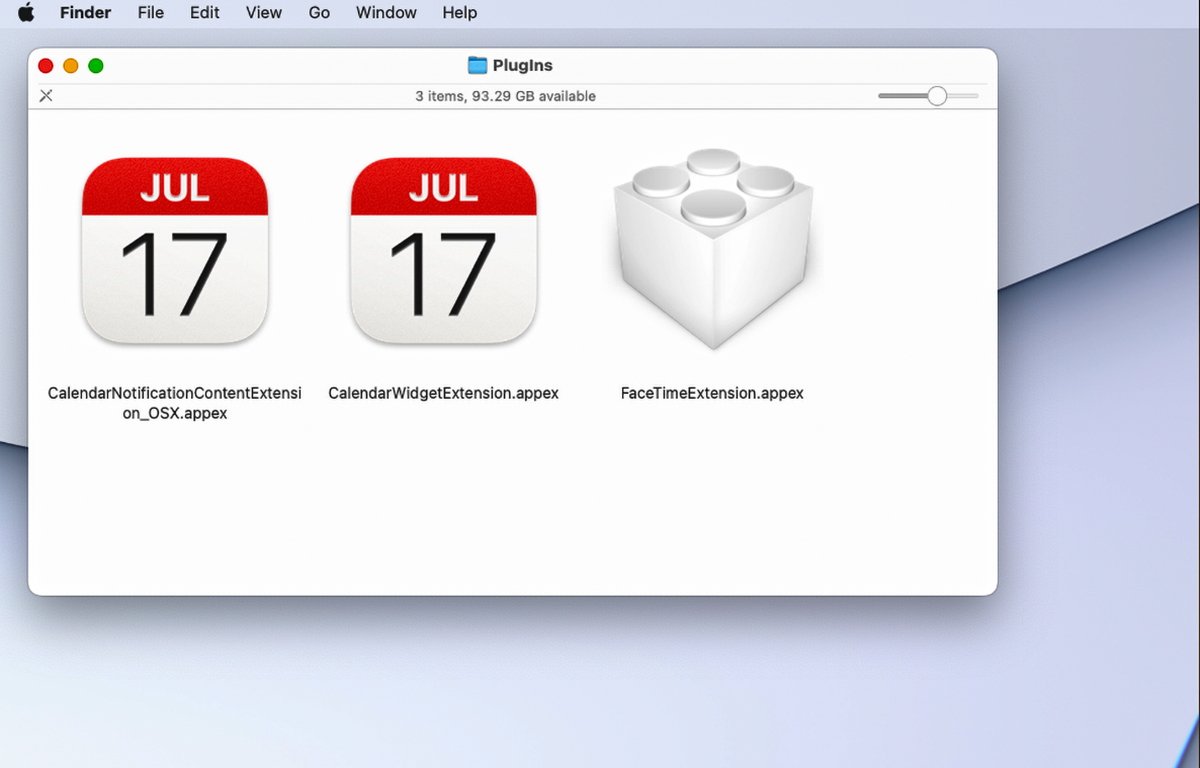
Widgets installed inside the Calendar app.
Widget Bundles
When you build a Widget in Xcode, it creates the Bundle folder for you, compiles your code, and copies the code binary and any needed resources into the Bundle.
Since Widgets are Bundles themselves, you can also Control-click on them in Finder and again using Show Package Contents from the popup menu to peek inside them.
Inside each Widget Bundle, you'll find a single folder named "Contents", and inside of that, folders named "_CodeSignature", "MacOS", and "Resources":
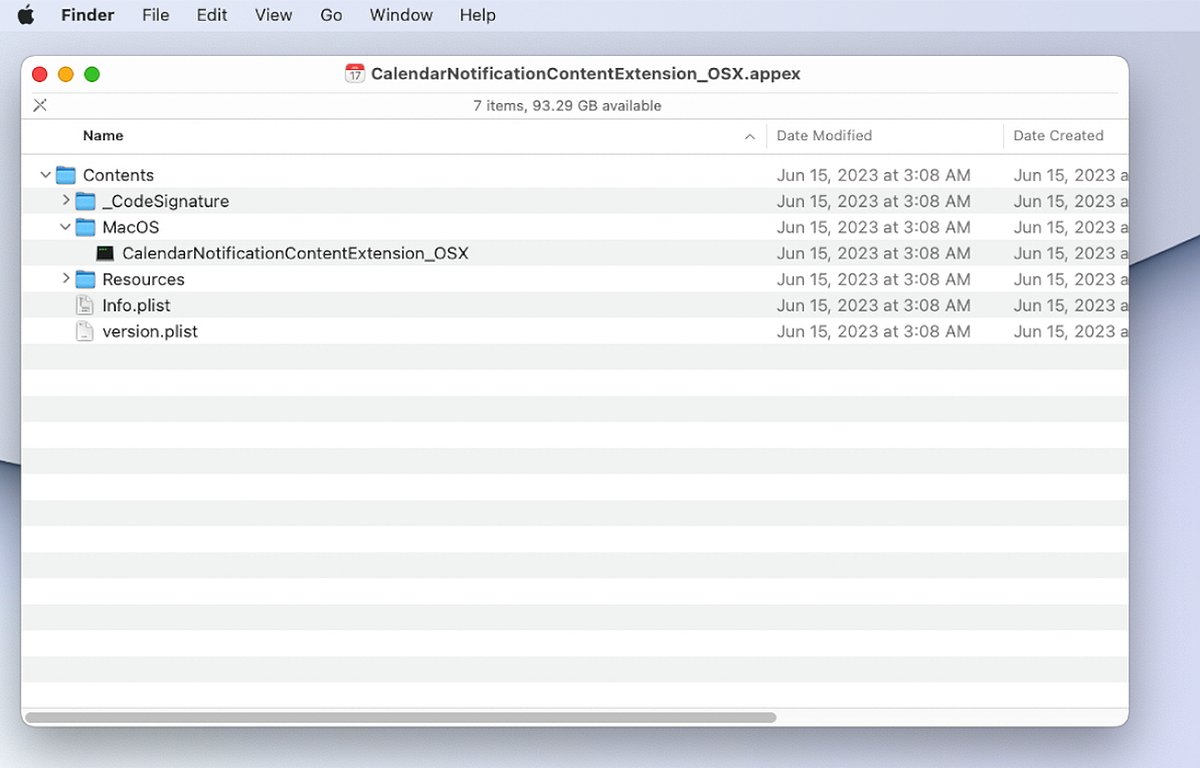
Inside a Widget Bundle.
The Widget code itself lives in the "MacOS" folder, and most other resources such as user interface files, text strings, images, and more live in the "Resources" folder. There are two additional files in the Widget Bundle which describe the Bundle to the system: "Info.plist", and "version.plist".
These files are auto-generated by Xcode when you build your Widget.
WidgetKit Simulator
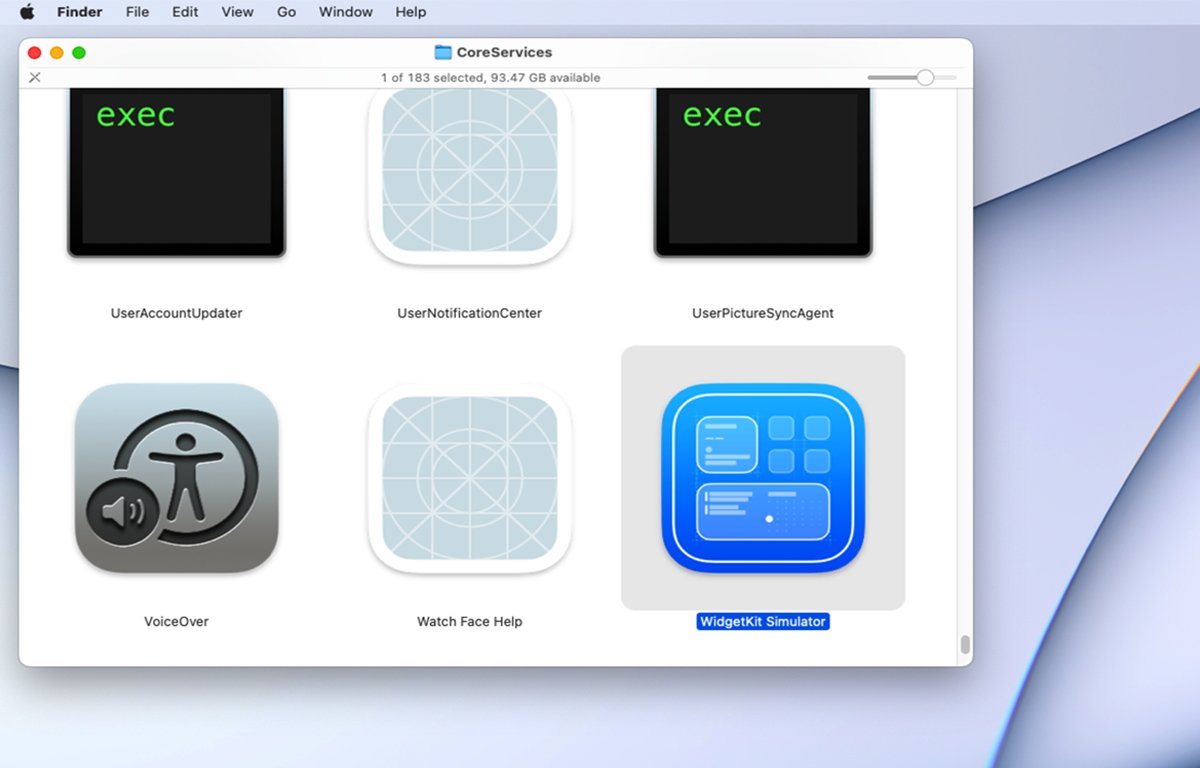
Hiding away on your Mac's hard drive in /System/Library/Core Services is an Apple app called WidgetKit Simulator. WidgetKit Simulator lets you peek inside apps and see all the Widgets they contain, then open them in the simulator to see what they will look like when they run:
WidgetKit Simulator.
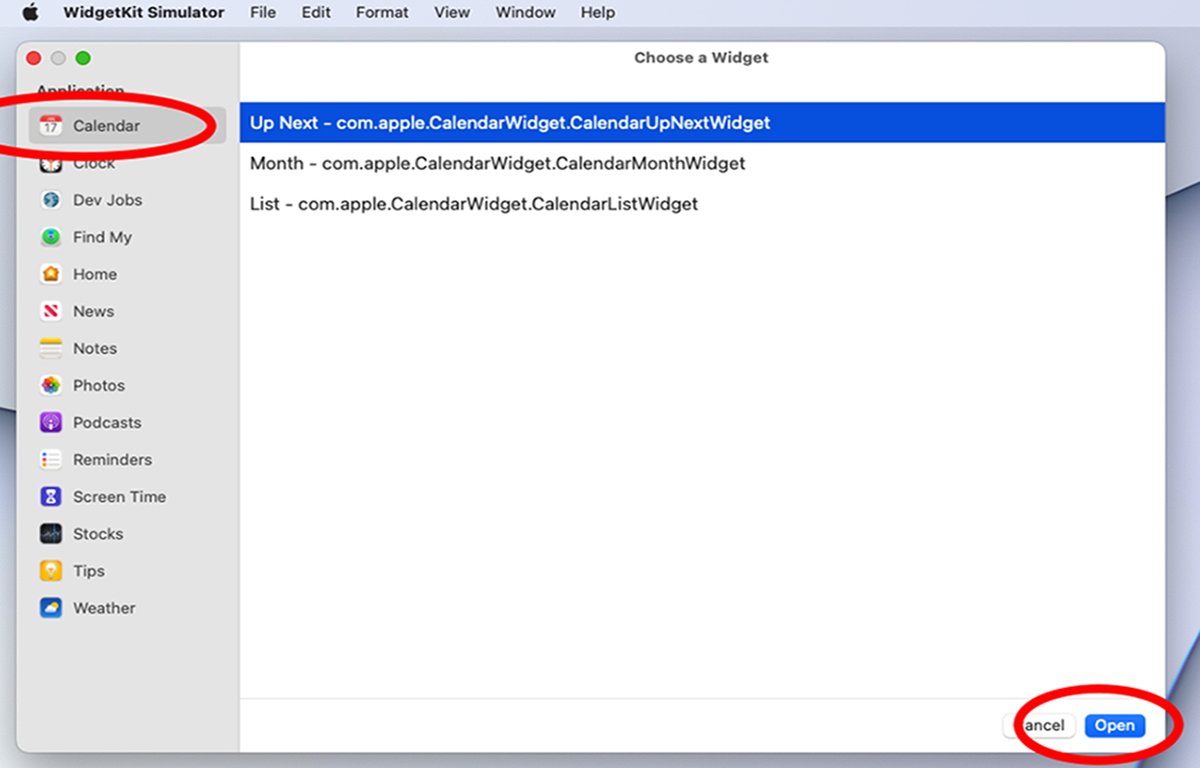
To do so, run WidgetKit Simulator, then select any one of the apps shown on the left. macOS knows how to find all apps installed on your Mac which contain Widgets:
Run WidgetKit Simulator, select an app, then a Widget from the list on the right.
Once the simulator opens a Widget, if you click on the "Info" row on the left, the simulator shows you all the details about your Widget. This is the same info as stored in the "Info.plist", and "version.plist" files:
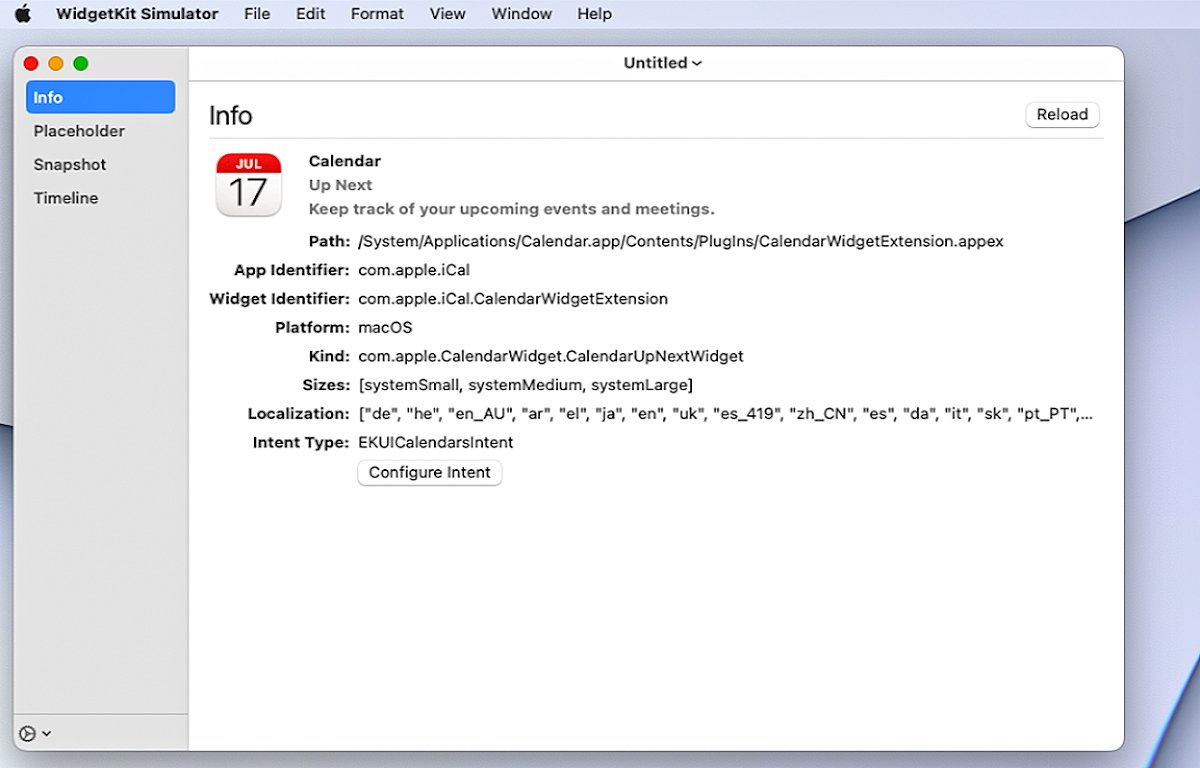
WidgetKit Simulator in action.
If you click on the "Snapshot" or "Timeline" row, the simulator will show you what your Widget will look like when it actually runs.
Widget code
When you design and build a Widget, you can keep it extremely simple - with just one size and interface, or you can make it more complex which utilizes multiple sizes, and load data from the network.
For iPadOS apps you can choose an extra-large sized Widget user interface.
You can also choose to build a Widget that runs on an iOS lock screen, or just on the iOS home screen or macOS desktop. In this example, we'll keep it as simple as possible.
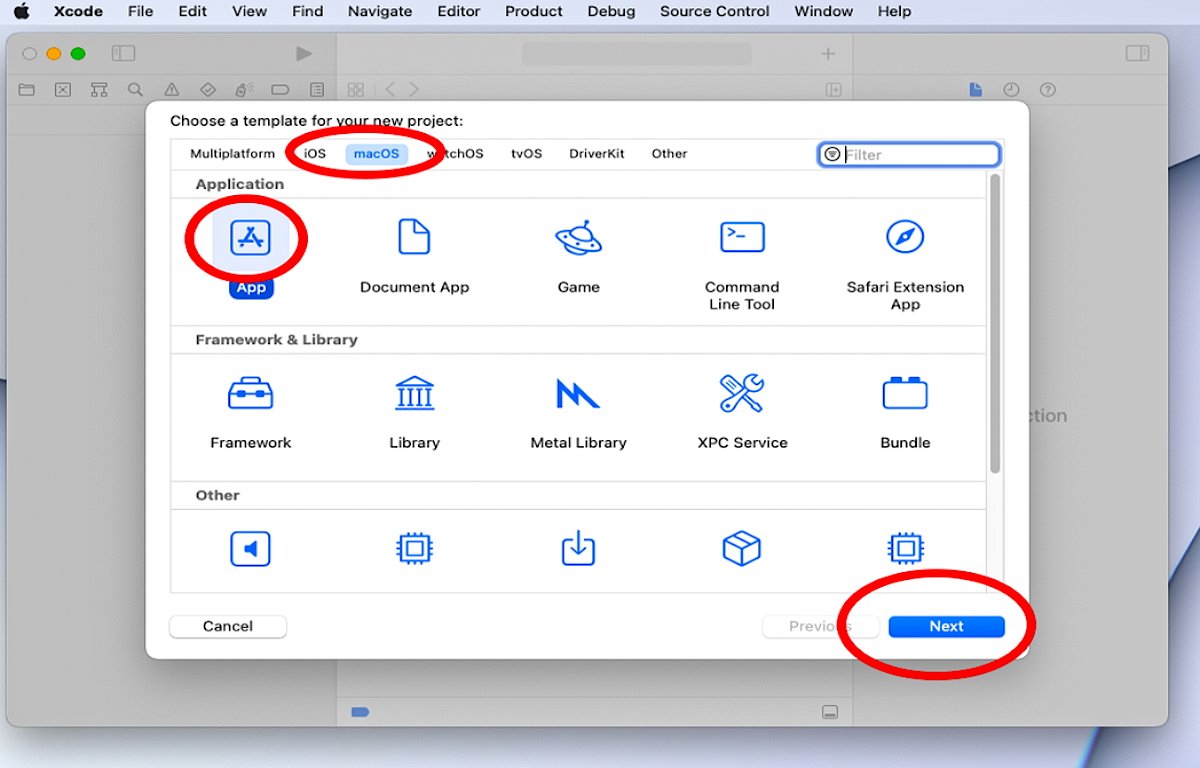
In order to create a Widget, or in Xcode a Widget Extension, you'll first need an existing iOS or macOS Xcode app project. If you don't already have one, create a new one in Xcode by selecting "File->New->Project" from the File menu. This opens the Xcode template chooser.
In the chooser, select "macOS" and "App" from the top menu, and the App row of icons below it. You could just as easily choose an iOS app, but for this example, we'll use macOS:
Xcode's New Project chooser.
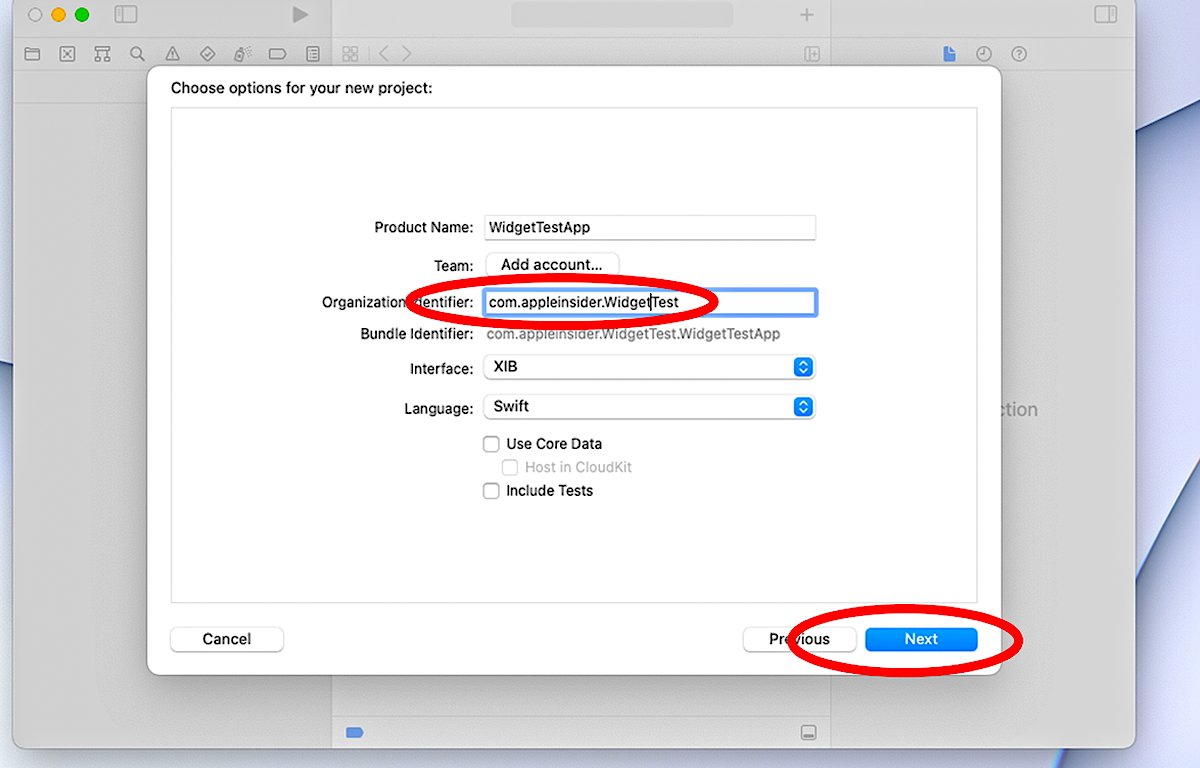
Click the Next button, and then fill in your project's details: a product name, organization identifier, which kind of UI you want, and choose Swift for the language:
Set the project details
Click the Next button again, and save your new project to disk. We'll assume you know how to create a macOS app and have completed it before we proceed to the next step, creating the Widget Extension.
Create a Widget Extension Target
Targets in Xcode are settings that hold everything needed to build one piece of software - an app, a Widget, an Extension, a Bundle, a Driver, or a Library.
Each Xcode project can contain multiple Targets.
To add a Widget Extension Target to your Mac app, select File->New->Target from the File menu, and then select Widget Extension from the chooser that appears:
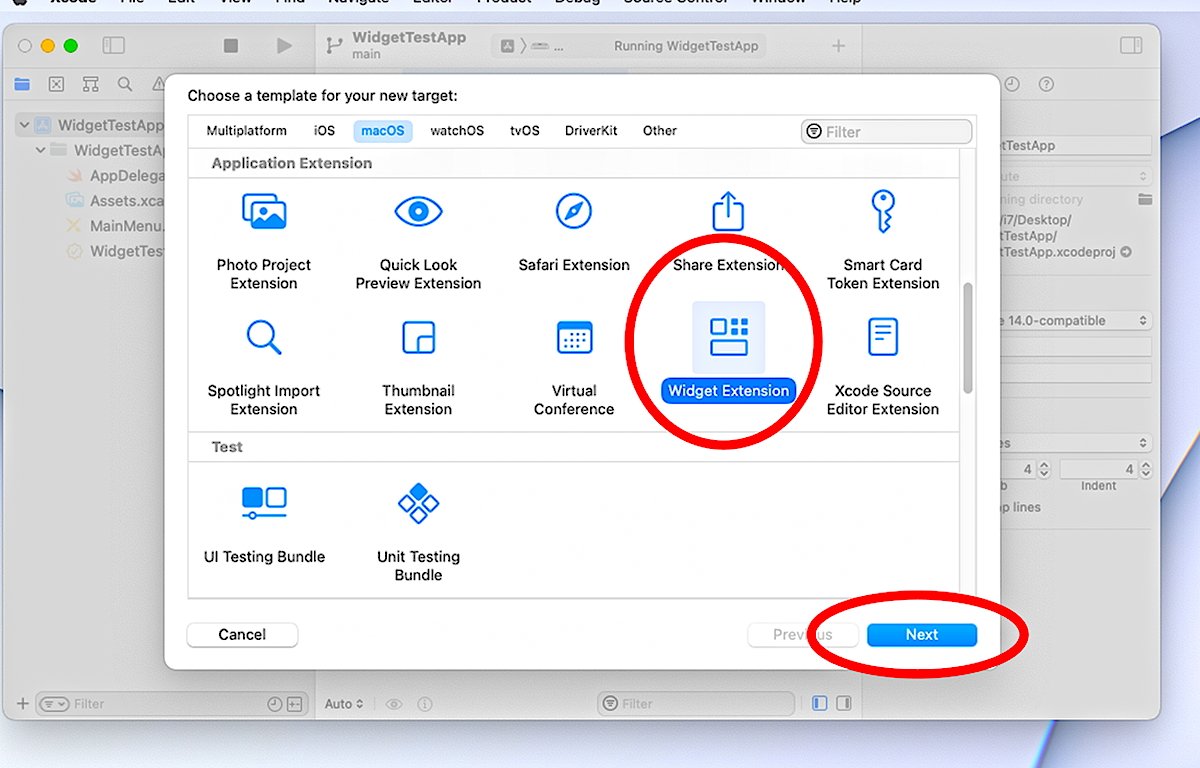
Choose "Widget Extension".
Click Next again, and fill in all the details for the Widget on the next pane. If your Xcode project has more than one Application Target already, choose which app to embed the Widget Extension in from the Embed in Application: popup menu at the bottom:

Set which app to embed the Widget in.
Click the Finish button. You may get an alert asking if you want to activate the Target Scheme for this Widget Extension. Click Activate.
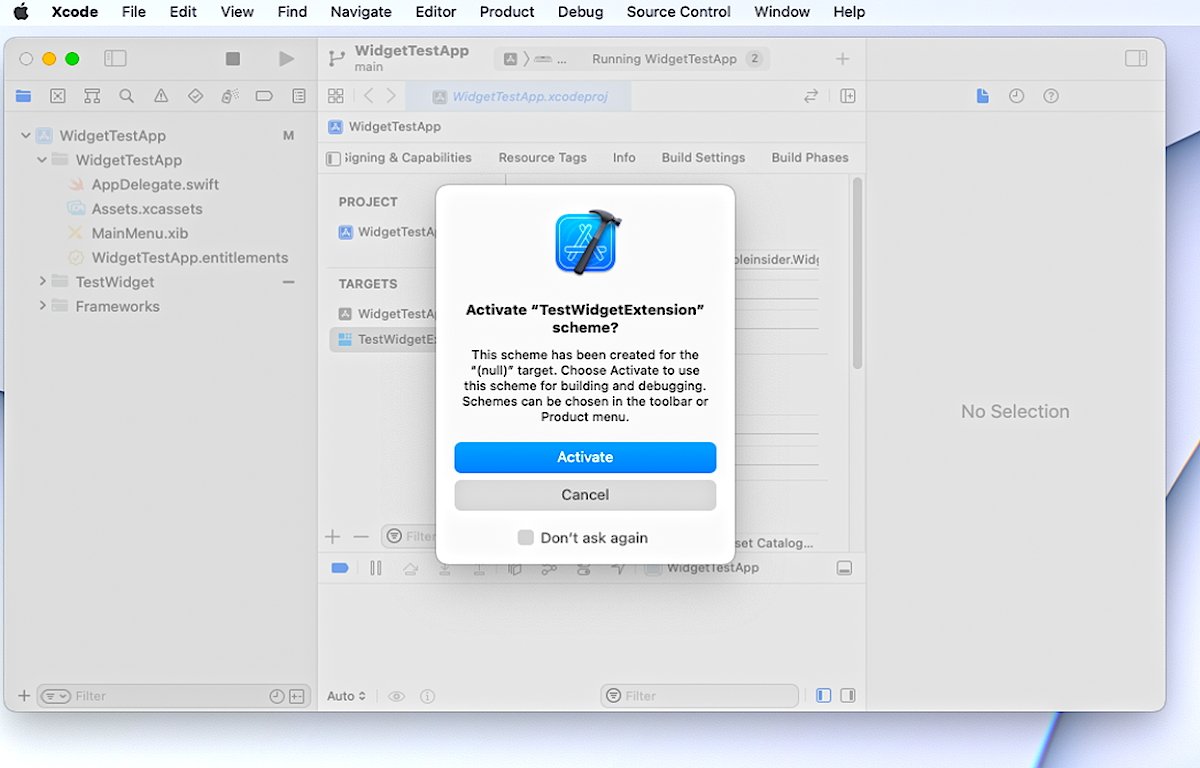
Click "Activate".
Think of a Scheme in Xcode as a group of settings used for each build step during the build process. You can edit Schemes at any time from Xcode's main menu by selecting Product->Scheme->Edit Scheme... (Command-
Once you add the new Widget Extension Target to your app you'll notice Xcode added both a new Target under the "Targets" section in your project, as well as a new subfolder with some new files:

The new Target and folder for the Widget files
Apple's default Xcode Widget Extension code creates a simple Calendar Widget with a View (the UI) and three Provider methods: placeholder, getSnapshot, and getTimeline.
The Provider struct inherits from an Apple class IntentTimelineProvider, which tells WidgetKit when to update the Widget's display. We'll get to the code in a minute.
Widgets can be user-configurable and the Widget needs to know how to display its data based on how the user has configured it. This is what the Provider does.
Xcode creates all the default source files you need for your Widget Extension, creates and stores them in a new subfolder in your Project's folder on disk, and adds them to the Xcode project for you.
These files, roughly are:
- An Info.plist file which contains the Widget's settings
- An .entitlements file which controls what the Widget can do
- An Assets.xcassets Bundle which will contain the Widget's icon
- An .intentdefinition file for Siri and Shortcuts customizations
- A Swift file with an extension of .swift containing the Widget's code
Widget Swift code
In the at top of the .swift file the code imports three Apple frameworks:
- import WidgetKit
- import SwiftUI
- import Intents
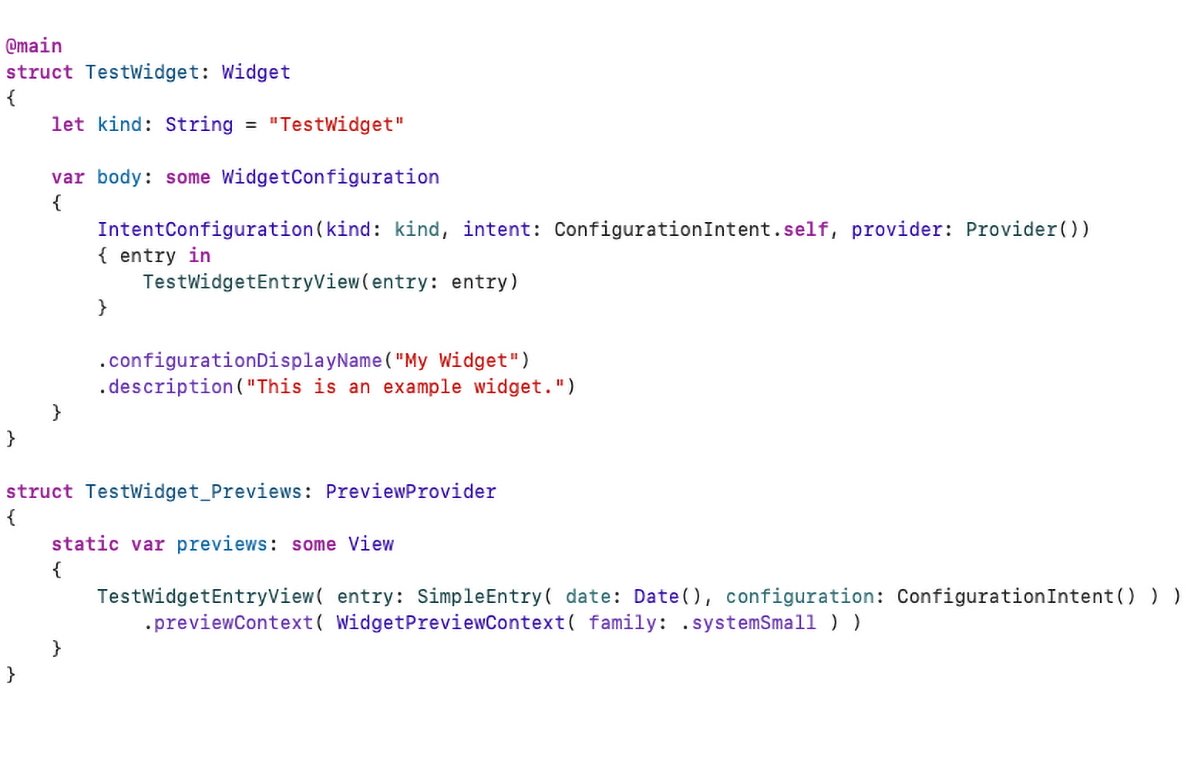
The .swift file contains five template structs or structures in Swift which define how the Widget operates:
IntentTimelineProviderTimelineEntryViewWidgetPreviewProvider
The Widget struct declares itself as the Widget's main entry point with the declaration @main at the top.
The last struct, PreviewProvider provides the SwiftUI preview so you can see what your Widget will look like right in Xcode. But in order for it to work, you'll need to modify the struct to provide info including a WidgetPreviewContext and a WidgetFamily enumeration (enum) to tell Xcode how to display the user interface.
Apple has documentation for both WidgetPreviewContext and a WidgetFamily on the developer site at Documentation/WidgetKit/WidgetPreviewContext and Documentation/WidgetKit/WidgetFamily, respectively.
You initialize a WidgetPreviewContext with a WidgetFamily, then pass it to the PreviewProvider using the previewContext(_:) method.
The Widget's SimpleEntry struct inherits from Apple's TimelineEntry protocol, and stores a date/time and a ConfigurationIntent. TimelineEntry is used to tell WidgetKit when to display a Widget.
Timelines are Apple structs that tell WidgetKit when to update the Widget's view.
The Provider's three methods essentially create a SimpleEntry containing a date and time, or in the case of the getTimeline() method, an array of entries, fills them in with a date and time, and returns them in a Timeline (which is also defined by Apple).
When the Widget's @main runs, it defines a kind and a body which calls IntentConfiguration(). That in turn calls the Provider() and View structs, which is what creates the timelines and views to display in the Widget:
The TestWidget struct.
All of this can seem confusing at first, but once you get the hang of it, it's easy. Essentially a Widget creates a view or a series of views and intents, along with timelines that tell WidgetKit when and how to display the Widget.
You could choose to store other data of simple or complex types in your Widget, but in this simple Calendar example, it simply stores the date and time for Widget display.
You may wonder how the actual view gets displayed in the Widget on-screen. The view is provided by the View struct, in this case struct TestWidgetEntryView : View which simply creates a Text view, storing the entry date with a "time" style.
A Text view is simply an Apple-defined Swift view struct that displays a single line of text:
"A text view draws a string in your app's user interface using a body font that's appropriate for the current platform. You can choose a different standard font, like title or caption, using the font(_:) view modifier."
When the indicated date/time arrives, the system simply asks WidgetKit to provide the view to be displayed.
Build it
Now you're ready to build your macOS app and its Widget Extension. To do so, select Product->Archive from Xcode's main menu. This will start the compilation process.
If everything worked, Xcode will link both your Mac app and Widget Extension, then ask you how you want to distribute it:
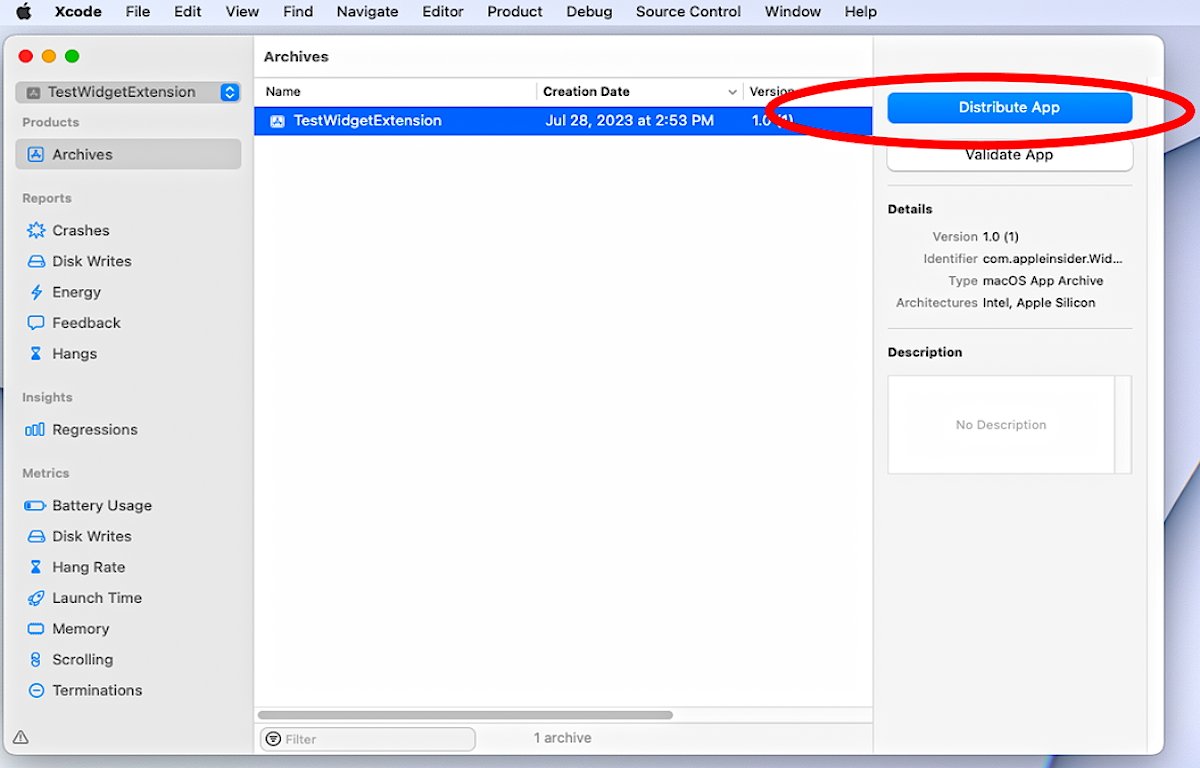
Click "Distribute App"
Click Distribute App, then Copy App, then Next, then save the app to disk.
Xcode creates a new folder in the location you chose with a timestamp. Your new app is ready in the new folder:
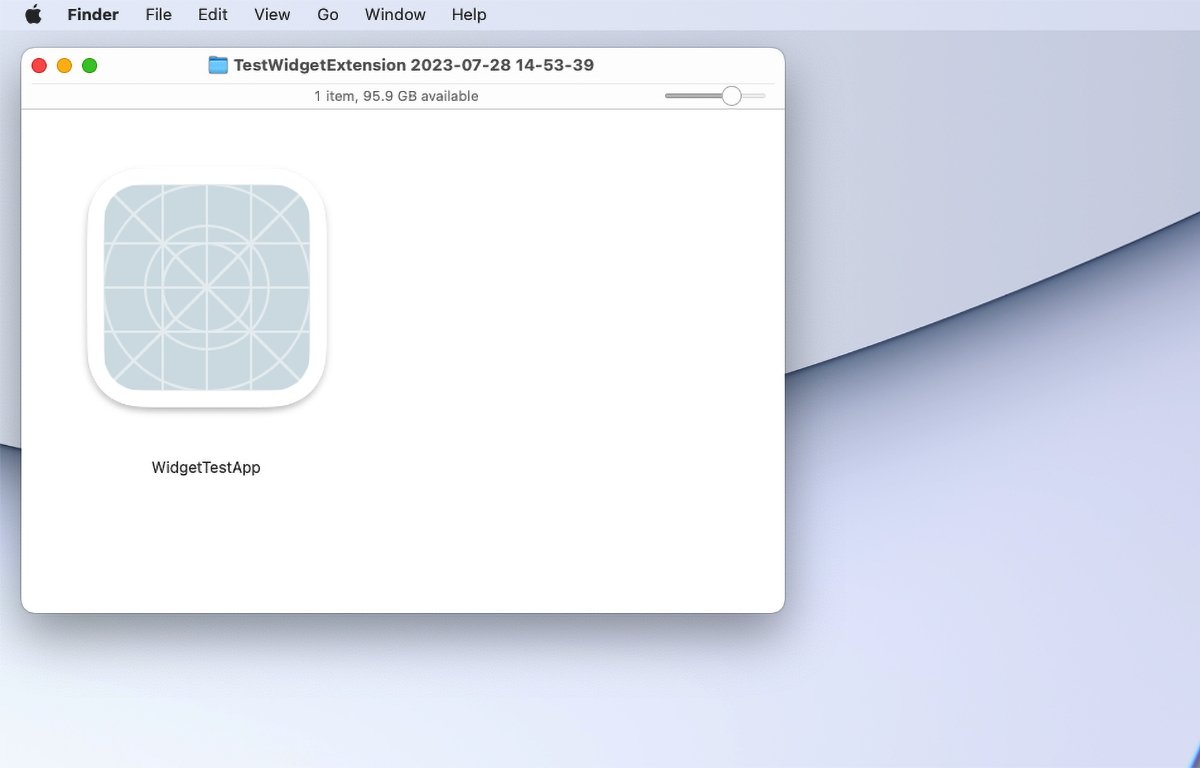
The built WidgetTestApp.
Open the folder, Control-click the app in the Finder, and choose Show Package Contents from the popup menu. Navigate to the /Contents/Plugins folder and you'll see your app's Widget:
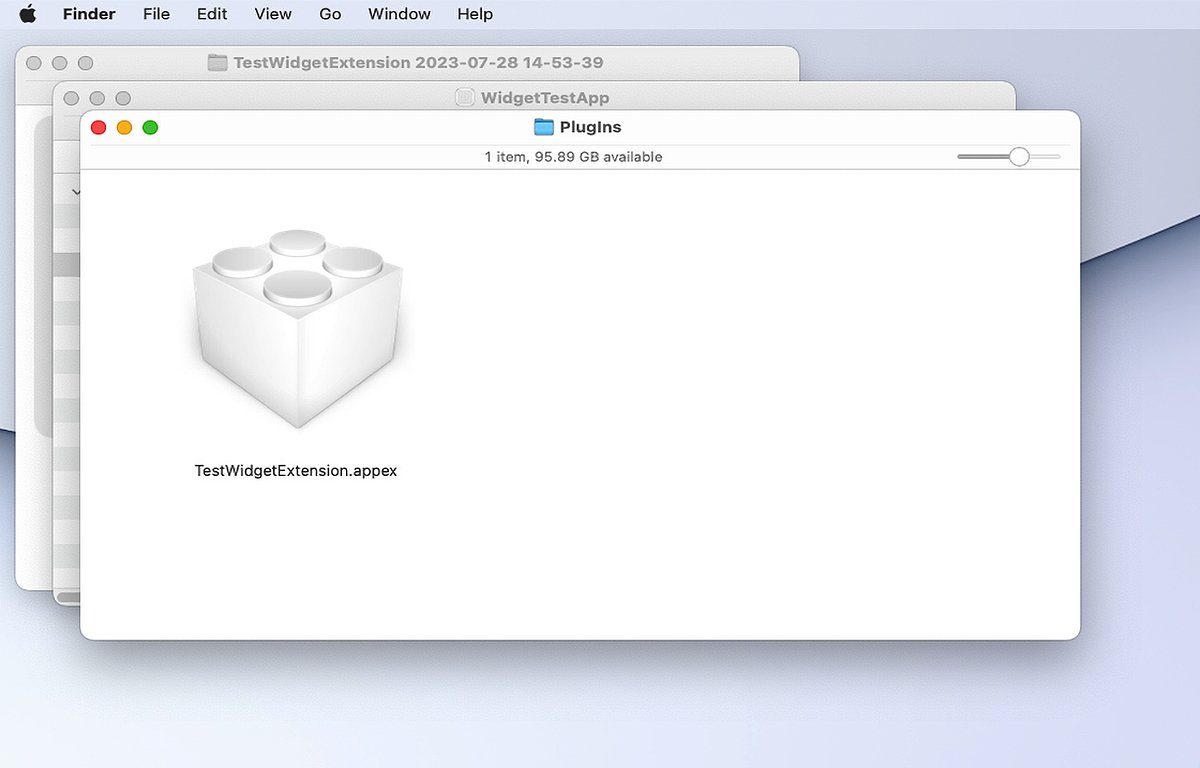
The TestWidgetExtension built as a Widget Bundle.
Now if you open WidgetKit Simulator again, you'll automatically see your app listed. Click it, then click the Widget on the right side, then click Open:
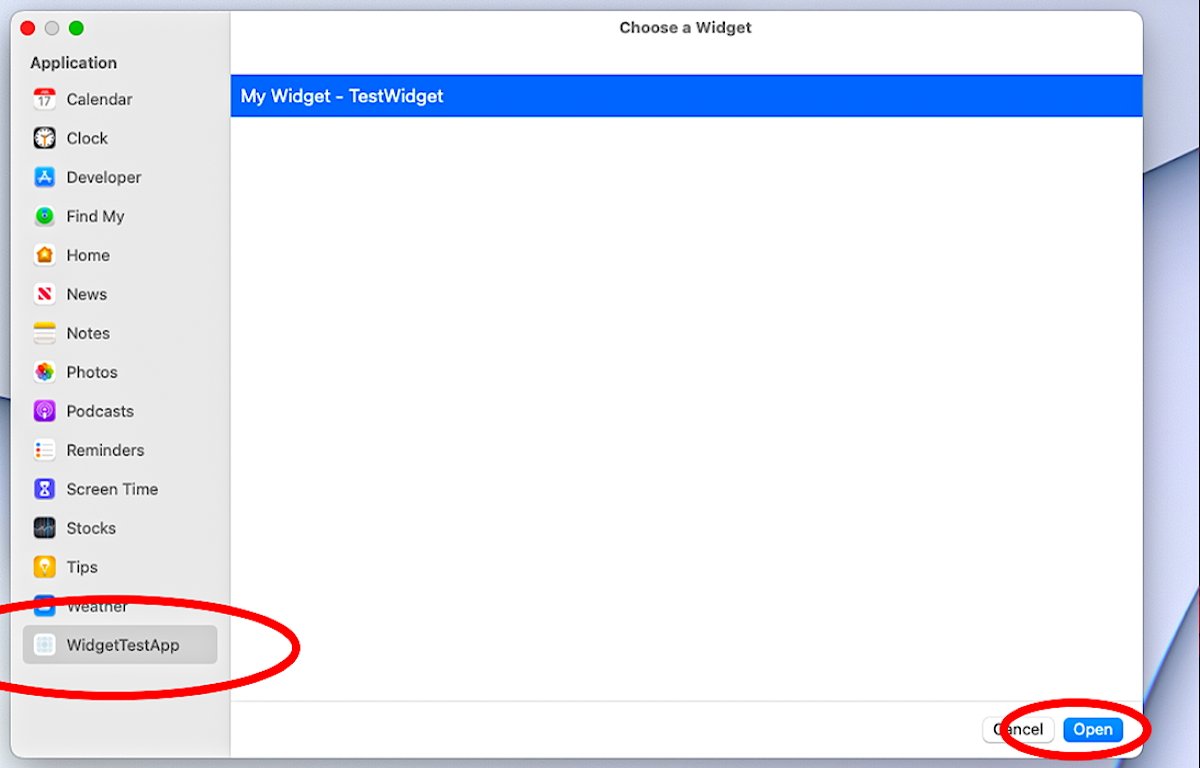
Click "TestWidget".
Click on the Timeline row and you'll see your Widget's UI displayed, with one view for each hour, over a five-hour timeline:
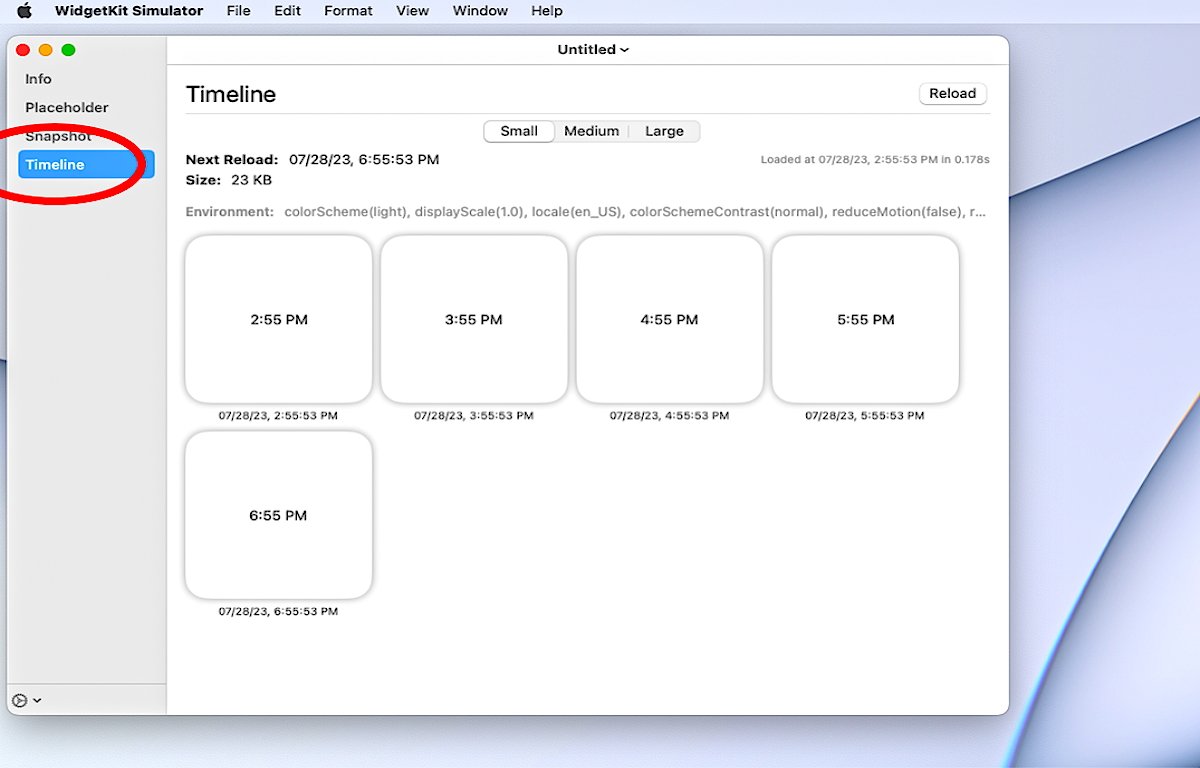
The series of Widget UIs displayed in the timeline over time.
In this simple example, we looked at how Widgets work, how to create them in Xcode, and how to preview them in WidgetKit Simulator. In future articles, we'll explore creating Widgets in-depth with more complex examples.
Apple has a number of resources for learning how to create Widgets. But be sure to check out the three-part WWDC video series "Widgets Code-along" from 2020, as well as "Design Great Widgets" and the "Meet WidgetKit" video from WWDC 2018.
There is also a discussion of Widget UI in Apple's Human Interface Guidelines.