If you're just diving into external monitors, the vast array of options and resolution spread before you can be enough to make you give up and buy an iMac just so that your monitor choice is made for you. AppleInsider talks about the three biggest and most important factors for a daily-use monitor for general use — screen size, resolution, and scaling.
As a general rule, the average consumer cannot pick a monitor off Amazon and know that it's going to be perfect for him or her. It isn't possible. You can tell what the physical size is going to be — though we all tend to underestimate how big something will be once it's on our desk — and you're rock solid clear about the price.
Even when the listing says it's for a 4K monitor and you know 4K is good, that's little to no help. It's because 4K, like most monitor standards, is utterly useless on its own. You need to know that 4K on a 21-inch monitor will look great and that 4K on a 49-inch one will be bad.
And if only it were that simple. It's easy to appreciate that 4K at 49-inches is going to be fuzzier than the sharpness of that 21-inch 4K monitor. But, that latter one is likely to make everything so small that it's unusable too.
Much of the time, that's going to be because you simply can't read the display when it's at maximum resolution — but often it's also because your Mac can't handle it either.
So the physical size of the screen is one fact. The resolution is a completely separate one. What your Mac can cope with is a third fact. Any one of these is at least reasonably easy to find out or understand, but you have to juggle all three.
What you can do, though, is go in armed with information, and know what to look for. Go in to searching any store or site's monitors and know what the problems are, know where you need to spend time comparing — and knowing what you really have to compare.
A note before we go much further. This article doesn't delve into color spaces, and calibration options on any given monitor — this piece is intended as a primer for the beginner monitor purchaser. Calibration and similar are topics for another day.
Jason and the monitor
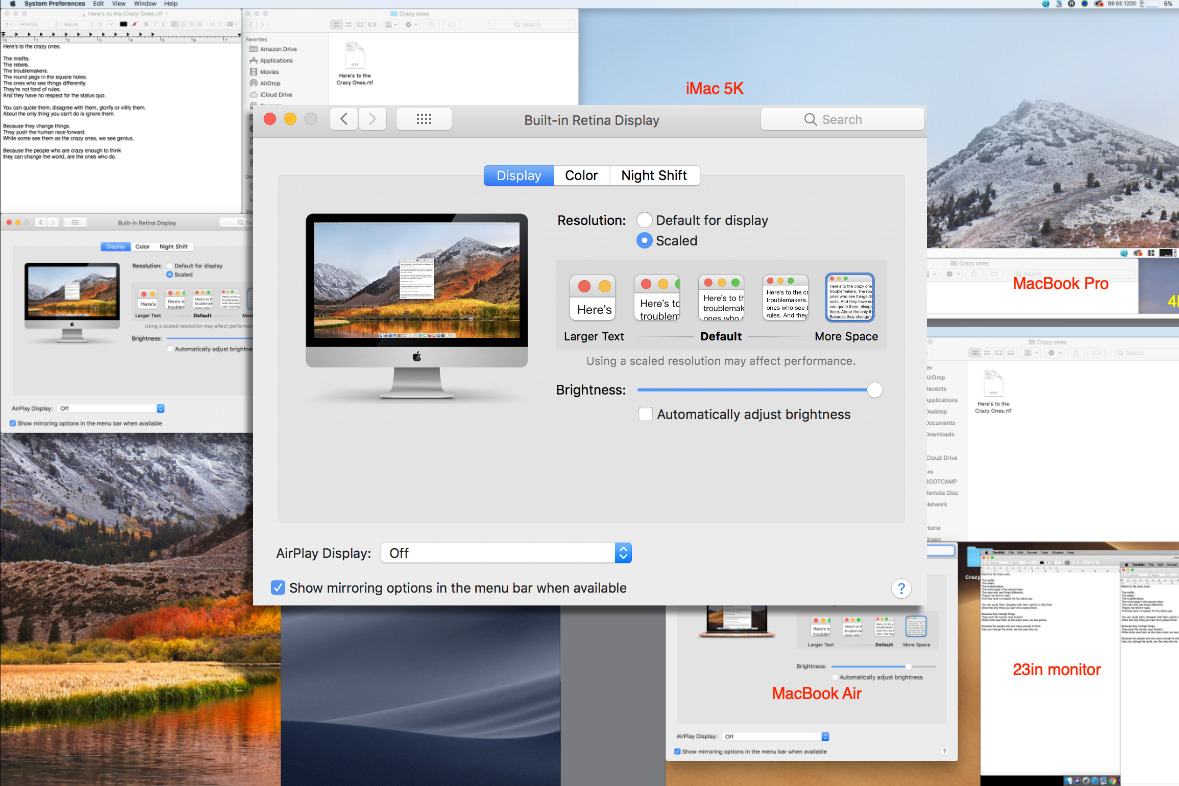
If you're buying an iMac or a particular MacBook, you've got no option about the physical size of the display. When you need a separate monitor, though, start with a 27-inch model such as the BenQ PD2710QC or Asus Designo MX27UC. We've included screen grabs from 23-inch and even 19-inch displays for comparison but there's now not even a price benefit to buying a monitor that size.
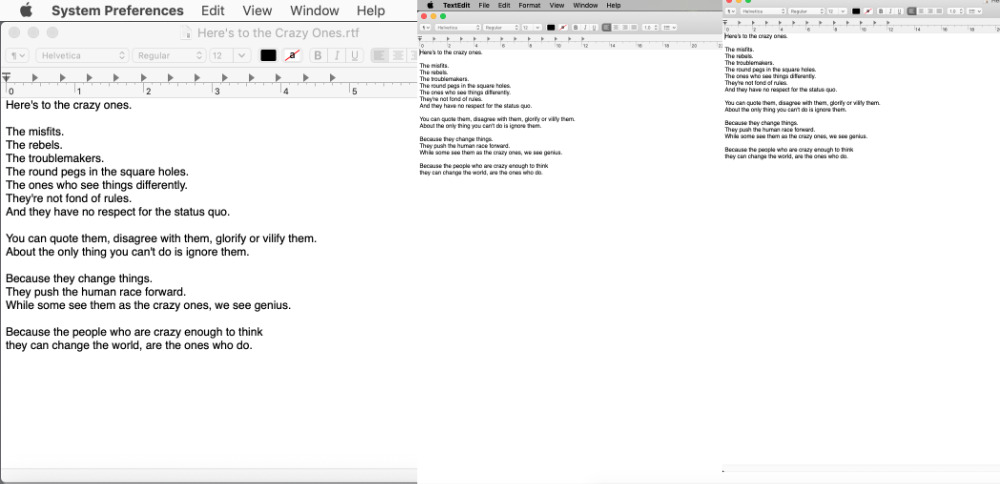
For comparison, the text on the far left is from a 28-inch 4K monitor. Middle is a 23-inch display and on the right is a 19-inch one, all at their highest resolution.
A 27-inch model might be slightly overkill if you're only ever going to be working on one Word document at a time. Nonetheless, the only times you'll ever regret getting a larger monitor are when you have to pay for it and when it won't fit on your desk.
Our illustration of different screens is really one of different resolutions. It happens that we took them across a complete range of monitor sizes but what a screenshot shows is the resolution, not how it looks stretched out over inches of glass.
Even so, there is one screen resolution that stands out by being practically invisible. Wedged between the screens from a MacBook Air and a MacBook Pro, you can see a thin sliver of what is actually a 4K display.
Where 4K displays used to be something you'd yearn for, now they're distinctly lost in the pack and so should be considered a minimum. Rather than using the term 4K or its various synonyms like Ultra HD, let us be more specific. Don't accept a monitor with a resolution of less than 1920x1080 pixels.
If this is to be your main monitor, regard 27 inches and 1920x1080 as the minimum requirements.
Resolution
Search Amazon for 27-inch monitors that run at 1920x1080 and you now know that they will all look the same to your eyes. There will differences in quality from different manufacturers and at different price points, but a Mac icon or menu on one will be the same size and clarity on all of them.
More importantly, you now also know that a 32-inch monitor at the same 1920x1080 resolution will be fuzzier, will show these Mac screen elements at a larger size.
You rather guessed that but it's one thing understanding the numbers, it's another when you see it in front of you.
Here's an example of the difference resolution makes. This is a screenshot from an iMac 5K at its highest resolution of 6400x3600 pixels. Inset to the bottom right is the screen from a 2012 iMac which is 2560x1440. They're both 27-inch screens.

Two images, both from 27-inch iMacs. The main one is a 5K iMac where the inset, at the same pixel scale, is a 2012 pre-Retina iMac
When you're comparing two monitors, do note the screen size but also calculate the dots per inch. You're rarely given this information and that's probably because it would make comparisons too easy. Yet somewhere in the details of every monitor's listing on every store's website, there will be the pixel dimensions.
They are always given as the horizontal number of pixels first, then the vertical. Unfortunately, screen sizes are done in a different way. They're measured diagonally instead. You could use that or you could look for the physical dimensions of the monitor and just accept that any stated width and height includes some bezels.
There's no way to be precise here, so use either figure and divide the number of inches you get by the horizontal number of pixels. Even though it won't be the correct number of dots per inch, it will be a comparable one. You'll be able to see that this monitor is going to be fuzzier than that one because it has significantly fewer dots per inch.
You could do the same calculation with the vertical number of pixels but it won't be any more use. Vertical pixels are a concern, though, as any lack of height to the display is one of the first things you'll notice when you use a new monitor.
Scaling
When you've picked a size of display and have chosen the highest-resolution monitor your budget can withstand, check that your Mac can drive it. It's easiest to check when your Mac is one that's currently on sale as Apple lists the specifications for what monitor sizes each machine can handle.
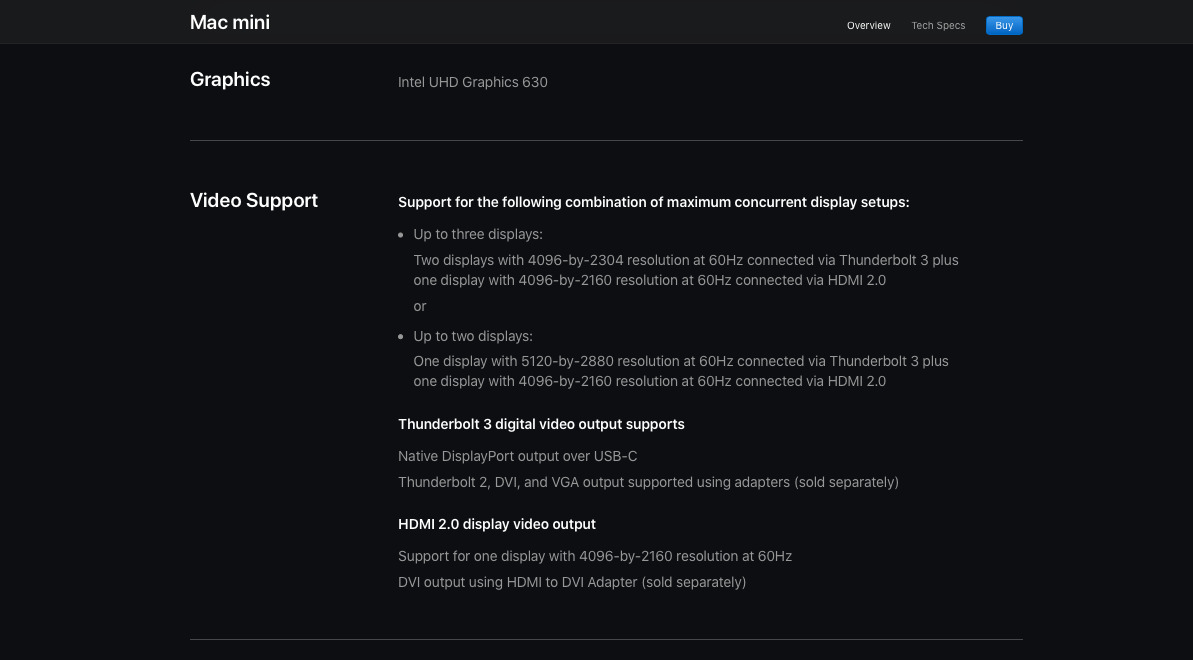
Apple is good at detailing the specifics of what displays different Macs can drive
It's surely got to be a waste buying a monitor when your Mac can't drive it to its highest resolution. Except your monitor might outlast your current Mac. Plus that highest resolution is likely to get you icons, menus and so on that are far too small and finely detailed to be able to read easily.
In which case a monitor that displays more than you can usefully use is definitely a waste — except that there is this scaling.
The idea is easy enough to grasp but harder to visualise and apparently also harder for technology firms to handle. Windows is far less able to successfully alter the size it shows icons and text at than Macs, for instance.
Broadly speaking, you take your gorgeously high-resolution monitor and tell it to pretend it is a less gorgeous and less high-res display. The only thing that stays the same is the physical size of the monitor.
Apple does work to make this as easy to figure out as possible — but only once you've realised you need it. We've seen people squinting at their MacBook screens, unaware that with a click or two they could be saving an opticians' bill.
Regardless of your size or resolution of monitor, you can go to System Preferences, Displays and chose Resolution: Scaled. Below a certain resolution, typically 4K, you'll see a list of which resolutions the monitor can handle - probably. In that case you would pick from the list and examine how each one looked — but that try-and-see approach is hopefully behind us all now because we won't buy a monitor under 4K.
When it is a 4K or better monitor, Apple shows you a graphical representation of how scaling works.
Depending on the monitor and the Mac, that representation will show you either four or five possible settings.
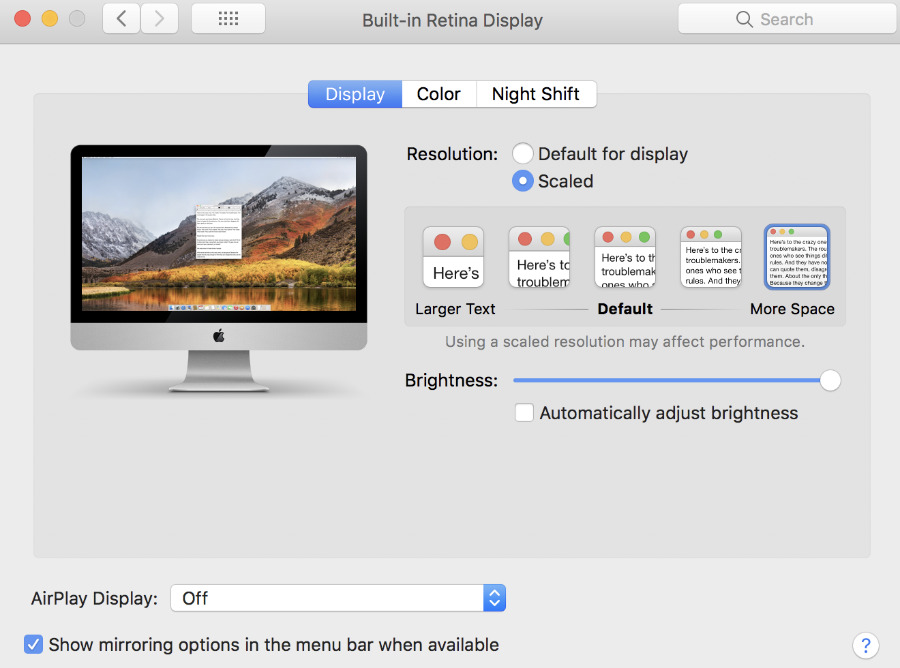
Above a certain high resolution, Apple shows a simplified system for choosing how much to scale down your display
Apple doesn't give any figures or pixel counts, it just has a range going from Larger Text to More Space.
The difference one stop on Apple's Larger Text to More Space makes
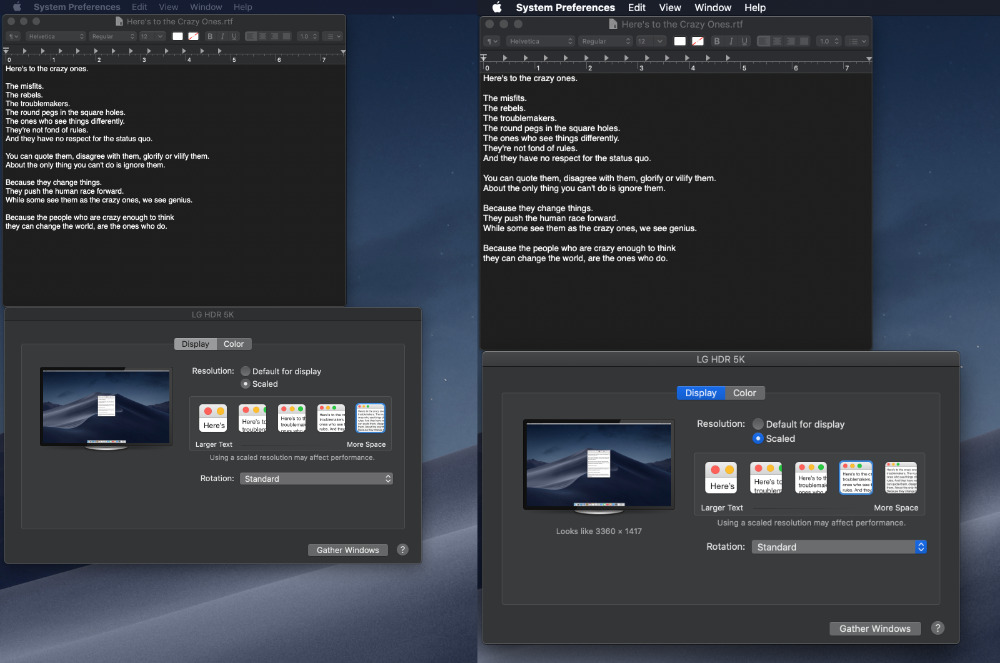
Don't go getting a tape measure out on this one, but just to give you an idea of what difference scaling makes, here's an example. It's two side-by-side images from the LG 34-inch monitor and while they are cut down so you can see them, they're displaying different scaled resolutions.
Specifically, it's one step difference in the range from Larger Text to More Space and you can see that it's significant.
This far and no further
What you can't see, and nobody can show you, is precisely how all this looks on every monitor you consider. Armed with this knowledge and hopefully a decent returns policy, though, you'll on your way to getting the ideal combination of size, resolution and scaling for your needs.
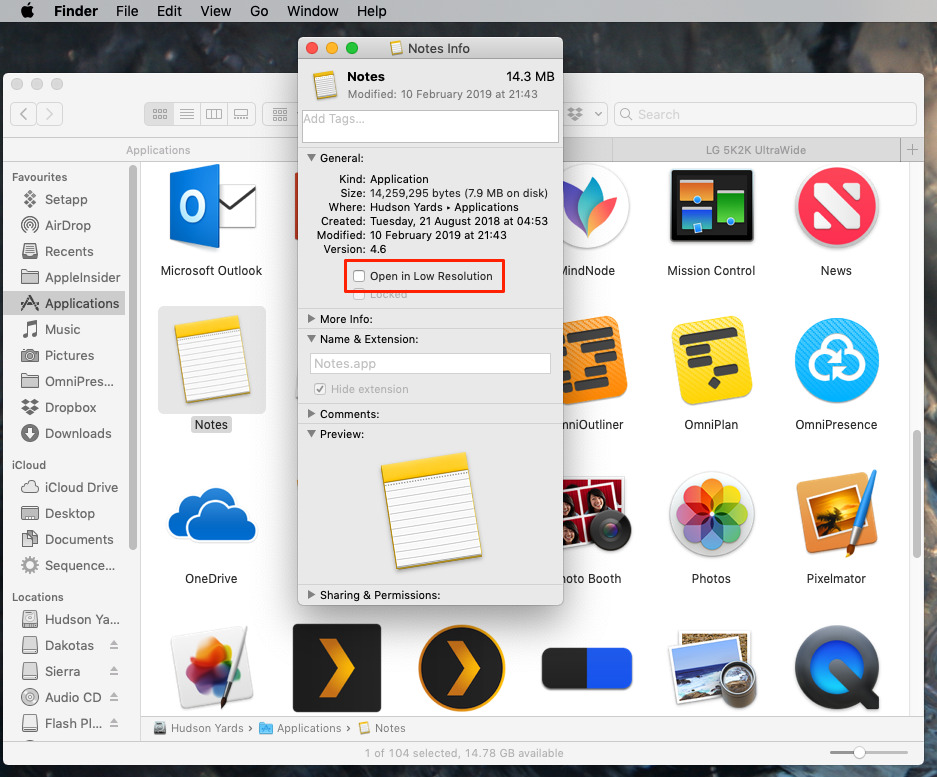
It may not be worth your trouble finding it, but there is an Open in Low Resolution option for every application
There is just one more thing, though. Maybe this is the most obscure feature in macOS or maybe we've just never needed it before, but you can tell an individual application to display in lower resolution. By itself.
Go to your Applications folder, right-click on any app and press Command-I choose File, Get Info.
You'll find a tick-box marked Open in Low Resolution. As ever, Apple doesn't give any pixel dimensions, but otherwise this does work. So if you need high res for your Final Cut Pro X work but that makes Microsoft Word too fine and small to use, you can get Word to open in lower res.
It does make a difference, but you have to be on a really high resolution monitor to see a significant change.
Keep up with AppleInsider by downloading the AppleInsider app for iOS, and follow us on YouTube, Twitter @appleinsider and Facebook for live, late-breaking coverage. You can also check out our official Instagram account for exclusive photos.