 Nathaniel Pangaro
While the main focus in 2022 is on streaming, the Music app on your Mac still allows you to import music files and CDs into your music library. Here's how to do it.
In macOS Catalina, Apple broke up iTunes it into three separate applications — Apple Music, Apple TV, and Apple Podcasts.
Here is how to upload music files and folders, edit singular songs or a whole album, and how to change the album artwork in macOS Ventura.
How to add files to the Music app
Uploading music is easy to do in the Music app, and only takes a few steps. Here is how to upload music files and folders.

- Open Music
- Go to the Recently Added tab
- Click on File from the top toolbar
- Click Import
- Select either the audio file or folder — containing multiple audio files — that you want to import
You can also drag and drop audio files directly into the Music app to make the import faster and more seamless.
Once you import the file or folder, a new album will be created in the Recently Added tab of the application with the name and artwork that was pre-added to the file before import being displayed.
How to import a CD in macOS Ventura
Importing a CD is easy to do with the Music app. The toughest part is finding a computer that still houses a disc drive. There are obviously external drives you can buy, but using them with USB-C and hubs can be a bit challenging sometimes. We'll be speaking more about this soon.
- Open Music
- Insert the CD you want to import into the CD or DVD drive
- The CD will appear below the Devices tab in the sidebar
- All the songs on the CD will automatically start importing into your Library
- To cancel the importing at anytime, click Stop Importing. Any songs already imported will still be in your Library.
- When the songs are finished importing, click the Eject button near the top right of the music window
Once your CD has been imported, you can listen to the songs it had, create playlists out of them, or edit the audio file's metadata further to your likings.
If you import the CD onto a computer that is not your own — but is logged into your Apple ID — the music will be transferred to your devices via iCloud Music Library (if you have it turned on).
How to edit audio metadata and labels
Once you import your audio, you may want to edit the metadata of it. This may include the file's name, author, album artwork, and other details about it.
You should decide if you want to edit just one song or the whole album before making changes.
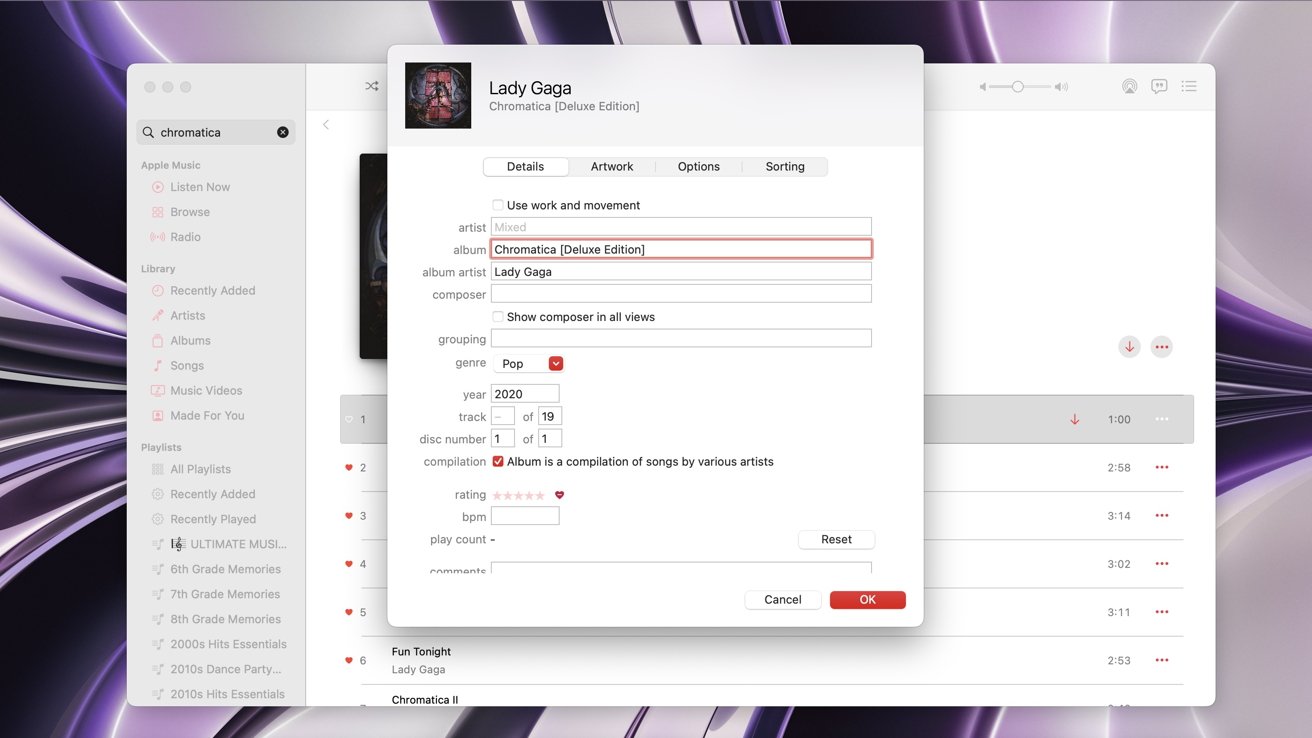
How to edit music metadata in macOS Ventura
- Two-finger click, right-click, or control-click on the song to edit that one specific song, or the album artwork to edit the whole album
- Click on Get Info
- A prompt will ask you if you're sure you want to edit the item(s). Select Edit Items from the options given.
- To edit different aspects of the audio file or album, just click on the text box with the information you want to edit and type in what you want it to say
- Click OK at the bottom right of the menu to apply the changes you had made
If you are editing a singular song within an album and you change either the album name or the artist of it, then the song will be separated from the album it was part of. It will then become part of its own album.
Changing the disc number — when editing one song from that album — will keep the song in the same album location, but will be brought to the bottom of the album and sectioned into the new "Disc Number" area you assigned it to.
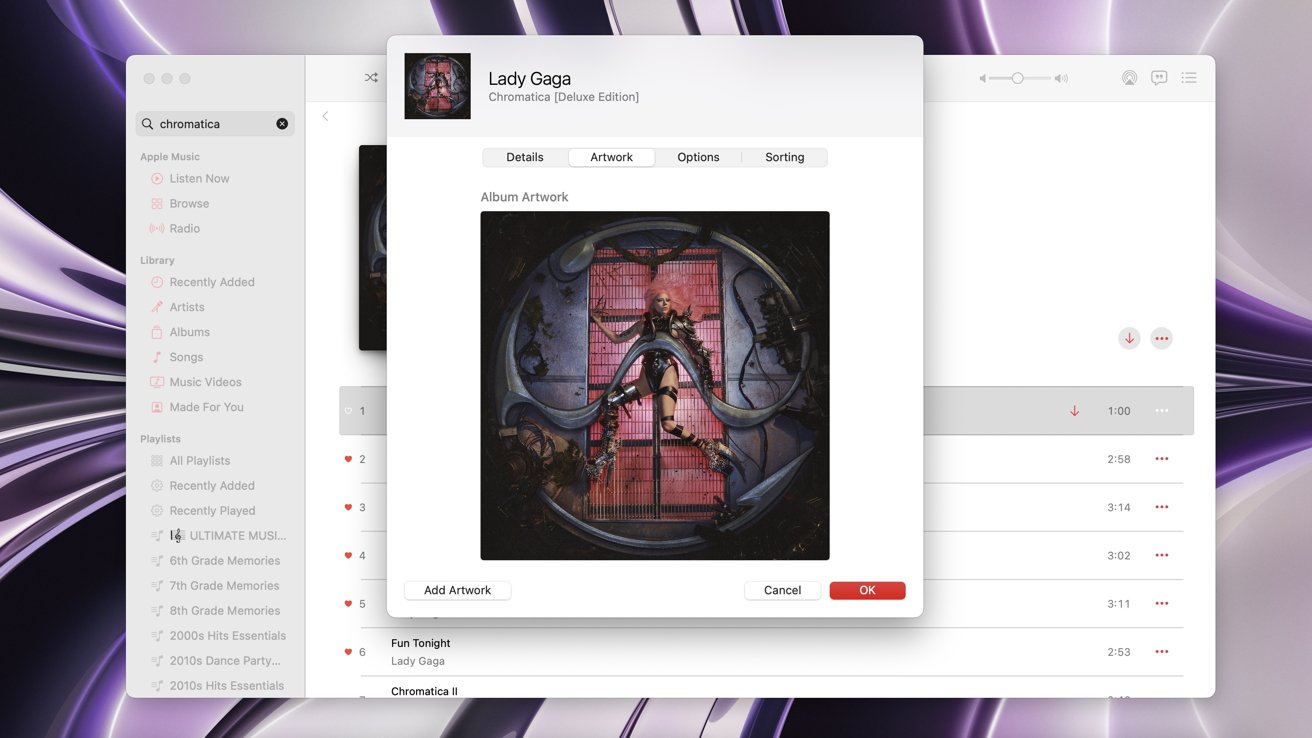
How to change the album artwork in macOS Ventura
If you do not like the current artwork an album has - or just want to change it - you simply can within the Music app. Here is how to change it.
- Two-finger click, right-click, or control-click on the song or album you want to change
- Select Get Info
- Click on Artwork from the tabs in the menu next to Details
- Click on Add Artwork at the bottom left of the menu
- Select the photo you want to change or make the album artwork to
- Once you select it, the photo will appear next to the current album artwork that was previously there (if there was one)
- Click OK on the bottom right of the menu to apply the changes
The changes may take a few moments to show on your other devices.
If they do not show, try removing the download(s) of the song or album and then redownload them. Do this on your other devices as well.
Even if you downloaded songs from Apple Music, you can go in and change their album artwork or details about them. It does not matter where the audio track came from.
Keep on listening
Importing music files and editing the file details and artwork is a great way to customize your music library to your personal preferences.
If you are not subscribed to Apple Music and then decide to join the service, the metadata that you customized (such as album artwork) may be changed to the default version that Apple Music offers. Any downloaded songs (like from an physical CD) will also be converted to Dolby Atmos format — if you have that enabled and it is offered for those songs.


 Marko Zivkovic
 Christine McKee
 Andrew Orr
 Andrew O'Hara
 William Gallagher

 Mike Wuerthele
 Bon Adamson


-m.jpg)