
Apple's Game Porting Toolkit launch at WWDC offered a way for developers to see how Windows games ran on Apple Silicon before porting it to macOS. Here's how to install and use the toolkit.
At WWDC '23, Apple released the Game Porting Toolkit (GPTK) - basically a repackaged version of the WINE API translation technology which allows you to run Windows games on Apple Silicon Macs.
WINE works on the Mac by mapping Windows native DirectX and other API calls to Apple's Metal graphics engine and standard POSIX APIs which are part of UNIX.
By providing direct bridging and translation to native APIs on the Mac, WINE allows Windows games to run at native speed. Since Metal is optimized to run efficiently on Apple Silicon Macs, it allows Windows games to run at near-native speed.
WINE isn't an emulator - it provides direct Windows to native API mapping on the Mac.
Similar to Steam's Proton porting tool, GPTK allows you to install and run most, but not all Windows games on your Apple Silicon Mac. WINE is still evolving so expect more compatibility in the future.
Be warned however that the setup process for GPTK is a bit complex and requires Terminal skills. It also requires over an hour to install since many software components must be downloaded and built from source code.
The GPTK Read Me has fairly good instructions, and several game bloggers have posted even more detailed instructions online. We'll try to simplify those instructions here.
Installing macOS Sonoma and the GPTK
To install the GPTK you will need:
- An Apple Silicon Mac
- An Apple Developer account
- macOS Sonoma beta 3 or later
- Xcode 15 beta
- Xcode 15 beta Command Line Tools
- Intel x86 version of Homebrew package manager
- Apple's Rosetta 2 emulator for Apple Silicon Macs
- Game Porting Toolkit .dmg download
To get the above components, first log in to your Apple Developer Account using your Apple ID, then go to https://developer.apple.com/download/ and download the macOS 14 beta 3.
After you download the macOS beta, get the developer components from https://developer.apple.com/download/all/.
You'll need the Xcode 15 beta 4, Command Line Tools for Xcode 15 beta 4, and Game Porting Toolkit beta 1.0.2 downloads.
You'll also want to set up an external storage device first and install macOS Sonoma beta onto it. Then set it as your Startup Disk in System Settings, restart into that volume, and install the Xcode beta and GPTK from there.
Note that the Sonoma beta has to be installed onto an existing macOS installation of Ventura. You'll want to erase your external storage device as APFS using Apple's Disk Utility, and install a new installation of macOS Ventura onto it first.
Be aware this will erase everything on whichever external storage device you erase in Disk Utility. You should probably back up all your important data from your Mac first.
You can download the macOS Ventura installer from the Mac App Store.
Once that's done, go to System Settings from the Apple menu, then select General->Startup Disk in the sidebar on the left.
After a few seconds, System Settings will display all volumes which your Mac can boot from. Select the one you just installed Ventura onto.
In the example below we made a volume named "Test" on an external USB drive:

Set the new external volume as the Startup Disk.
Click the Restart button.
Once your Mac boots into the new installation of Ventura, run any software updates to make sure everything is up to date.
To install the macOS Sonoma beta, go back to Apple->System Settings->General but this time select Software Update in the General list.
Next to the Beta Updates row, click the small info button:
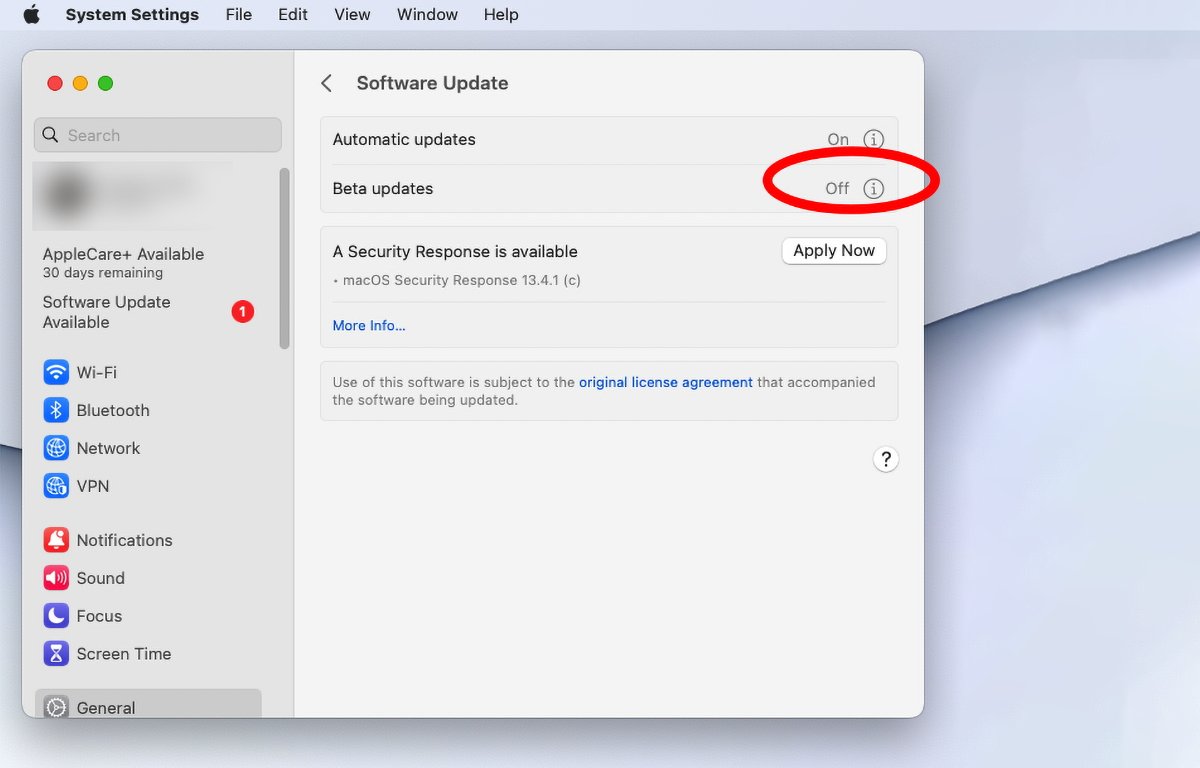
Click the Info button.
If the Beta Updates switch is set to Off, click the small popup menu and select macOS Sonoma Public Beta from the popup menu. Click Done and you will be returned to the Software Update pane:
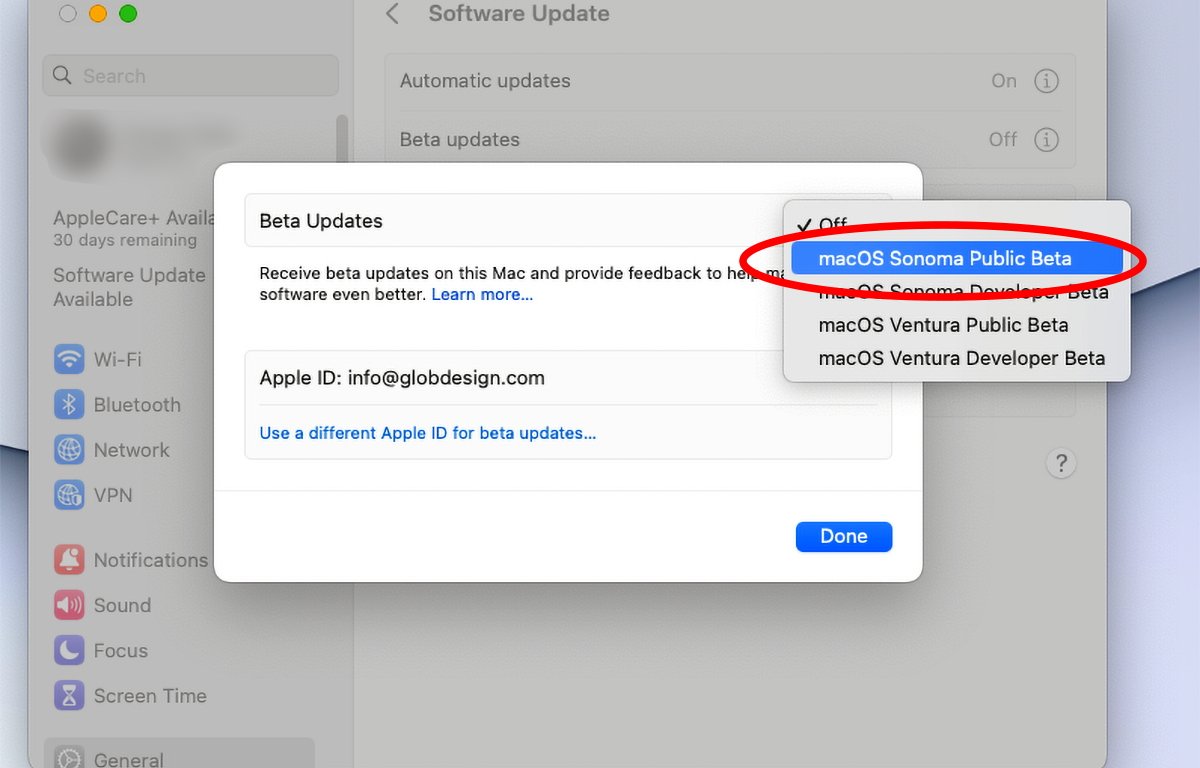
Select the "Sonoma beta" from the popup menu.
A new pane for the Sonoma beta appears, along with an Upgrade Now button to the right. Click Upgrade Now to begin downloading the macOS beta:
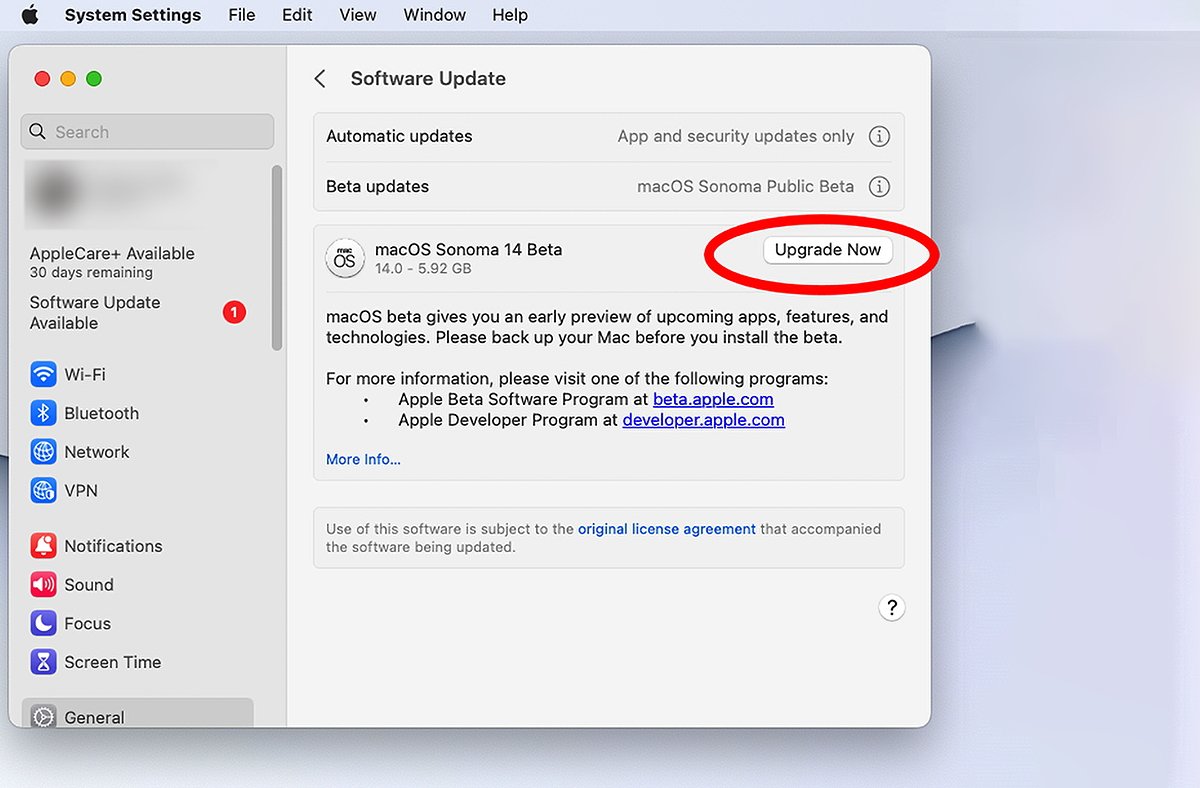
Click "Upgrade Now".
Once the beta finishes installing, your Mac should reboot, and if it doesn't, restart. Once you're booted into macOS Sonoma, you'll need to install the Homebrew package manager.
If for any reason the beta update fails to install, you can also install it manually using the UniversalMac_14.0_23A5286i_Restore.ipsw file you downloaded from Apple's site.
Installing Xcode beta and command-line tools
Next, unzip the Xcode_15_beta_4.xip file (.xip is just a signed .zip file), and the Xcode command-line tools .dmg, which contains an installer.
Copy the Xcode 15 beta to your Applications folder first, double-click it in Finder to run it, and if prompted, install any additional tools it asks for.
Next, open the Xcode Command Line Tools .dmg you downloaded from Apple's site, and double-click the Command Line Tools.pkg. Follow the setup instructions in the installer to install the tools.
Installing GPTK
Next, double-click the Game_porting_toolkit_beta_1.02.dmg you downloaded from Apple's site. This disk image contains three command-line tools, a Read Me, and a lib folder which contains the D3DMetal.framework bundle, the libd3dshared.dylib dynamic library, and the Windows to POSIX WINE bridge libraries which make the code translation for Windows games possible.
The command line and Homebrew tools will be used to install the porting toolkit libraries. But first, you must configure Homebrew and Apple's Rosetta 2 emulator to work properly together.
Currently, there are two versions of the Homebrew binary: one for Apple Silicon (ARM) Macs, and one for Intel (x86) Macs. We'll get to this in a moment.
Once the Apple Rosetta 2 emulator is installed, it's possible to run an x86-only shell window in the Terminal app so that commands entered into it only run x86 versions via Rosetta. This is required in order to run the commands and tools needed to set up the GPTK.
The included Read Me has the complete steps for setup, but we'll cover them briefly here.
Make sure Rosetta is installed
To install the Rosetta emulator on your Mac, open a Terminal window and type:
softwareupdate --install-rosetta and press Return. You may be prompted for an admin password.
Once that completes, enter x86 mode in Terminal by typing:
arch -x86_64 zsh and pressing Return.
Next, install the x86_64 version of Homebrew in Terminal:
/bin/bash -c "$(curl -fsSL https://raw.githubusercontent.com/Homebrew/install/HEAD/install.sh)"
and pressing Return.
You may again be prompted for an admin password to complete the installation.
We have previously covered how to install and use Homebrew in depth.
Once that finishes, check the Homebrew installation in Terminal:
which brew and press Return.
If the result isn't /usr/local/bin/brew you'll need to modify your PATH variable to put /usr/local/bin first, which tells macOS where to look for tools.
The PATH environment variable can be modified on login by use of one of many configuration files: the .bashrc or .zshrc file in your user's home folder, or the profile file in the etc folder at the root of your startup disk.
Next, tap the Apple Homebrew tap in Terminal:
brew tap apple/apple http://github.com/apple/homebrew-apple
and press Return.
Now install the GPTK
In Terminal, enter:
brew -v install apple/apple/game-porting-toolkit
and press Return.
This can take quite some time - up to an hour depending on the speed of your Mac, since it will download and compile several pieces of software while running.
The GPTK Read Me mentions a note about possible errors during this step:
"If during installation you see an error such as "Error: game-porting-toolkit: unknown or unsupported macOS version: :dunno", your version of Homebrew doesn't have macOS Sonoma support. Update to the latest version of Homebrew and try again".
brew update
brew -v install apple/apple/game-porting-toolkit
Configure WINE prefixes
In WINE ,you can configure a virtual C: drive just like in Windows. This is called a prefix in WINE terminology.
For GPTK you'll install the toolkit and any games you want to run into the same prefix. From the Read Me:
"Run the following command to create a new Wine prefix named my-game-prefix in your home directory".
WINEPREFIX=~/my-game-prefix `brew --prefix game-porting-toolkit`/bin/wine64 winecfg
"A "Wine configuration" window should appear on your screen.
Change the version of Windows to Windows 10.
Choose Apply and then OK to exit winecfg.
If the "Wine configuration" window does not appear, and no new icon appears in the Dock, verify that you have correctly installed the x86_64 version of Homebrew as well as the game-porting toolkit formula."
Install GPTK into the WINE prefix
For this step, you must ensure the Game Porting Toolkit-1.0.2 .dmg file is still mounted on your desktop. If not, double-click it again to mount it.
The bridge libraries mentioned above must be installed into the WINE prefix you created above. To do so in Terminal type:
ditto /Volumes/Game\ Porting\ Toolkit-1.0/lib/ `brew --prefix game-porting-toolkit`/lib/
and press Return.
ditto is a macOS command line tool that knows how to copy files and folders on the Mac with perfect precision - copying any resource forks, permissions, ownership, groups, and Access Control Lists to the destination files.
There is also a verbose mode for ditto. See the ditto man page in Terminal for more info.
The above line copies the bridging libraries from the mounted game porting toolkit .dmg to the WINE prefix you created above.
Install your Windows game(s)
Now that the WINE prefix and GPTK are set up, you can copy any Windows games into the prefix (the C: drive) by using the open UNIX command and copying your game into the prefix in Finder. For example:
open ~/my-game-prefix/drive_c
This will open the C: drive in a new window in Finder into which you can copy your Windows game binaries. The C: drive works just like any other volume on your Mac's Desktop.
Run your Windows game in WINE
At long last, you're now ready to run your game using WINE.
To do so you specify on the command line the command gameportingtoolkit, followed by the WINE prefix path, the drive letter (C: in this case), then the full path to the game binary you copied above. For example:
gameportingtoolkit ~/my-game-prefix 'C:\Program Files\MyGame\MyGame.exe'
launches the game named MyGame in \ProgramFIles\MyGame in the WINE C: drive.
By default your game launches with the Metal Heads Up Display, but you can suppress the HUD by using the command gameportingtoolkit-no-hud instead:
gameportingtoolkit-no-hud ~/my-game-prefix 'C:\Program Files\MyGame\MyGame.exe'
The Read Me details other options such as disabling ESYNC for more game compatibility.
Apple's GPTK is an exciting new addition to Mac gaming, and as it evolves and improves it promises to bring many Windows games to the Mac running at near-native speeds. This means every Apple Silicon Mac is suddenly open to the entire world of Windows gaming.
It also means that once perfected, game developers won't need to port their games to the Mac - making most Windows titles playable on the Mac from day one.
You'll also want to check out macOS Sonoma's Game Mode which further enhances gameplay on Macs.


-m.jpg)