-xl.jpg)
Before selling, gifting, or recycling a Mac, you'll want to take a number of steps to properly prepare it. Here's how.
Whether you have your eye on a new M1 Mac or you just want to get rid of an old macOS device in an environmentally responsible way, it's important to properly sign out of certain services and delete your old data before doing so.
The process is fairly straightforward but may take some time, so be sure to budget some time to preparing your Mac before getting rid of it. Also, these steps only apply to Intel-based Macs, since a couple of steps are a bit different on Apple Silicon machines.
With both of those things in mind, here's how to prepare your Mac device before you get rid of it.
Step one: Back up your Mac
Make sure to back up your Mac before proceeding.
If you're planning on selling, regifting, or recycling your Mac device, it's likely that you've already thought about the data stored on it. If you haven't, let this be a reminder.
Preparing a Mac for transfer to a new owner should involve deleting all the data on it for both security and privacy reasons. If you don't want to lose that data forever, you'll need to back up your device before you proceed to any additional steps.
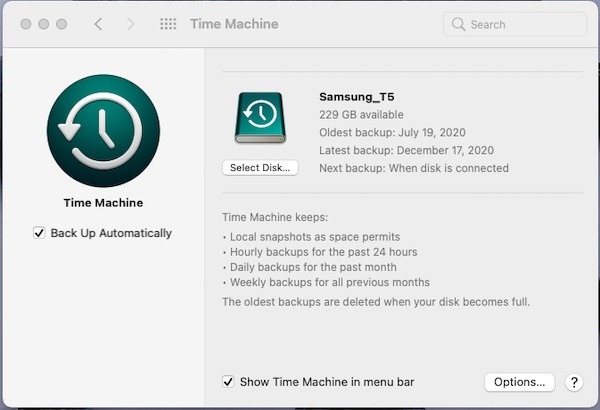
The simplest method of backing up your Mac is using Apple's built-in Time Machine feature. There are other options to consider, and more information is available here.
Sign out of your services
Signing out of your services and your Apple ID, is also a good idea.
Erasing your Mac will typically ensure that your data stays in your own hands. But, depending on the version of macOS that the Mac is running, there are a few additional steps you may want to take.
If you're on OS X Mountain Lion or earlier, then it's a good practice to sign out of iMessage. Here's how.
- Open the iMessage app on your Mac.
- Choose Messages from the top menu bar, and then select Preferences.
- In this menu, click on iMessage.
- Finally, click Sign Out.
If you plan on transferring a device running macOS Mojave or earlier, then you'll want to sign out of iTunes, too.
- Open iTunes.
- In the iTunes window, select Account and Authorizations.
- From that drop down menu, select Deauthorize this Computer.
- You'll be prompted to enter your Apple ID account credentials and password.
- Once you do, hit Deauthorize.
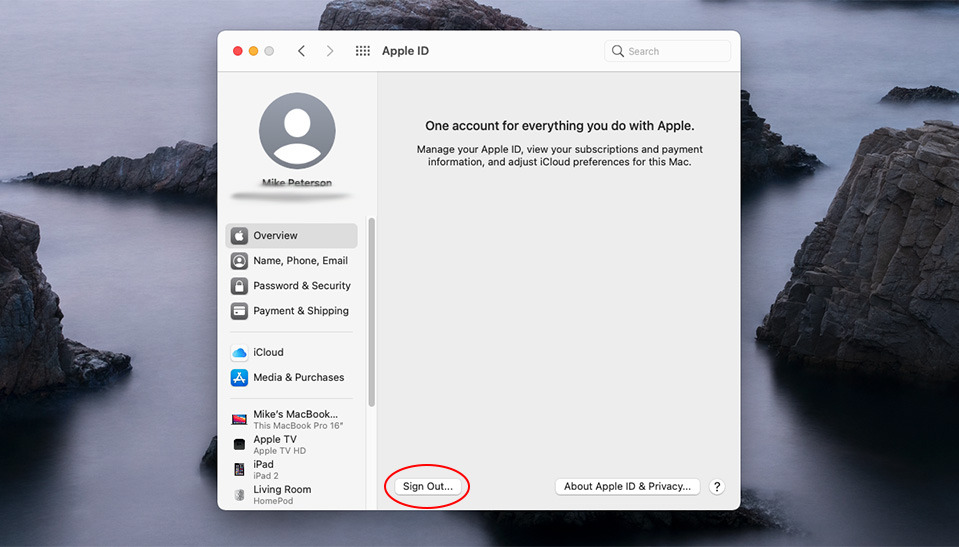
Finally, it's a good idea to sign out of iCloud on any Mac device before you go about erasing the drive.
In macOS Catalina and macOS Big Sur, this is done by clicking on the Apple icon in the top menu bar, then navigating to System Preferences > Apple ID. From here, select Overview and then click on the Sign Out button.
It's a similar but slightly different on macOS Mojave and earlier. Choose the Apple icon in the menu bar, select System Preferences, click iCloud, and then click Sign Out.
You may be asked if you want to keep a copy of the iCloud data on your Mac. It doesn't really matter one way or the other, since you'll be erasing your drive and any iCloud data will remain synced to your Apple cloud storage.
A couple of additional steps

Apple also recommends that users reset the NVRAM on their devices.
One step that many people miss is to reset the nonvolatile random-access memory (NVRAM) and parameter RAM (PRAM) before reinstalling macOS.
It's a best practice, however. Resetting the PRAM will clear certain user settings from your Mac's memory. It'll also restore certain deeper-level security features that may have been changed. Here's how to do it.
- Shut down your Mac.
- Turn on your Mac and immediately press and hold Option, Command, P and R.
- After about 20 seconds, you can release your keys.
You'll know that the reset worked if you see the Apple logo appear and disappear for a second time on T2-equipped Macs. On older Macs, you'll hear that signature startup sound.
Do note that resetting the NVRAM and PRAM using this method only works on Intel-based Macs. There's no option to manually reset NVRAM on Apple Silicon Macs.
In addition to resetting your NVRAM, you may also want to manually unpair any Bluetooth devices from your Mac.
This step isn't strictly necessary, but it could avoid confusion if you live with the person you're transferring the Mac to. It could also mitigate any Bluetooth security concerns you may have.
Just navigate to Apple menu > System Preferences > Bluetooth. Hover over the devices you'd like to unpair and click the X icon next to them.
Finally, erase and reinstall macOS.
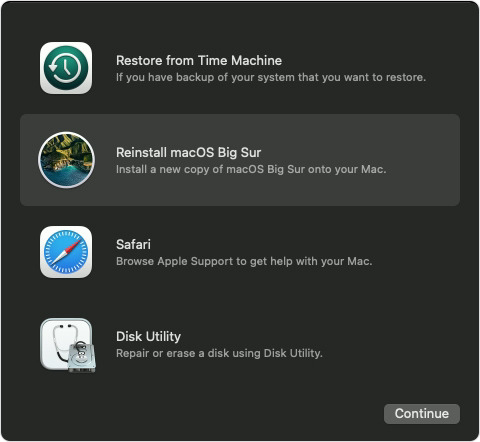
Once you're finished with the necessary steps, you can reinstall a fresh copy of macOS.
Now that all of that is done, you're finally ready to erase your Mac's drive and restore it back to its factory default settings.
There are a number of ways to go about this, but the easiest is to use Disk Utility to format your drive and reinstall macOS.
Here's how to do it.
- Shut down your Mac.
- Turn on your Mac and immediately press and Command and R.
- You may be prompted to select a user and log in with the password for that account.
- From here, you'll be presented with a utilities window. Select Disk Utility.
- Select Macintosh HD from the sidebar.
- Click Erase and input a new name and format. For simplicity's sake, you can leave both to Macintosh HD and APFS or Mac OS Extended (Journaled).
- Next, click Erase Volume group. If that isn't an option, click Erase.
- If you have Find My enabled, you'll be prompted to deactivate it with your Apple ID and password.
- You may want to delete any other internal volumes besides Macintosh HD. Just click the minus icon next to each volume.
- Finally, quit Disk Utility
Now that your disk has been erased, you can select Reinstall macOS (Version Name) from the utilities window.
Once macOS finishes installing, you'll likely be faced with a setup assistant. It's at this point that you should shut down your Mac and leave the setup process to whomever is receiving it.