Apple's Notes app is often overlooked, but has newfound power. Here's how to create, edit, collaborate, and share notes from within the app.
From the very basics of using Notes by yourself, to collaborating with others, these are the most useful features Apple has introduced to the Notes app over the years.
How to get around typing in Notes
From the introduction of the Notes app, you could always type your notes with your device's keyboard. From iOS 9, though, Apple gave more options on how to type and edit text from within the Notes app.
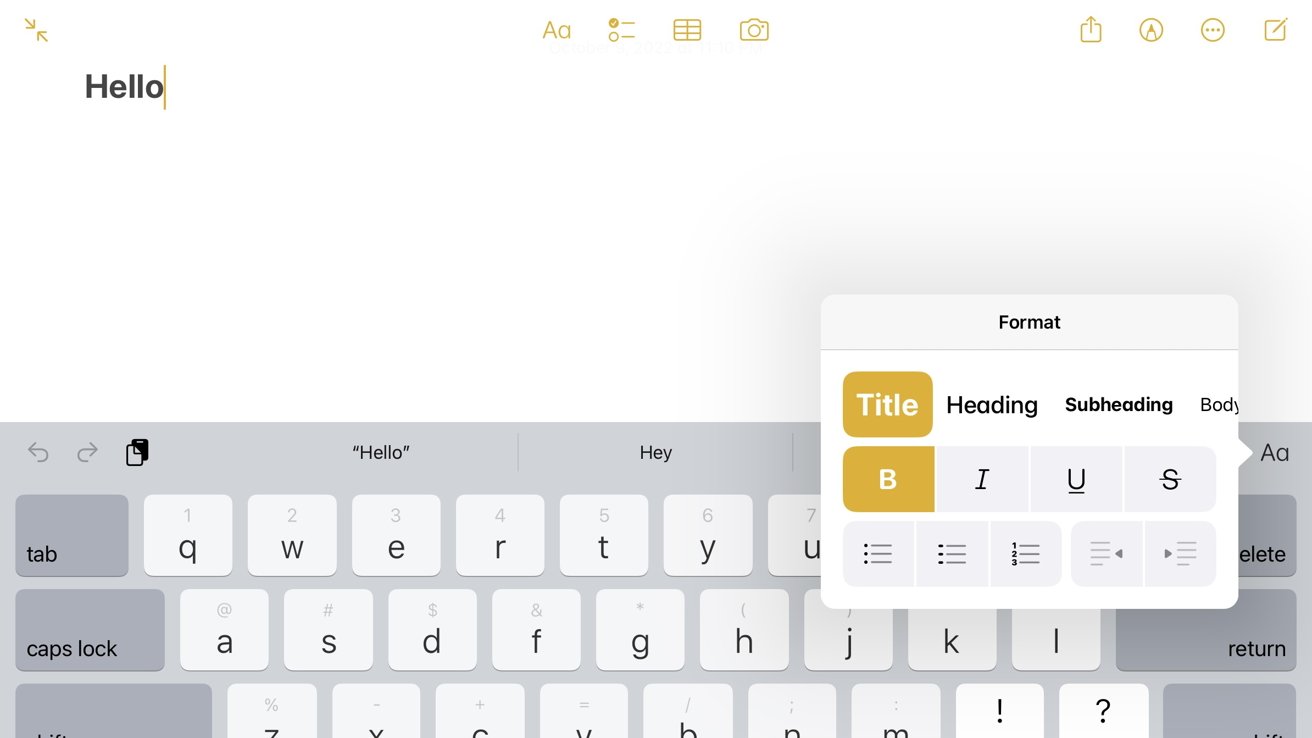
There are multiple ways to format your text in Notes. Here is how you can select from them.
- Tap on the Writing tab (the square with the pencil icon on the bottom right of the screen)
- Tap on the Fonts tab (the icon with the uppercase and lowercase "A" (the second tab to the left))
- Highlight the text you want to format (if you have already typed it)
- Select how you would like your text formatted (B = bolding, I = italicizing, or U = underlining)
There is also an option that allows you to insert lines in the letters of your text.
Preset formats are also available for you to use. The preset formats you can select from are:
- Titles
- Headings
- Subheadings
- Body text
- Monospaced text
Bullet pointing lists are easy as well with the option to create a bulleted, lined, or numbered list. You can also indent or de-indent paragraphs or lists as well.
With these abilities, you can customize your notes and detail them to how you see fit. It helps you organize and section different aspects of each note when you think it is needed.
How to start drawing
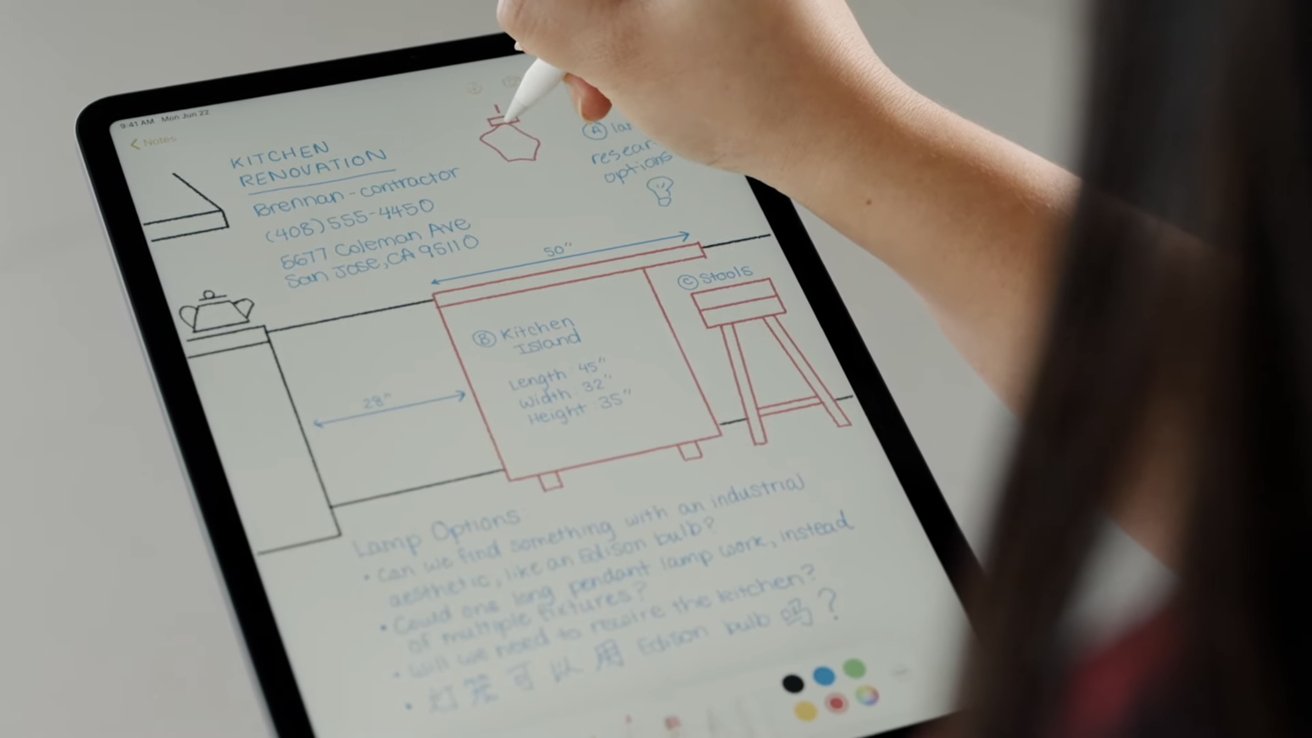
Typing is not the only way you can write out notes, you can also write them by hand or add drawings as well. In iOS 9, Apple also expanded the Notes app to allow you to do even more within the app than you could before.
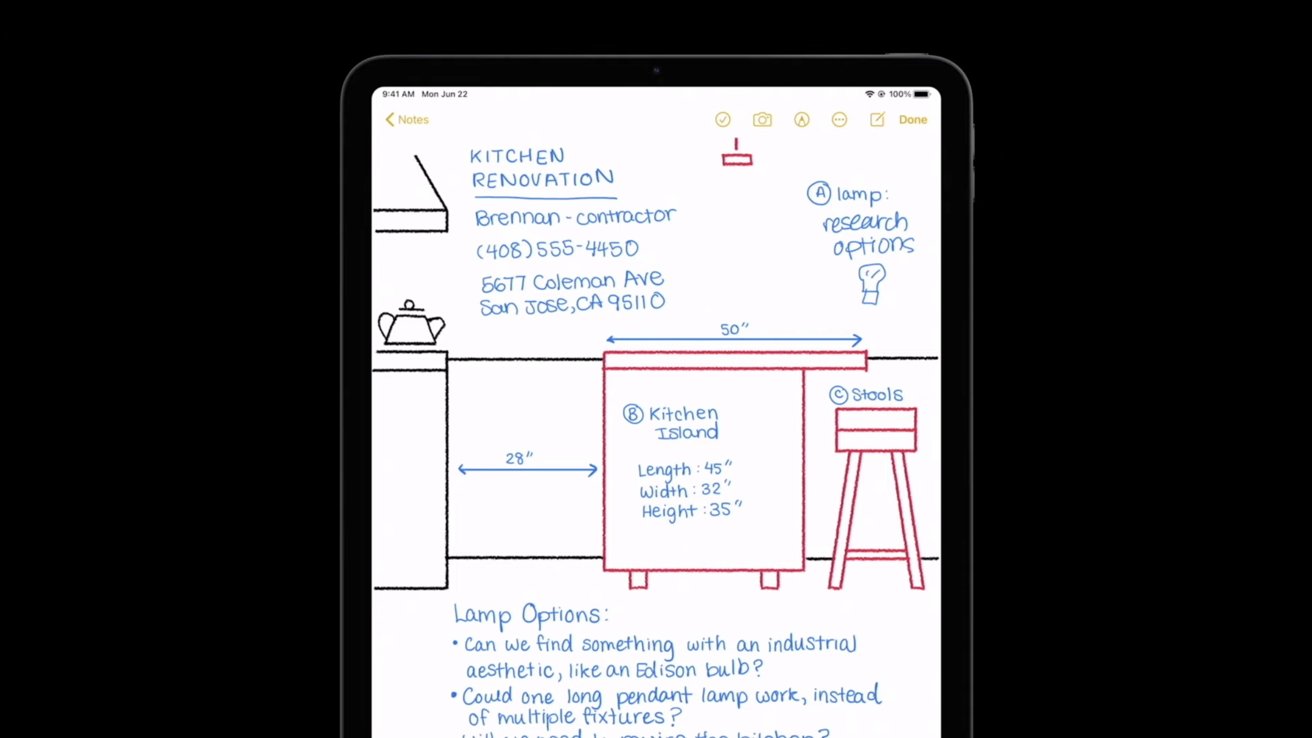
You can add multiple drawings within different areas of your note. You can add drawing to one area of your notes or in-between textual paragraphs.
You can choose from a marker, a highlighter, a pencil, an eraser, a text-lasso, and a ruler to work with in the drawing tab. Here is how you access them.
- Tap on where you would like to insert your drawing
- Tap on the marker icon at the bottom of the screen (second icon to the right)
- Select the writing tool you want to use
- Start drawing with either your finger or Apple Pencil
There are multiple functions each utensil brings to the Notes app.
How to use and customize writing tools
The marker tool allows you to draw and write in a more prominent ink-like textures. The highlighter allows you to highlight areas with a more transparent coat to it. The pencil brings the textures of a real pencil in a digital form.
You can either draw with the pre-set thickness and opacity of each writing utensil or you can edit them. Here is how to change the writing-thickness and opacity of each writing utensil.
- Tap on the writing tool you want to use to select it
- Select the color you want to write with
- Tap on the same writing tool again to bring up further options
- Select the thickness you want the tip of your writing tool to be
- Underneath is a color slider, drag how dark or light you want the color's opacity to be
You can also write out typed text as well, but it only works on iPads right now. Here is how you can do that.
- Tap on the Marker icon
- Select the writing tool with an "A" on it
- Start writing - with your Apple Pencil - anywhere and it will convert to typed text
You can also select previous written text and tap on "Copy as Text" to copy and paste your written text anywhere.
In iPadOS 16, if you want to write your notes but they are not straight, you can select your written text and tap on "Straighten" to have your device straighten the text you have written.
How to use the eraser
The eraser - as the name suggests - erases what you draw or write. The customization options are different than what you can select from with the writing tools.
Here is how to customize the eraser tool.
- Tap on the eraser tool to select it
- Tap on the eraser tool again to customize it
- Select if you want to erase by object or by pixel
- Start erasing content you want to erase
If you select to erase by pixel, then you can choose how big you want the eraser to be. You cannot choose that option if you choose to erase by object.
How to use the lasso and ruler tools
The lasso tool allows you to lasso up any text or drawings that you have done and be able to change the color of them or move them anywhere on the page. This is helpful for if you are writing down a brainstorming chart and need to move ideas, or want to move a subject in a drawing you are creating.
The ruler tool can help you draw straight lines in your note. The tool can be rotated any degree so you can position it any way you want.
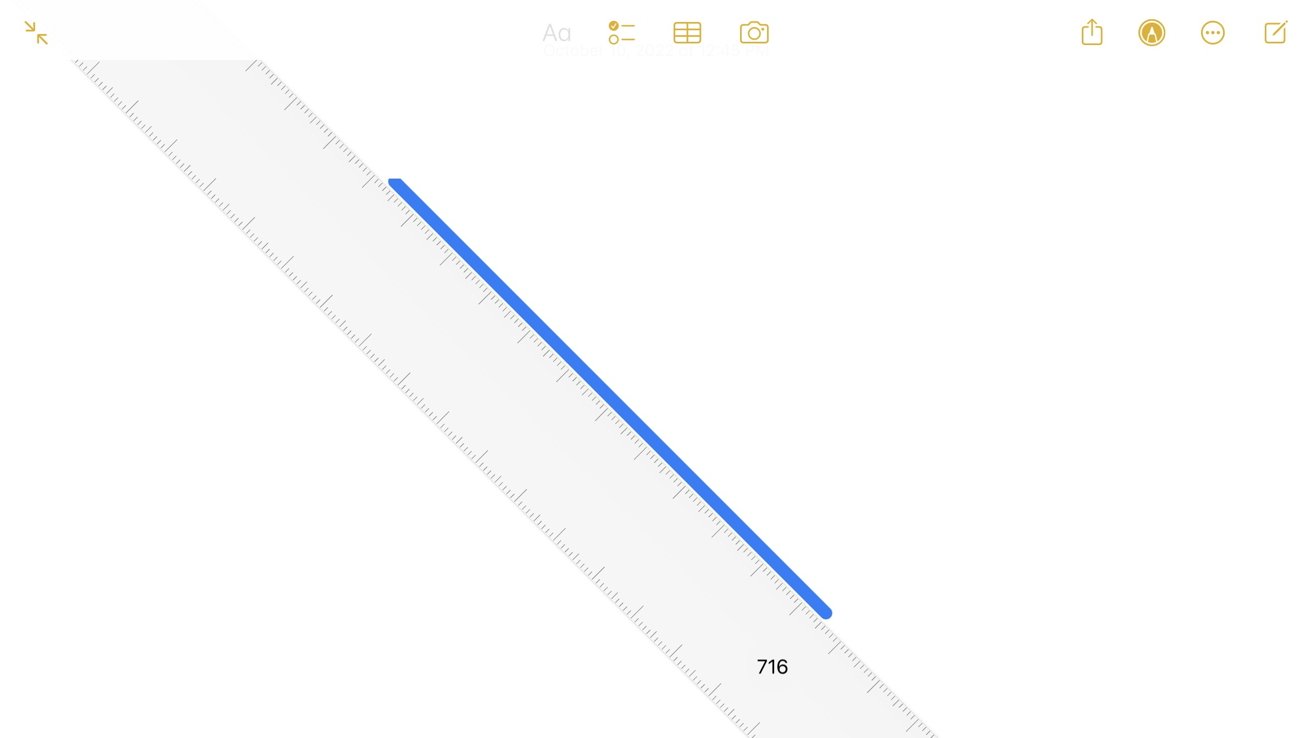
The ruler tool will stay on the screen when selecting another tool (like the marker, highlighter, or pencil). Each writing tool will notice the ruler and draw along it when creating a straight line.
How to draw shapes
Introduced in iOS 14 and iPadOS 14, the Notes app can recognize shapes and help you create perfect versions of them.
"Sometimes you want that more professional cleaned-up look," said Jenny Chen, an engineer for Apple Pencil software, at WWDC 2020. "And so now, when I draw a simple shape and pause at the end, it'll automatically convert to that ideal shape."
Drawing perfect shapes can work with either drawing with an Apple Pencil or your finger. Here is how to draw shapes in the Notes app.
- Draw the shape you want to include in your drawing
- Once done drawing the shape, hold your finger or Apple Pencil down at the end of the drawing
- Wait about a second or two and the shape should convert into a more professional looking version of it
This can work with triangles, circles, rectangles, hearts, stars, and other shapes as well.
This also works with arrows and lines. Just hold at the end of drawing them and the app will either straighten the line or fixate the arrow. The arrow can either be curved or straight.
Unfortunately, if the app cannot depict what type of shape you are trying to draw, it will not convert it and you will have to try again.
Shapes can be pre-added within a drawing without you having to draw them. Here is how to add them.
- Tap the Plus icon at the end of the tool selection bar (next to the color selector)
- Select "Add Shape"
- Select the shape you want
Once you place the shape, you can move it around, resize it, decide what color you want it to be, how thick you want the lines of it to be, and how prominent you want the opacity of the color of the shape to be.
Text, signature, and colors
Though you can type in text around drawings, you can also add text into drawings. Here is how you can accomplish that.
- Tap the Plus icon at the end of the tool selection bar
- Select "Add Text"
- Double tap on the text box to insert your text
- Type in the text you want added to the drawing
You can customize your text with the font you want, the font size, the text alignment, and if you want it to be bolded, italicized, and/or underlined. You can also change the color, the text box size, and move it anywhere within the drawing.
Signatures are another addition you can add to your drawings. Here is how to add a signature.
- Tap the Plus icon at the end of the tool selection bar
- Select "Add Signature"
- Select the signature you want to use (you can have more than one)
- You can add another signature by tapping "Add or Remove Signature". You can remove signatures from there as well.
Once you insert your signature, you can change the size, rotation, color, and line thickness of it to your likings.
Color options have been expanded as well. With changing the opacity of the color, you can also select any color your heart desires.
Basic colors like black, blue, green, yellow, and red will be pre-shown, but selecting on the colored-circle with a color ring around it will allow you to select from an array of colors. You can configure the color you want either by a grid, spectrum, or slider selector.
You can also use a color-selecting tool to specifically pick the color from a drawing based on the pixels in it. You can also choose the opacity of the color you want to use as well.
Apple Pencil support
If you are using an Apple Pencil and an iPad that supports it, you will have more customization control when writing or drawing within the Notes app.
Highly sensitive sensors within the tip of the Apple Pencil allows it to recognize position, force, and tilt when writing or drawing. This means that if you push harder with Apple Pencil, the lines will get thicker, and if you tilt the Apple Pencil, the lines will be wider - like if you were drawing with a real pencil. It mimics the real details of a physical writing utensil depending on how you use them.
If you have an Apple Pencil (2nd Generation) - that works with the iPad Pro, iPad mini, or iPad Air - and you tap the flat surface twice, it will switch between the eraser tool and the last drawing tool you were using. This allows easier and more fluid drawing and writing actions than previously with the Apple Pencil.
How to enable lines and grids
When writing notes, drawing on a blank canvas may be hard to configure your notes and keep everything organized. The Notes app allows you to add a lined or grid layout to your note to keep your handwriting neat and organized.
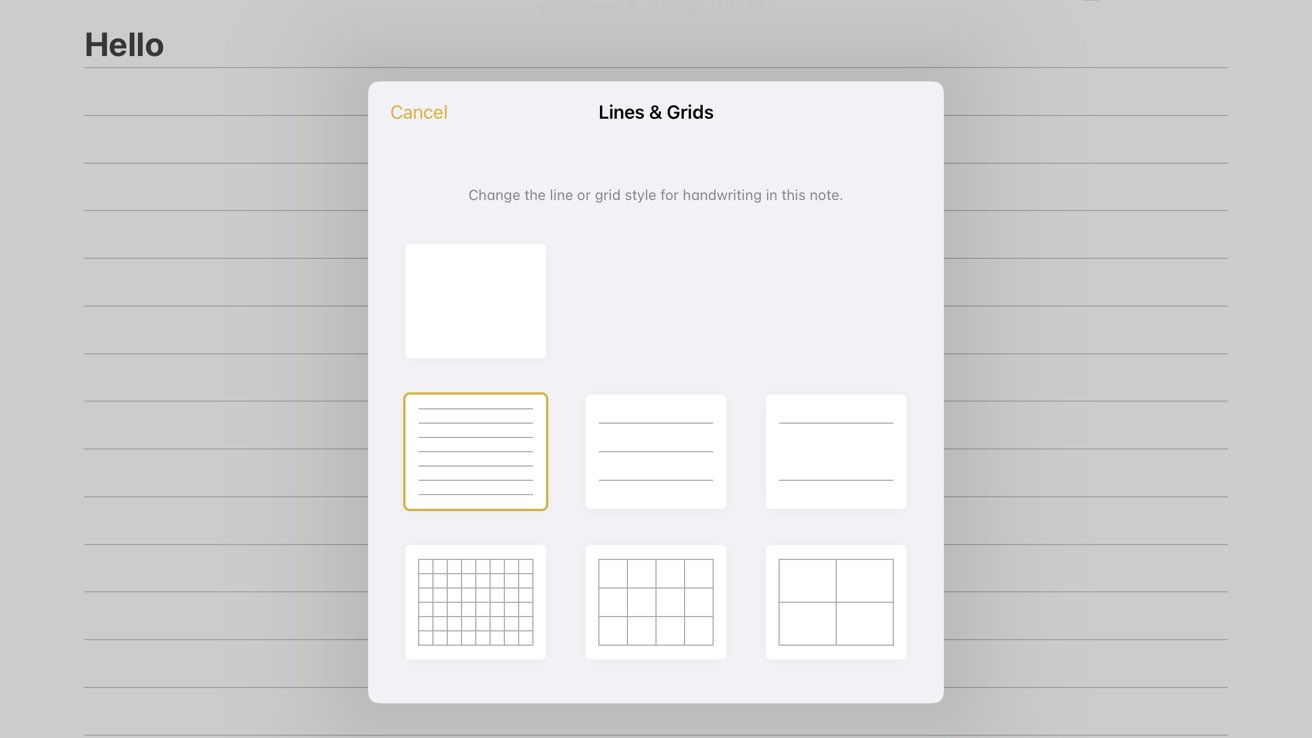
Here is how to add lines and grids to your note to be more organized.
- Tap on the More Options icon (the three dots in a circle icon usually in the upper right of the screen)
- Select "Lines and Grids"
- Choose the size and layout of the lines or grid you want
- The one you choose will then show up on your note
Any text, lists, or media you add to your note will divide the line or grid design you choose. This means that the content you add will not overlap the grid or lines unless it is in a drawing.
You can create Tables as well from within a note. Here is how to add a table to your note.
- Tap anywhere on your note
- Tap on the Plus icon on the right side of the screen over the keyboard
- Tap on the Tables icon all the way on the left of the options
- A 2x2 table will be inserted into your note that you can rescale
- Tap within the table and hit "Next" on your keyboard to add more rows
Rows can be moved with the three dots surrounding the table. You can also tap the Tables icon - that you tapped to create the table - again and it will give you the options to delete, share, or copy the table and also convert it to text.
How to add lists
You can create To-Do lists in your notes as well to help organize chores you have to do or a shopping list you want to create - for example. Here is how to create or add a list to your note.
- Tap on the List icon at the bottom of the screen (far-left icon with the two circles (the top being filled in and having a checkmark in it) and lines)
- A circle will appear next to your cursor and it will create the first task you want to put on your To-Do list
- Type in your first task
- Tap "Next" on the keyboard and it will create another task
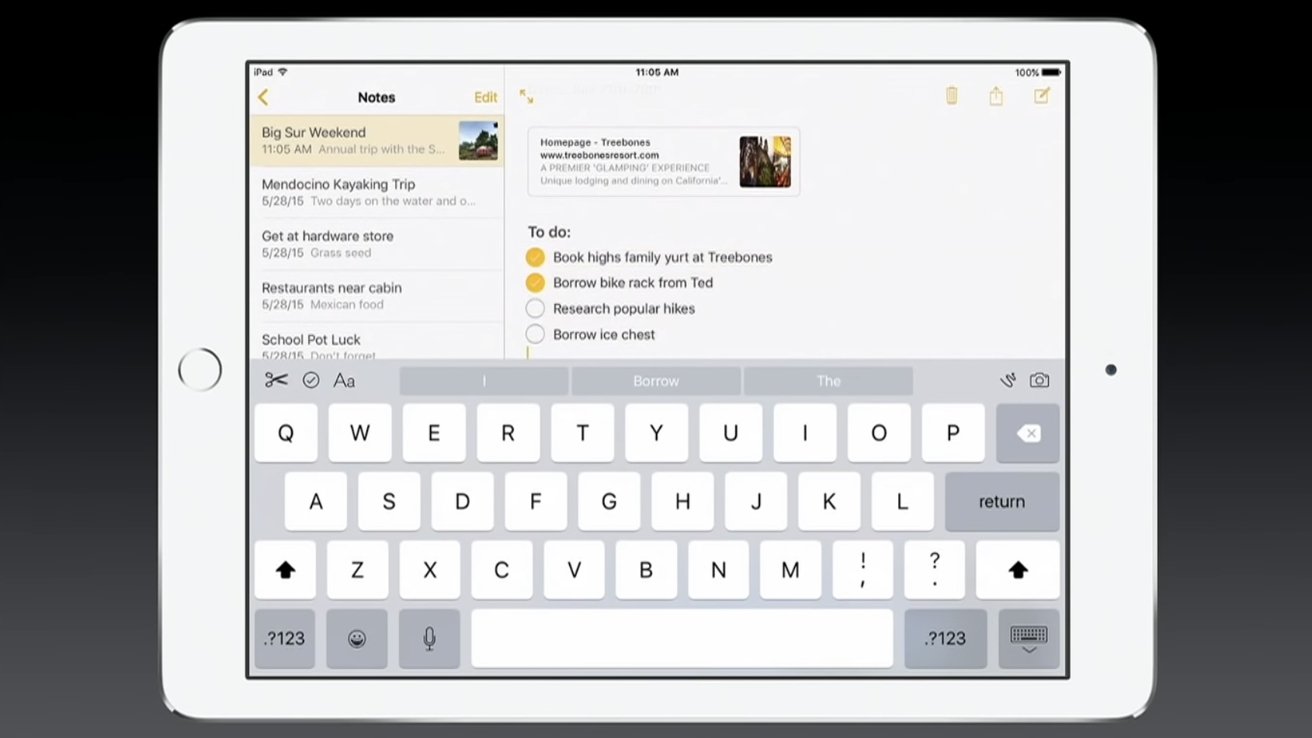
A circle will appear next to all of your tasks on the list. Tapping on it will signify that you completed that task and a green checkmark will show in the circle. The task will move to the bottom of the list once tapped.
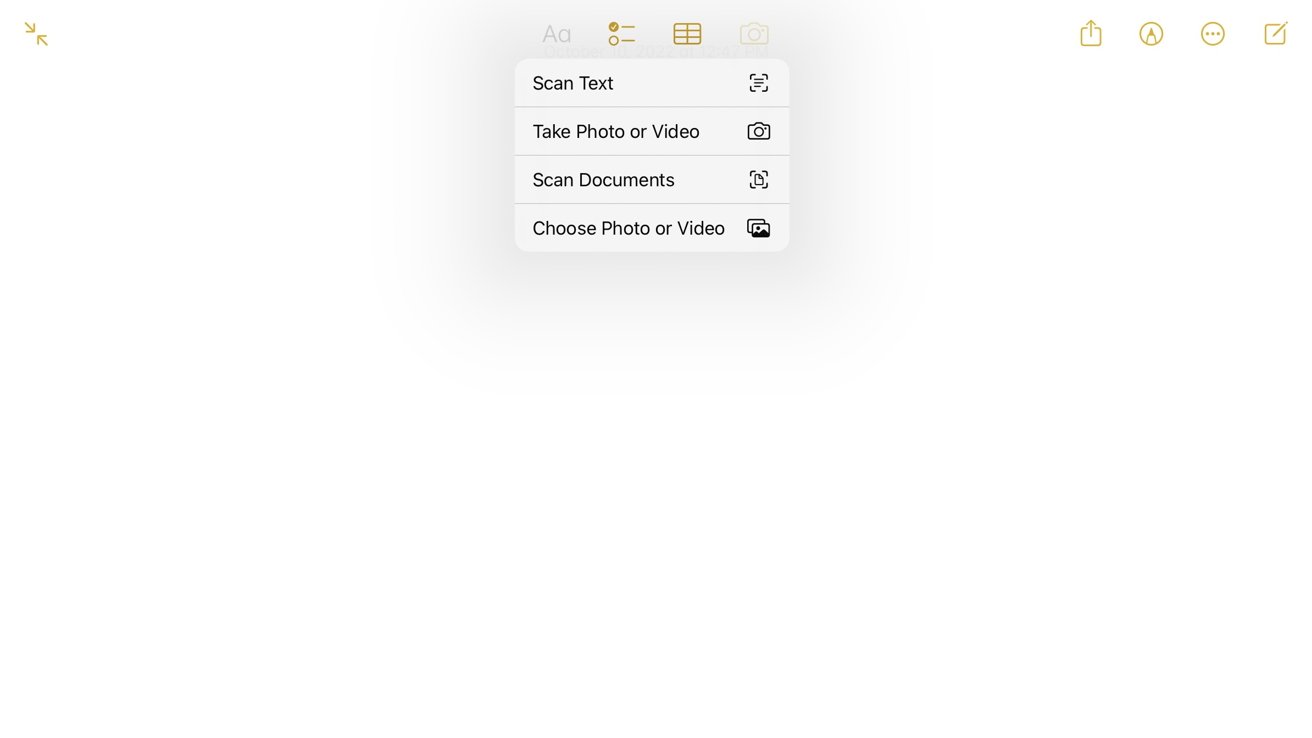
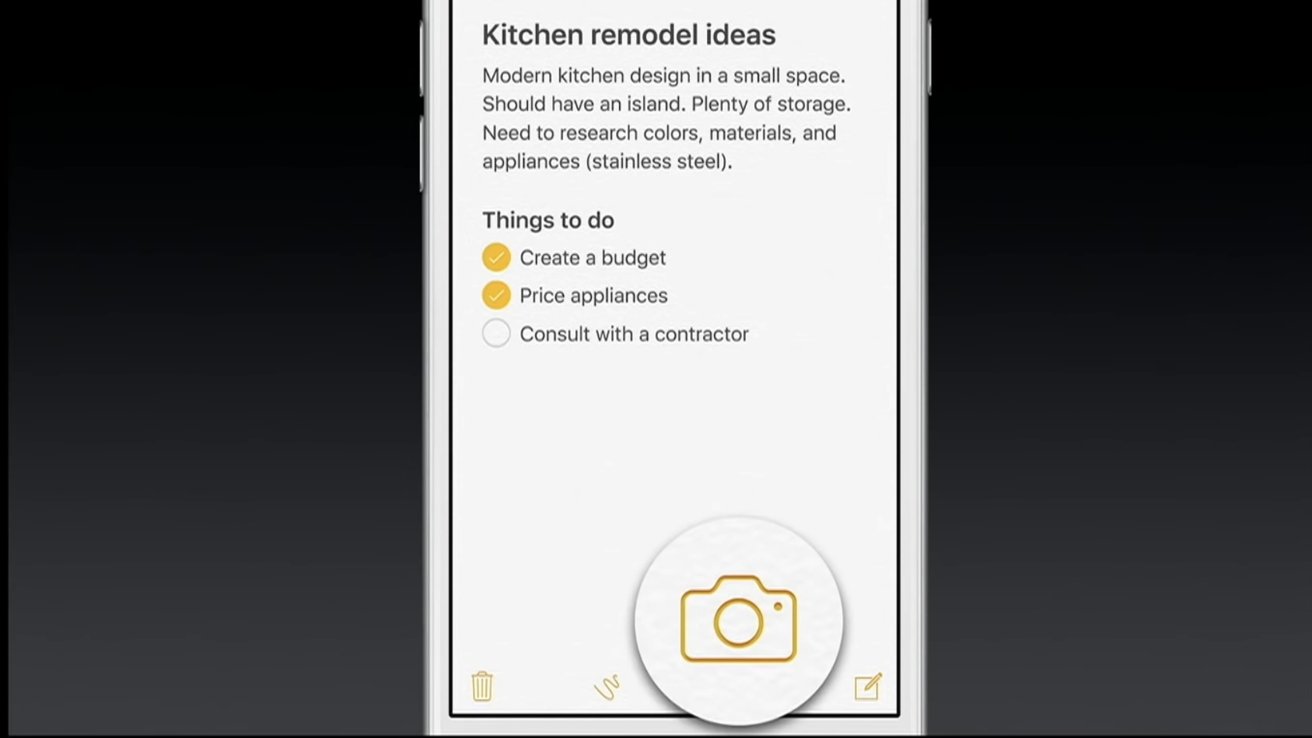
How to scan documents
The Notes app allows you to take a picture and scan documents so you can have them later in digital form. Here is how to scan them.
- Tap on the Camera icon at the bottom of the screen
- Select "Scan Document", or you can also tap on the More Options icon and select "Scan" to capture a document as well
- A yellow filter will be placed across your document to show you what your device will capture
- Tap on the shutter icon to capture the document, or your device will automatically do it for you
- The document captured will shrink to the bottom of the screen and you can tap on it to edit it
- Once you are done editing and capturing, you can tap "Save"
- The document will be inserted into your note into a section called "Scanned Documents"
When scanning the document, you can choose if you want the flash to be one, if you want a filter applied over it, and/or if you want the shutter to be on.
To edit your captured document, you can rearrange the four corners to be able to align the document to the correct position in case your device did not do so in the first place. You can also set a filter on it and rotate the capture if it is in the wrong orientation.
You can tap on the scanned document and share it to other people, other apps, or save it to the Files app for better organization.
The document you captured will be formatted as a PDF, and will be shared and saved as that as well.
How to insert pictures and videos
Just like scanning a document, you can add photos and/or videos to your notes as well. Here is how to add them.
- Tap on where you want to insert the media if you have text already written in your note
- Tap on the Camera icon
- Select "Choose Photo or Video"
- Select the photo(s) and/or video(s) you want to add
- Tap "Add" in the upper right of the screen when you have selected everything
- The photo(s) and/or video(s) will then be inserted into your note
You can also take a picture or video directly from the Notes app to insert into your note.
- Tap on where you want to insert the media if you have text already written in your note
- Tap on the Camera icon
- Select "Take Photo or Video"
- Capture the photo or video what you want to add
- When done, the photo(s) and/or video(s) will then be inserted into your note
Adding photos and videos into your notes ia a great way to organize your notes with media if they go together and need a quick way to access them in the future.
How to insert outside text
If you write down something on a piece of paper or board and would like to convert it into a note in the Notes app, you can. Here's how to convert it.
- Tap on the Camera icon
- Select "Scan Text"
- A mini-camera will pop up at the bottom of the screen. The text that will be added will be highlighted and bordered with yellow lines around the corners.
- Tap the blue Insert button at the bottom of the screen once the text you want to be added is highlighted
- Once tapped, the text that was highlighted will be added to your note
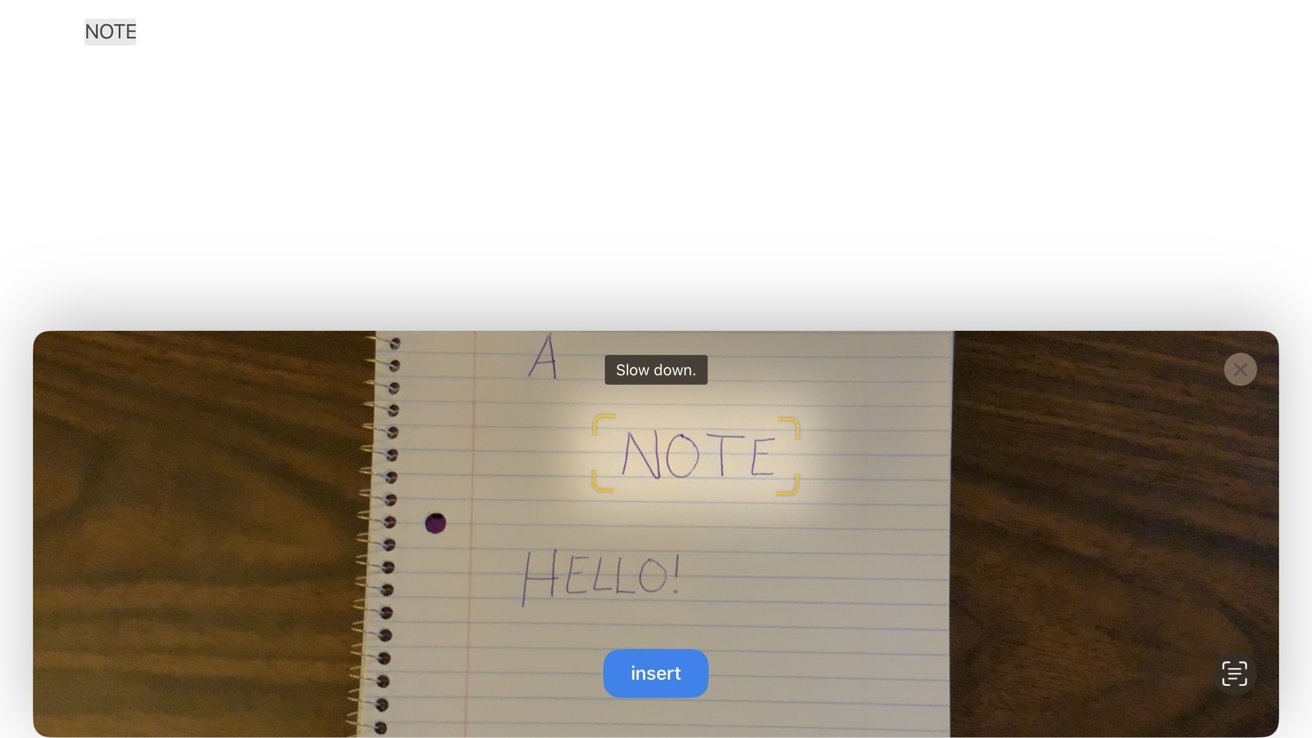
You can convert handwritten text (like from a note) or textual messages (like from a sign) into your note.
The text can be edited and deleted once added.
How to collaborate with others
If you are working with others and want to all be able to participate, add content, and edit what's in a note together, you can do that.
In iOS 16, Apple allows you to collaborate on a note with others also using Apple devices.
Sending a collaboration invite is easy. Here is how to start one.
- Tap on the Share icon
- Make sure the invite is set to "Collaborate" before sending the invite. The option is next to Notes app icon on the share sheet.
- Select the people you want to invite from the share sheet or send it directly from another app
Once the people who you want to collaborate with accept the invite, they can go right into the note and start editing. The invite will be sent to them the same way as if you were sending a link.
There are different ways you can collaborate in the note to make sure it is easy to find edits and mention people as well.
If you want someone to work on one area of a note, you can now "@" them in there and they will be notified and brought to where they were mentioned.
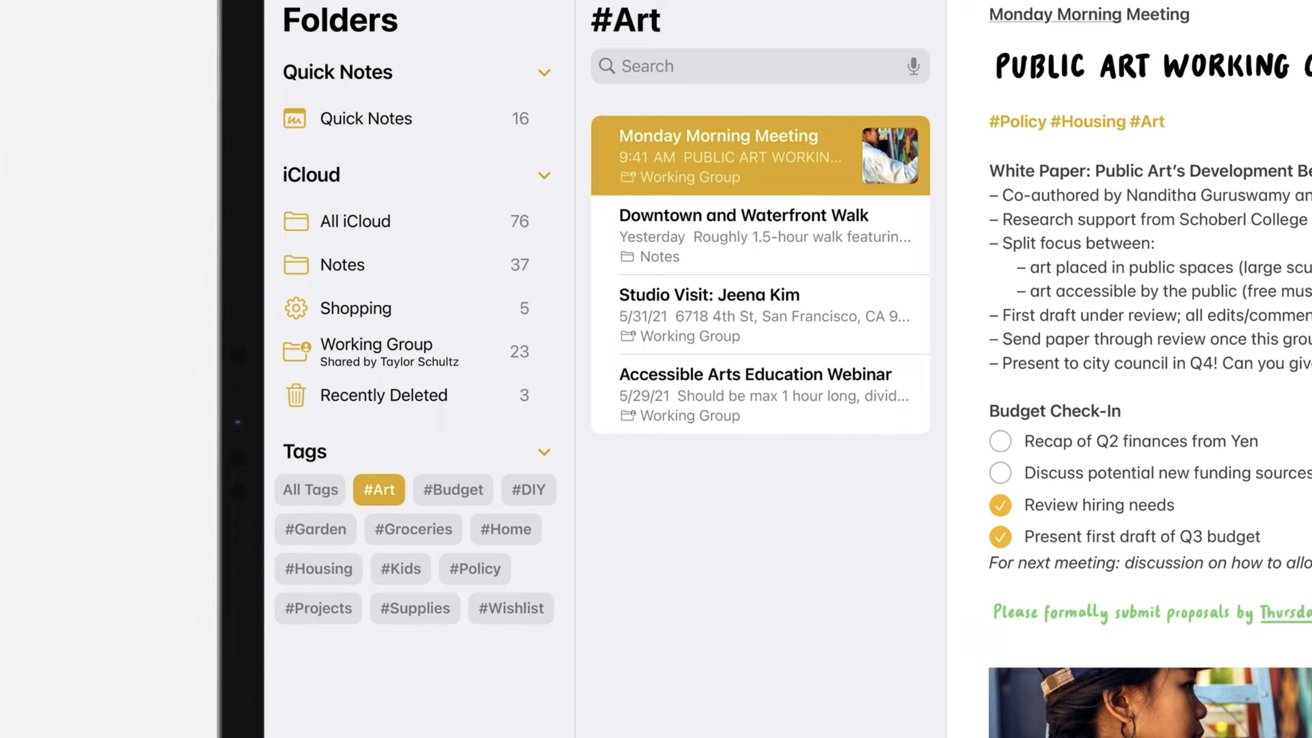
You can also add hashtags to tag the note into different categories to organize your notes with others. These tags can be added anywhere in the note. You can then find the note(s) you tagged with the keyword(s) you have chosen in the Tag Browser in the Folders view.
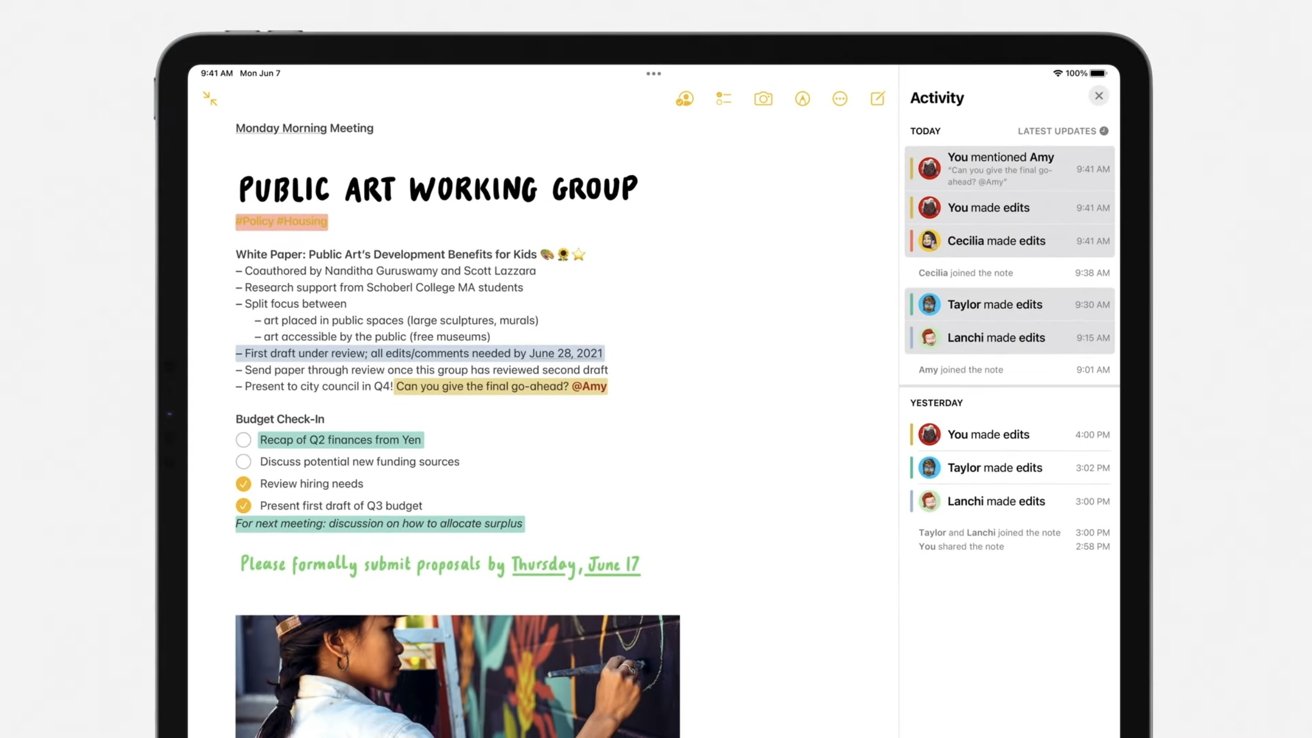
There is also an Activity tab to see what changes were made by who in the note so you can stay up-to-date when you step away.
How to share notes
If you are not looking to collaborate with others on a note and just want to share the content in it, you can do that as well.
- Tap on the Share icon
- Switch "Collaborate" to "Send Copy". The option is next to Notes app icon on the share sheet.
- Select whom you would like to share the note with or what app you would like to share it within
Unlike Collaborate, when sharing the note, it will copy and paste the content of the note into the message box and not send it as a link to the Notes app.
Notes that are locked cannot be shared until unlocked.
How to lock and pin notes
Sometimes you may have personal and private information in a note that you do not want anyone else to see. You may also have a note that has important information that you want to pin at the top of your list of notes so you do not have to go looking for it later.
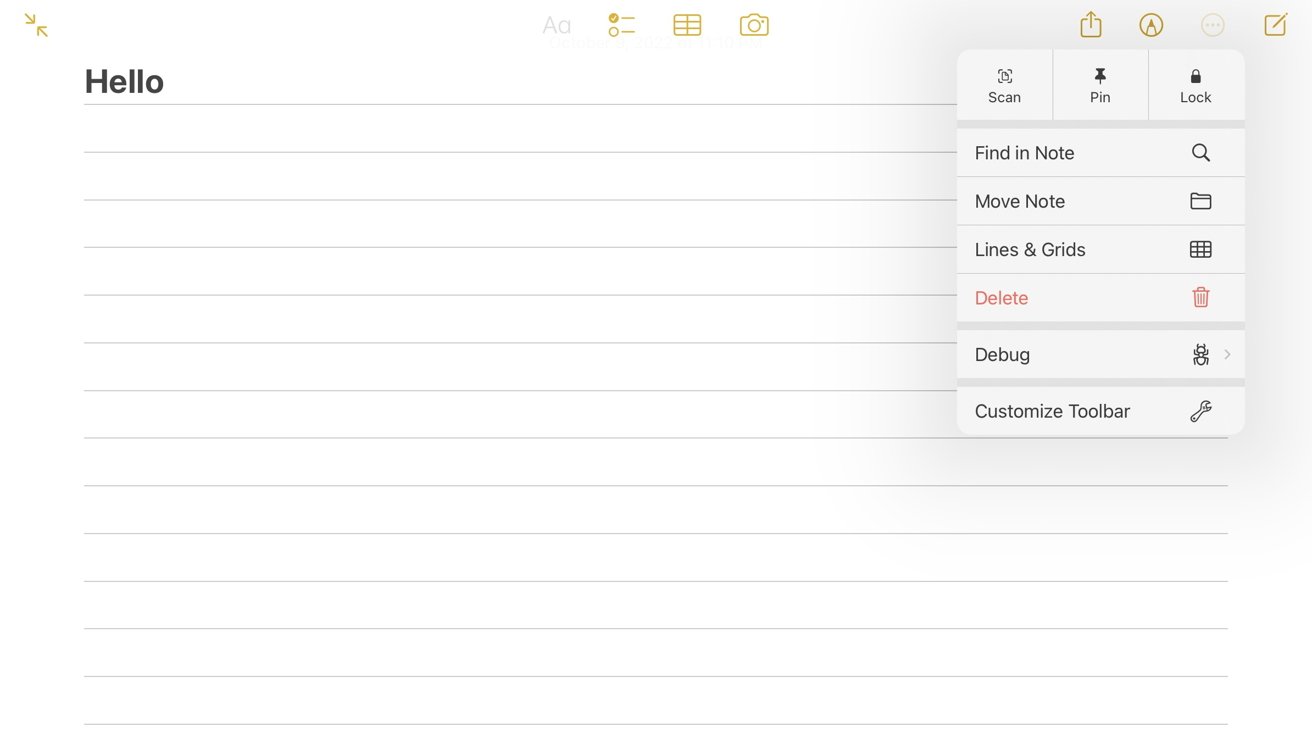
The locking and pinning features can help you keep your important notes easily accessible and private when needed.
How to lock notes
Here is how to lock a note.
- Select the More Options icon
- Tap on Lock to lock your note
- The note will automatically lock once the option is selected
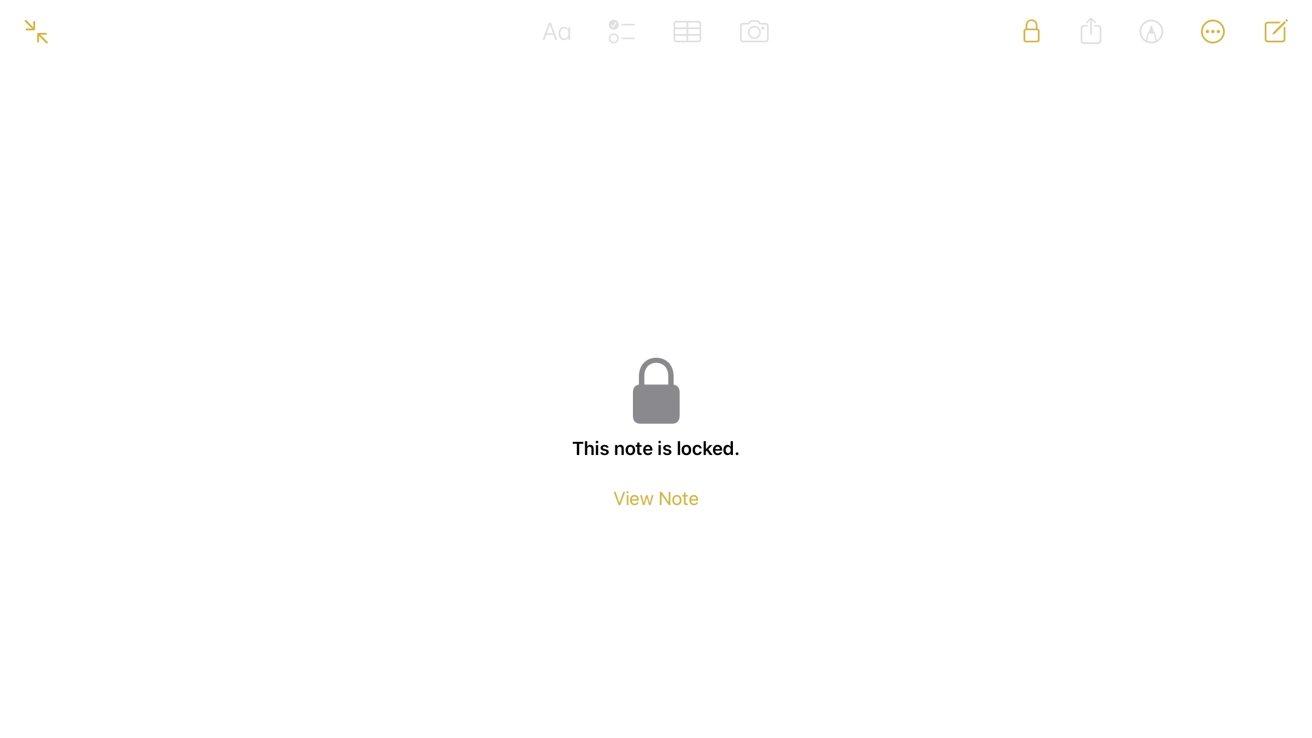
This note will not be able to be unlocked unless you verify your authentication with Face ID, Touch ID, or type in the password you created for it.
In iOS 16, iPadOS 16, and macOS Ventura, you will be able to use your device's password to unlock your notes. This will only work for devices running 2022 software updates and later.
To remove a lock from a note, it is nearly similar to locking it.
- Select the More Options icon
- Select Remove under the icon that has a lock with a slash through it
- Verify your authentication
- The note will then remain unlocked
Passcodes are synced across all devices and are protected through end-to-end encryption through your iCloud account.
How to pin notes
Here is how to pin notes for easier access to them in the future.
- Select the More Options icon
- Select Pin
- Go back into the view of all your notes and the note you just pinned will be at the top of all of the notes
A new "Pinned " section will be created in your All iCloud viewer of notes. The order of pinned notes will be ordered on the date that the note was created. So if you pin a note that was created before another note that is already in the pinned category, then it will appear under that note.
You can also unpin notes you don't want pinned anymore. Here is how to unpin a note.
- Select the More Options icon
- Select Unpin
- The note will be removed from the pinned area and returned to where it was originally before you pinned it to the top of the page
Pinning notes is a great way to organize your most important notes for easier access later when you need them right away.
How to create and organize folders
You can organize your notes in individual folders however you want them to be organized and separated.
Here is how to create and organize folders in the notes app.
- Go into the Folders view
- Tap the Folder icon with the Plus sign on it at the bottom left of the screen to create a new folder
- Select where you want the folder to go
- Name the folder
You can also make the folder a Smart Folder - which organizes it with tags and other filters you want added to it (such as date created, date edited, shared, mention, checklists, attachments, folders, Quick Notes, pinned notes, and locked notes). You can mix and match which filters you want to be applied to the Smart Folder.
Once you have created your folder, you can add notes to it. There are two ways you can add your note(s) to a folder - one is by swiping left on the note in the Notes view and tapping on the note icon, or going into the note, tapping the More Options icon, and selecting "Move Note".
Either way will bring up a list of all the folders that have been created. Tap on the one you want to move the note to and it will be moved there.
Moving a note to a folder will not make it disappear from the list of all the notes you have created and/or the ones you have pinned.
You can add folders within existing folders too. Here is how to add a folder into a folder.
- Go into the folder you want to add a folder into
- Tap on the More Options icon
- A list will appear, and under "Share Folder" will be "Add Folder"
- Tap on that, name the folder, and it will be added to the overall folder
Adding a folder into a folder is a great way to increase your organization in the Notes to know where everything is and which notes belong together in the same category.
Quick Note
People with Apple Pencils were already able to tap the screen or Lock Screen of their iPad when it was locked to easily jump into a new note and start writing or typing instantly. Since iPadOS 15, Apple has taken being able to quickly jot down a note even further.
Here is how to access and create a Quick Note.
- With an Apple Pencil, swipe up from the bottom right of the screen and a little note will appear
- You can type, draw, write, and/or add a link into it to quickly write down a little memo
- When done, swipe the note away
To get access to it later, you can swipe from the bottom right of the screen or view it in the Notes app in the Quick Notes folder.
You can do nearly anything you could do in the Notes app from the Quick Notes tool. You can change the color and writing utensil you are using, and tap on the note to start typing.
If you are on a webpage when starting a Quick Note, a button will appear at the top of it suggesting to add the link of the webpage to the note for easy access to it later.
You can select a portion of text from a web page and select "Add to Quick Note" to be able to add it to a note. When you click on it later in the note, it will bring you to the web page and the area the text is located on that page for easy guidance.
Quick Notes can be created on Macs as well.
- Hold the Control key and click on the text you want to add to a Quick Note
- Select Add to Quick Note
- The Quick Note can be viewed again by bringing the cursor to the bottom right of the screen
It's possible to create a Quick Note on iPhone, too, but it's a different process and not really as quick. For a brand-new Quick Note, you have to set up Control Center to give you a button. However, iOS apps can save into a new Quick Note through their Share option.
- Tap on the Share icon
- Select Add to Quick Note
- The Quick Note will appear from the bottom of the screen
- You can add more to it, select Cancel to either save or delete the note, or Save to save it
- The note will then shrink down to the bottom right of the screen for you to tap on if you want to view it or add more to it
Quick Notes are an easy and fast way to be able to write down quick information when needing to. They can be edited and deleted in the Notes app once created.
Stay organized and creative
The Notes app is more than just an application that allows you to write down information or text, but is now a platform to unleash your creativity in different ways of text, drawings, and shapes as well.
Note-taking on Apple devices has come a long way since the beginning, and the addition of the Apple Pencil has opened up the possibilities of what the Notes app can do.
The Notes app is pre-installed on all iOS, iPadOS, and macOS devices.


