How to use Google Authenticator on iPhone and iPad
 Malcolm Owen
Google Authenticator is available for iOS and iPadOS, as well as Android.
Last updated
Beyond just making social media venues safer, here's how to shift away from SMS-based two-factor authentications and secure your online life properly, by using Google Authenticator on your iPhone.
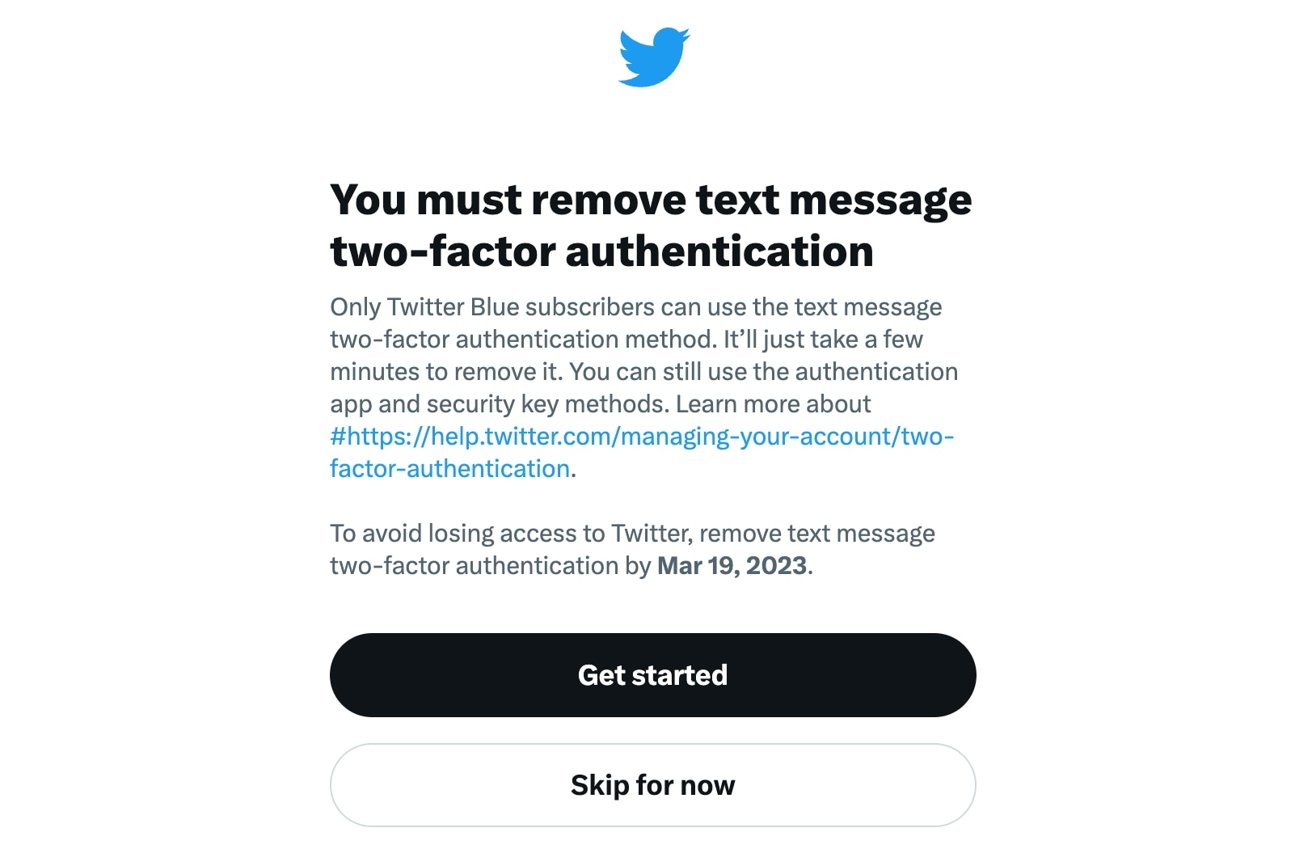
Two-factor authentication (2FA) has entered the news due to a change at the embattled Twitter/X. Under a February policy change, the service is forcing free users unwilling to pay the Twitter Blue subscription away from the SMS-based 2FA system, in favor of using authenticator apps.
Despite the hue and cry about it, authenticator apps are better security-wise than using SMS messages. This is what you should know about 2FA, and how to get up and running with it on one of the most popular authentication apps, Google Authenticator.
What is two-factor authentication?
Two-factor authentication is a great way to secure online accounts, as it goes above and beyond the standard username and password. If an online attacker knows or can work out your password, 2FA can stop any further access to it.
The principle of 2FA is that it's based on confirming what you "know" and what you "have." Think of it as using a security door where you have to punch a code into a keypad ("know") and a physical key into a lock ("have") to gain entry.
While the password for the account classifies as the "know" portion, the "have" consists of some form of verifiable token. This could take the form of a physical object, such as a YubiKey, but more commonly this refers to a mobile authenticator app or an authenticator keyfob.
Both the app and keyfob are set up to produce a new code repeatedly after a certain amount of time has passed, such as 30 seconds. These codes are not random, as they're generated from a seed known to the service, as well as following predetermined and unchanging rules.
In effect, the online service you're authenticating with will know what the correct code the authenticator last generated was, and so can confirm or deny whatever code you read and type into the service's log-in screen.
Using an app for 2FA is also a bit more secure than using a keyfob for code generation, since you still have to authenticate with your iPhone to access the app in the first place.
A simpler form also exists where a website could call upon the user to confirm in a companion app that they just signed in. This works too, but it's rarer and only really exists for a few major services, such as Facebook and Google apps.
Apple's ecosystem can also function similarly, with a user's other Apple devices prompting for a confirmation and offering codes for a user to manually enter into the device they're signing into.
What's the issue with text-based 2FA?
While two-factor authentication itself is a good idea, the implementation of one form leaves the system weak.
Using SMS or text-based 2FA means that, rather than using a code generated on an app or a physical dongle, that code is instead sent to your smartphone as a text message.
At face value, that seems fairly OK, and in most cases, it is. The problem is the nature of SMS itself.
One-time SMS passcodes are sent as plaintext over your network's cellular system, so they are openly readable and unencrypted. Obviously, this is not ideal, but can work in a pinch.
The other problem is that it relies on the message being sent to your smartphone's SIM card. As carriers are able to be tricked by an attacker into swapping SIMs on an account system, it's possible for a phone number to work with another SIM card entirely, one possibly already in the hands of the attacker.
In such cases, a legitimate SMS-based 2FA code could be sent through the carrier's network, but be received by the attacker. If they also happen to know your account credentials, such as from a data breach of a major service, they could potentially sign into your account and take control.
Since the SMS system itself is the weak link, shifting 2FA over to an app on your smartphone is a wise move.
Getting started with Google Authenticator
Google Authenticator is a very established and popular authenticator app, for quite a few reasons. For a start, it's reasonably straightforward to use, which is key when trying to encourage more people to secure their accounts in the first place.
It's also from a well-known name in the tech world: Google. Regardless of your feelings about the company's ad business and data collection habits, brand name recognition is still a big thing to the general public.
It also helps that support for it is pretty widespread.
Then there's the possibility of using multiple devices. It is possible to set up Google Authenticator on multiple devices, and have codes across all of them work the same way.
This may not necessarily be viewed as the upmost in security, but considering you still have to log into your phones and tablets in the first place, it's a decent trade-off.

Linked to that is cross-platform support, since it works on iPhone, iPad, and Android devices. You can have it on iOS, iPadOS, and Android if you really want.
Do bear in mind that you do not actually need a Google Account for this. While you can obviously use it with Google's system — and you should — you can still use it with other third-party services without linking your Google Account to the authenticator.
Given that the system relies on you either entering a set-up key or scanning a QR code, it is highly advised to set up the 2FA on a different device than the one you're setting up Google Authenticator on.
Furthermore, while the general way of enabling 2FA on a service is similar across the industry, the actual way of doing it for each app or service will vary. What follows is more a general guide rather than specific instructions.
How to set up Google Authenticator for iPhone and iPad
- Download Google Authenticator from the App Store to your device. It is free to download.
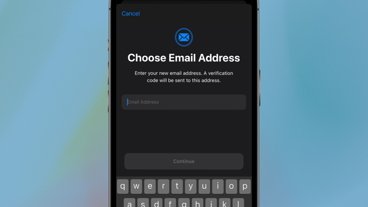
- Sign into whatever service you want to enable 2FA for, and attempt to set it up. This could be an option in account settings under a section marked "security" and an option offering to "set up two-factor authentication," for example, but this will vary between services.
- When asked, you should select to use an authenticator app. You may be recommended to use specific authenticator app, so check that Google Authenticator is on that list.
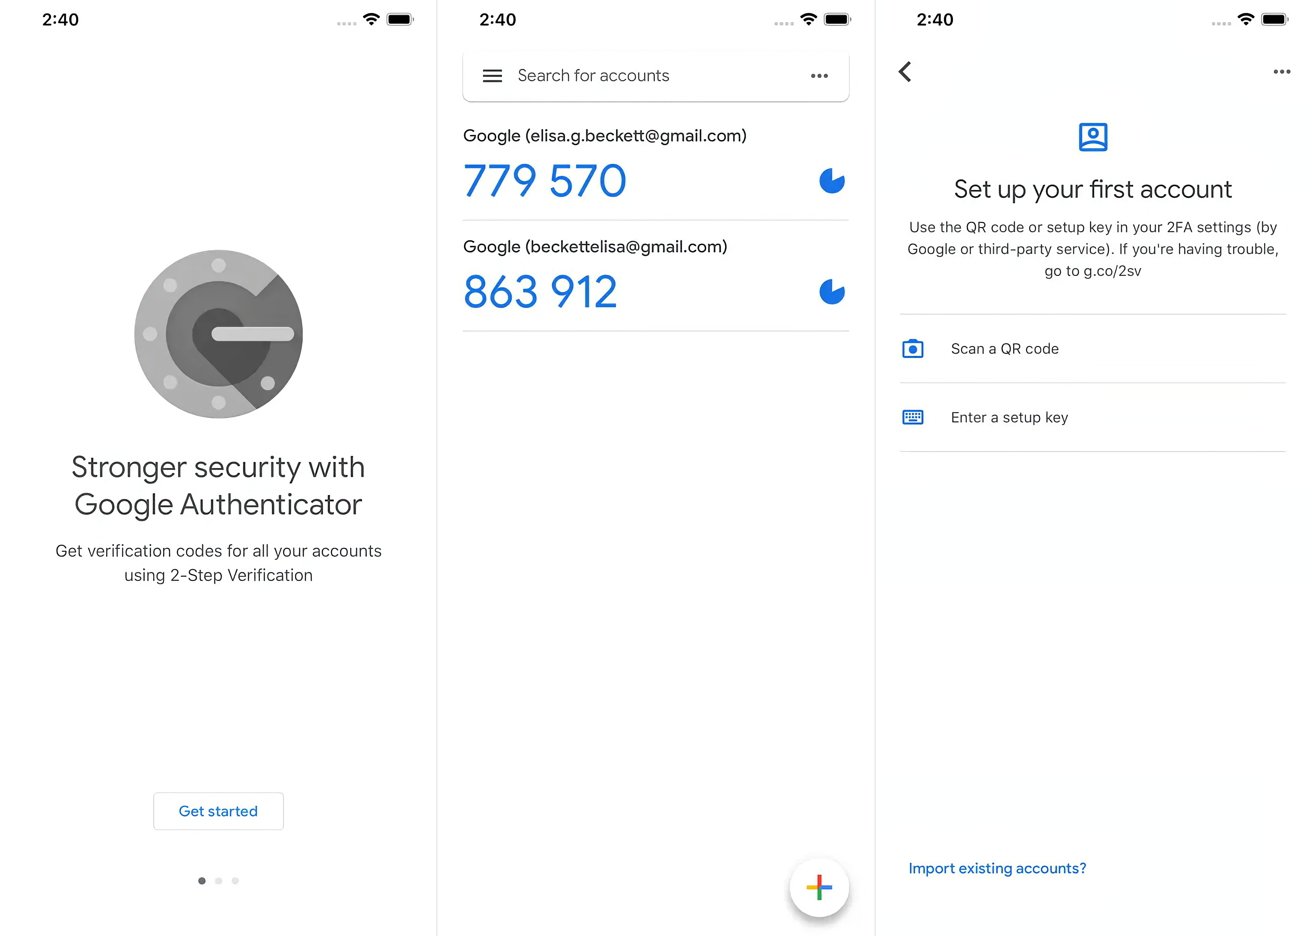
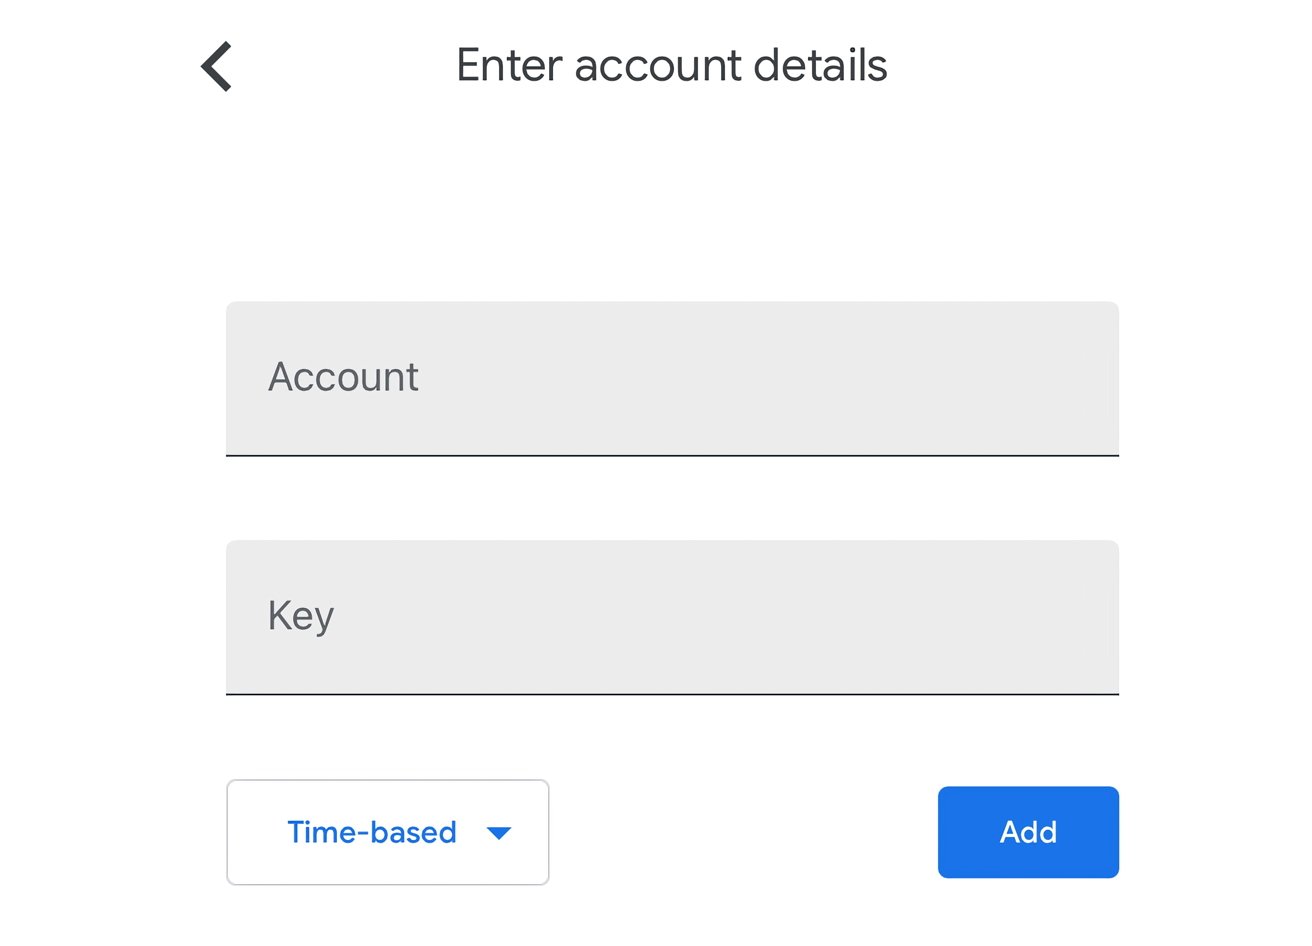
- Once presented with either a QR code or an authenticator key, open Google Authenticator on your iPhone or iPad.
- If this is your first addition to the app, you will be asked how you want to add the code directly. Otherwise, select the plus symbol in the bottom-right of the screen.
- If a QR code is presented to you in the site or app you're setting up 2FA for, select Scan a QR Code, then use your device's camera to scan the code.
- If a key is offered, enter in the account name (usually the relevant email address) and the key provided to you on-screen. Make sure to select whether it is Time-based or Counter-based if the account system advises as such, otherwise leave it to Time-based.
- You will then be asked to confirm that the authentication system has worked. Enter the six-digit code appearing on your device's screen into the app or service you're setting 2FA with as confirmation.
Once you're set up, you will be asked to use the authenticator app to generate a code to log into services, whenever you log in.
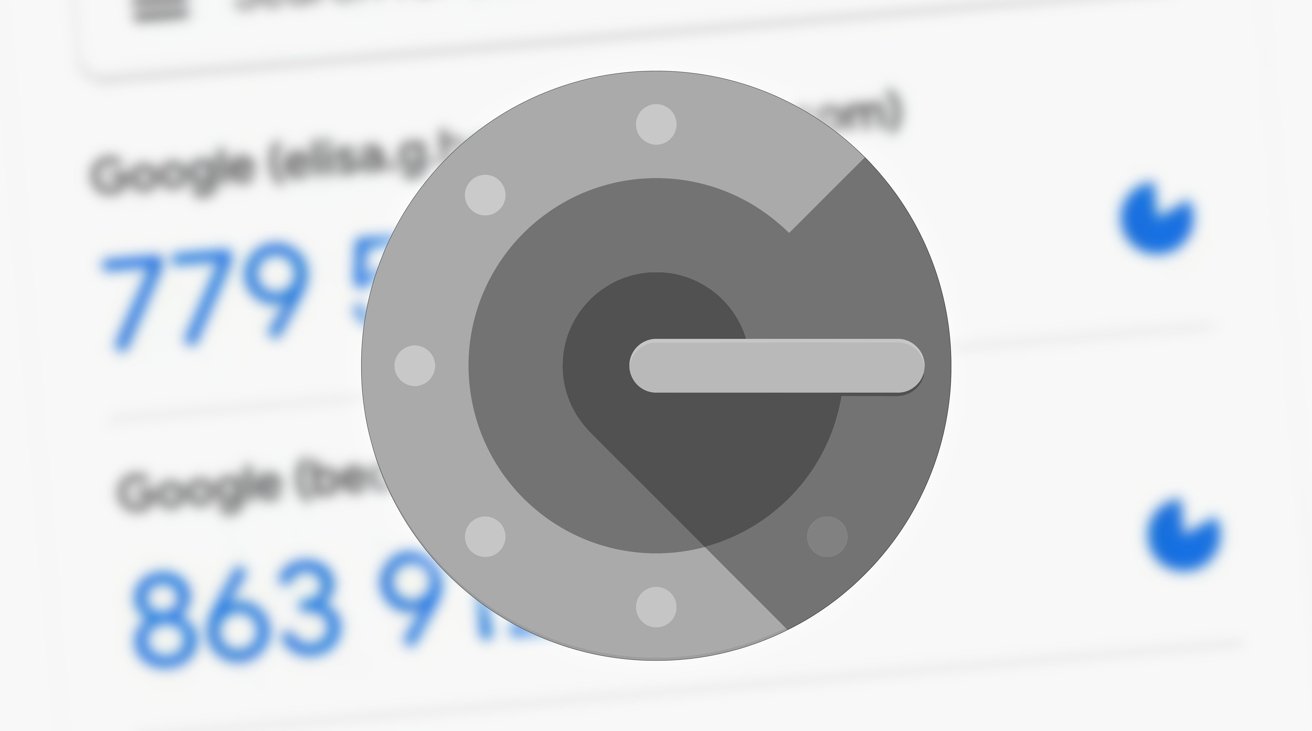
This is straightforward, as all you need to do is open Google Authenticator, look for the service and account name relating to it, and then read the associated six-digit code. Since the code changes periodically, you may want to wait until the timer expires and a new code appears, to maximize your code entry time.
If you're entering the code into an app on the same device, tap the code to copy it to the clipboard, which you can then paste into the app's textbox for entry.
How to delete account listings from Google Authenticator for iOS
- Open the app and tap the three dots in the top right.
- Tap Edit.
- Tap the pencil icon next to the relevant account.
- Tap the trashcan.
- On the confirmation box, tap Remove account.
Remember that removing an account from the Google Authenticator app doesn't affect the status of 2FA on the account itself. If you wish to remove 2FA from the account, do so before removing the Google Authenticator listing.
Just the beginning...
You can do more things with Google Authenticator, such as setting it up so you get the same codes across multiple devices. Yes, you can use multiple devices using the same app to scan the QR code at the time of setting up. However, you can also take advantage of the export function to do the same thing for multiple codes at the same time.


 Amber Neely
 Thomas Sibilly
 AppleInsider Staff
 William Gallagher

 Christine McKee